
I originally wrote this page in 2015. It’s now 2024, and I’m coming back to give this route-description a bit of a refresh. My very first time up The Tooth was on Oct 10, 2013, as a rope-lead, near the end of my first year in the Seattle Mountaineers Intermediate course. That day we had clear blue skies, but it had freshly snowed, making the boulder field slippery & tedious, but the climbing route itself had already dried nicely thanks to the south aspect and its direct sun. Since then, I became a Climb Leader in late 2014, graduated from Intermediate in 2016, and now my total times up The Tooth is 10 summits–and counting–as I continue to lead climbs for the Mountaineers and help students get that first Basic Alpine Rock experience.
The Tooth is probably the most popular alpine rock climb in Washington state. The “South Face”, or “Basic route”, or “5.4 route” is heavily used by climbing clubs & private groups alike: as a Mountaineers ‘Basic Rock’ alpine climb, as well as many other climbing clubs, and also by friends just looking to give less-experienced friends a beginner-friendly first multipitch alpine rock experience. There is plenty of other information out there, and the climbing route is fairly intuitive, so this guide is pretty overkill, but I’ll put it out there anyway.
Overview
- 5.4, 4 short pitches
- Trailhead at 3100′, leave trail at ~4100′, rope up at 5280′, summit at 5604′.
- ~3 hour approach at a moderate pace from Alpental, especially if you’re a large group with some participants who just passed the Mt Si fitness test. If you’re a pair of veteran climbers, you can do the approach in 2 hours.
- ice axe, and possibly light crampons, required when the approach still has snow, roughly through early-July
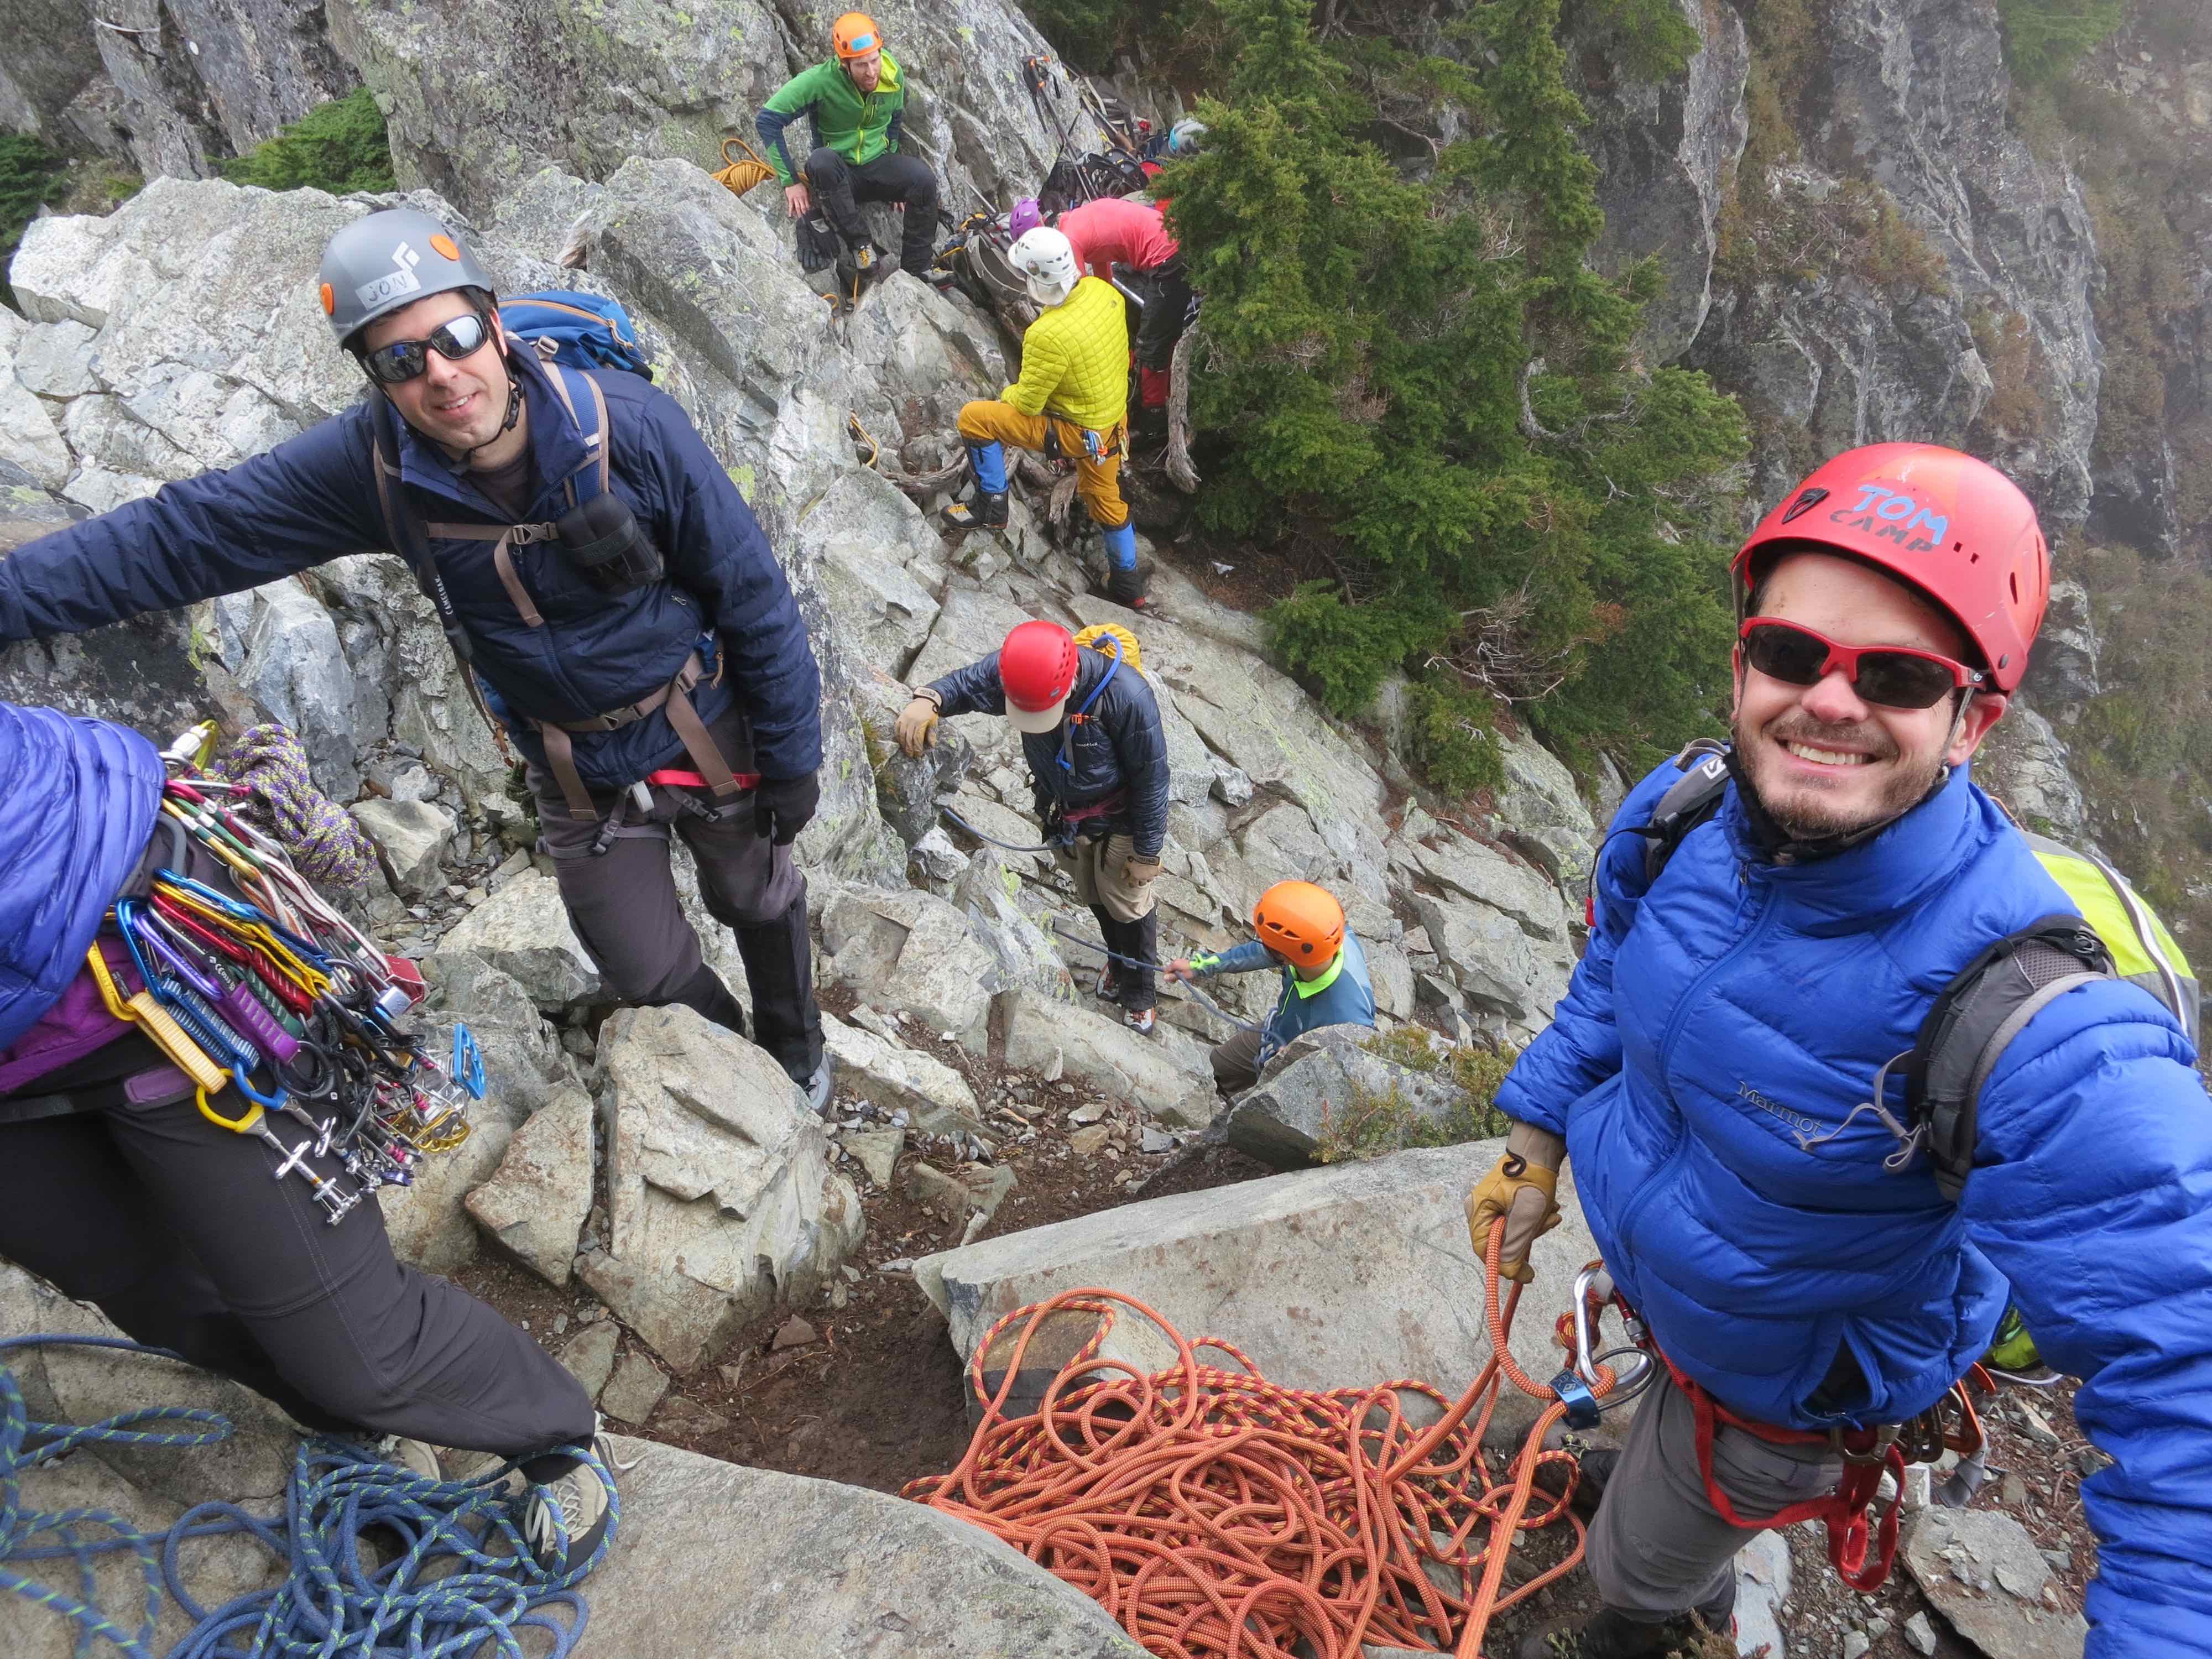
- The route will be crowded. Strategize appropriately. If you go on a weekend, an early start is highly recommended to beat the crowds. If you are confident in your own speed, it may be possible to arrive intentionally late in the day, when (if you’re lucky) traffic on-route may have cleared a bit. Weekdays will be better, but it’s still unlikely you’ll be alone. Also, set your expectations and your patience appropriately. You chose to do this, knowing full well that it is popular. And by choosing to be there, you yourself are a contribution to the crowd. So chill out, own your decisions, be friendly, and enjoy the day in this beautiful location at whatever pace it goes at 🙂
- Every belay anchor can be either a tree or rock horn.
- To descend, rappel the climbing route. There are more established rap stations than necessary.
- 12 hours car-to-car is pretty typical if you’re doing this climb to give experience to new climbers. Stay sharp on efficiency, for your sake and others.
Contents
- Overview
- Thoughts on rack selection
- Gear Recommendations
- Drive
- Approach
- Where exactly is Pineapple Pass?
- Going Up
- Going Down
- Optional: Rappelling from the base of the route into Great Scott Bowl
Thoughts on rack selection
A lot of the route takes passive-pro really well. Sure, the south face’s first ascent was nearly 50 years before spring-loaded-camming-devices were even invented, but even by modern standards, this route probably could be led entirely without any long run-outs even with just a set of nuts, and small to medium-sized hexes. However, I don’t really expect the majority of climbers today to have hexes readily available in their gear-closet. Even the old biggest selling point of hexes is losing its weight, literally: it had been a notable tradeoff back when a 1970’s rigid-stem Friend weighed twice as much as a hex, but now, the weight of a Black Diamond Camalots Ultralight is not that different from a hex of the equivalent size; so hexes no longer offer that much of a weight savings. Plus, the speed-advantages of cams while on route are substantial, both when placing & when cleaning. And that is important on a route of this popularity, where likely the next team’s leader is on your heels feigning patience while your follower stands still and hammers away with their nut tool. Finally, since this 2400′ approach is not exactly generating a high ‘Strava Relative Effort’ score for any regularly-training mountianeer, it certainly doesn’t require counting grams in the pack to be successful at, so I’ve settled into a certain “comfortable rack” for this route, where I pack a few cams more than perhaps the minimum, for the sake of being quick & confident while on route.
Gear Recommendations
- Rack:
- My comfortable rack:
- a set of 10 nuts (They’ll get used a decent bit)
- for cams, singles of BD cams #0.3 to #3
- Slings: 6 to 8 single-length slings (~60cm), 4 to 5 double-length slings (~120cm). The majority of single-slings I’ll have as alpine-draws, with two carabiners each, ready to clip nuts or fixed-pieces. Most pitches zig-zag side-to-side a bit, so don’t skimp on the doubles.
- Amongst those cams, the #3 isn’t mandatory on this route, it’s a nice-to-have. Similarly, if you’re feeling confident, the #0.3 & #0.4 aren’t critical either, you could probably use nuts in those placements instead.
- In other words, if you want a minimal rack, it would be more like: slings, nuts, singles of BD cams sizes #0.5 to #2
- And/or if you want to incorporate hexes in your rack after all, go for it. You could choose to do so either in-addition to cams, to create a slightly more generous rack. Or it could be in-substitute of cams, if you know what you’re doing and you want a history-appreciating experience. I find having 2 to 5 hexes, in small to medium hex sizes, results in finding a decent number of hex placement opportunities.
- My comfortable rack:
- 60-meter single rope (that length mostly for the rappels, as the climbing route is best descended in four <30-meter rappels. While going up, no pitch is longer than 40-meters at most.)
- For the approach in early season, bring light crampons & an ice axe. If you expect the snow will be soft by the time you reach it, just an ice axe is fine.
- Optional but recommended: Radios. There’s usually not much environmental noise up there (i.e. it’s not super close to a noisy road or river,) so if by some miracle you were alone, shouting to your climbing partner would be easy. However, given the popularity of the route, it may be easier & more pleasant to speak softly & directly to your partner via walkie-talkie, rather than be part of a dozen different people all yelling different things to different partners all a rope-length away.
- Optional but recommended: It can be nice to have a small “summit pack” to wear while climbing, to carry your lunch and a few other essentials up to the summit with you. An “REI Flash 18” pack fits that role very nicely, or any other small, roughly 8 to 18 liter pack. Alternatively, you could also just climb with whatever pack you hiked in with. (FWIW, I always use my Osprey Mutant 38 for getting my gear to the base of this climb.)
- Bring your headlamp with you on the rock climbing portion!! If you have to wait for other parties, odds are high that you’ll be finishing the route after sunset.
- Footwear:
- On the approach: Depends on the season. If snow is present, then snow-appropriate boots are recommended. I’ve found both light 3-season mountaineering boots and just general hiking boots work equally well. Later season, when all the snow is gone, approach-shoes really shine, though boots are certainly are still fine too. Trail-runners could work if you feel confident about your ability to scramble in them. Trail-runners are somewhat not-my-favorite because they tend to be very soft & flexible, and use a less-sticky rubber, compared to the stiff-soles & sticky-rubber on approach shoes or mountaineering boots. Often times on scramble moves, if you need to step on an edge, a trail-runner will just flex and slide off, whereas an approach shoe or boot can hold that edge and stick. But trail runners certainly can work if you have prior experience scrambling in them, so it’s up to you. Bring whatever footwear you feel good about using for crossing talus fields and moving through some scramble terrain.
- On the climbing route: If you’d like to bring rock-shoes for the climbing portion, go for it. If you do bring rock shoes, just make sure they’re comfortable enough / not too tight so that you can wear them for a number of hours without hating life. Or, you can also climb this route in whatever footwear you wore for the approach as well. It’s very reasonable climbing, even in mountaineering boots, which I do encourage you to try at some point, as it’s good practice for future larger alpine objectives. A lot of the climbing on this route is easy & juggy, it gets a 5.4 rating as an outdoor climb, but by gym-ratings will probably feel similar to top-roping a 5.8 in a climbing gym.
Drive
Drive to Snoqualmie Pass. If coming from Seattle, take Exit 52, left at the base of the ramp, under I-90, then almost immediately a right-hand turn on to “Erste Strasse Rd” toward Alpental. Go 1.3 miles past I-90, and park at the trailhead for Snow Lake at 3100′. Don’t forget to display your Northwest Forest Pass in your car. (Or “America The Beautiful” pass.)

Approach
https://caltopo.com/m/1KN7D
Depending on time of year, there is a winter-approach and a summer-approach. The winter-approach only makes sense if the entire Alpental valley floor is snowcovered. As a rule of thumb, if there’s snow still along edges of the parking-lot, the consider the winter-approach. In all other cases, the summer-approach is the way to go.
Winter approach: (generally usable until late-May or early-June) Park wherever the ski resort will let you. Respect the ski resort’s operations, they’re letting you park in their lot without paying them anything. Walk to the northernmost parking lot up-valley, and start up the groomed ski-cat track there. Be aware that skiers may be coming downhill fast on this same track, so be ready to get out of the way. In time, you’ll leave to groomed cat-track entirely, and you’ll be on your own to navigate over snow to Source Lake.
Also, if you are going up the Source Lake valley at all in May or earlier, be aware that you may not be entirely out of avalanche season, and this valley has quite a history of avalanche tragedy. I would say check NWAC, but they’ve likely stopped forecasting. At least consider carrying the holy trinity of beacons/probes/shovels. Ideally you’ve taken an AIARE Level 1 course yourself. If not, consult with someone who has before traveling in the Alpental valley in a late spring month like May. (And for backcountry travel in deeper winter months, it is crucial that you yourself have taken AIARE Level 1.) Generally by June 1st, I stop worrying about avalanches entirely.
Summer Approach: (the default, typically starting in June) Follow the Snow Lake Trail. At about 2 miles, a small wooden sign marks the trail intersection between Source Lake (straight) and Snow Lake (right turn.) Continue straight, towards Source Lake, and the trail will gradually curve leftward.

Soon after that, views of the valley open up, and you’ll be able to spot Source Lake below you, and The Tooth visible in the distance above you. As soon as you see a continuous talus field to your left, depart from the trail (~4100′,) and make a traverse across the talus that descends at first, and then starts climbing towards The Tooth. It’s not a bad idea to put on helmets as you leave the trail here, it’s better to have them on a-little-too-early than a-little-too-late.

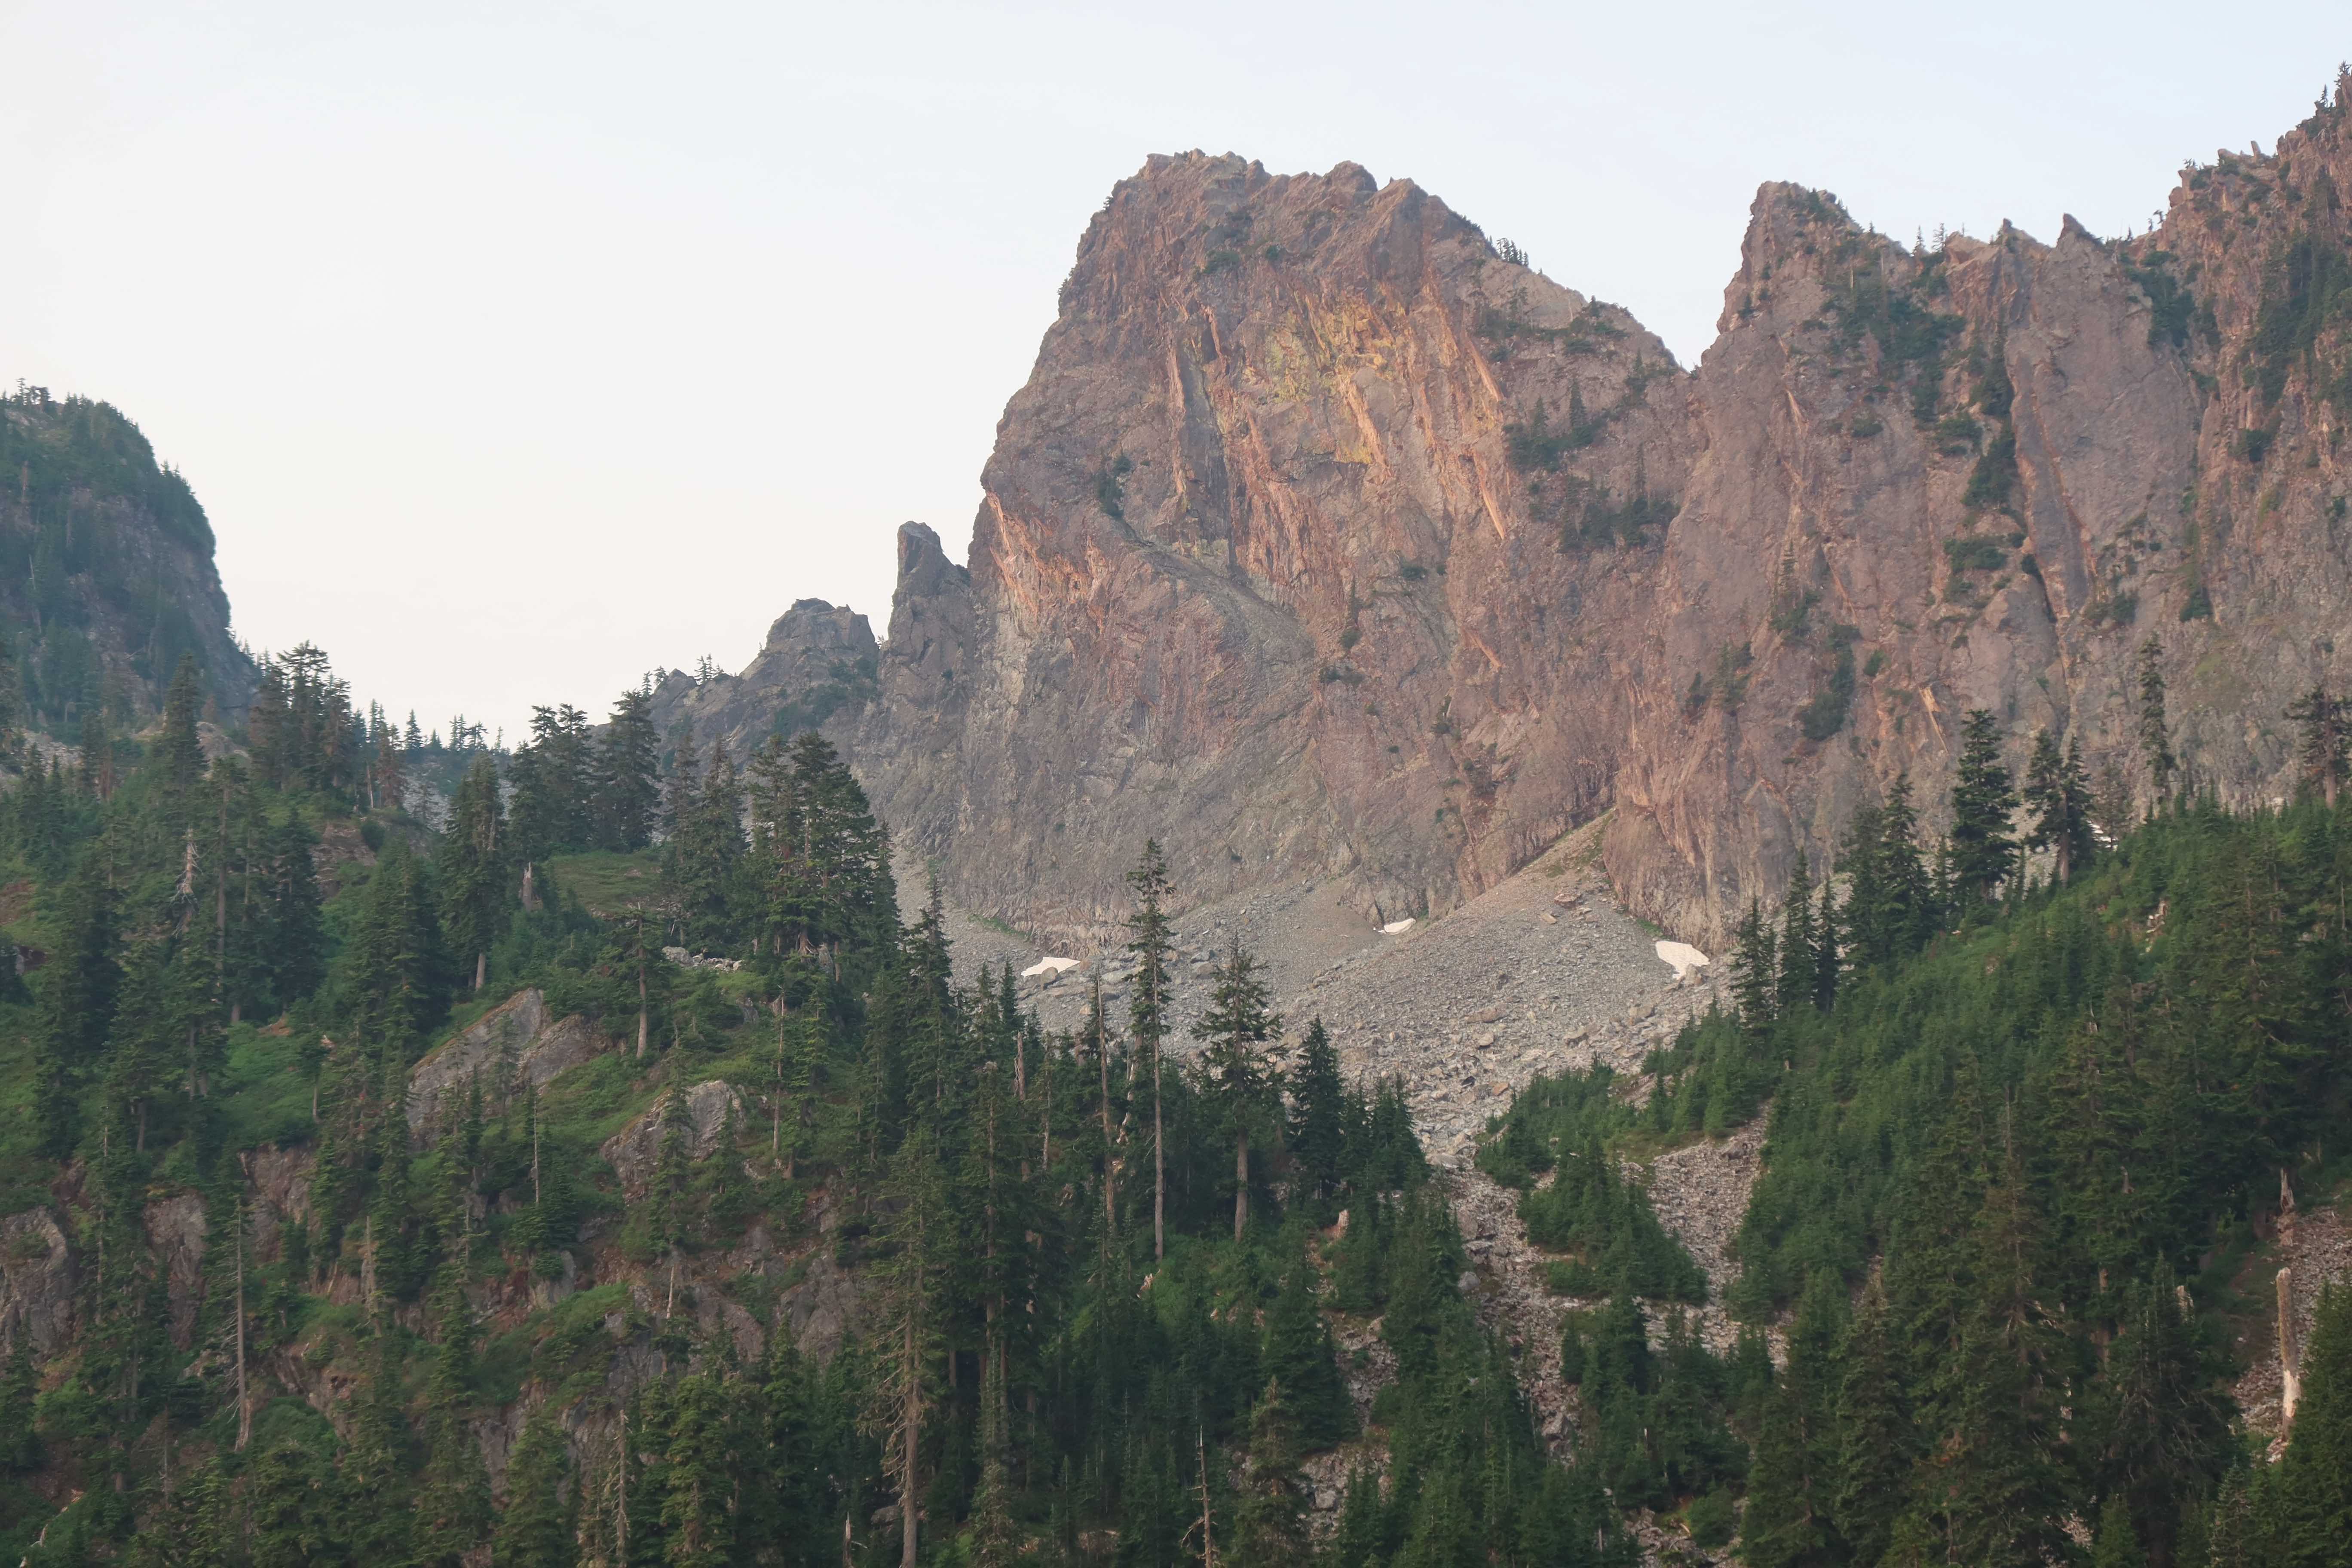
Ascend talus and/or snow by whatever you find to be the path of least resistance until you end up in Great Scott Bowl, beneath The Tooth.
The two photos below are from up in Great Scott Bowl, looking back down the approach, taken from roughly the same spot, illustrating the difference in snow you may encounter in June versus September.


To the left of The Tooth is a pointy rock finger. Go up the gully on the further-left side of that.

Later in summer when all snow is gone (from mid-July onward,) getting to the notch at the top of that gully is a relatively easy rock scramble (about Class 2-ish, maybe light Class 3.) Earlier in the season, when snow is still present, it can present a decently steep & long snow-slope, and possibly a snow-moat at the top that could be as much as 8 feet deep, presenting a challenge to negotiate, necessitating at least an ice axe, possibly also crampons if the snow is firm.


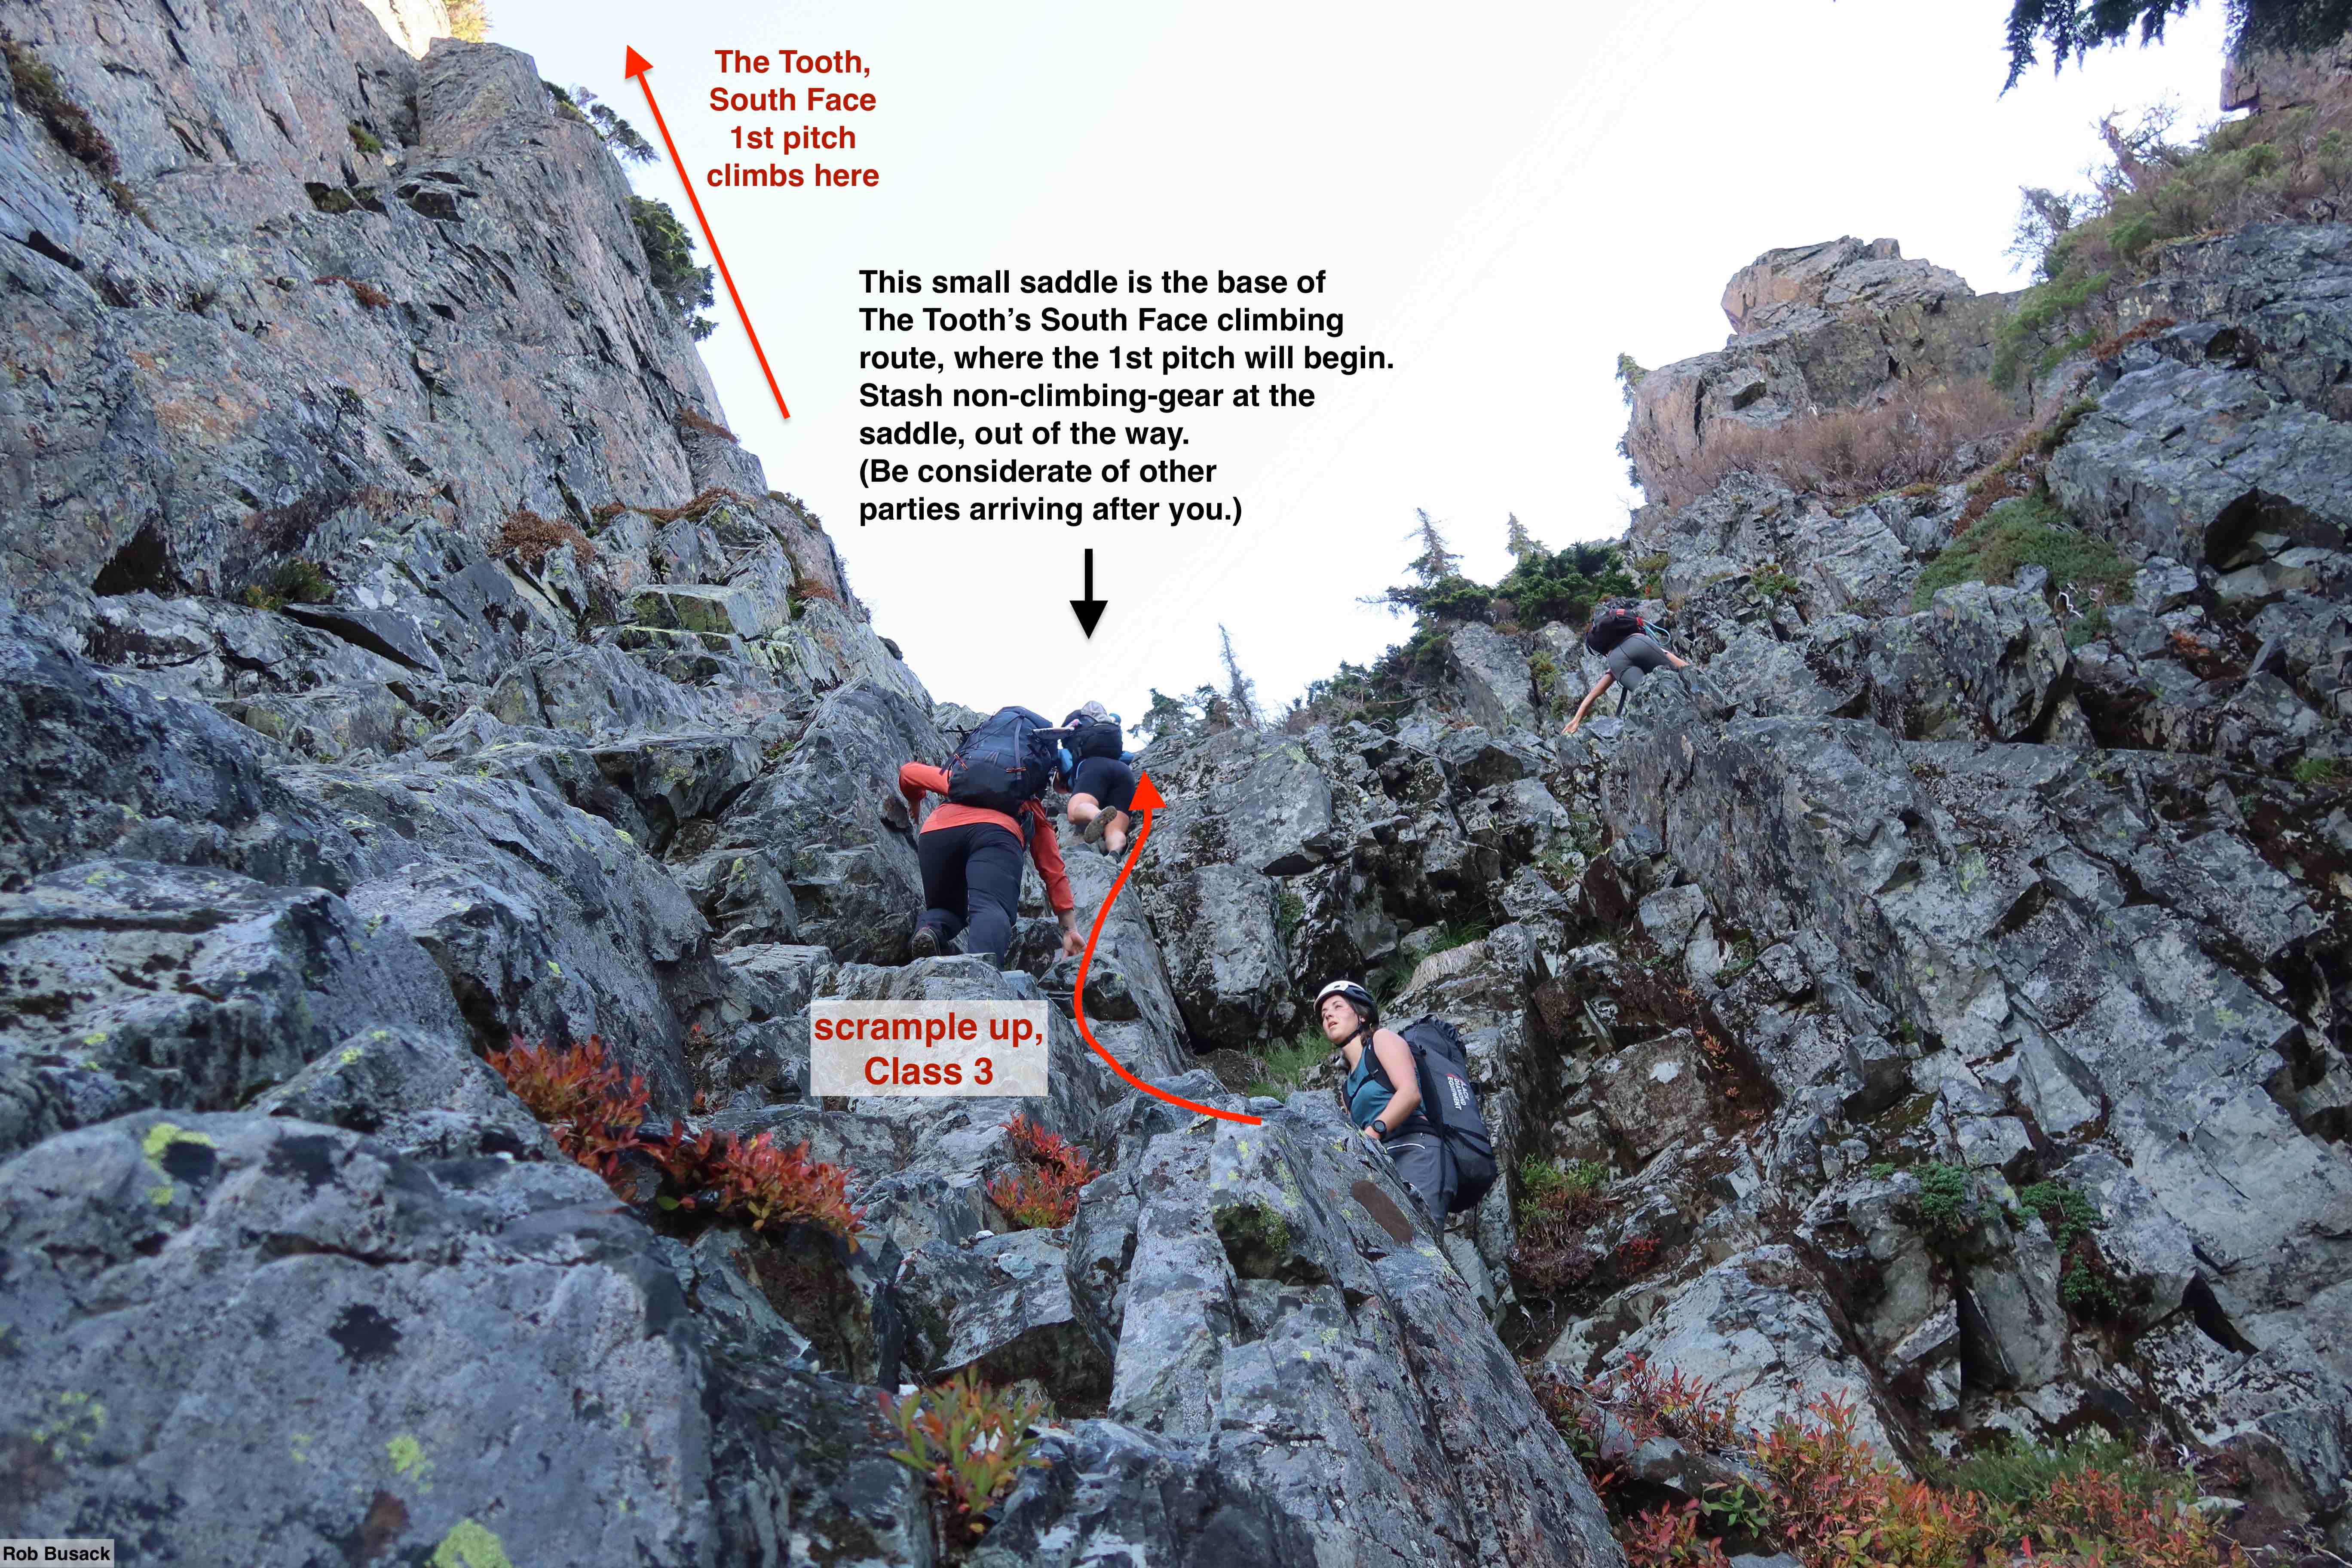
Once on the other side, scramble down briefly, and walk out on an exposed sidewalk that appears to dead-end in the air, but makes an easy right at the last moment. At this point, you’re only about couple hundred feet of travel from the base of the route, but there’s still a few scrambly ups & downs jogging through the forest to get there. Work your way northwest until you are sure you are beyond the pointy sub-peak.

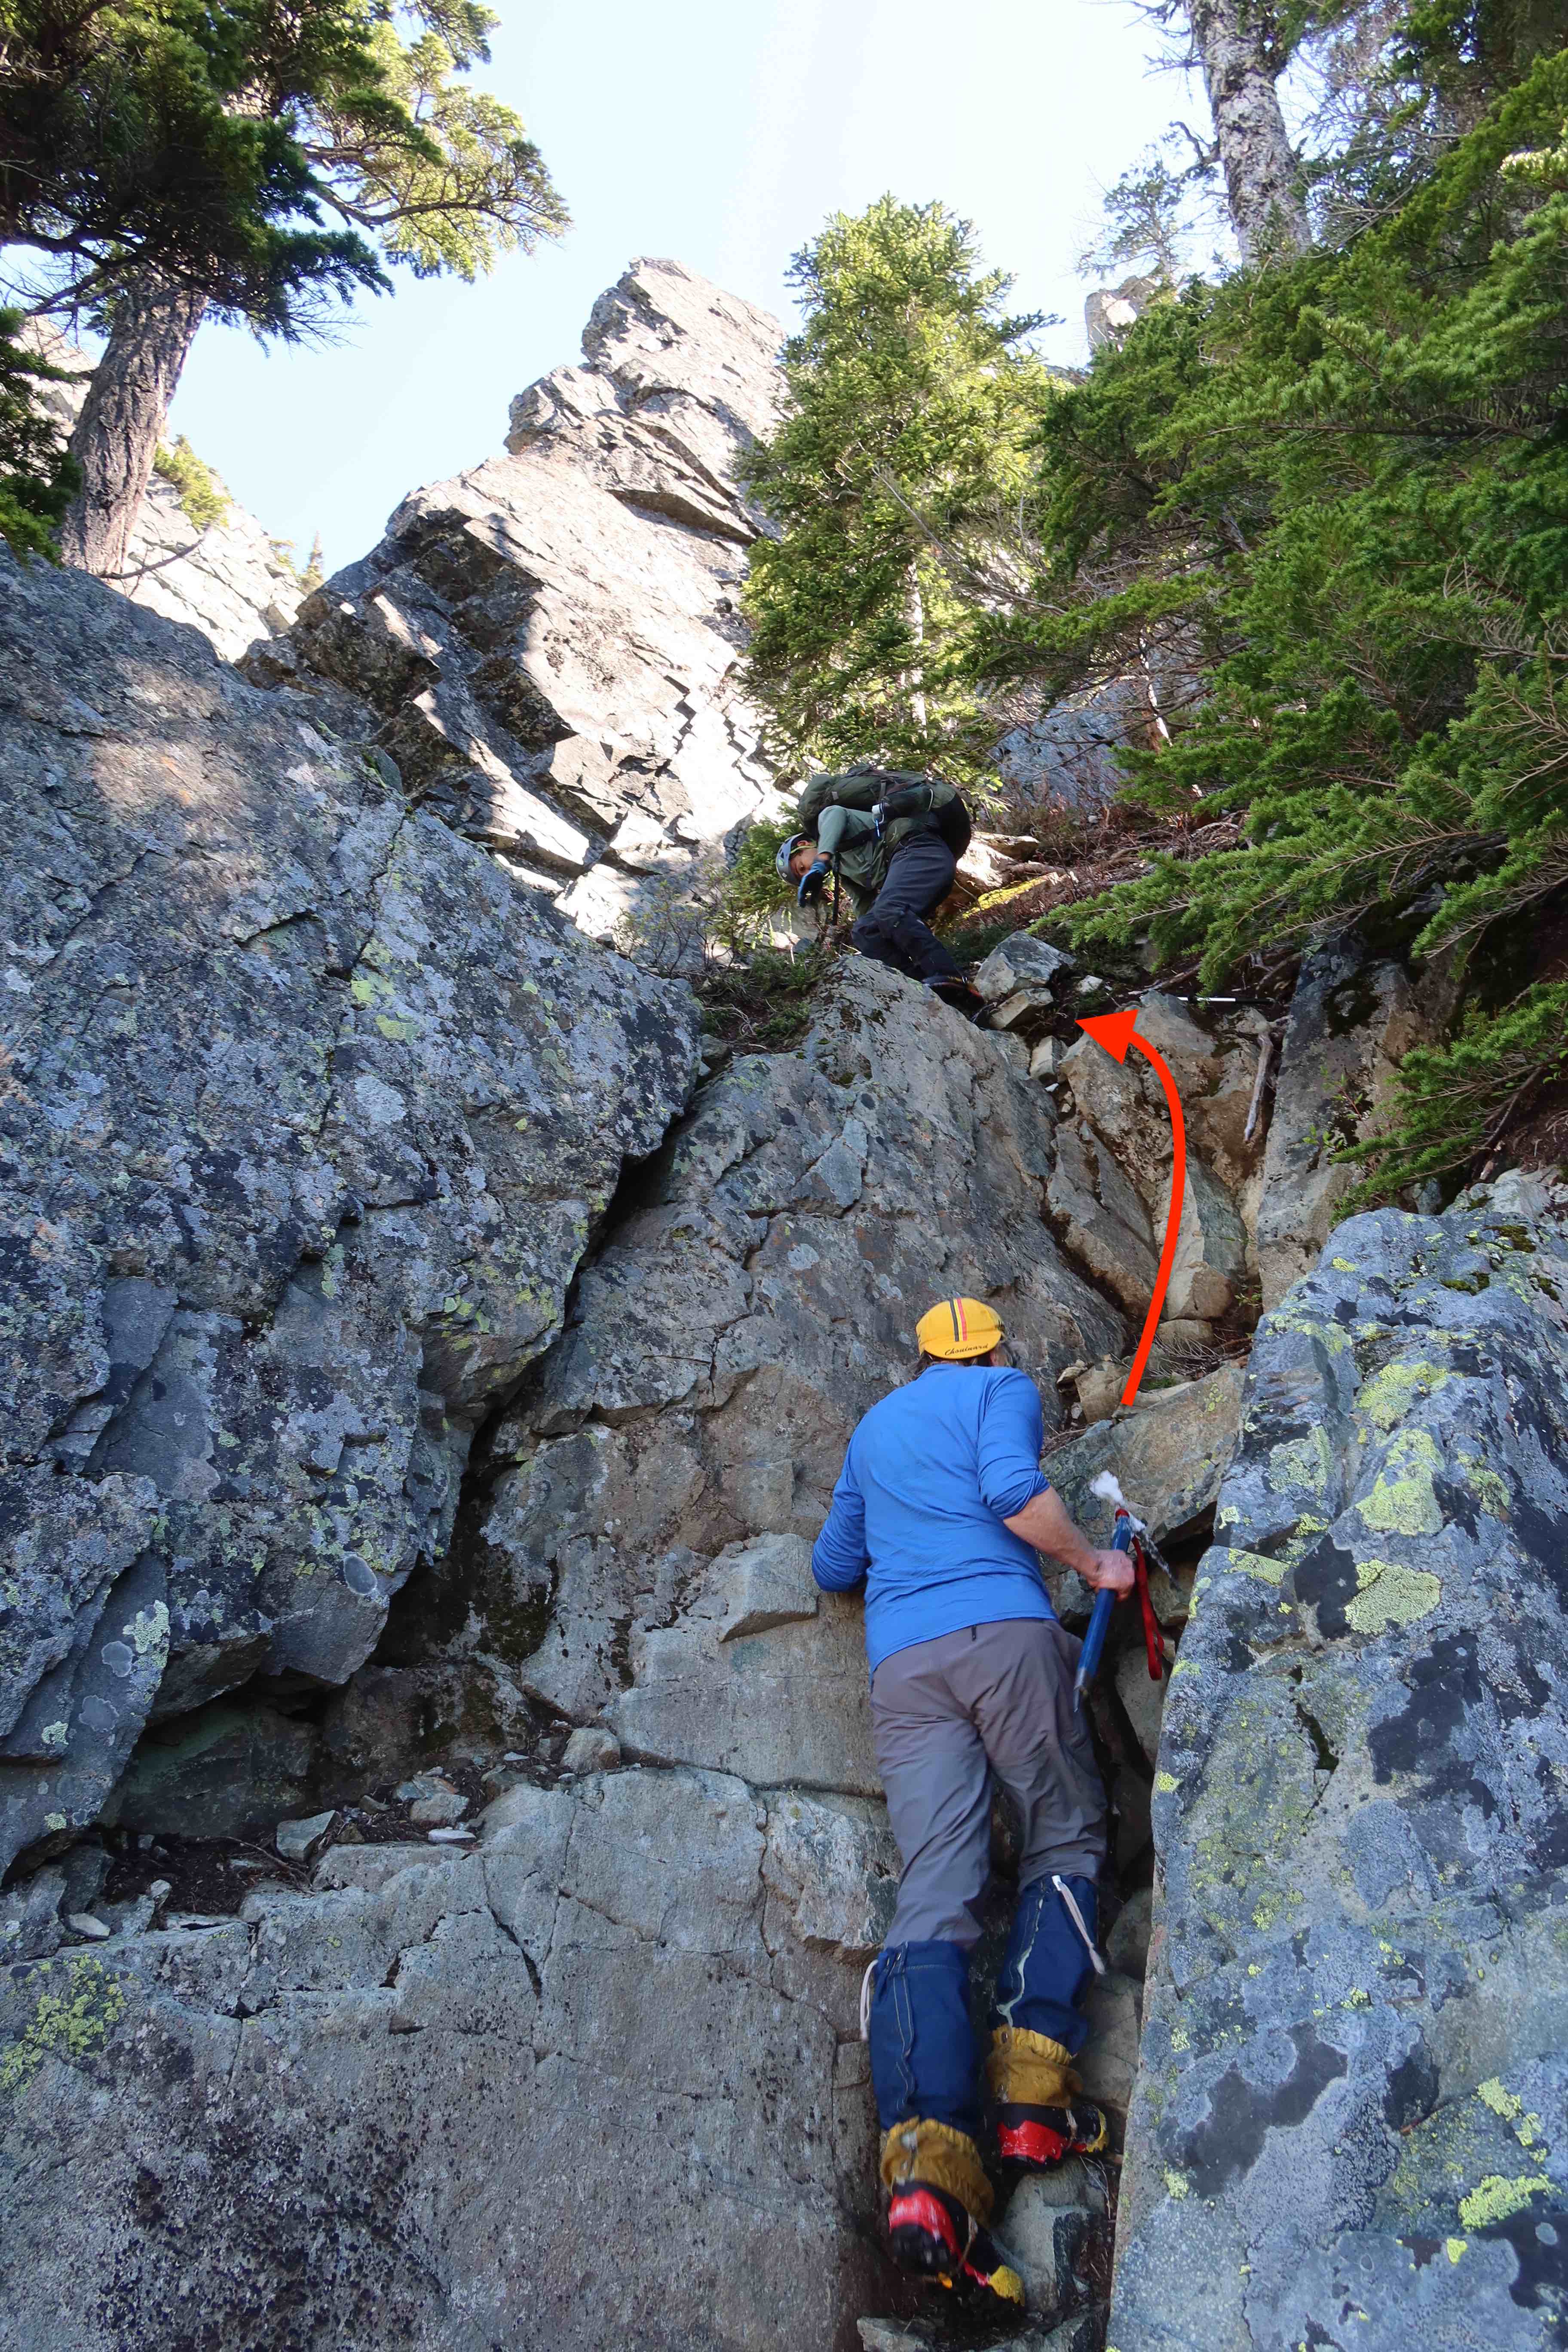

Once you’re out of the trees and able, ascend right, towards open sky, to arrive at the big notch between The Tooth and that pointy sub-peak. This notch is the base of the South Face climbing route. Stash any gear you’re not going to climb with here, and make sure you put everything politely out of the way of any other climbing parties that may arrive there after you. It’s a small space, and it gets busy.
Where exactly is Pineapple Pass?
(This is unimportant non sequitur…) There’s certainly consensus that “Pineapple Pass” is the name of a location near the top of Great Scott Bowl, and somewhere southeast of The Tooth, but there is some variance about exactly which feature of the ridgeline holds that name, where exactly a pin on a map should go to label “Pineapple Pass”. I’ve noticed that Fred Beckey’s “Cascade Alpine Guide”, and Jim Nelson’s “Selected Climbs, Volume 1” both label the high notch, exactly where The Tooth’s 1st pitch starts from, as “Pineapple Pass”. (47.44534, -121.45407. 5280′) However, I’ve heard a lot of people, especially amongst the backcountry-ski-touring community, refer to the little flat ridgeline with trees at the upper-left (southeast) end of Great Scott Bowl as “Pineapple Pass”, and some younger maps have added a label there as a result. (47.44498, -121.45177. 5230′) I often treat the Beckey guide as the authoritative answer whenever there’s confusion about a place-name in the mountains, and since it is the older source, I tend to trust that’s a more-accurate representation of whatever naming decision was originally made, so a part of me wants to respect its version of “Pineapple Pass”, since it likely is the original location. However, when I think about what a “pass” is in general, that high notch strikes me as an awkward choice, as it is not the easiest route of passage between the valleys on either side of this Denny-Mountain-to-Tooth ridgeline, the second newer version of “Pineapple Pass” feels like the more natural location to apply the term “pass” to. At the end of the day, it kinda doesn’t matter, since those two spots are a mere tenth of a mile apart, and everyone has a sufficient sense of the general area you’re referring to when you say “Pineapple Pass”.
Going Up
I like to bring along a smaller backpack to act as a light summit-pack, in which I always put four things:
(1) a little food (it’s nice to have a lunch-break on the summit)
(2) a little water (maybe a liter, maybe just half a liter)
(3) one spare layer, in case the temperature or wind feels chiller at the top than the base
(4) always a headlamp, for that one-in-a-hundred-chance that something throws us wildly off schedule
Maybe optionally a fifth: added sun-protection, like sunglasses & a little sunscreen.
An “REI Flash 18” pack is an ideal size to put two-people’s-worth of those items in the same pack, to allow the lead-climber to be pack-free, and the follower carries the pack while on top-rope. Or, both climbers could each carry their own packs the entire time. It’s a pretty reasonable route to climb with a light pack.
The climbing route itself is actually pretty intuitive. Just climb what feels easiest to you, keep moving upwards, and you’ll naturally stay on route. Still, I know I feel better with as much beta as possible, so here you go.
Pitch 1 – 5.4
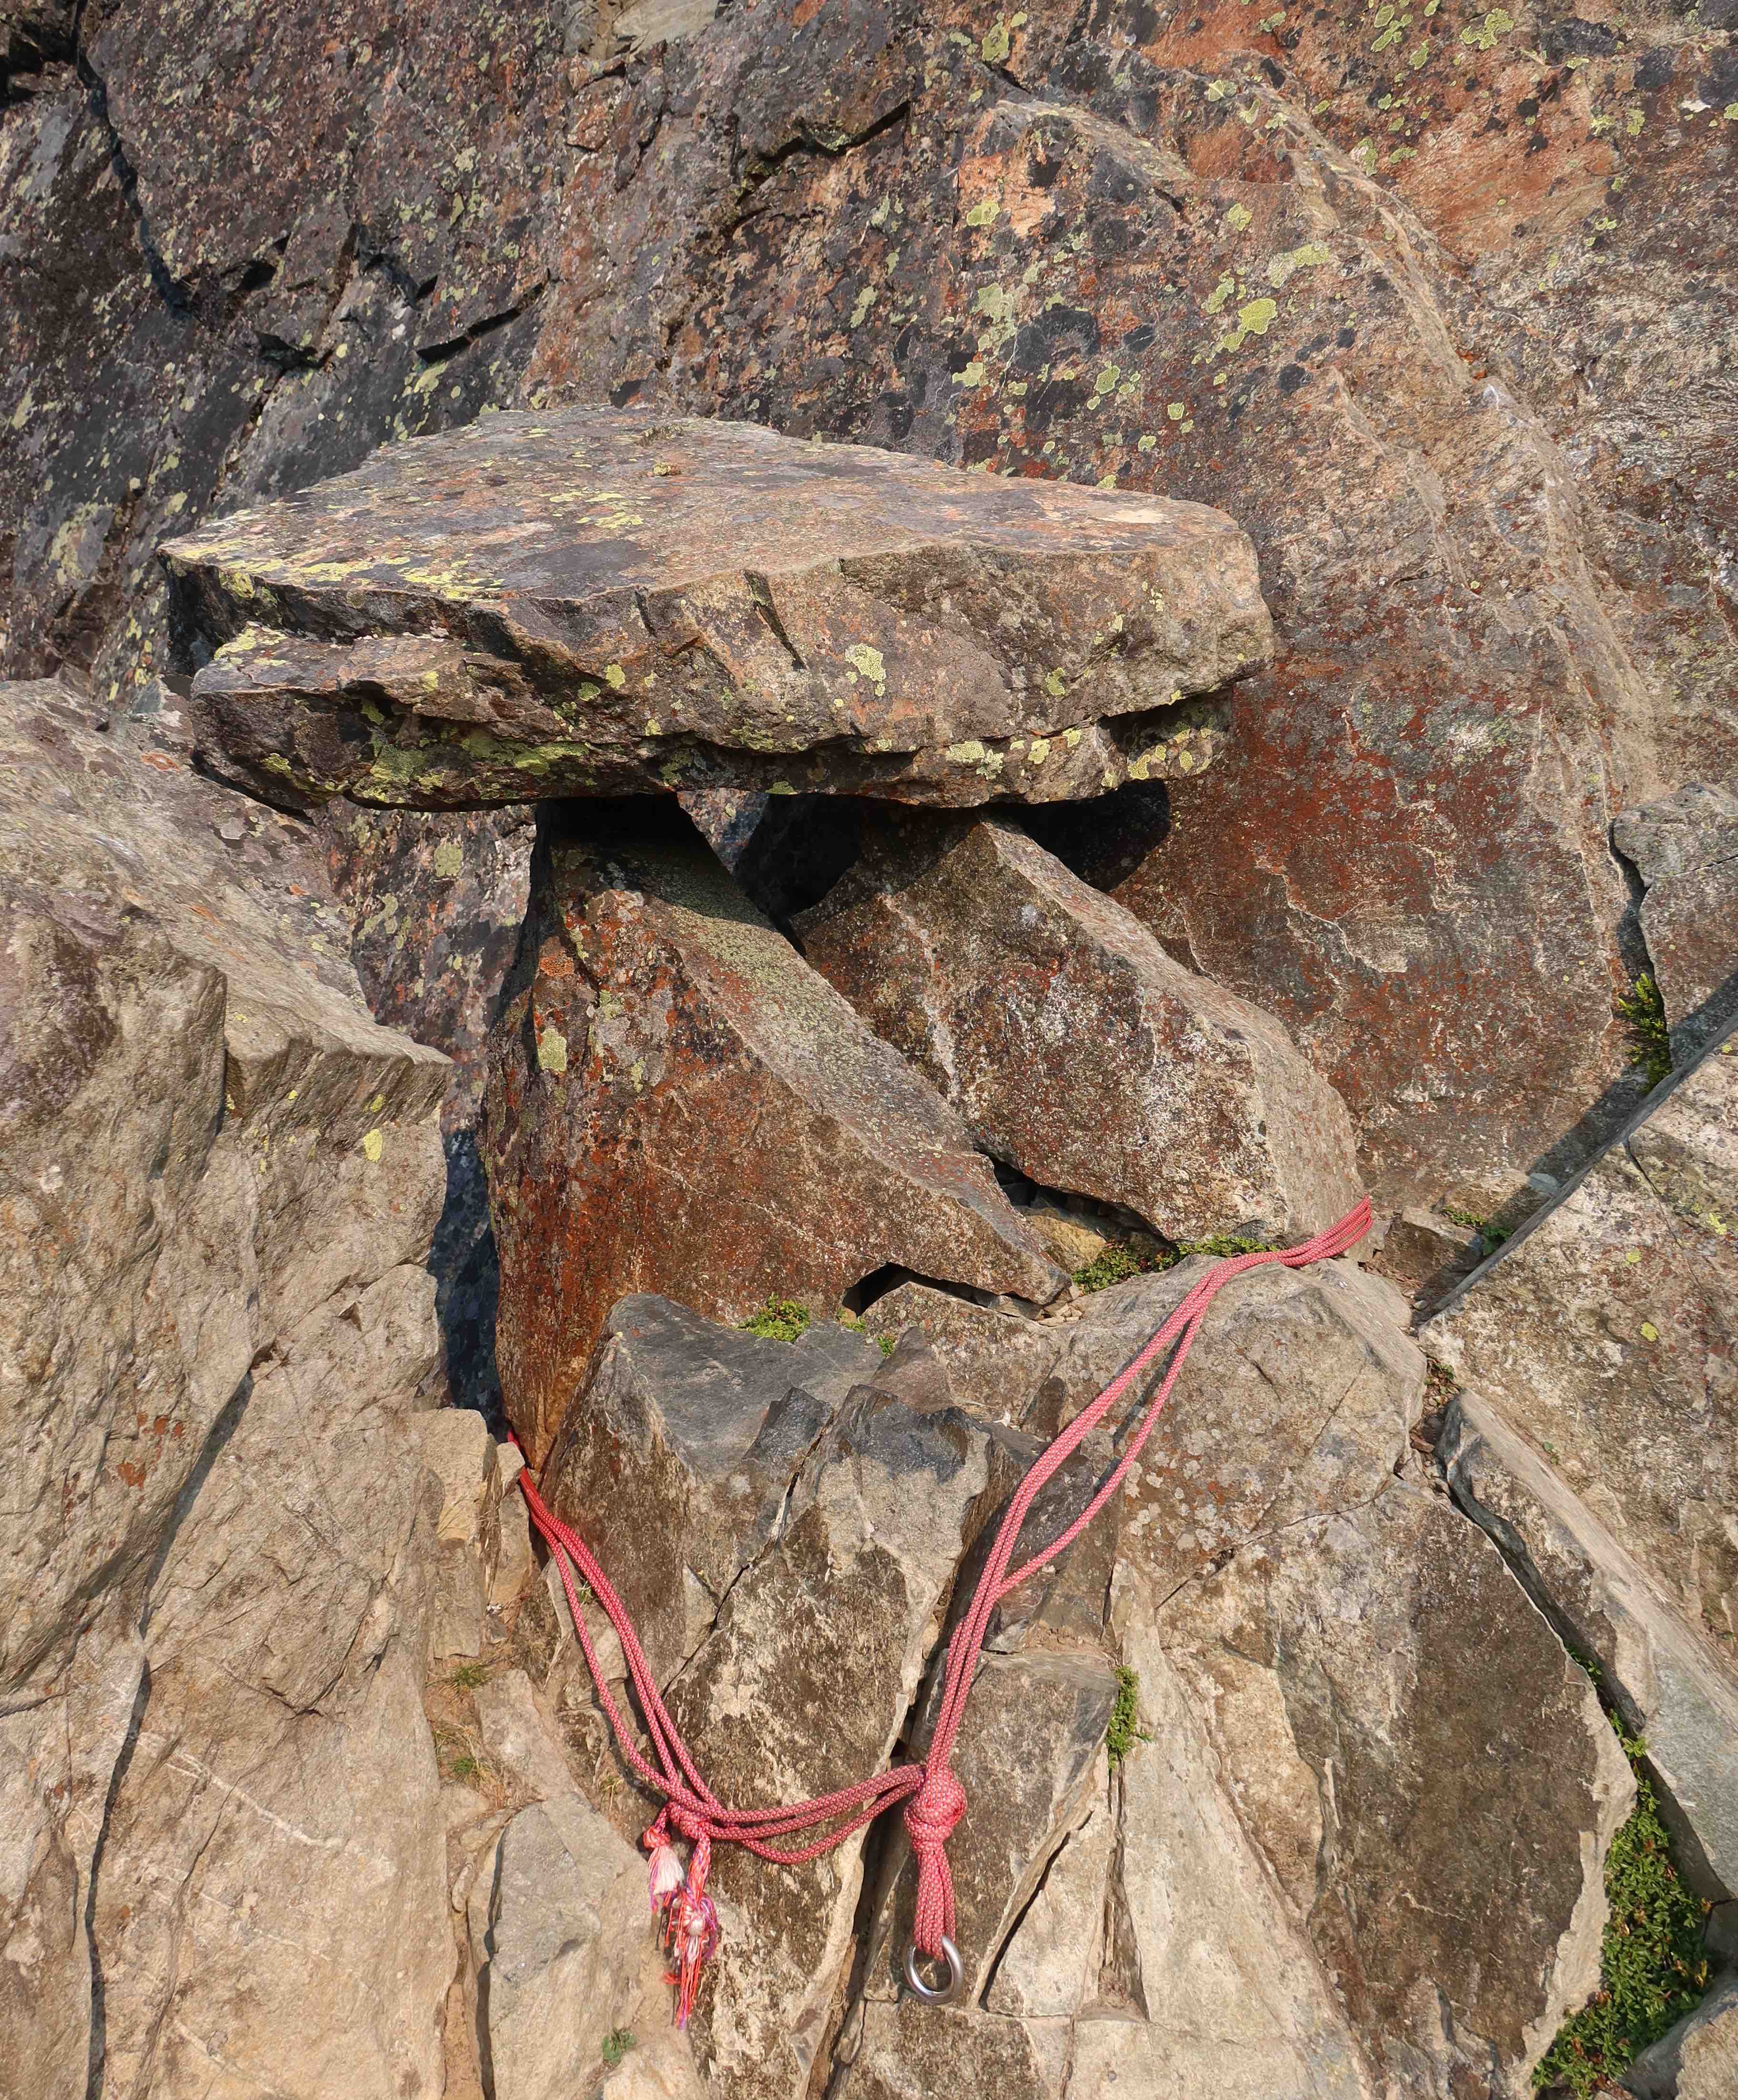
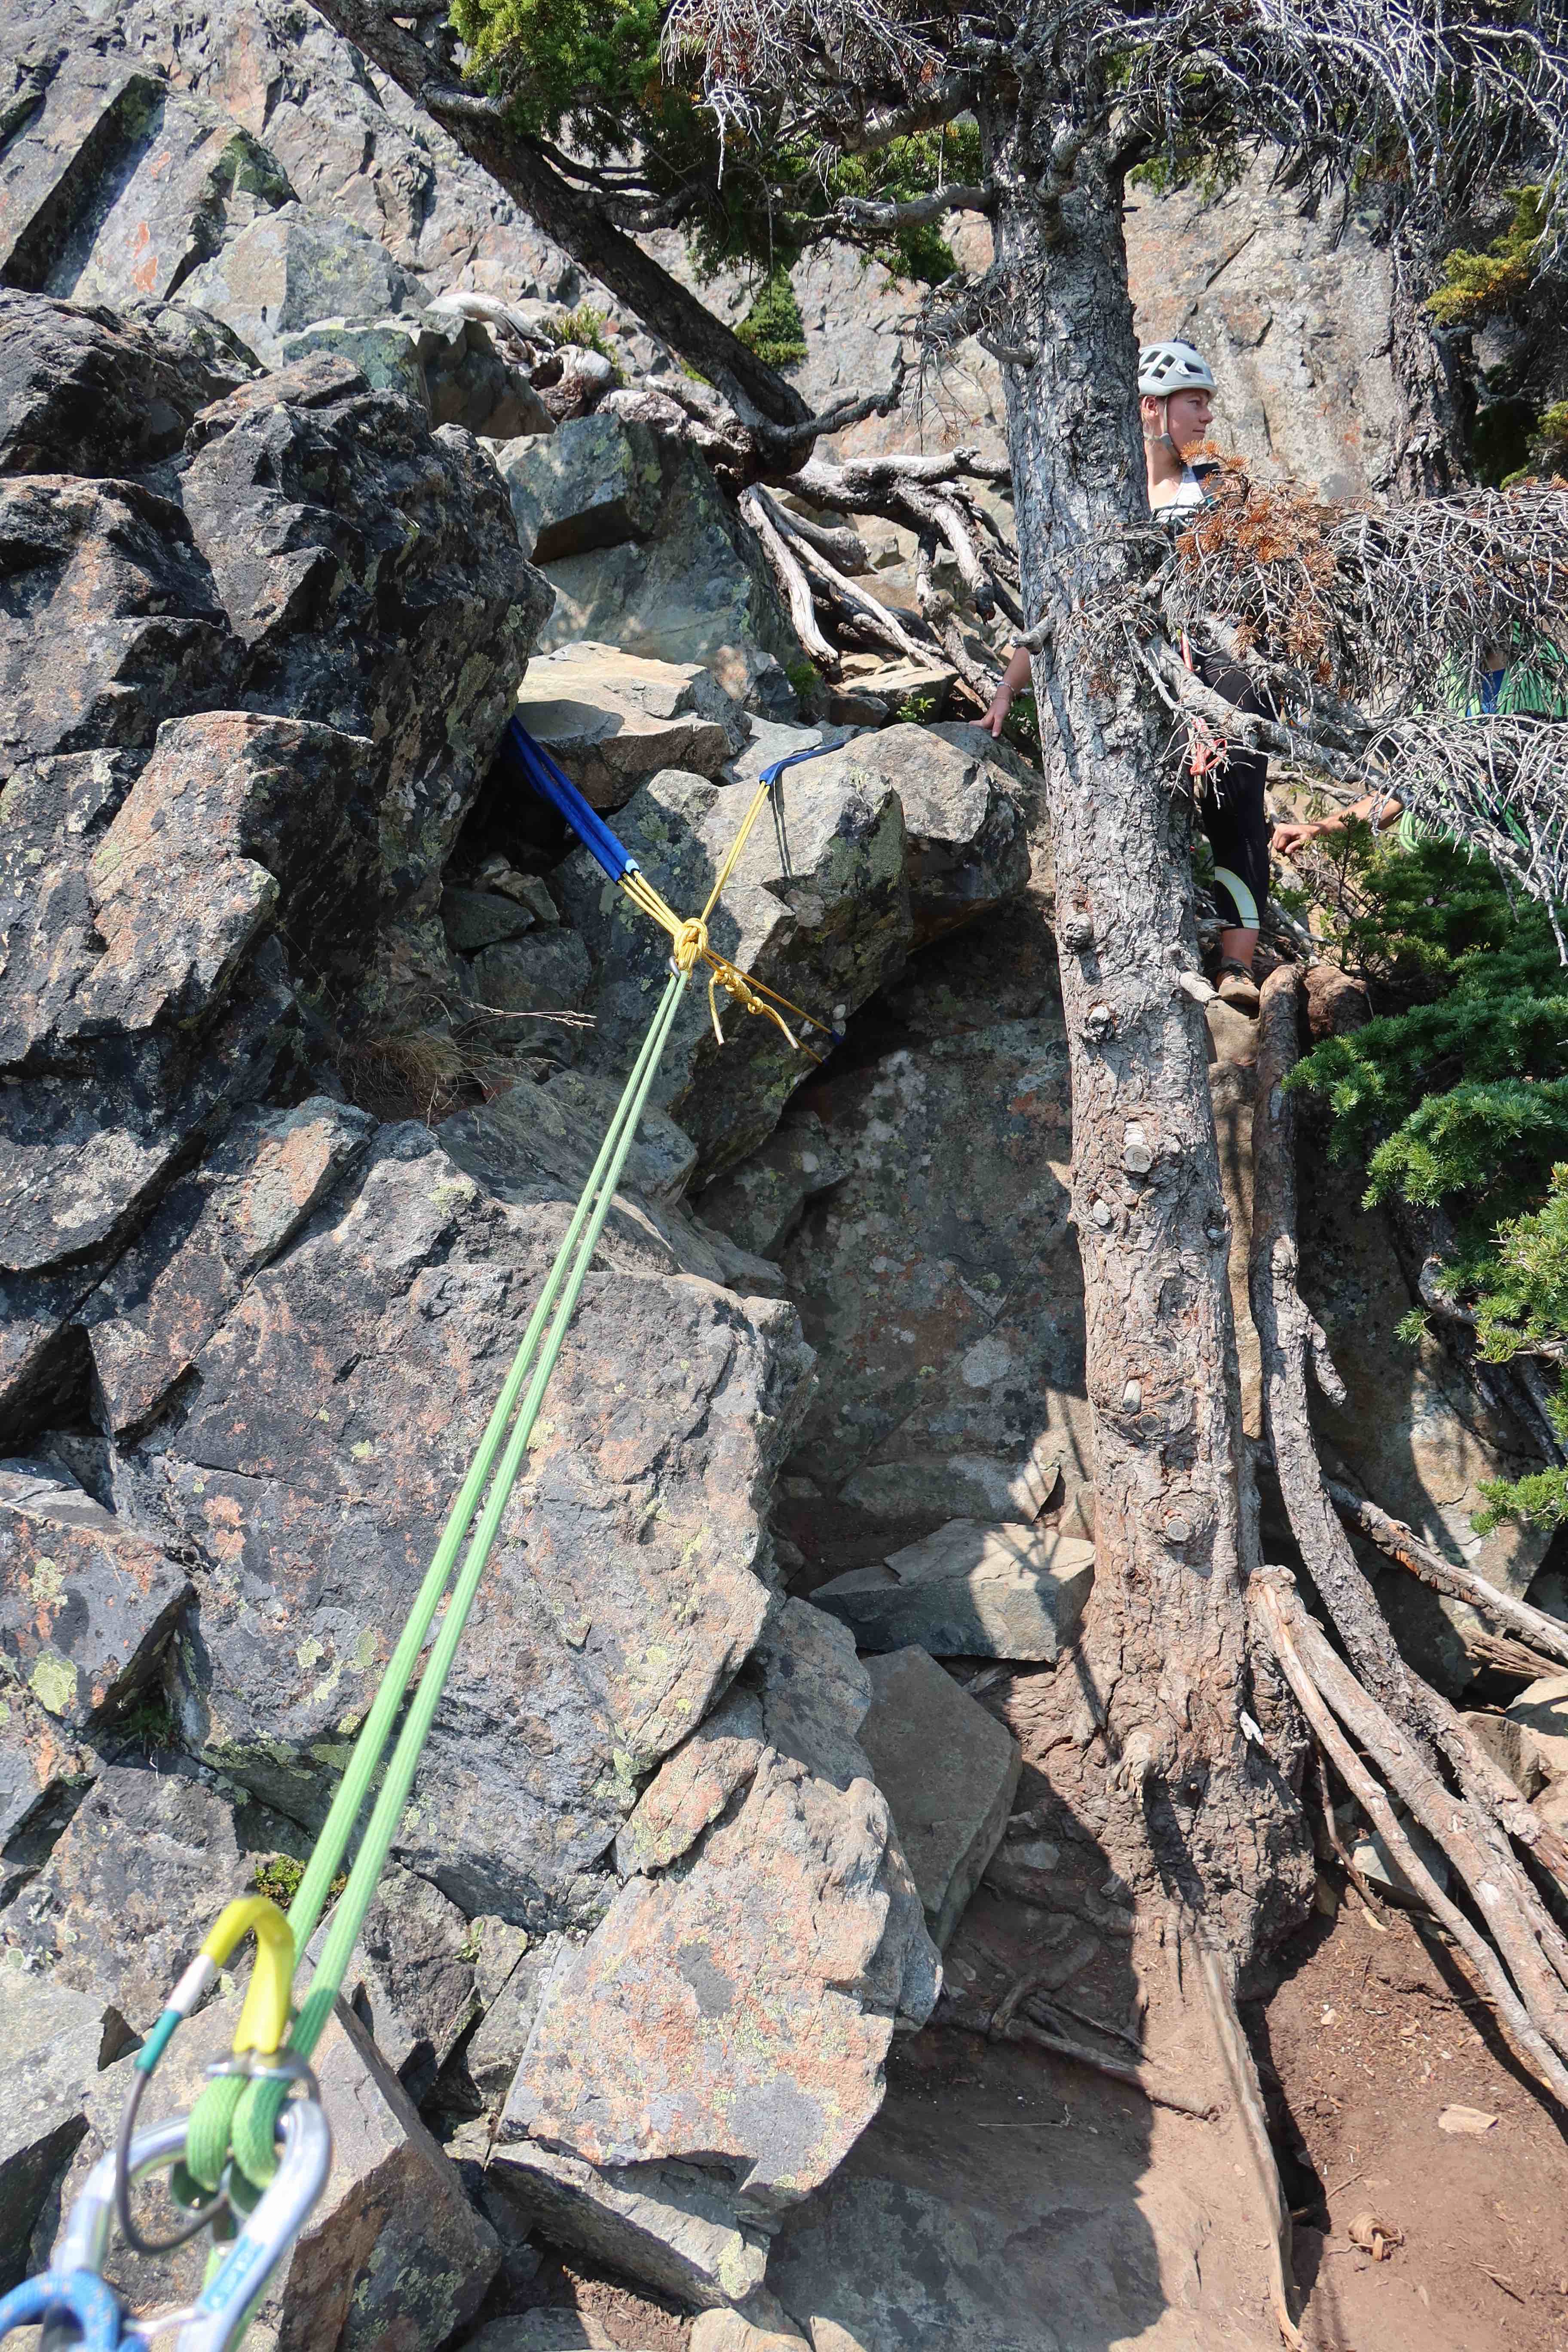
Start on easy ramps that angle first left (to a large rectangular block), then right, then follow the big vertical crack system upward. Once upon a time, I used to end this pitch about 70′ up on a large ledge with a small tree. That tree is very much dead, and almost unnoticeable now. (Last signs of life there were in 2019, I think?) Fortunately, you can continue: from the large ledge, just to your right of the small dead tree, go up another vertical but easy crack system & blocky terrain for another 30 feet to arrive at a slung rock-horn with a balanced-table-top rock on top of it. That is now the standard 1st pitch end, and serves as a rappel station for later.
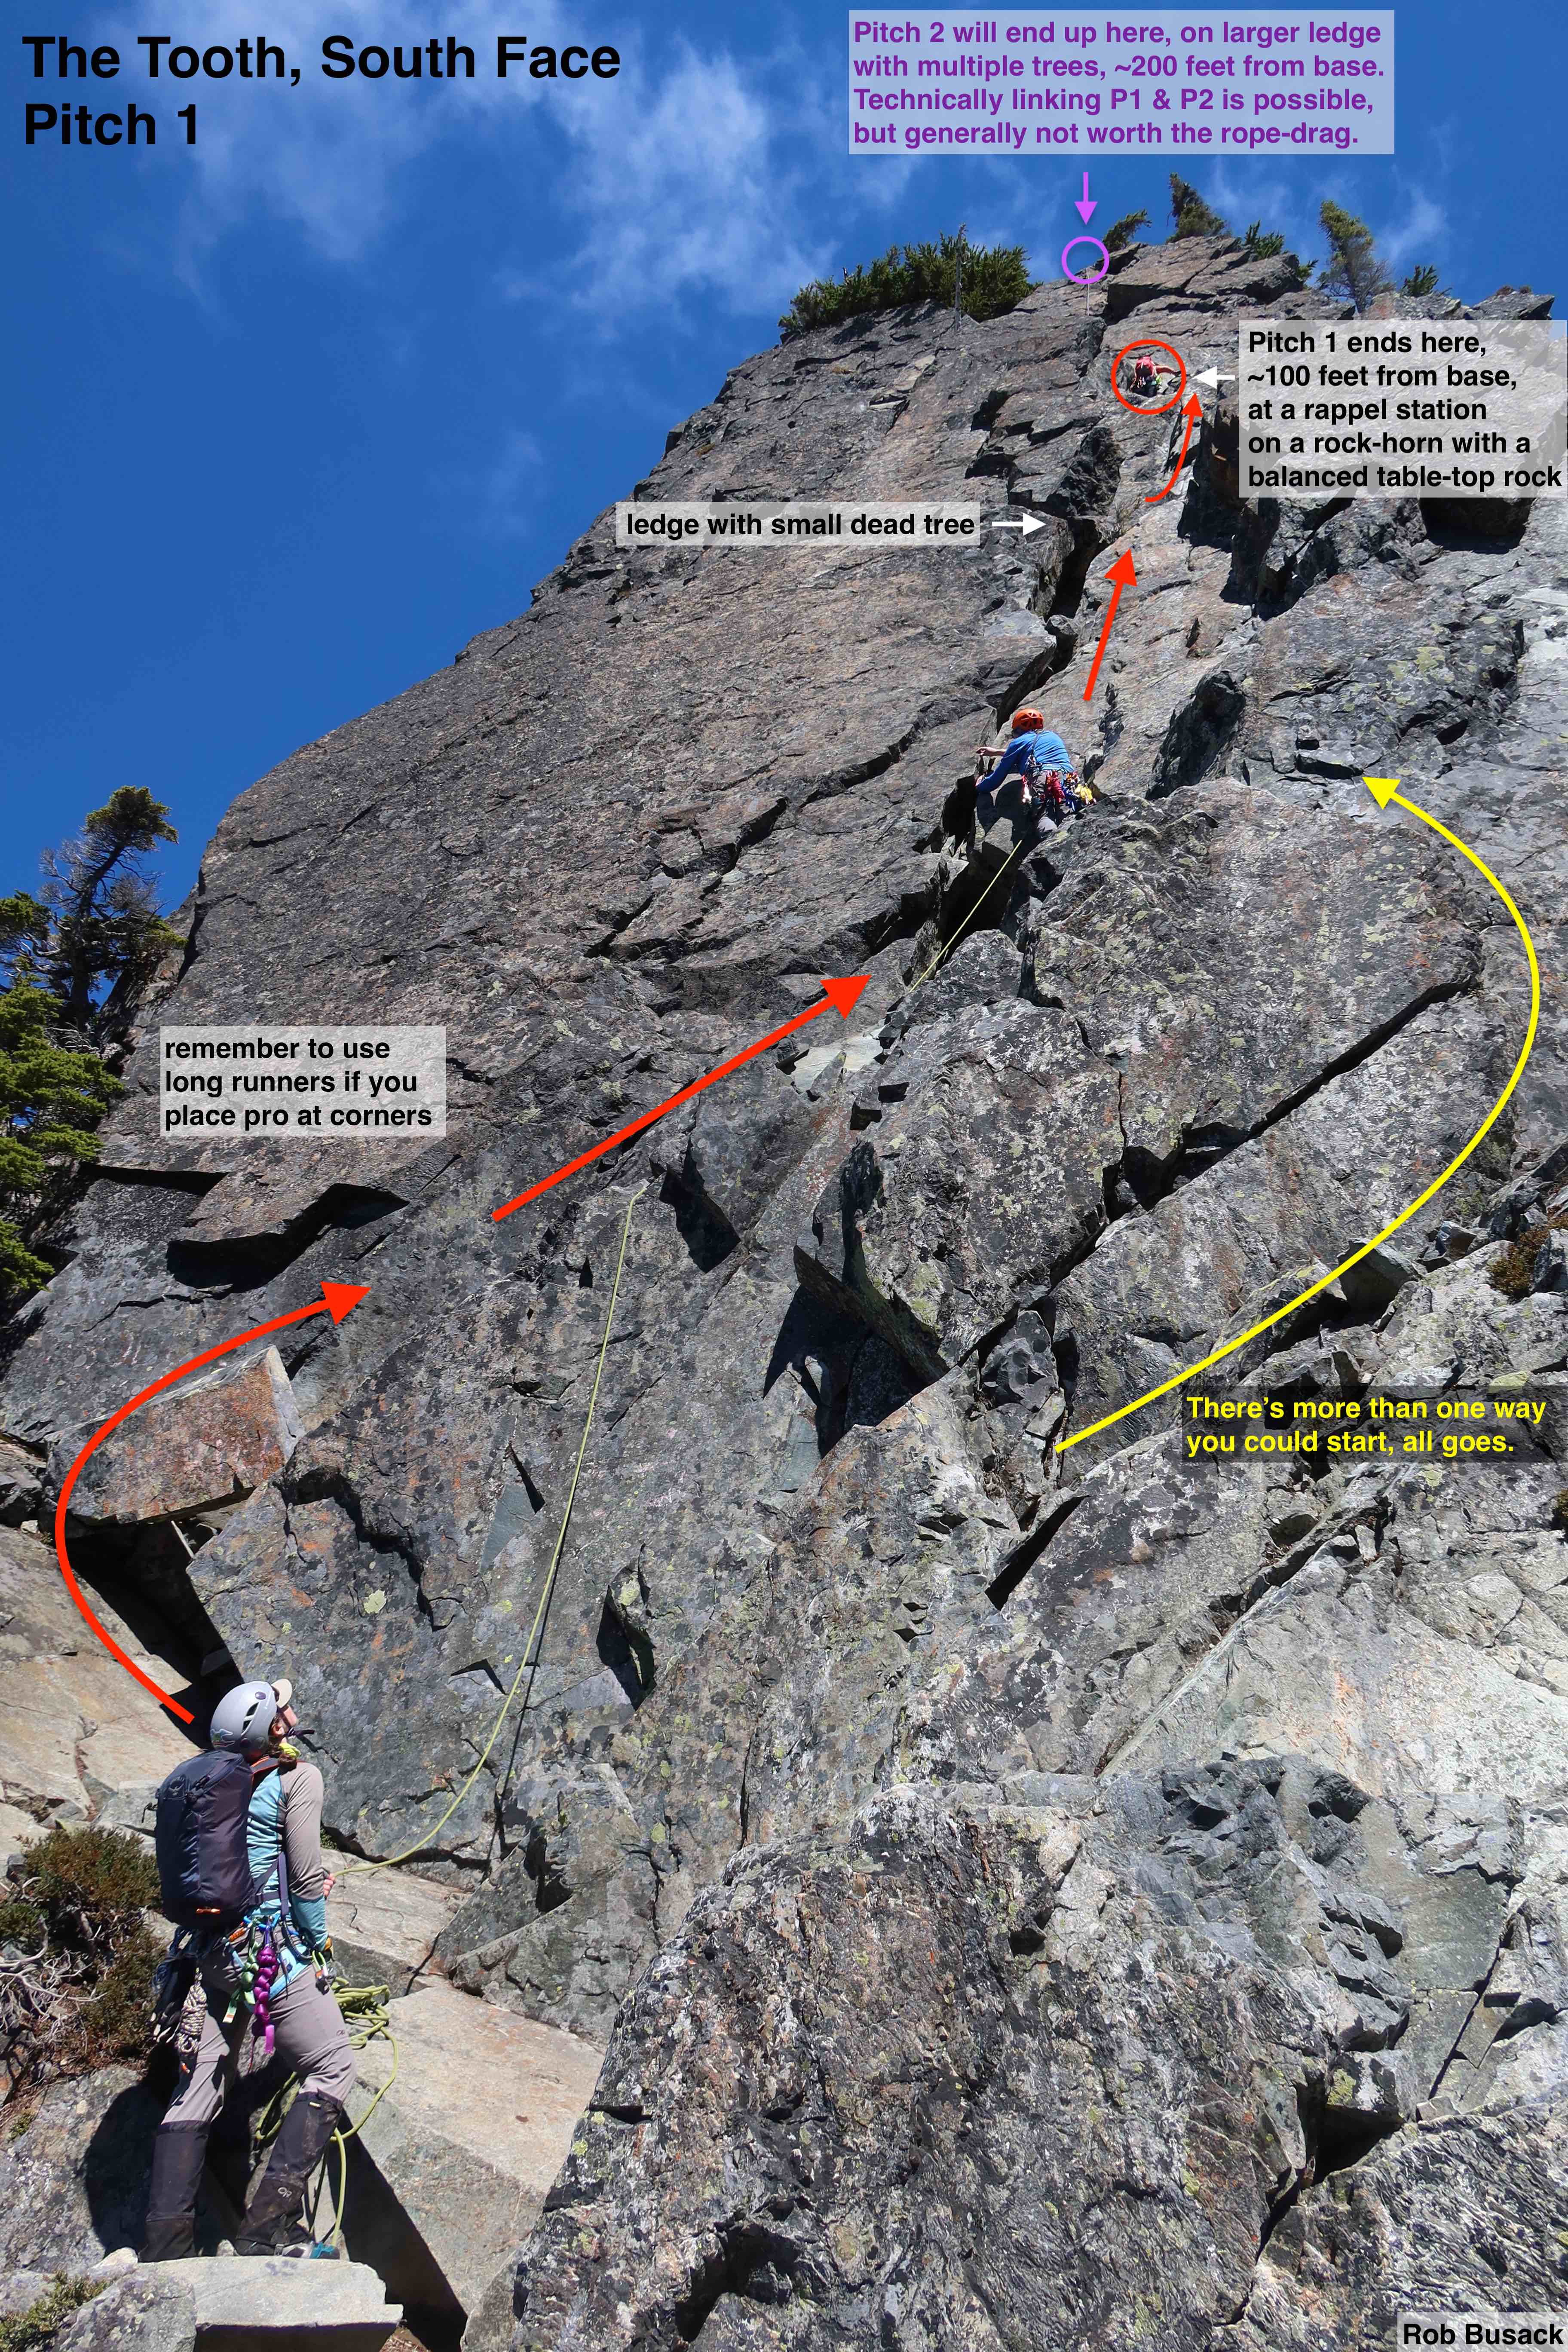
Pitch 2 – 5.4
From your pitch-1 anchor, angle up rightward to start, though it soon switches back left. Pitch 2 follows some slightly zig-zagging ramps. Remember to use double runners when you change direction, or suffer the rope drag. The wall is steep, with a bit of an airy feel, but the footledges are large, big enough fit an entire boot on. Finally, finish on steep but blocky rock until topping out on a dirt-covered ledge with a number of sizeable trees.
Like all pitches on The Tooth, more than one way goes. Don’t stress if you’re on a different line than what I’ve drawn, it’s all fine.


To end pitch 2, perhaps the best anchor-option is to build a gear-anchor in the one medium-ish crack right were you top-out (shown below,) it has the advantages of keeping you close to the edge so you can see your follower directly, and keeping you separate from the rappel-anchor area nearby, which can be useful for crowd-management. Plus you don’t need much trad gear for pitch 3 ahead, so it’s okay use up all your cams in an anchor here. The most noticeable crack for this anchor fits a BD #1 (red) and/or #2 (yellow) quite well, though some creativity may be required to place more pieces.

Alternatively, if you do opt to use a tree as an anchor, double-check all of the following:
(1) Look up. Are the needles still green & plentiful? ONLY use a tree that you can verify is still alive.
(2) Is the tree big enough? Trees should be at least 5-inches in diameter at a minimum. Remember the saying “Five and alive!”
(3) Push on the tree a bit and verify that it feels sturdy. Seriously. This is a video of one of the trees on this very ledge. The Tooth is so heavily used that I am worried that all the leverage trees endure as anchors, and all the foot-trambling on top of their roots, will eventually kill most trees along this route.
Pitch 3 – 3rd class scramble with some exposure

Pitch 3 is mostly a 3rd class scramble, with maybe some 4th class moments thrown in. However, there’s some exposure at points, and the base of the 4th pitch is only about 110′ away, so you might as well lead it like any other pitch of rock climbing. Use your doubles and sling the trees you pass, but there’s not much need to place more pro than that. This pitch ends on a ledge with more than one tree set up as rap stations.
Pitch 4 – Three options
There are at least three unique ways to climb the 4th and final pitch. All get you on top of the same big comfy summit.
• the furthest-right option -> There’s a direct route up to a small notch with a tree in it, which is the easiest version of the 4th pitch. It’s about 4th class or 5.0, and fairly short. You can end & belay at the tree you see up there.
• “The Flakes”, 5.5 -> Just left of the further-right option, there’s a very fun variation with a bit more challenge! Climb up rightward-facing flake edges (often a fixed-cam or two in there). This gets you up on a high ramp (which, on my first time up, I thought was “The Catwalk”,) on which you traverse left until you feel ready to pull up and on to the summit. To me, it was best to ignore the first temptation to top out, and go further left for a slightly easier spot to pull up and over. Once on top, walk over about 15 feet to reach an awesome rock horn to use as a belay anchor.
• “The Catwalk”, 5.4 -> Lower and more left, a narrow and somewhat hidden foot ramp takes you far out left. It goes a little ways before you get your first good piece of pro in. It’ll take you far out left, until you meet with the horizon line only about half way up to the summit. Embrace it, go left, and eventually step around the arete and on to a more southwestern aspect. Once there, turn 90° right back towards the summit proper, and it’s an easy romp up to the top to finish.

Going Down
First, a brief soapbox that’s not specific to The Tooth: For any & every rappel in a climbing-context, I strongly advocate for always following Rob’s Three Rules for Rappelling:
- Always put knots in the ends of the ropes. (A triple-fisherman, or barrel-knot, in each rope-end is a great choice.)
- Always use a system that will stop if the rappeler lets go. (An auto block is the most common answer. Receiving a firefighter’s-belay is another valid solution.)
- Always test before you trust. (Before unclipping your PA, make sure there is slack in your PA, and put your weight on your whole rappel setup, then unclip the PA.)
Obviously, you do you. While I think those are good rules to live by, I’ve met enough climbers that I know somebody somewhere out there will get all huffy & hotheaded at the idea of me encouraging those things. If that’s you, and you want to take more risk, that’s up to you, just do your own thing. It’s not like I’m even going to know that you did! Unless you fuck up and become an accident report. Then I’ll know. And, I told you so. Anyway, do whatever’s right for you.
Two Rappel-Route Options on the South Face
Even with just the South Face, there are multiple rappel-route options. The most traditional rappel route almost exactly reverses the pitches that you climbed up – simple enough – but it also has the disadvantage of rappelling into parties below you if one party is trying to go up at the same time as other parties are trying to go down, and can create traffic-jams on busy days. There is a second possible rappel route, involving some somewhat-hidden bolts off to the side of where pitches 1 & 2 are, which allows upward-traffic and downward-traffic to take separate lanes in that area, thus allowing you to avoid that traffic if rappelling on a busy day. (And almost every day on The Tooth is indeed a busy day.) The traditional rappel route is described here first, and the traffic-avoiding rappel route is described in a later section.
The Traditional Rappel Route – Reversing the Pitches
Rappelling the 4th pitch

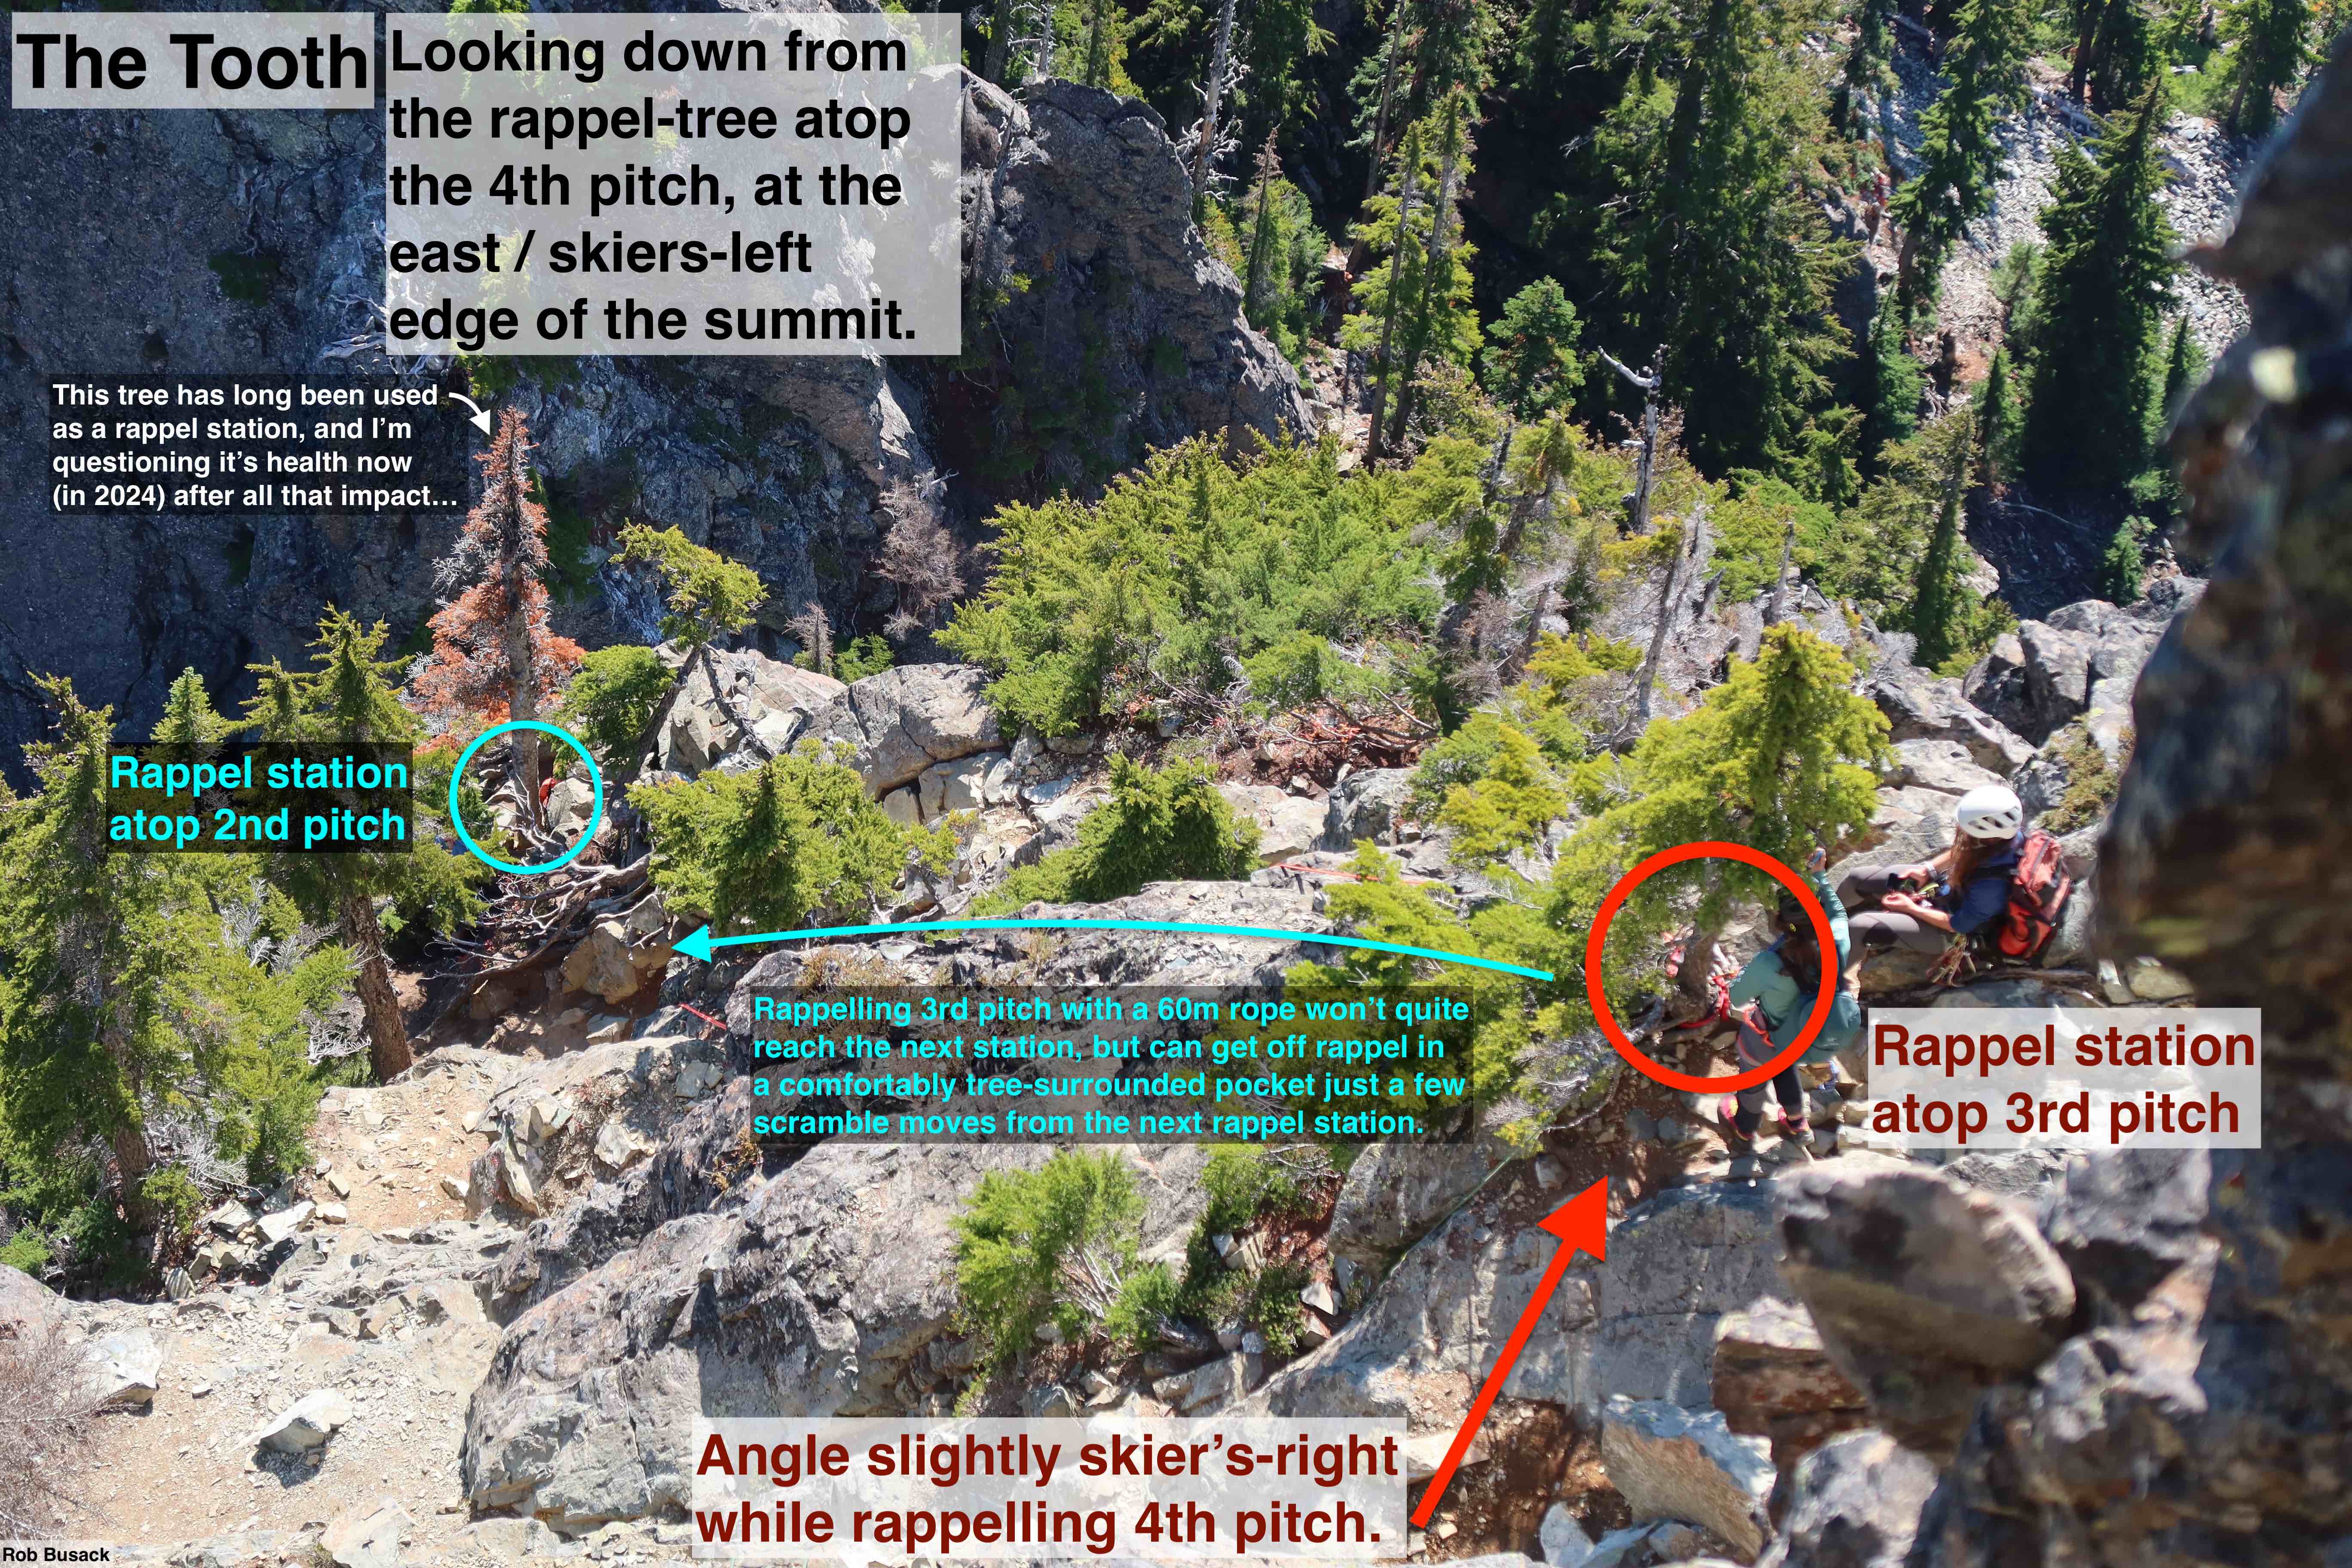
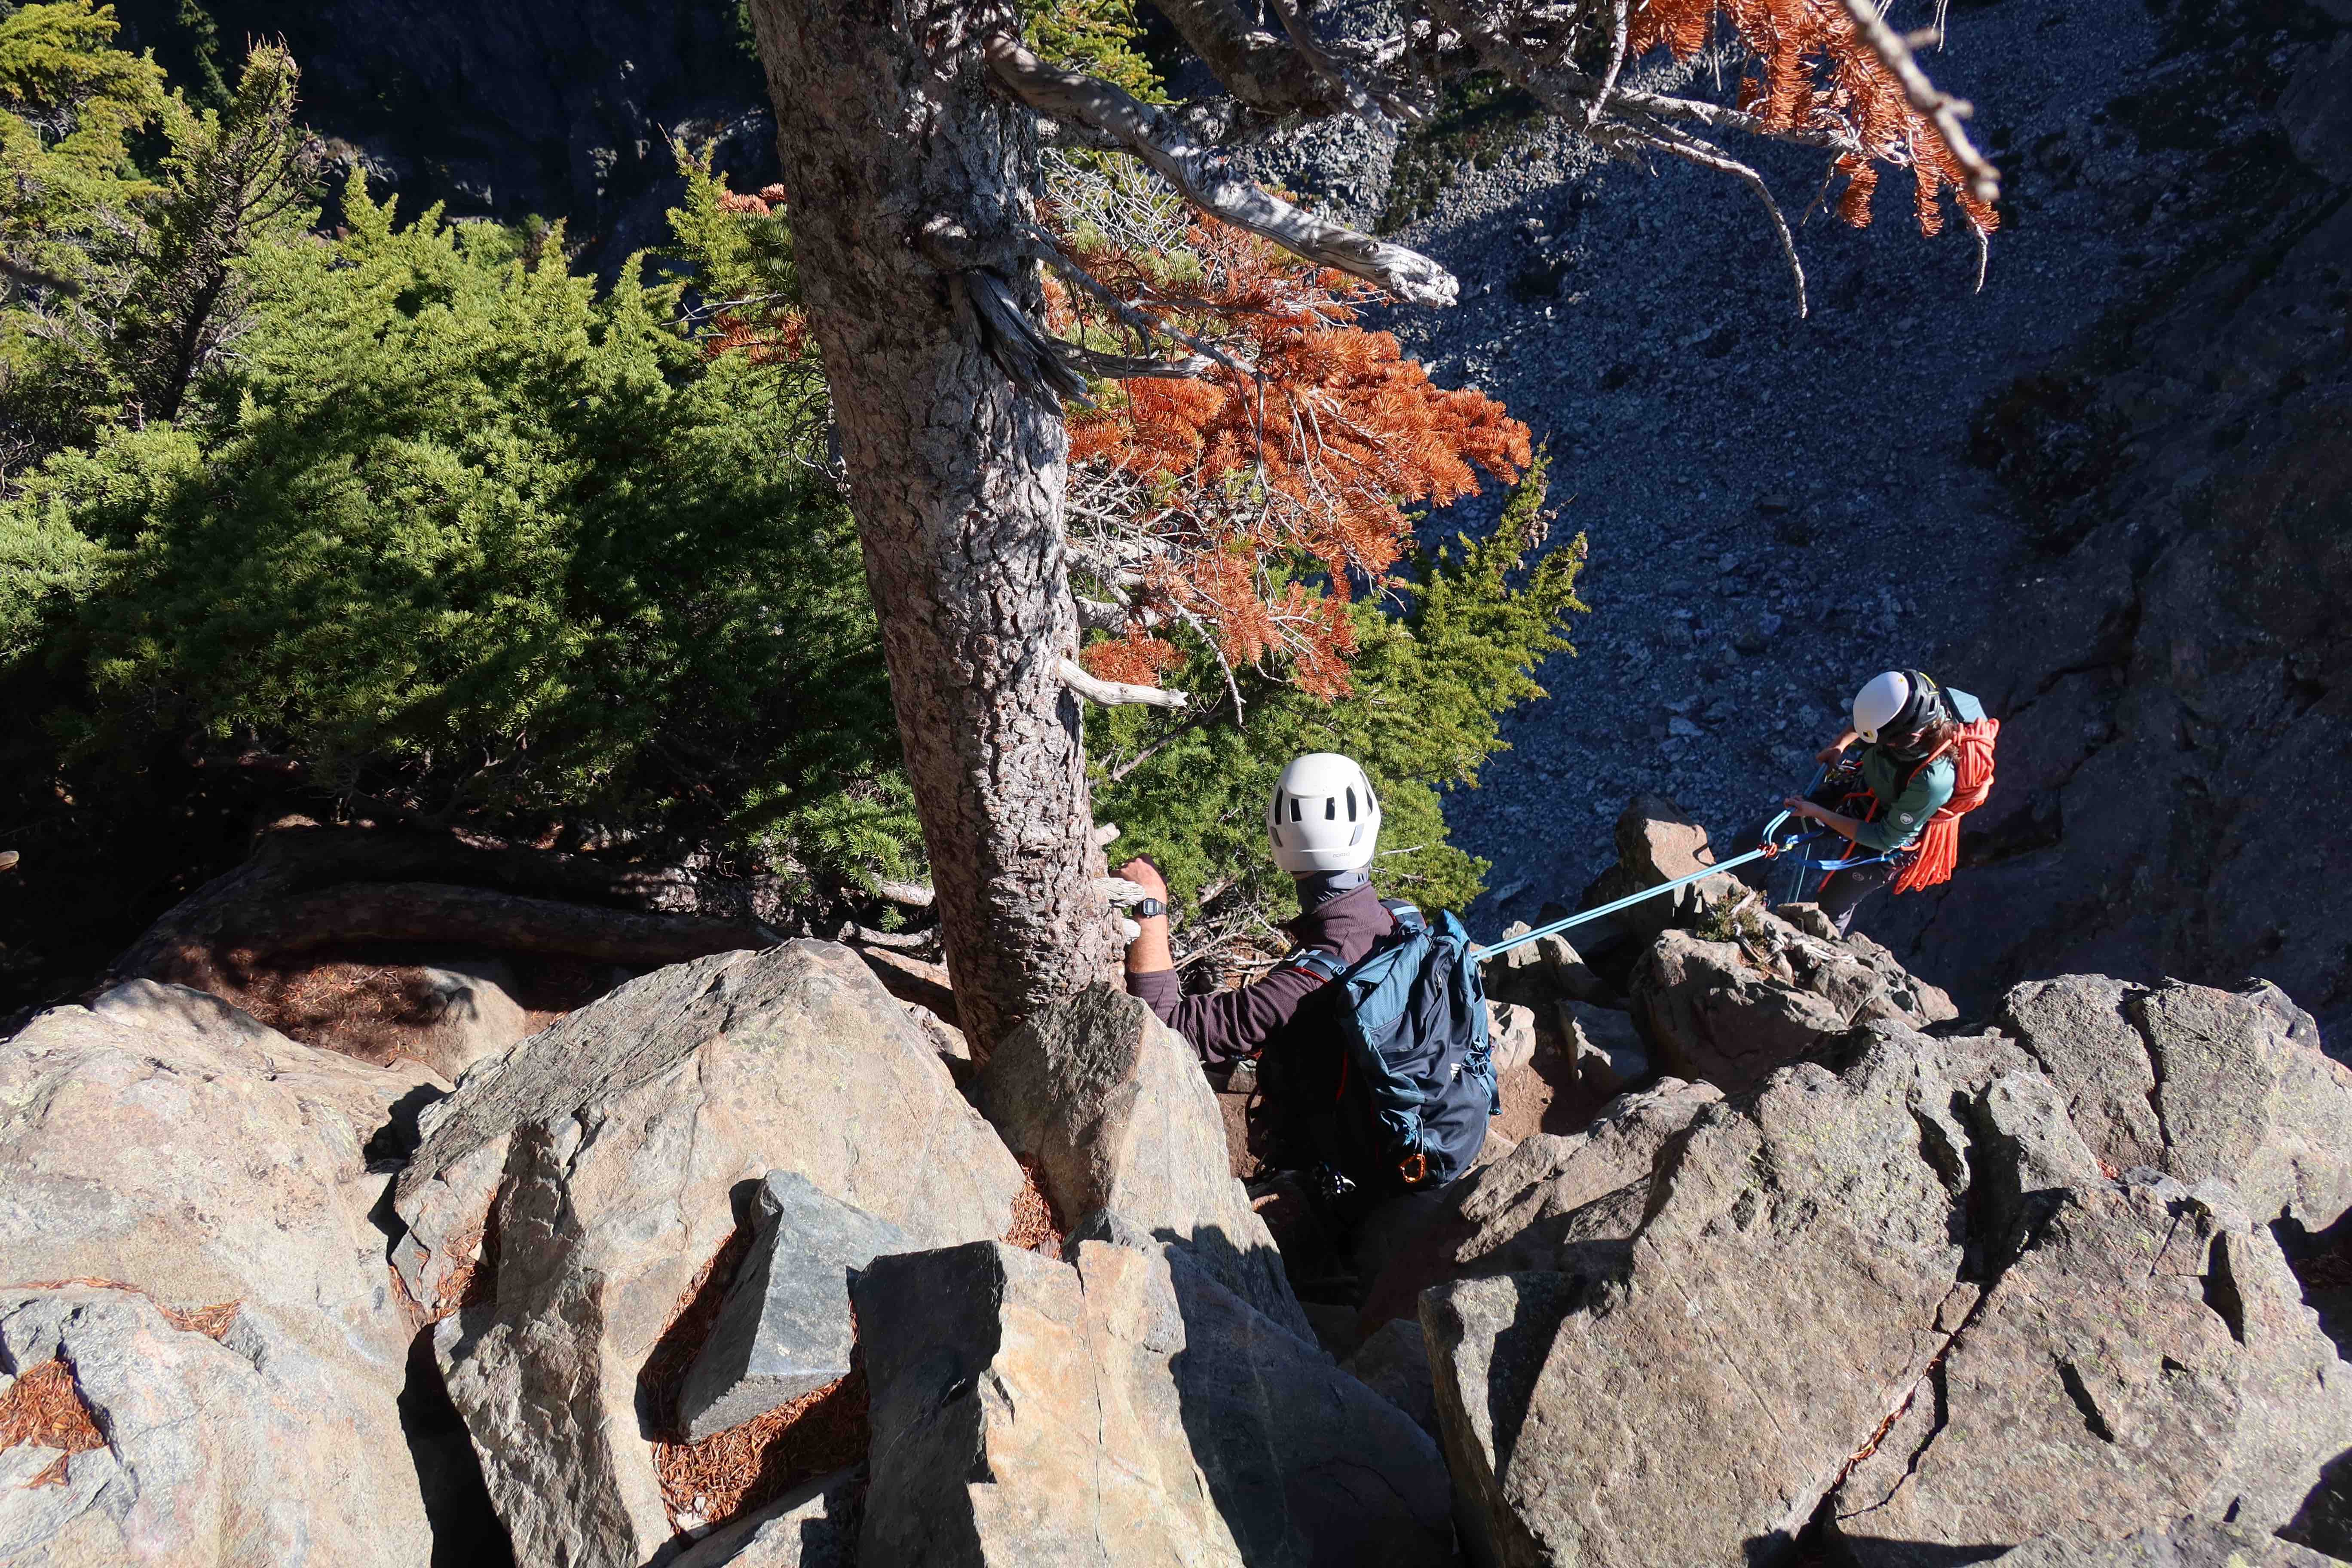
From the summit looking back towards the climbing route, on the left a small step down leads to the tree in the notch where the easy version of the 4th pitch ended. That tree makes a fantastic rap anchor, and probably already has slings & rings on it. A ~25m rappel will put you back on the ledge where you finished the 3rd pitch.
Rappelling the 3rd pitch
Although scrambly, with the exposure here, I certainly prefer choosing to rappel this pitch. I’ve found a 60 meter rope (i.e. 30 meter rappel) comes up just slightly short of 2nd pitch’s top tree, so you do have to get off rappel and down-scramble a bit, but by then that section is short and extremely well protected by trees around you, so it’s a much more palatable unroped down-scramble.
If you are really comfortable and confident in your down-climbing skills, you could scramble down this 3rd pitch unroped. Discuss it while up at the summit, and make rappelling the 4th pitch as long as possible if you do. Only down-scamble it if everyone in your group is comfortable and experienced, NOT if you’re taking a beginner out for their first alpine rock experience.
Rappelling the 2nd pitch
The ledge where pitch 2 had ended has a large & straight tree on the skier’s-lefthand side, which has been the standard rappel tree there as long as I’ve been climbing The Tooth. If your rappel of pitch 3 didn’t quite reach this tree, it’s decently safe to get off rappel and carefully scramble the last few moves to it unroped.

Sidenote: I’m a little worried about the long-term health of that tree. It’s endured years of likely-daily rappel-leverage shaking it, and constant feet compacting it’s roots and the soil around it. I don’t think it’s going to survive that forever. It’s probably fine to keep using this tree for the near-term (I’m writing this in mid-2024), and it is in such a convenient spot, but some other anchor may be needed here at some point in the future.
Update: As of August 2024, a rock-based rappel anchor has now been set up in this same location, removing our reliance on that dying tree.
Like all the other climbing pitches you rappel on the Tooth, I recommend setting up this rappel of the 2nd pitch as a <30-meter rappel, with a single 60-meter rope. I mention it here specifically because with how the tree is set back about six feet from the edge, there can be enough friction between the rope and the top surface of this ledge that pulling the rope here becomes quite difficult if you try to pull your rope from any further away than the slung-rock-horn atop pitch-1.

Rappelling the 1st pitch
Rappelling from the slung rocks atop the 1st pitch will bring you back to where you first roped up in almost exactly 30 meters.
Or: The Traffic-Avoiding rappel route
This is an alternative way to rappel, starting from the summit.
Rappelling the 4th pitch
At first, the traffic-avoiding rappel route begins the same as the traditional rappel route: the very first rappel you do is exactly the same. The small tree in the step-down at the southeast (skier’s-left) edge of the summit is a good place to start rappelling from. While rappelling, angle slightly skier’s right to reach the same tree you would rappel to if doing the traditional rappel route.
Rappelling the 3rd pitch
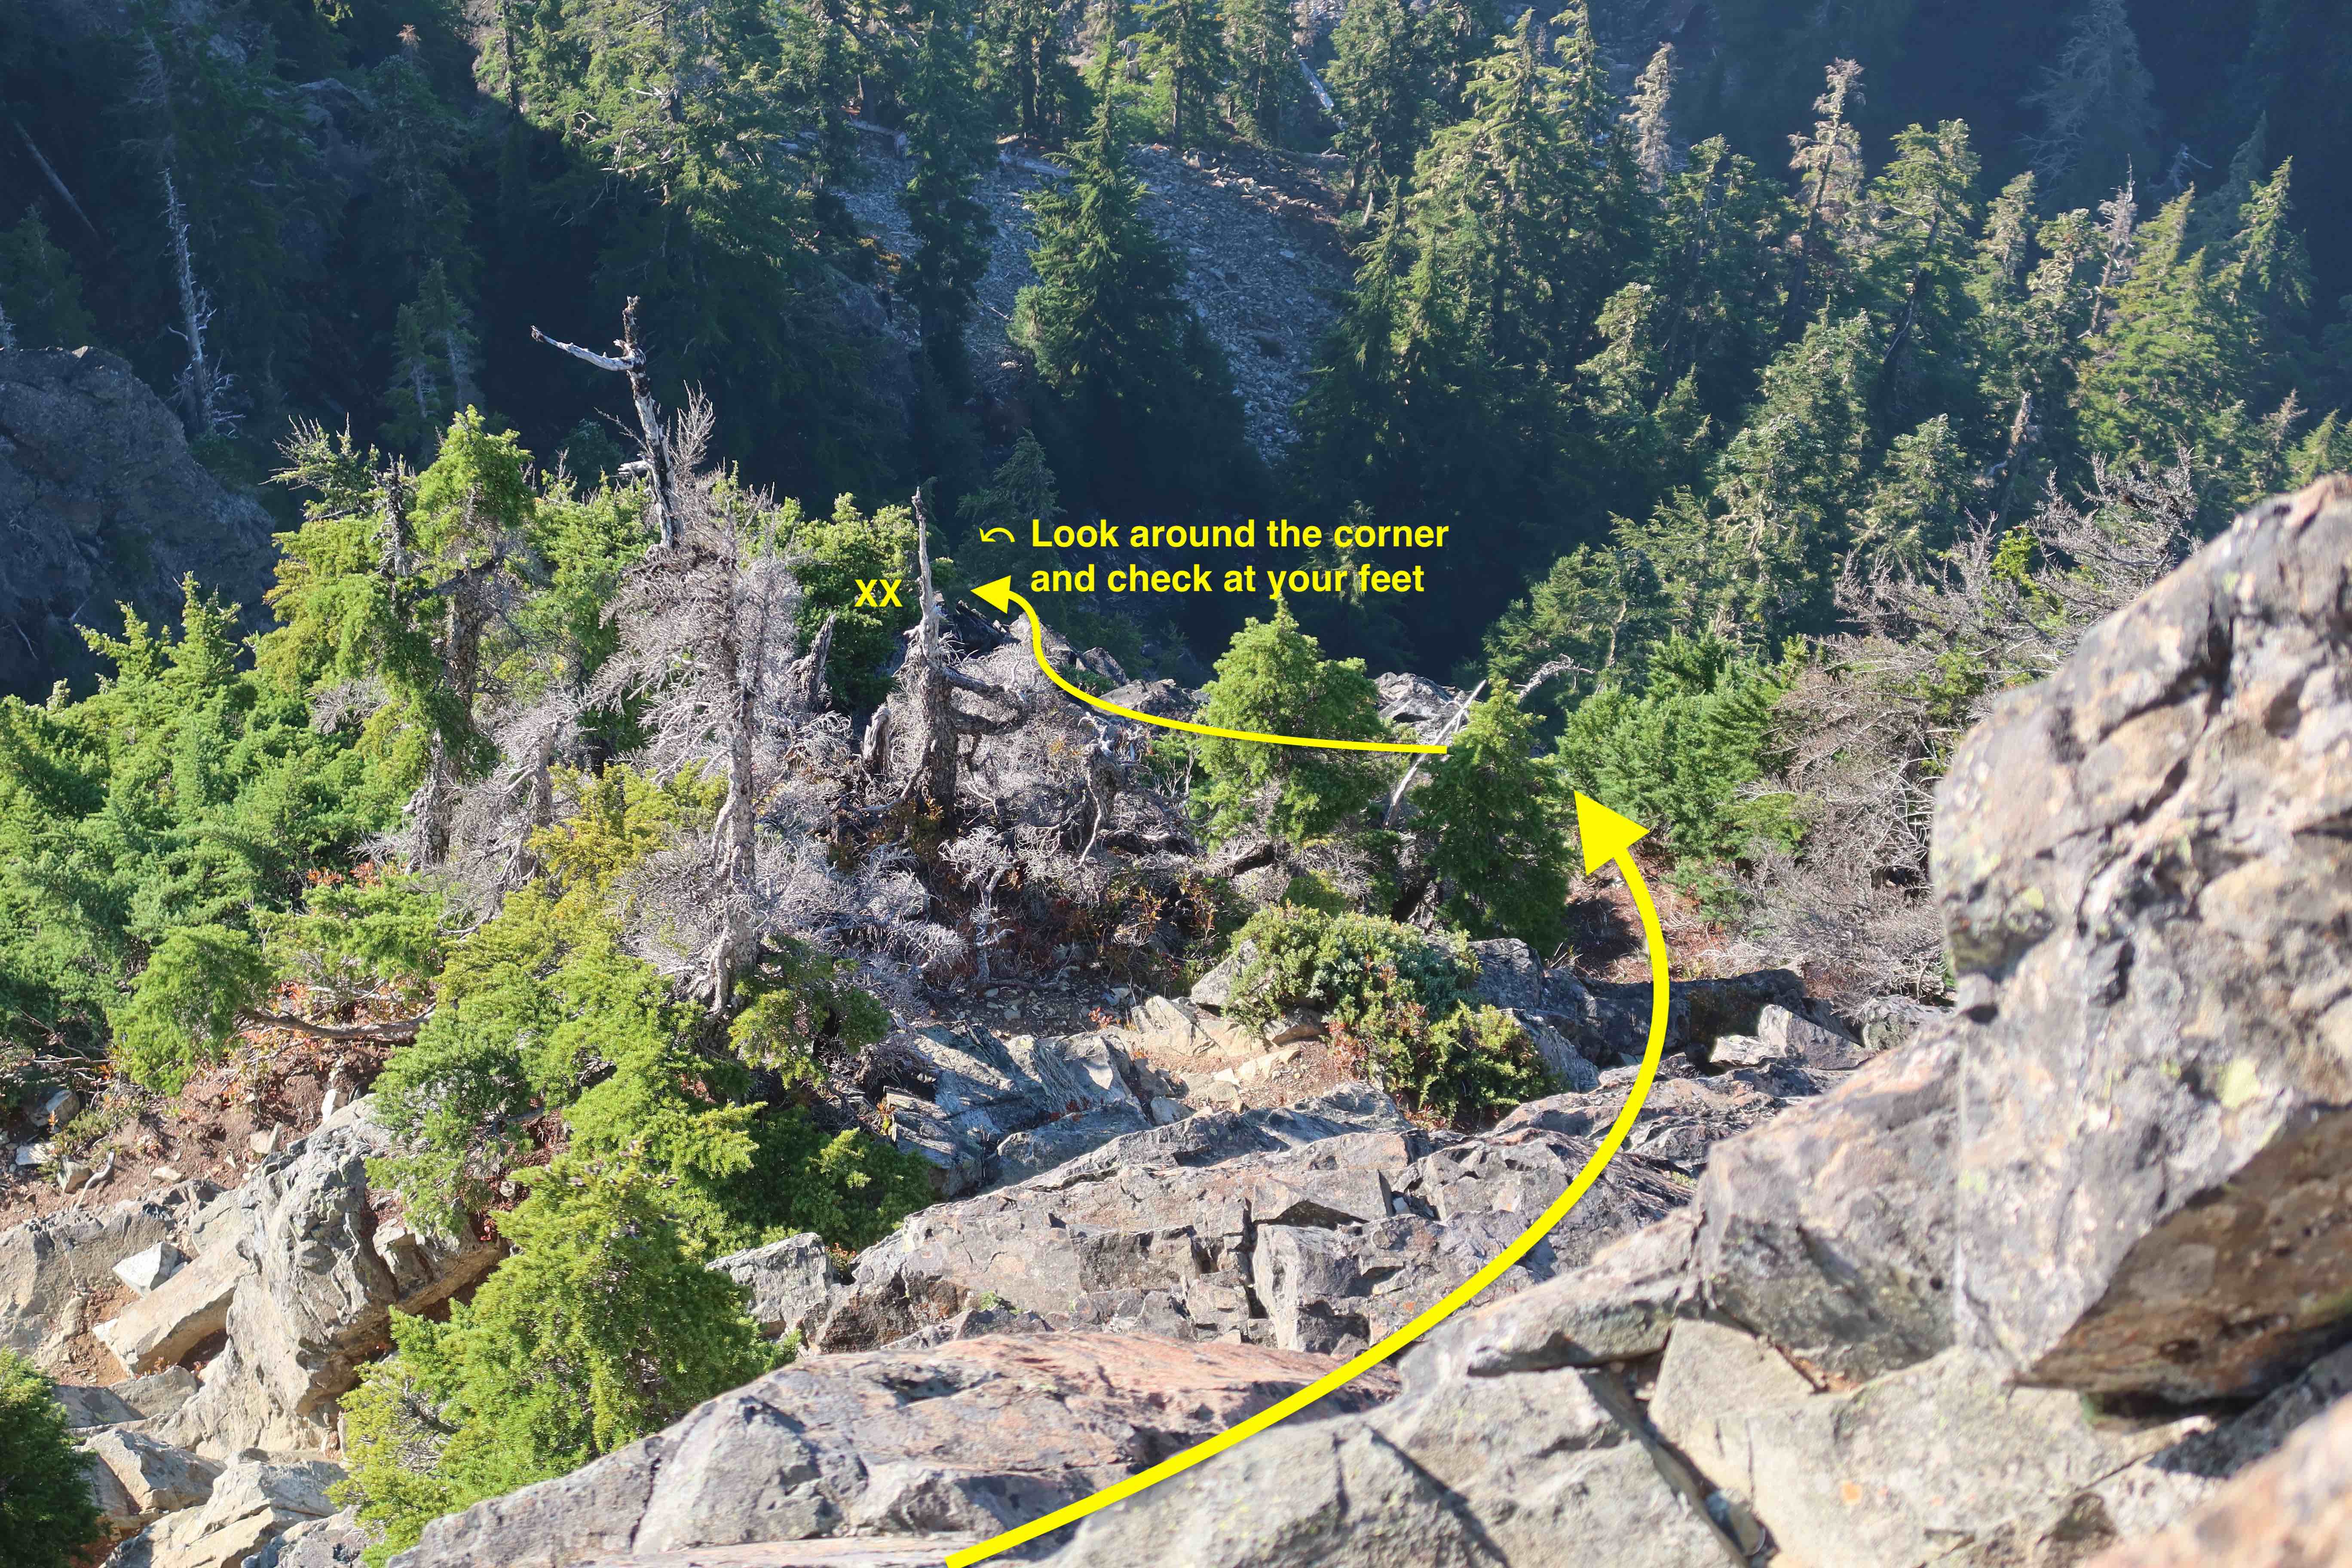
Now, although you are rappelling off of the same tree that the traditional rappel route utilizes as an anchor for rappelling the 3rd pitch, where you want to aim and travel to during this rappel is different. Rather than aiming skiers-left (southeast) for the now-dead tree that is the traditional rappel-station, instead, aim very-slightly-skiers-right (southwest) towards a plentiful clump of trees, out on the southwest corner of the ledges below you. While rappelling, use the least-bushwacky passage (which is a little towards the skiers-right side) to get into that clump of trees, and out to the cliff-edge of the rock just beyond those trees. Stay on rappel, and step sideways along the cliff edge back towards the centerline of the climbing route. (You may have to bounce your tensioned rappel ropes up over some tree-tops as you step sideways.) As you work your way along the cliff edge around the clump of trees, you’ll get very near your rope-ends before the anchor is visible (you did tie stopper-knotes in your rappel rope, right???) Almost exactly at your rope-ends (assuming you have a 60-meter rope, doing a 30-meter rappel), black bolts with a chain and rappel ring will be at your feet.


Rappelling the 2nd pitch
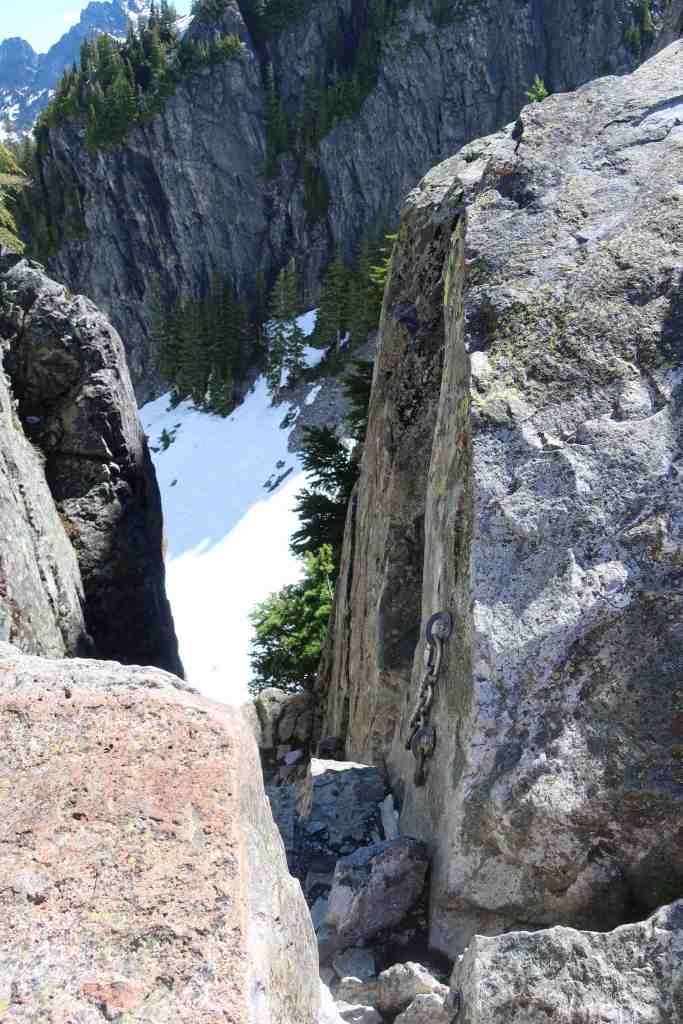
From this bolted rappel station, look down, and slightly skiers-left. Straight down is a fairly clean face for about 25 meters, and once you’ve thrown your rappel rope, the rope ends will land roughly where there’s a significant gully/dihedral. While rappelling, swing a little climber’s-right to get your feet on the ground of that dihedral-gully sooner rather than later, so that you can walk out to that next edge as you approach the ends of your ropes. Another pair of black bolts with chain and rappel ring is located under a micro-roof, which you’ll arrive at just before you reach the ends of your rope.

Rappelling the 1st pitch

Rappelling from this bolted rappel station will deposit you nicely at the base of the 1st pitch in just under 30 meters.
Optional: Rappelling from the base of the route into Great Scott Bowl
Either way, once you are back where you started the climb (i.e. standing at the bottom of the 1st pitch), you have two options to get back into Great Scott Bowl. You could reverse the scramble route you took to get up, which I recommend. Or, you could rappel down the big gully you see on the east side of things, starting from the bolts & chain shown here. There are two disadvantages to doing the rappel: 1) It’s slower than just reversing the scramble route, especially if your party-size isn’t small. 2) There’s a noteworthy amount rockfall hazard in the gully you’d be rapping down. It’s about 50 meters total to get down, and there is in intermediate anchor about half way down that is partially sheltered, so you could do two rappels with just one 60 meter rope. Or, if you do choose to rappel this, I somewhat recommend tying together two 60m ropes to do a double-rope rappel. That’ll get you down onto the snow of Great Scott Basin in a single rappel. (Otherwise people would have to stop and hang out at an intermediate rap station mid-gully.) Once someone gets to the very bottom, they should shout VERY LOUDLY that they’re off rappel (it’ll still be hard to hear them there) and they should move FAR off to the side, so that it would be physically impossible for any rocks bouncing down the gully to reach them. Whatever you choose to do, be safe!

Thank you for this detailed write-up! It’s the best beta I’ve seen on The Tooth anywhere.
That’s quite a compliment, thank you!
Yea it really is the best beta source I’ve been able to find as well! Very thorough, thanks for posting!