
On July 26-28th, I had the opportunity to climb the Complete North Ridge of Stuart, as a 3-day trip. I’m so stoked and grateful that this opportunity came up, and that we were successful, I finally got to climb this route!! I have long dreamed of climbing this ultra-classic, since my first trad lead more than 12 years ago. I had held off on going for it for a long time, primarily out of concern about the climbing-difficulty of the crux pitches. I wanted to be extra-sure of my ability to on-sight 5.9 trad before making an attempt. I felt ready a few years ago, and had made an attempt, but opted to turn around before roping-up because the weather ended up being significantly cloudier & windier than what the forecast had predicted. This time though, everything went right!
There’s plenty of other information out there on the North Ridge, some I’m not necessarily going to write a complete guide to the route here. Even if I wanted to, a complete guide that shows where to go on all the pitches wouldn’t be possible or practical, there’s just so much ground to cover, it’s more important that you’re able to route-find on your own. This post is just going to be some notes from my one successful experience on the North Ridge of Stuart, partial beta that may or may not be a useful ingredient in the formulation of your own plan 🙂
- What We Did
- Big-Picture Decisions about the Route
- The Gear I Packed
- Some Pitch Notes
- Hauling Packs
- Determining if you are ready for the North Ridge of Stuart
What We Did
- Day 1: (Strava) Drove from Seattle to the Esmeralda TH to stash a car (2h30m), drove to the Colchuck/Stuart Lake TH (2h15m), hiked in to the “Talus Palace” bivy area at 6490′, (4h30m) just before the 1st pitch of the Complete North Ridge begins.
- Day 2: (Strava) The entirety of the roped-climbing: Set our alarms for an hour before first light, we were roped up and starting the first pitch by 5:30am. We passed the 8200′ notch at 12:20pm, and topped out on the summit by 8:20pm, a mere half hour before sunset. Spent a late but comfortable night in bivy sites just a 15-minute scramble down from the summit. (Note: our near 15-hours on route included some delays we just had to wait for, which I’d estimate added about 3 hours to our time. If circumstances had been different, I think the pace we were actually moving at would have gotten us base-to-summit in about 12 hours. But unexpected delays are just part of the reality you’re signing up for in multipitch climbing 🙂)
- Day 3: (Strava) Made quick work of descending the Cascadian Couloir, going from bivy site to cars in 5h30m. (Normally I recommend budgeting 8 hours for summit-to-car on Stuart, but I have enough personal-repetition of the Cascadian Couloir descent that I have it really dialed.) Long drive to retrieve the car-shuttle from the Colchuck/Stuart Lake TH, and drive home to Seattle.
- For a GPS track of our entire 3-days combined, see PeakBagger.
- Or, here’s a GPS track for just the Cascadian Couloir, if you’re looking for that. See also the notes in the “Descent” section of my previous West Ridge guide.
Big-Picture Decisions about the Route
Four interrelated questions will shape the big-picture outline of your plan:
- Are you going for just the Upper North Ridge, or the Complete North Ridge?
- Often there’s imprecise language around how much of the route is being referred to, especially when someone just says “North Ridge”, which could mean either. I like the names “Upper North Ridge” and “Complete North Ridge” for clarity. The “Upper North Ridge” starts the actual rock-climbing from a notch at 8200′, which is accessed by scrambling a rock-gully up the west side, from the Stuart Glacier’s edge around 7700′. This is the original route climbed, and is usually (but not always) what people mean when they only say “North Ridge”. Whereas the “Complete North Ridge” starts the actual rock-climbing from 6700′, adding 1500′ of roped-climbing-terrain before passing the notch at 8200′ and continuing up the original Upper North Ridge. Many other route descriptions use the name “Direct North Ridge” to mean the same thing as this “Complete North Ridge”, but the word “direct” feels awkward to me here, since most people approach from Esmeralda and come at the North Ridge from the west, where the gully that accesses the Upper North Ridge is most directly ahead, and the so-called “Direct”/Complete North Ridge requires additional circling down and around out of the way to get to.
- How many days do you intend to take?
- I’ll recommend budgeting 3 days if doing the Complete North Ridge, and 2 long-days (optionally 3) if doing the Upper North Ridge. Of course it can be done faster, but I’d rather set your expectations for what an “average” time is than tell you what the speediest-best-case-scenario time might be. In general, I think it’s prudent to carry bivy gear on this route.
- How will you approach the base of the climb?
- By far the most typical exit is to go down the Cascadian Couloir, over Longs Pass, and to the Esmeralda trailhead, so the Esmeralda trailhead also makes a lot of sense to start from. From the Esmeralda TH, the standard approach goes over Ingalls Pass, past Ingalls Lake, near the start of Stuart’s West Ridge, over Goat Pass; then either travels on the Stuart Glacier if going to the Upper North Ridge, or attempts to avoid the glacier by crossing below it if going to the Complete North Ridge. The Esmeralda TH is not the only trailhead option though, as a more direct approach could be made for the Complete North Ridge if you started from the Colchuck/Stuart Lake trailhead instead, but doing so complicates the descent: either you set up a car-shuttle between the two trailheads (which is rather nice once set up, but adds so much extra driving that it is debatable if it’s worth it), or do something else complicated like descend the Sherpa Glacier (which is rarely done, compared to the Cascadian Couloir) or go some other route farther around, which perhaps defeats the purpose.
- Do you need snow gear? (i.e. ice axe, light crampons or maybe just microspikes)
- It’s really nice if you can avoid having to carry any snow gear, both because it’s so important to minimize pack-weight, and because an ice axe can add a headache while hauling. (If you must bring an ice axe, light & short is strongly preferred, ideally short enough to fit entirely inside your pack while climbing, rather than strapped to the outside, where it may hook and catch on rock while hauling.) It’s harder to know if you can afford to not have the snow-gear, since there’s a chance it is critical gear to have, depending on route and time of year.
- The first question is: what’s the state of that snowfield on the descent around 8800′ just south of the false-summit? Probably through early-July there’s enough snow there to require an ice axe, and possibly by the end of July / early August enough snow has disappeared that you could do without there. Recent satellite photos or reports from other climbers will help add data-points.
- If you are reasonably confident you won’t need an ice axe for the descent, then the second question is: do you need snow gear for the approach you are taking? Different approaches have different likelihoods of requiring snow gear:
- If you are going for the Upper North Ridge, and thus crossing the Stuart Glacier, you almost certainly do need snow gear no matter the time of year, and probably should include some real crampons (not just microspikes) as I’ve heard reports of tricky & steep transitions getting off the glacier and into the rock gully. I’ve also heard it gets icier & worse later in the summer, though I have not checked it out myself.
- If you are going for the Complete North Ridge and approaching from Esmeralda, the question of snow gear is a fuzzier maybe. You can probably avoid the actual Stuart Glacier entirely by cutting far enough downhill below it, but you probably will have to travel on some seasonal snowfields while getting around it, between Goat Pass and the toe of the North Ridge. So how big are those snowfields right now? And what slope-angle? Many of them are low-angle enough you could walk across them without any special gear, but a few, like the descent from Goat Pass, are around a 40° slope angle. And how firm will the snow be at the time of day you’ll be on it? Depending on conditions, maybe you need ice axe & traction, maybe you can get away with just-ice-axe, or just-microspikes and no axe, or maybe you don’t need any snow gear at all. It’s hard to say, and this will likely be the gear-packing-question you agonize over the most 🙂
- If you are going for the Complete North Ridge and do the hassle of the car-shuttle so that you can approach from the Colchuck/Stuart Lake TH, it’s highly unlikely you’ll need snow gear for any part of that approach. If you don’t need snow gear for the Stuart’s descent, then it’s a safe bet to leave it out entirely.
With those four questions, there’s no single clear-cut “best” answer to all of them. For my first time up the route, I wanted to choose the most conservative set of options possible. At first I was thinking that meant taking the smallest bite, going for just the Upper North Ridge first, since it required half as much roped-climbing as the Complete North Ridge. However, it’s got its own drawbacks too, since it would add ice axe & crampons to our pack-weight, and I’ve heard getting from the glacier, to the gully, and the steep scramble up to the 8200′ notch can present its own challenges. Would it not simplify things if we didn’t have to bring snow gear? And if we’re considering the Complete North Ridge, what are the trade-offs between the standard approach from Esmeralda vs the hassle of a car-shuttle so we could approach from the Colchuck/Stuart Lake TH? The standard approach from Esmeralda TH to the toe of the Complete North Ridge is in the ballpark of ~9 miles, ~4800′ gained, ~2000 descended, which I estimated would take around 8 hours. Approaching from the Colchuck/Stuart Lake TH would be 6.5 miles, 3300′ gained, which I estimated would take 4 or 5 hours. The car-shuttle adds 2h15m one-way, (or 4h30m if you sum both the drop-off and retrieval added drive times.) So which is faster overall? They’re not that far apart timewise, but car shuttle does mean less time on your legs so you start the climb slightly fresher, and it helps add assurance that you won’t need snow gear at all if you know you don’t need it for the descent. Since we were a party of 4 and had two cars readily available, we opted for the car-shuttle, and overall felt like it benefited us. On a future trip, I may or may not do that again, I think the options aren’t that far apart in terms of their pros & cons lists.
The Gear I Packed
- For a rope, I had a 35-meter 8.9mm alpine rock rope, which worked really well. We never felt the need for anything longer, and we didn’t have to coil up any rope to shorten while simul-climbing. We did need to bring a separate cord for hauling.
- The rack I had:
- 12 single-runners (all with 2 carabiners, which was helpful, I didn’t mind the “weight penalty” of the extra carabiner, since it saved time by avoiding faffing around for an extra carabiner on nut placements, of which there were plenty.)
- 6 double-runners (and very glad for it, I wouldn’t bring any fewer slings. Very helpful for long simul blocks. Maybe even bring more doubles next time? It could be helpful to have 4 doubles with 2 carabiners each, and 4 doubles with single-carabiners each, as there were quite a few places we slung rock-horns or natural chockstones, etc.)
- single #4 (useful on the upper Gendarme pitch in the wide crack be. If you’re really confident in your fist-jams, you could get away without it: place a #3 where the wide-crack starts, and then in about ~10 feet of climbing you’re at the fixed #4, which is at the end of the wide-crack.) While not crucial anywhere else, we placed it plenty of times elsewhere on the route just because we had it. For me personally, I’d definitely bring a #4 again if/when I repeat this.
- doubles #3 down to #0.3. Glad to have it all. Some may call the second #3 unnecessary extra weight, and sure, it’s not mandatory; but I was quite happy to have it. We had plenty of pitches where we placed both #3’s just because we had them. Those long simul blocks really benefit from having a lot of pro that you can go through before having to stop, and the second #3 was indeed one more useful piece of pro on a lot of those pitches. I found that finger-sized pieces were perhaps the most frequently used, #0.4 and #0.5. Doubles of those sizes was fine, no need to triple up anything. (Hmm, I suppose if I had a third #0.4 only, I certainly would have used it, but it would be very much just a nice-to-have extra.) Not that there were any sustained finger-cracks, but there were a lot of single-move finger-cracks, where sinking a knuckle provided a nice point of balance for a ~5.5 move.
- plus a single black totem. We used it, but didn’t need that size as often. Singles of that size was fine. (Totally superfluous extra: I suppose there were a few places a red BD X4 #0.1 could have gone too. But definitely not necessary.)
- set of 10 nuts: Very glad to have them. We went through a lot of nut-placements. Some simul-blocks I ended having used 9 out of the 10 nuts. (Heck, would it be crazy to bring two sets of nuts?? Definitely not necessary, but it could facilitate even longer simul-blocks. Hmm, no, don’t start weighing down the rack too much. There wouldn’t be enough slings to go through two sets of nuts.)
- hardware for hauling: two additional spare lockers, a microxtraxion pulley, and a tibloc. (Bonus: perhaps bring a 3rd toothed-progress-capture as well, it was nice to have 3 on some of the rather long simul-blocks.) (Another nice-to-have: A webbing single-runner. Normally all my single-runners are skinny dyneema, but the wider webbing is more comfortable on your foot.)
- cord for hauling: a 30-meter Petzl Rad Line was our lightest option, weighing just 1.5 lbs. Alternatively, 30 to 35-meters of 7mm accessory cord also works well, but weighs 2.5 lbs. Or, we saw a number of people bring full 70-meter bi-pattern ropes, with the lead-climber connected at the middle, placing pro only on one side, and using the other side as a haul strand. That would work, but I’m pretty sure our separate-cord options are lighter overall.
- radios – I had intially resisted bringing them, thinking it would be a good way to save weight. The group convinced me to bring them though, and once out there, I was very glad to have them, I would definitely bring them again. There’s a lot of people on route, a lot of shouting, a lot going on, and plenty of chances for complication that would benefit from extra-communication (hauling, simuling, reporting if a simul-section was micro-traxion-protected, etc.) Also, with two rope teams, we’d sometimes be apart, and could offer route-finding advice, or checking if they were doing okay, etc. I definitely would bring radios again.
- personal climbing gear:
- rock shoes that were 1/2 size bigger than my normal rock shoes. Having the bigger shoes was critical. My feet swelled quite a bit during the day, and even these oversized shoes felt too tight near the end. A person in another party on the route had worn their regular-sized rock shoes, and they were absolutely dying from the foot-pain. I wore my rock shoes from the base of pitch 1 all the way to the summit. Even on the easier simul terrain, I just felt more confident in the movement with the rock-shoes on, allowing me to move a little quicker. We did take a couple shoes-off breaks at some of the bivy-ledges while we ate & drank, but that was mostly because we were waiting for our second rope-team, don’t go in expecting you’ll have time to take your shoes off.
- crack gloves – I used them a ton
- I brought my more comfortable harness, and I was glad I did. (Petzl Adjama) Mainly because of the nice gear-loops on it. If I had brought my tinier harness (Black Diamond Couloir) it would have been so annoying having the small gear-loops, getting gear on and off the gear-loops would have cost enough extra time to actually be significant
- the usual bits on the harness: nut tool, belay device, a few spare lockers, cordelette for anchors, a pair of small prusik loops in case of emergency.
- The Edelrid MegaJul really shined as a belay-device on this route. It was nice to use it to manage slack in the system while simuling, similar to how some use a grigri, though it was much lighter. Of course you should bring whatever belay device you are comfortable with, but you probably do want an assisted-braking type of device, for the sake of slack-management while simuling.
- Personal Anchor – I brought it, and used it exactly once, at the one unexpected rappel shortly after the gendarme. In hindsight, didn’t really need it, could have just made one at the time with the slings we had.
- approach shoes for the approach & walk-off
- helmet, of course
- my sleep-setup:
- 40° quilt (14oz. Enlightened Equipment Enigma. I think Katabatic Gear quilts are better, better pad-attachment-system, but Katabatic didn’t have a 40° option available at the time I made my purchase.)
- 3/4-length pad (8oz. Thermarest used to make an extra-short version of the NeoAir Xlite, which is just 47″ long, providing just-enough pad at a wonderfully minimal weight. Unfortunately, I think they discontinued that particular size. I’m glad I have one from before.)
- my modified “SOL Escape Lite” bivvy (7.5oz, modified to add width. See my notes on gear from the West Ridge.)
- bug head-net, necessary for the lower bivy site, since my bivy bag doesn’t close at the face, and there were mosquitos during the night
- Z-packs “medium pillow” stuff-sack – perfect for packing the quilt inside of, since you need a stuff-sack for that anyway. Then turn inside-out and put spare article of clothing in there to make a nice pillow at night. (However, when we bivied on the summit, temps were in the mid-30’s and I wore every layer of clothing I had inside my quilt. I was warm and comfortable as a result, but had nothing to put in this stuff-sack to make a pillow. I ended up using my rock-shoes as a pillow, lol)
- my little sleep-kit ziplock bag: eyemask, earplugs, chapstick, & melatonin. All very useful.
- ^ note that the entirety of my sleep-setup adds up to about 2 pounds. That’s not much. Quit yer whining about “oh, overnight gear is so heavy!” and take a closer look at the weight of the gear you’re using.
- my clothing:
- base layer: sun-hoody, hiking pants. (REI Sahara sun-hoody, & REI Sahara zip-off pants)
- a long-sleeve wool shirt (7.5oz. Icebreaker Merino 200 Oasis half-zip shirt)
- a light fleece (7.5oz. NorthFace Future Fleece. Senchi Designs makes some nice lightweight fleeces too, a similar option)
- a light puffy (11oz. Outdoor Research Superstrand LT hoody)
- a windbreaker shell jacket (7oz. Black Diamond Alpine Start Hoody, an excellent wind-blocking layer, and wonderfully abrasion-resistant, allowing me to rock-climb and do a lot of rubbing elbows with the rough granite without shredding my rather-delicate wool-shirt or the light-fleece layers, which I sometimes climbed in.)
- I opted not to bring a rain jacket at all. I don’t usually do this, I typically “always” carry a light waterproof jacket (an Outdoor Research Helium, 7oz,) “just in case”, as there definitely have past experiences in the mountains where I’ve been caught by rain that wasn’t in the forecast. However, the Meteoblue forecast for the days we were climbing showed “0% chance of precip, and 85% confidence in that forecast-accuracy”, so I opted to rely on that, and shave the weight, leaving out rain gear entirely. Fortunately, that worked out just fine, and I’m happy with the decision this time around. If it had rained though, I probably would have been in significant trouble. Make your decision here carefully.
- a warm hat
- a sun-hat (just a generic baseball cap)
- a buff (didn’t use, but was glad I had it. If it had been even a few degrees colder, I would have needed it.)
- a single pair of lightweight leather gloves (I didn’t use them, but was glad I had one pair of gloves with me anyway, just in case)
- a grand total of 2 pairs of socks: some medium-weight wool ones that were comfy inside my approach-shoes for the hiking portions of the trip, and some thin socks that I like to wear inside my climbing-shoes at the beginning of the day before my feet swelled enough to fully fill the rock-shoes
- ^ the above clothing was absolutely perfect, I was extremely happy with it. It was just enough, and nothing extra. The low bivy was warm & almost-windless- while the sun was gone, I wore my fleece & wind-shell, but didn’t get out the puffy at all. Climbing on the North Ridge was hot for about the first two-thirds. For a North Ridge, it sure gets a lot of sun. Throughout the AM hours, the east sun shines pretty directly on the ridgeline. Around mid-day, the angle of the sun was high enough to be just above the summit from our perspective, so we were often looking up into it (sunglasses were very helpful.) In the afternoon, up near the Gendarme, we started to get sun in some places and shadow in others, though more significantly the higher elevation and increased exposure to wind made things start to feel very chilly. I wish I had layered-up slightly more before starting up the Gendarme, I should have at least put on my wool shirt and windbreaker before the 1st Gendarme pitch. It was very windy & very chilly at the base of the Gendarme, extra-so at the tiny belay stance between the two Gendarme pitches (where it’s definitely too small to risk opening a pack to change layers), and still chilly (though slightly less so) after finishing the 2nd gendarme pitch.) After the 2nd gendarme pitch, I had to put on my fleece too (now wool shirt, fleece, and wind-shell) and was still chilly for the remainder of the climb. Part of that was also the late hour of the day, since we were approaching sunset. Also we had a pretty sustained wind up there that was hard to escape. (Thankfully after we summited and got onto the south face where the scramble and all the bivy sites are, that side was not in the wind, making it possible to be comfortable with all my layers on. If it had been windy on that side too, I would have survived with all my layers on, but it would have been kinda miserable & challenging.)
- other gear notes:
- Katadyn BeFree – a nice-to-have, I’d bring it again. (The three places I got water: a strong stream of snow & glacial runoff near the toe of the Complete North Ridge, at 47.48095, -120.89454. A weak & slow evening trickle off the snowfield just south & below the true summit. And at Ingalls Creek, at the footlog.)
- We had one shared stove: a pocket-rocket, a titanium pot, and one medium (220g) butane fuel canister. This single shared stove for a group of four worked perfectly. Having the medium-sized canister meant that we had a comfortable extra-margin of fuel, which I was glad for, as we did end up having to melt snow at the summit. A small (110g) fuel canister would have been okay, but I bet if we had that size that it would have run out during the snow-melting, likely yielding just-enough melted water to get by, but it would have been cutting it close.
- various “10 essential” things I carry got used more than I expected:
- iodine tablets – definitely used them at times. Sometimes I needed to collect a lot of water, but didn’t have the time to sit there and slowly squeeze all of it through the BeFree. Better to just drop in some iodine, then go do other camp-chores.
- ibuprofen – there were some takers in our group
- my spare lighter – handy when the lighter that had been with the stove was temporarily misplaced at camp
- spare AAA batteries – useful when my radio’s rechargeable battery died
- tape – I’m pretty sure I taped something, but now I can’t remember what.
- headlamp, of course. I also had a spare headlamp. I even used the spare briefly: since our summit bivy was getting set up right as the day’s light faded, I put my spare headlamp on a rock at my bivy site and turned it on, effectively marking the site, making it easy for the second rope-team to find us when they arrived, and making it easy for me to find my own way back to it after I scrambled off to get water, go to the bathroom, etc.
- typical stuff, all was used:
- sunglasses
- sunscreen
- InReach (nice to let my emergency-contact know that we had summitted successfully)
- first-aid kit — okay, this wasn’t used, but I certainly wouldn’t leave it out
- toothbrush — okay, this was a small luxury, but I don’t regret it.
- long-handled spoon – necessary for dehydrated meal packs. I did leave out my cup, which saved an ounce or two.
- toilet paper & blue bags
- Food:
- I was happy with the food I brought. It was effectively just-right. I ended with just a trace-amounts of goldfish-crackers and gummy-candies left over. I ate every single bar I packed. (Here’s a photo of exactly what food I packed for this 3-day trip.) (I had made two PB&J sandwiches in addition to the food shown in the hallway food photo. However, I ate those before leaving the trailhead, so I figure they don’t quite count.)
- Trader Joe’s chocolate-covered espresso beans were a great way to satisfy my morning coffee needs without adding weight.
- Ursack, just the yellow “critter-resistant” one (5oz) – I carried it, and stored my food in it, and had no issues. I don’t know if it was entirely necessary though. My partners did not have an Ursack (and I could not fit all of their food in mine,) so they left their food in their backpacks overnight, and had no issues at either the low-bivy nor the summit-bivy. In general, I would recommend bringing a critter-resistant Ursack over just trusting your luck though.
- We did NOT bring any snow-related tools. (No ice axe, no microspikes, etc.) This ended up working out perfectly, we never needed them, so I’m glad we didn’t have the weight (nor the complication of hauling packs with ice axes, where you’d likely need to get the axe fully inside the pack so it doesn’t catch)
- I had the bottle-capacity for 5 liters of water. I was glad for this, as it allowed me to collect 5 liters in the evening at the low-bivy, and not have to collect any more in the morning. I drank a liter when I got up, and started the climbing route with 4 liters in my pack, which I think is the right amount to start climbing with. During our climb, there was an unfortunate incident where a party member hadn’t fully-closed their pack before hauling it, and he had two water bottles fall out, losing 2 or maybe 2.5 liters of water during that 3rd pitch, so close to the start of our day. I donated a full liter of water to him, so he & I effectively had 3 liters each during our time on the North Ridge. 3 liters worked, I was fine, but I was glad I started with 4, because otherwise we wouldn’t have had the margin to deal with an unexpected problem like that. Later, at the summit, I was able to collect water at a small slow trickle off the lingering snowfield just south of the summit, providing each person in our group an added 1.5 liters that night, useful for dinner and getting through the night. On the morning of our third day, the trickle had stopped, so we used our stove to melt another liter-per-person for everyone before starting down the dry Cascadian Couloir.
Some Pitch Notes
Our experience of the pitches while climbing the Complete North Ridge:
- scramble up below the 1st pitch
- lower three crux pitches:
- pitch 1 by the J-tree: It was reasonable enough to climb with a pack on up until the chimney. There the lead-climber (Jacob) hung his pack on a cam, then finished the pitch, opting to belay at the higher of two possible finishing ledges. When I arrived at where the pack was hung, he tried to lower a loop of the unused portion of our climbing rope to me so he could pull his pack up. However, our 35m rope was too short to get a loop all the way down to me. So instead, I kept my pack on, clipped Jacob’s pack to my belay loop so it hung below me, opted to aid: I grabbed the rope I was being belayed on, and used it to pull through the chimney moves. Grunty & not stylish, but it worked, and is probably faster than futzing with lowering a loop of rope anyway.
- pitch 2: relatively short & easy. I was able to lead this pitch with my pack on.
- Pitch 3: 5.9+ is right, I think this was the hardest climbing moves of the trip overall. A lieback, with the foot-smears getting moderately polished, and the crux comes when the crack gets shallow, so you’ve got less to sink your grip into. Also, we found pitch 3 to be exactly 30 meters. We had a 35-meter climbing rope, which worked perfectly. We definitely hauled packs on this pitch, and our haul-cord was a 30-meter Petzl Rad Line, and it only exactly reached, there was no spare distance in the haul line, which made it really difficult to get the pulley system set up and started. We had to start with the pulley low, in an un-ergonomic position, get the packs up a ways, then attach a second pulley at a higher anchor, and once that higher pulley was loaded we could take out the first one, then hauling went smoothly. If you are hauling and your line is only 30-meters, you could extend it by adding a cordelette between the packs and the rest of the haul-line. Once the knot between your cordelette and haul line reaches the pully, your packs will be very close to the top and you can pull them up by hand.
- The simuling after the lower three crux pitches (go right) was surprisingly hard climbing movement at first: sustained 5.6 with some 5.7 moves. Using microtraxions or tiblocs in a few places to guard against follower-falls really helped our confidence, otherwise we might have had to pitch out those pitches. It was probably 300’ of travel before the difficulty eased off to a more comfortable movement for efficient simuling. I would simul through those hard moves again, with the same liberal use of microtraxions. It was concerning because we were worried that if the whole North Ridge was that difficulty-rating as well, it would make simuling overall slow, and really shorten simul-blocks because we’d be placing so much gear. Thank goodness it eased off, and then our speed really picked up. You should probably be climbing strong enough that you could entirely simul some other 5.6 route before getting on this, like Liberty Bell Beckey route, or R&D.
- shortly after getting above 7000’ the difficulty of movement eased off, to more of a 5.4 average (ranging between 3rd class and occasionally one 5.6 move at times) There our speed and distance between pro placements really picked up.
- two bivy rock-rings at 7500’, and each could fit two humans if they snuggled close. For us, it was an excellent place to sit and take our first significant food & water break since getting on route.
- another nice ledge at 8000’, with a single nice bivy site (could fit two humans if they snuggled close)
- 8200’ notch had a lot of bivy sites, and even a small lingering snowfield. If you had to, you could melt snow with a stove to make water, but that amount of stopping-time would only make sense if you were staying there for the night.
- the upper north ridge simul-pitches before the Gendarme get really cool!! A lot of narrow ridge traversing. Very picturesque.
- the Gendarme itself:
- It gets chillier up there!! Layer up at the base, or before getting to the base. If there’s any wind at all, you’ll be especially cold at the tiny belay stance between the two pitches, and you won’t want to be getting things in or out of your pack at that stance.
- pitch 1: burly lie-backing. The crack is continuous, so you could place gear at any time, even french-free if needed. But it is indeed a hard pitch of climbing, very solidly 5.9. (It’s quite a bit harder than “Plum Pudding” at Index, it doesn’t feel right that both of those pitches are “5.9”.) Crux is at the top, so at least if you fall it’s probably a clean fall. We did a classic beached-whale-move at the top.
- pitch 2: the famous off-width pitch. Prior to actually climbing the route, I had long imagined this to be the crux pitch. Perhaps it’s because I expected it to be so difficulty, but I was surprised to find it was a bit easier than I expected. The “off-width” section is fairly secure first-sized if you have decently big hands and crack gloves (it was nearly an ideal size for me, it would be much harder for someone with smaller hands.) The off-width section is fairly short, about 10’ of climbing. One #3 and one #4 can really stitch it up thoroughly, and someone more confident would be fine just placing one or the other only. The fixed #4 up there is just after the crux, above that the climbing eases a bit. Go right at your first opportunity after that.
- also worth noting: How tired you are by the time you reach the Gendarme plays more of a factor than I initially imagined. It seem obvious in hindsight, but I didn’t fully digest it before: you’re definitely not climbing the 5.9 pitches here while fresh, you’re climbing them after you’ve already done 2300’ vertical feet of roped climbing, and your arms are going to be tired. I almost wish had been more solid at leading 5.10a trad before getting on this route.
- After the gendarme, we scrambled about 200’ of travel, (past a pair of bivy sites,) and ended up cliffed out at a rappel station. After a lot of down-climbing and exploring and time-wasting looking for a “faster” way around, I concluded there was no other way around, we did indeed have to rappel. I did the trick where instead of completely transitioning over to a rappel, I lowered Jacob through the steel quicklinks, then had him lower me, which was slightly faster than a traditional transition to rappel.
- After the rappel, there’s that one more pitch of 5.7 / 5.8 crack climbing. It’s short, and it is relatively easy, it’s just daunting with a pack on. After having done the rappel, you can scramble up to the base, and get a proper lead-belay for that pitch, if it makes you feel better.
- From there on out, there is still a surprisingly large amount of “easy” simul-terrain to go to reach the summit. It’s still 500′ vertical feet away. It just keeps going, and going, and going. In my mind, I had thought the Gendarme was close to the end, but in reality I think there’s almost a quarter of the route remaining above the Gendarme. It’s a lot. Amazingly, Jacob led it in one very very long simul-block to reach the summit. Also, go right, go right a significant amount, especially any time you need to get past something that looks harder during this section. The summit is more to the right than you think.
- The number of pitches we did:
- first three pitched out
- then Jacob & I did 9 very long simul-pitches between there and the Gendarme
- two pitched-out pitches on the Gendarme
- then kind-of 2 simul-pitches from there to the summit (though with the rappel early in there, breaking it up in kind of a funky way)
- ^ that totals to 5 fixed-belay pitches, and 11 simul-pitches, or 16 pitches total. And it’s all very time-consuming, because those simul-pitches were quite long, and many of the pitched-out pitches included the extra complication of hauling, which really adds to transition times. We were on-route & roped up for almost 15 hours. Some of that was just necessary waiting for delays outside of my control. If it hadn’t been for those, maybe I could have been 3 hours faster?? Hard to say.
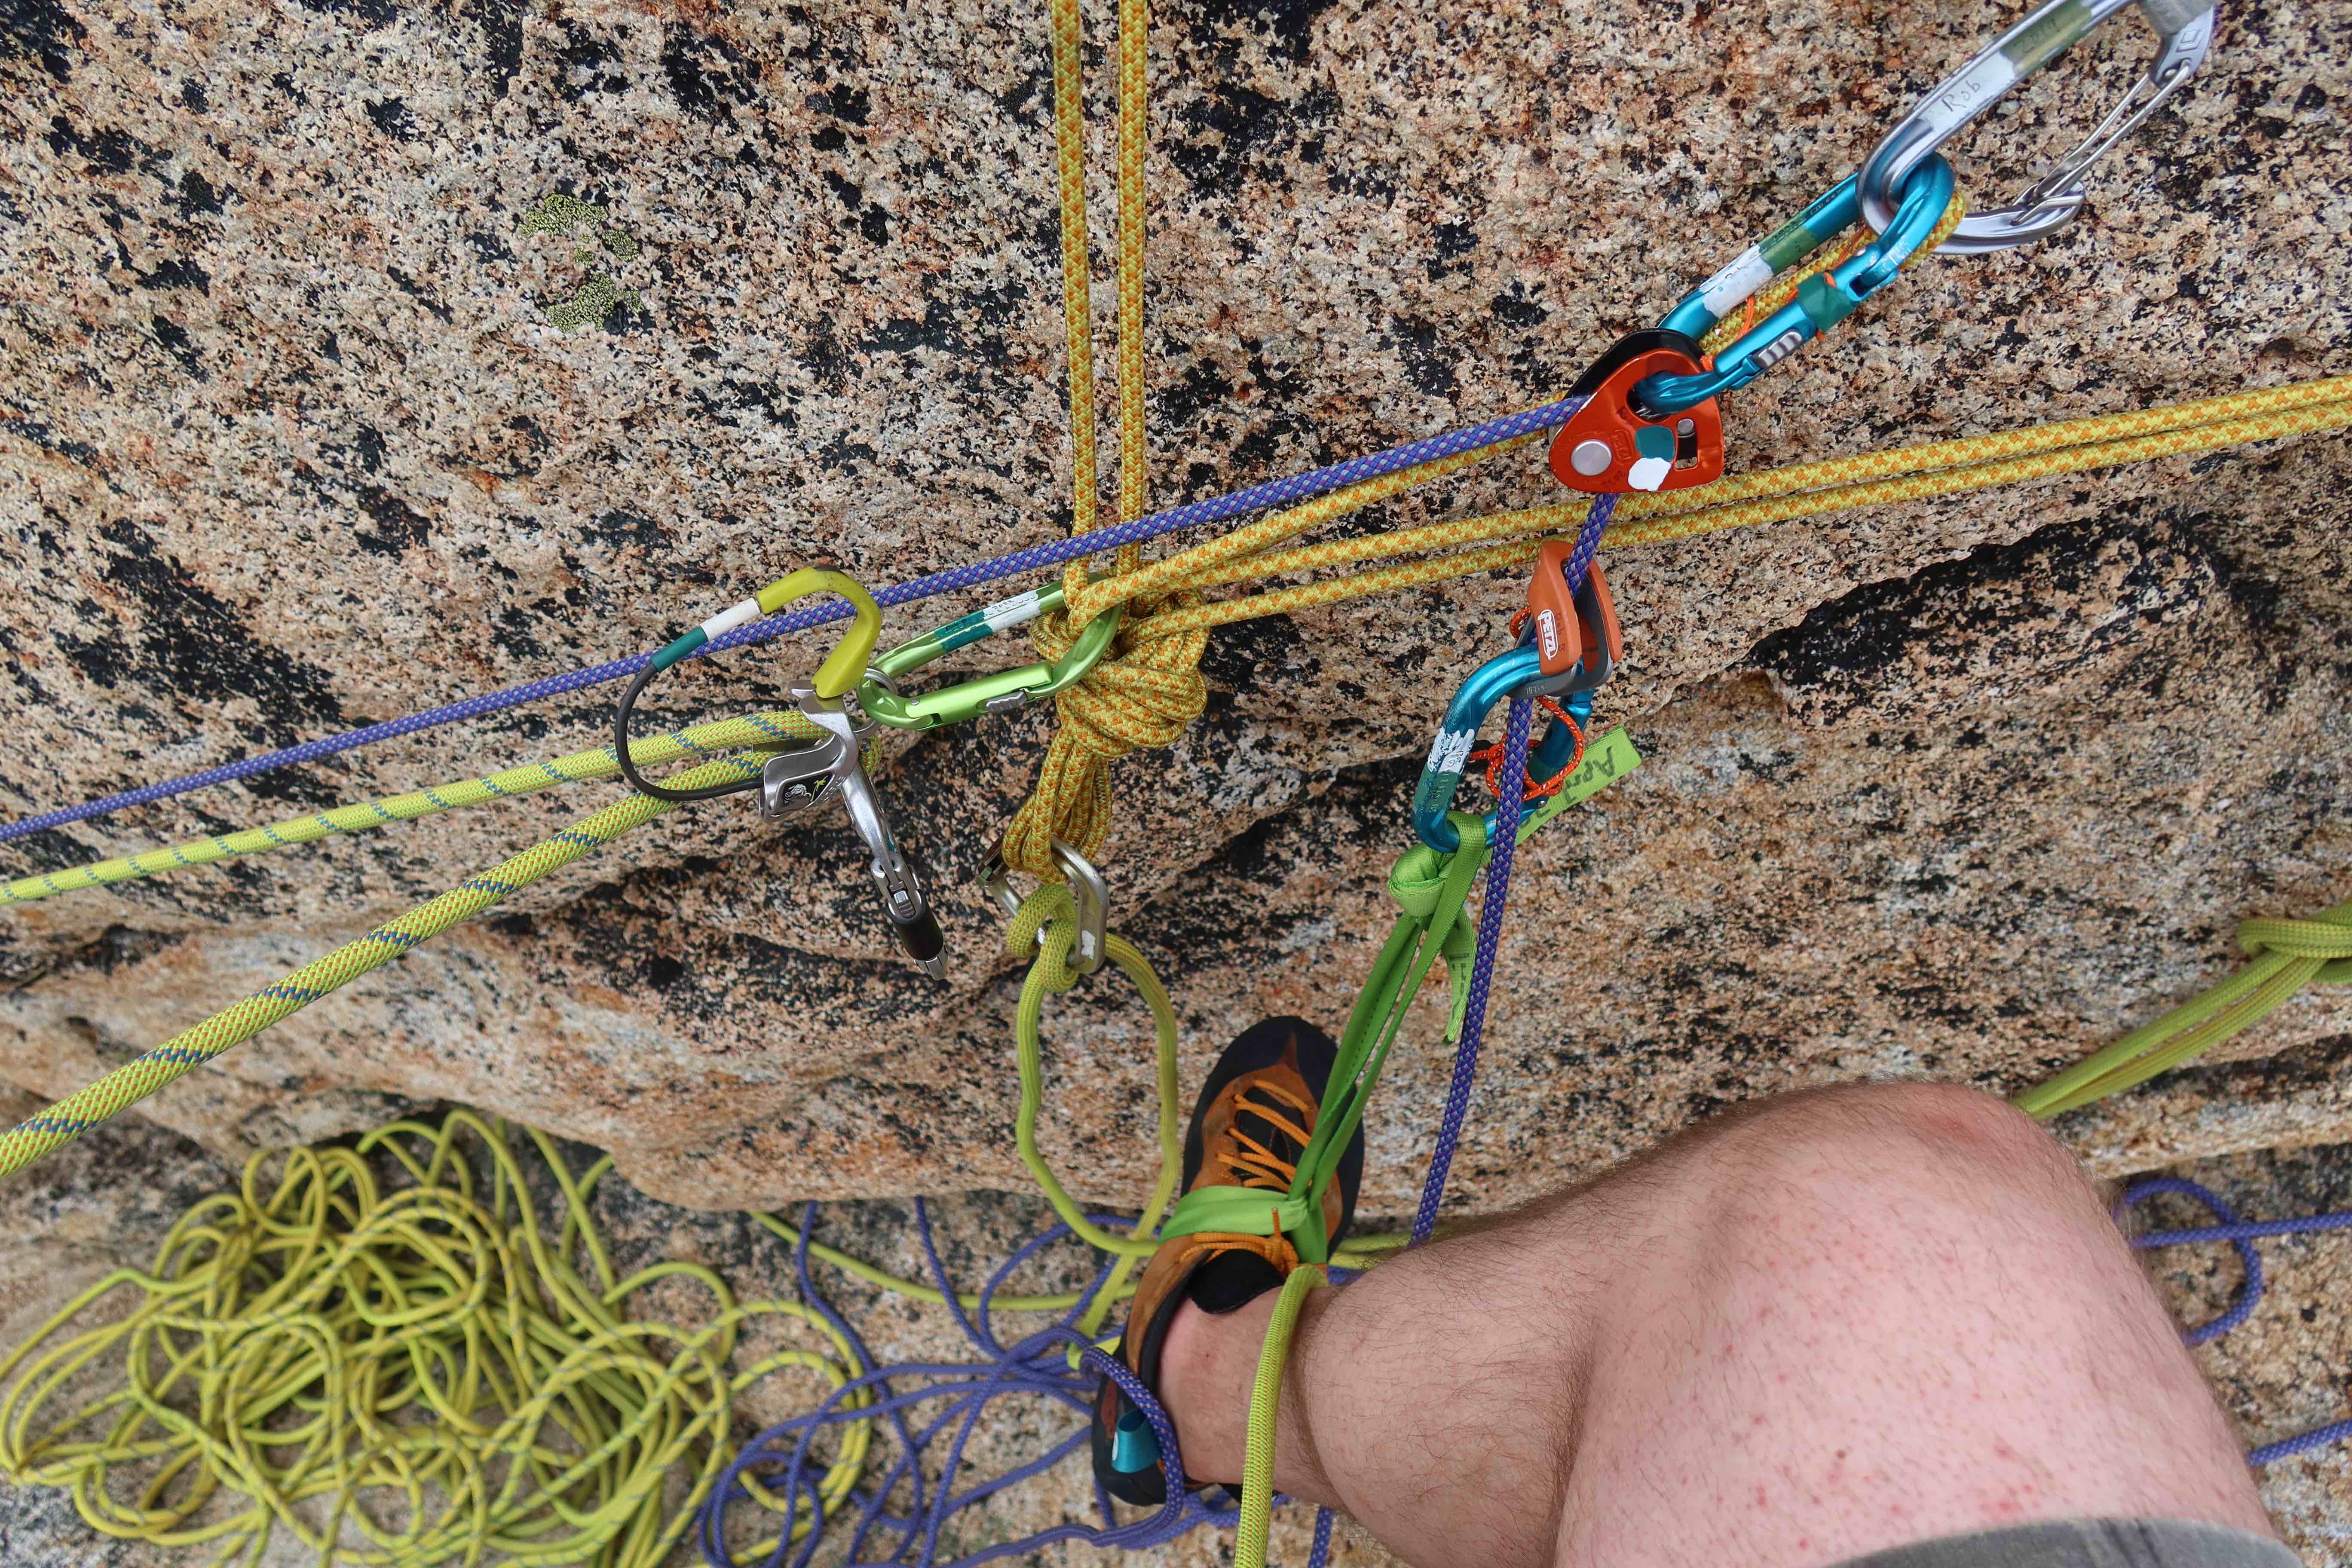
Hauling Packs
We opted to haul our packs on three different pitches: First, on Pitch #3 of the first 3 pitches at the beginning of the Complete North Ridge. Then, on both of the two Great Gendarme pitches.
I recommend bringing an additional locker for each end of the haul-line, plus a microtraxion-style pulley that you clip high on an anchor and is your progress-capture while hauling, plus a tibloc (or second microtraxion) which you attach to the pull-side of the pulley. Take a loop of webbing (a webbing single-runner works well) and girth-hitch it around one of your shoes, so it stays in place on your shoe. Clip the webbing to the tibloc, so that you are able to apply a pulling force by stepping down. Use your body-weight, not your muscles.
Determining if you are ready for the North Ridge of Stuart
There are three aspects of skill- and experience-building that are necessary before you make an attempt on the North Ridge of Stuart. (And I’m not talking about the fundamentals of leading trad, multipitch climbing, or mountain-sense for the alpine, those all go without saying long before any of this. Given that you already have multiple years of experience leading trad on multipitch alpine climbs, on top of that you also need…)
- You need to have prior experience climbing with an overnight pack.
- You need to have enough prior experiences simul-climbing that you have become quite fast at it.
- You need to be able to on-sight 5.9 trad.
Overnight Pack
If you haven’t yet had the experience of climbing with an overnight pack (and therefore figuring out & testing out your own minimal-weight gear setup for bivying,) then you should put the West Ridge of Stuart much earlier on your todo list than the North Ridge. And if you’re saying right now: “Oh I don’t need overnight gear, I’m gonna do it car-to-car in a day!” then you definitely better go do West Ridge in-a-day first. And remember, the North Ridge is literally an order of magnitude larger than the West Ridge. The roped climbing on West Ridge covers 300′ of vertical gain, and the roped climbing on the North Ridge covers 3000′ of vertical gain. Be realistic about what you can do in a day. And don’t pooh-pooh the idea of bivying, not only does it add a lot of safety margin, it can really enrich the pleasant memorableness of a trip. I cherish the memories of many of the incredible overnights I’ve had in these precious alpine places!
Simul-Climbing Experiences
The North Ridge of Stuart should definitely NOT be your first time simul-climbing. Nor should it be your second, and probably not even your third… Make sure you’ve had experiences simul-climbing on multiple other routes before you get on the North Ridge. Everyone knows that the whole point of simul-climbing is so that you move fast. But it’s not as simple as: “If you simul-climb, then you will move fast.” Simul-climbing is not the fundamental source of speed, experience is. Being fast comes from experience and repetition, doing a thing enough times that you’ve become smooth at it, the technical details of the skill become an afterthought, which also allows you to focus on other things, and further refine details. Do at least a handful of routes where you make use of simul-climbing so that you’ve accumulated enough repetition with it to get there. Here are a few route ideas where you could get additional simul-climbing milage:
- Blues Buttress on Poster Peak
- Southeast Ridge of Shuksan’s summit-pyramid
- West Ridge of Thomson
- West Ridge of Forbidden
- South Buttress of Cutthroat
- Northeast Ridge of Black Peak
- Serpentine Arete on Dragontail
Leading 5.9 Trad
It is important to be confident in your ability to on-sight 5.9 for this route, both because it’s committing (finishing the route up and over is virtually the only way out once you are high enough on the ridge to face the Great Gendarme, so you have to be able to climb it,) and secondarily (less critical but still important) because the route is so popular, you’ll almost certainly have another party on your tail waiting for you, so you have a responsibility to others to at least come into this reasonably well prepared to climb 5.9 efficiently. (And of course: once you’re actually on the pitch, if you need to take, and rest, and/or pull on gear, by all means do so!! The person on the sharp-end should always be given as much patience as they need, taking the time to prevent a fall is infinitely worth it, and saves everyone time in the long run whether they realize that or not. The responsibility is in the preparation, long before this climbing day, putting in the time at the gym and at the crag building the strength and the skill so that climbing the cruxes confidently and efficiently is likely to be a non-issue.)
Now that I have climbed the route, I will say that I had built the 5.9 cruxes up in my head more than they turned out to be in reality, they do feel like appropriately-graded modern 5.9, not some old-school 5.9+++ sandbag (looking at you, Castle Rock’s Damnation Crack…) That said, I’m glad I took seriously the preparation of getting good at leading 5.9 trad before getting on this route. How tired you are by the time you reach the Gendarme plays more of a factor than I initially imagined. It seems obvious in hindsight, but I didn’t fully digest it before: you’re definitely not climbing the 5.9 pitches here while fresh, you’re climbing them after you’ve already done 2300’ vertical feet of roped climbing, and your arms are going to be tired. I almost wish I had been more solid at leading 5.10a trad before getting on this route, to give myself a bit more margin of preparedness, though it did all work out fine with where I’m personally at now (which is that I feel solid leading 5.9 trad, and am somewhat breaking into 5.10a trad leads with a lot of takes.) I also think it’s important that all members of your climbing team are capable of on-sighting 5.9 trad leads, even if you have some plan where just one person is expected to lead those pitches, there are plenty of ways that plan could change once you’re out there and so far up this huge & committing route.
Here are some ideas for less-committing routes to gauge climbing-move-difficulty on:
- Inca Roads at Tieton – I consider this route a grade-defining 5.9, an ideal test-piece in general. However, Inca Roads is about straight-in-finger-locks, and utilizing small basalt edges for feet, so the climbing style is different than any of the cruxes on the North Ridge. But I still think you should go lead Inca Roads before attempting the North Ridge of Stuart, just because they are in a similar grade of movement difficulty.
- First Blood at Tieton – This “5.8” off-width just right of Mush Maker is mostly fist-jams for me, though perhaps a bit sandbagged at the 5.8 rating, 5.9- would probably be a more accurate description. Projecting this route until you can lead it clean is excellent preparation for the North Ridge. If you can lead this, (with multiple BD #3 and probably two BD #4 cams,) then you’ll have no problem at all leading the much-shorter & similar-width off-width section that’s famously on the Great Gendarme’s 2nd pitch (where a single BD #3 and single BD #4 will be plenty for the about-10-feet of offwidth found within that pitch.)
- Air Guitar at Vantage (Frenchman Coulee) – Although rated 5.10a, I hate to say it, but I think Air Guitar is pretty soft for the 5.10a grade, and is more on par with 5.9’s found elsewhere. By all means go lead it, it’s good practice, but don’t consider it assurance that you are ready for the 5.9 on Stuart, as some of the Stuart cruxes felt like harder movement than Air Guitar to me.
- (Scary) Canary at Leavenworth’s Castle Rock – The old 5.8 rating on Canary is bullshit, Canary is definitely 5.9, if not maybe 5.10a. If you can cleanly lead the 1st & 2nd pitches of Canary, then you can lead the crux pitches on the North Ridge. (I do recommend the Old Grey Mare start-variation to get at least one piece of pro in early, before making that groundfall-risking traverse into Canary’s 1st pitch.)
- Outer Space on Leavenworth’s Snow Creek Wall – That 3rd pitch which is the 5.9 crux pitch of Outer Space is a pretty good representative of the climbing difficulty found on North Ridge’s crux pitches.
- In Leavenworth’s Purina area, Poison Ivy Crack (5.9-), Glass Eye (5.9+), Existential Exit (5.10a), and perhaps Exit Wound (5.9+?) are all good opportunities to get more mileage leading moves in the same ballpark of difficulty.
- Plum Pudding at Index – Plum Pudding is pretty soft for a 5.9, but the style of climbing is a similar type as some of the crux-pitches on North Ridge: lie-backing up a corner system, smearing your feet, and placing pro in a crack you’re not lined up well to see into. Plum Pudding should feel like an easy-breezy lead for you. Go into the North Ridge knowing that the pitches that await you there are like Plum Pudding, but a half-notch harder difficulty.
- Godzilla at Index – Even at 5.9+, Godzilla still strikes me as a bit of a sandbag, it’s a heck of a thing to lead for a 5.9 climber. The layback section is excellent practice for North Ridge, since it’s a similar style, but Godzilla’s lieback is perhaps a half-notch harder than the North Ridge liebacks. Overall, leading Godzilla is an excellent test of readiness for the climbing difficulty on North Ridge, since if you can lead Godzilla, you can be confident in your ability to lead any cruxes on the North Ridge.

Wow great write up! Just curious – what did you do to protect your packs during hauling? I can’t imagine you brought a dedicated haul bag on this trip. Did you use a pack protector of some sort?
Thanks so much! About protecting packs while hauling: the simplest/lightest solution is to simply not worry about it too much 😂 Yeah, whatever pack you bring is probably going to get a few new scuffs on it as a result, but with only three pitches of hauling, it’s not too bad, it’s not going to ruin the average climbing pack. And a few new scuffs give that pack more “character” 😁 I certainly wouldn’t want to bother with any kind of “pack protector” that was extra-gear, since I’m already really scrutinizing the total ounces & keeping the pack as light-as-possible for the sake of all the non-hauling pitches where I have to climb with the pack on my back.
I brought an Osprey Mutant 38, which is such a personal-favorite pack of mine that I happen to have both an old one that’s pretty worn out but I hadn’t thrown out yet, and a newer one that I bought to replace it. So when I did this climb: I just brought the older one, so that any new scuffs really didn’t matter. But even if I had brought the newer one, sure there would have been some scuffs, but I’m pretty sure it would have been fine. Tools not jewels ☺️ Two of the other people in our party-of-four had Hyperlite Mountain Gear packs (I think it was the Headwall 55?) The white dyneema parts of those HMG packs did very well at the abrasion-resistance, for the most part shrugging off new scuffs.
Perhaps the most important thing to note here: have as LITTLE as possible attached to the outside of your pack while hauling. Ideally no items at all attached on the outside of the pack, since it’s those attached things that are most-likely to get badly scratched up, plus any hard-objects encourage abrasion at the attachment-points themselves. The more the outside of the pack is clear and “soft”, the less abrasion is likely. For example: I often have a tiny keychain-thermometer hanging at a point on the outside of my pack, and an after-market hip-belt-pocket add-on, and I was careful to take both of those items off and put them in a inside-pocket, at least for the duration of the roped-climbing portion of this overall trip. If you wanted to go even further and be really-extra-careful, you could try to pack your pack so that no hard-items on the inside are touching any pack-walls. E.g. a rigid stove-pot pressed against a pack wall creates a hard-spot, where the pack-fabric is more likely to abrade if that specific spot rubs against a rock wall. But if you wrap the rigid stove-pot inside a puffy-jacket before putting it in your pack, strategically placing some padding, then the pack-fabric has the soft puffy behind it when that spot rubs against the rock wall, making abrasion far less likely to happen.