
February 26, 2016
At last!! This was the 6th time I had blocked out a date on the calendar to climb this route in winter conditions, but it was the first time that I didn’t have to cancel it due to poor avalanche conditions or poor weather. We finally did it, and we actually summited! It helped that I had also done this route during the summer as a rock climb (Sept. 4, 2015) so I was already familiar with the route & approach. This has also convinced me that if you want to do this route in the winter (or most any winter climb) scheduling it far in advance and crossing your fingers for good conditions is futile, don’t do it. Instead, build a list of like-minded climbing partners you can call on, all of whom are interested enough in the route that they’ll take a vacation day on short notice to do it. Wait for the good weather and safe avalanche conditions to come first, then schedule the climb opportunistically. Personally, I wouldn’t do this climb unless NWAC predicts “Moderate” danger or lower. If you see three consecutive days of no precipitation coming down the pipeline in the weather forecast, odds are you’ll have stable enough avy conditions to climb during that third day. Still, confirm NWAC’s forecast before you go, and make good decisions for yourself.
Weather & Avy Forecasts (for future trip planning)
http://forecast.weather.gov/MapClick.php?lon=-121.46658&lat=47.45741
http://www.mountain-forecast.com/peaks/Chair-Peak/forecasts/1901
http://www.nwac.us/avalanche-forecast/current/cascade-west-snoqualmie-pass/
The key points of our February 26th trip
- party of 4 (myself and Nate as one rope team, Abby & John as the second rope team)
- approached with snowshoes via Source Lake winter route
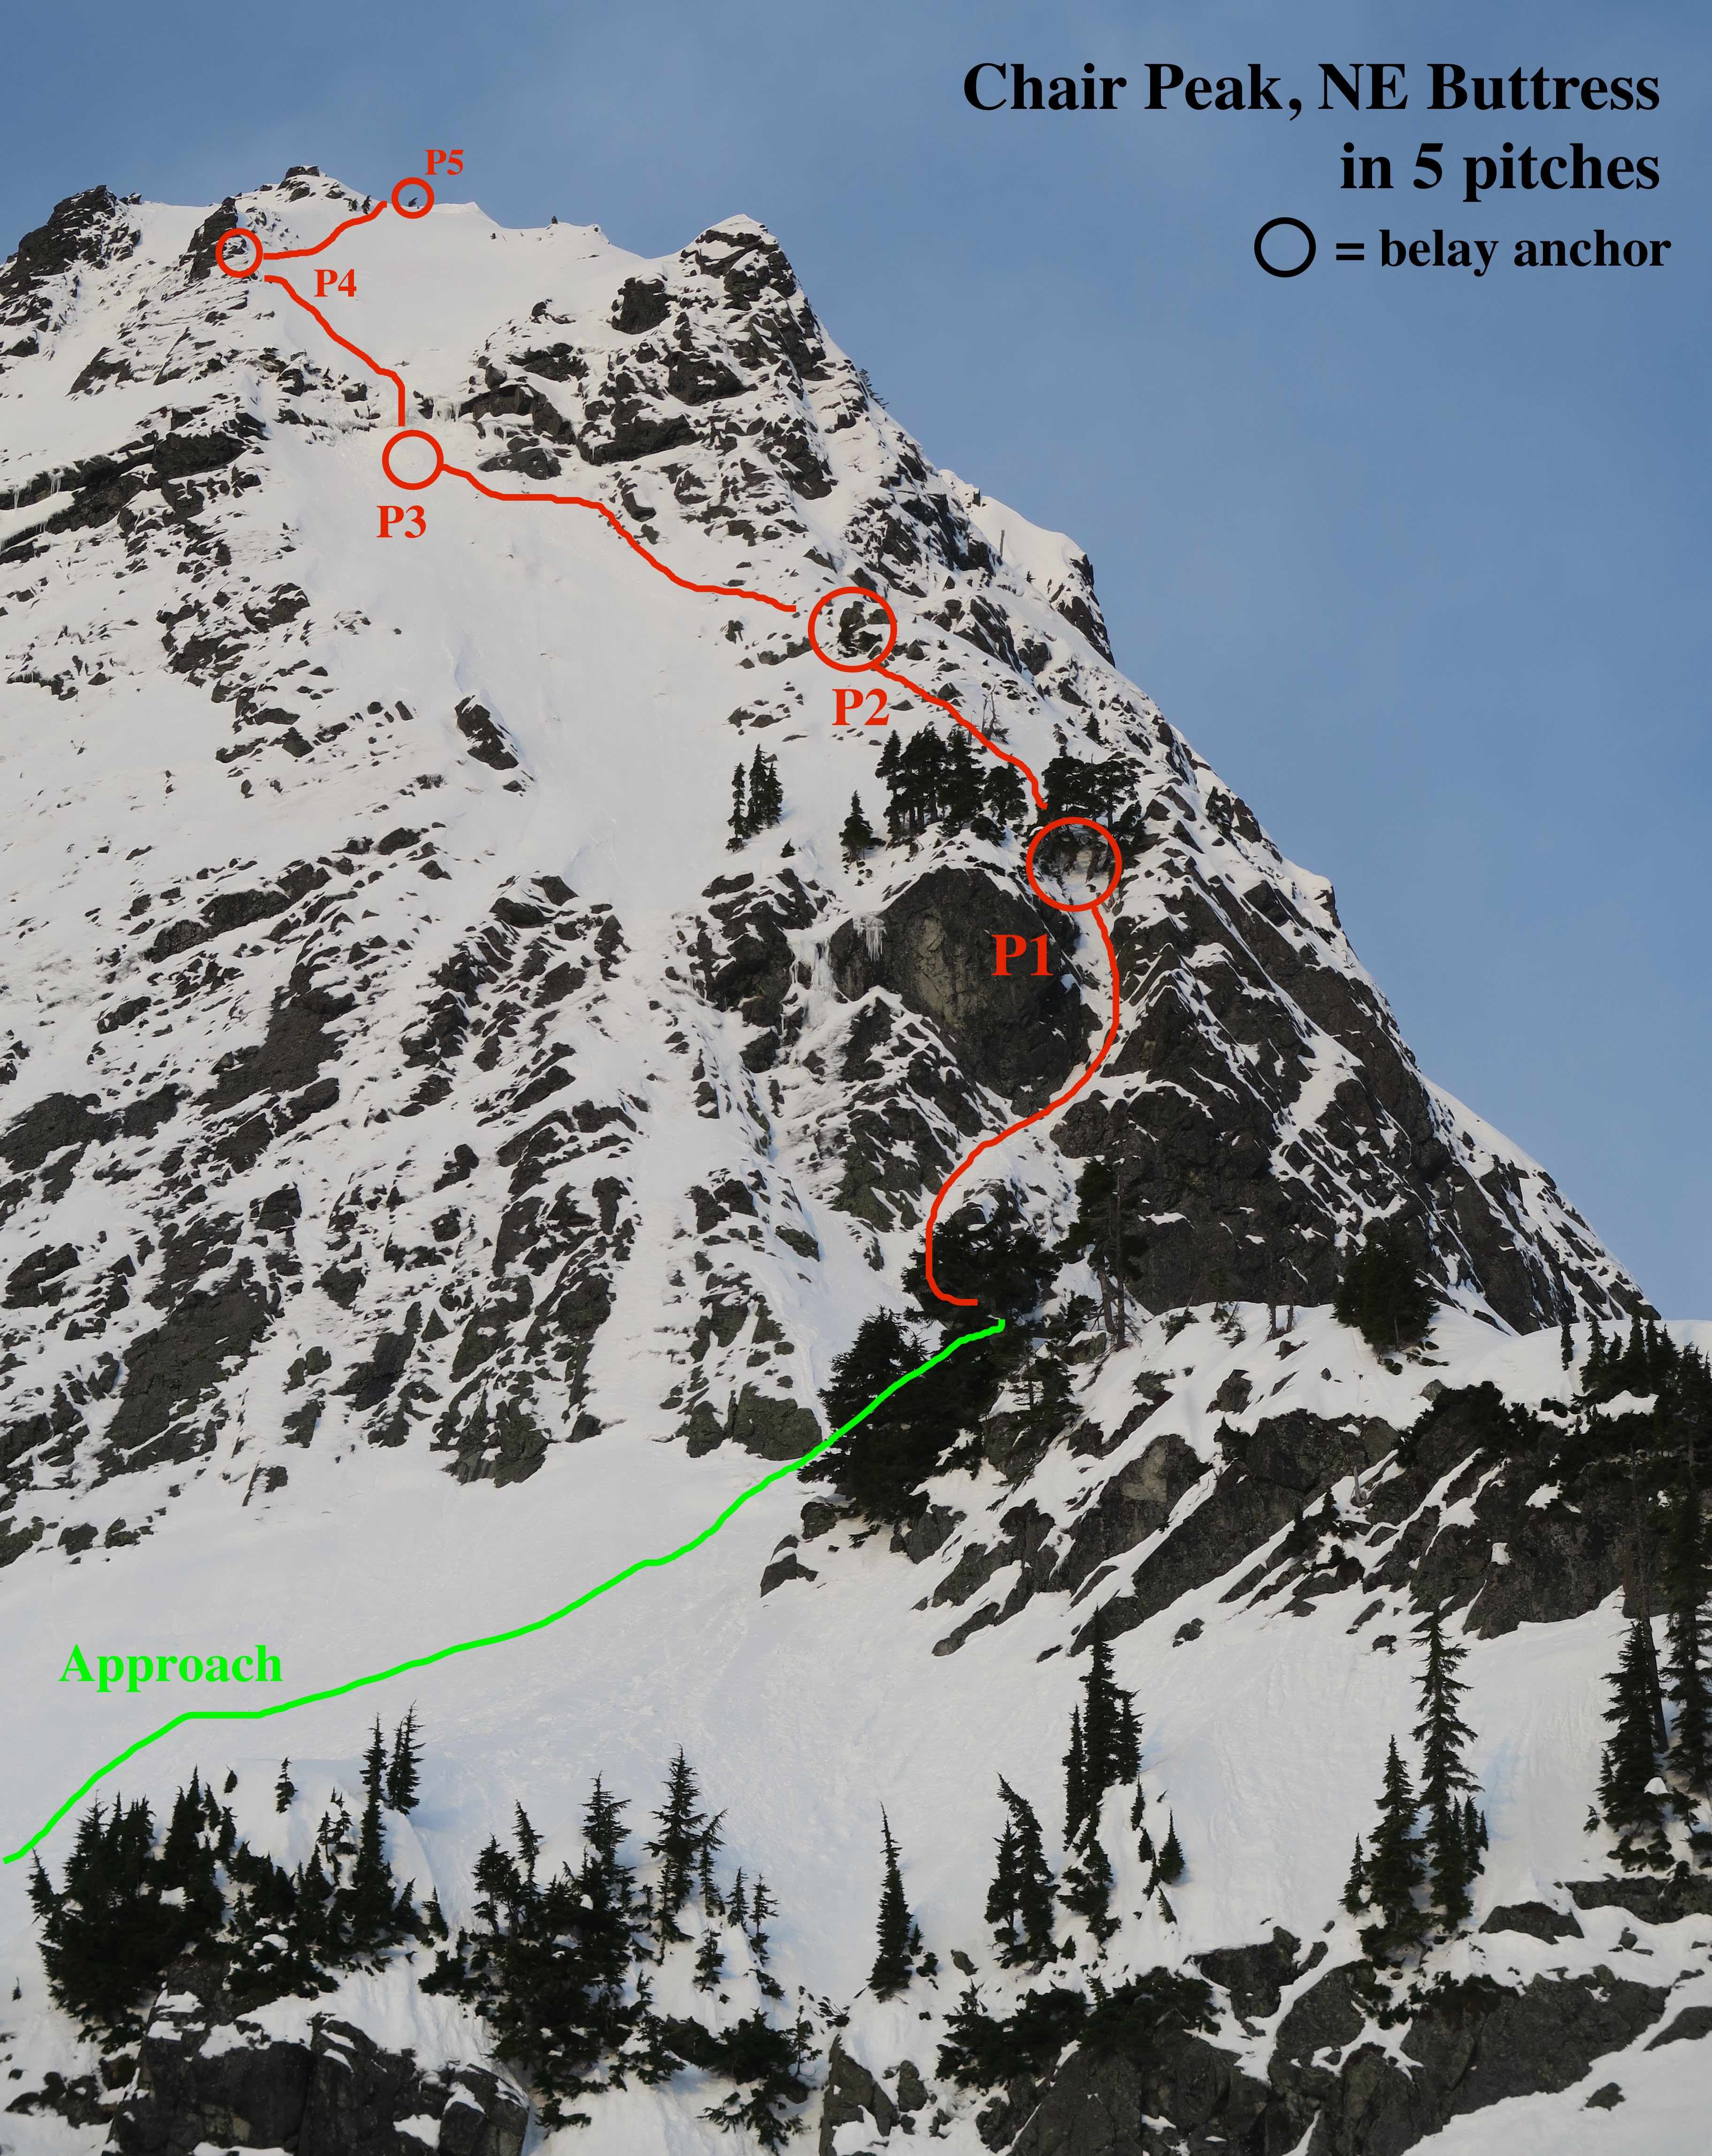
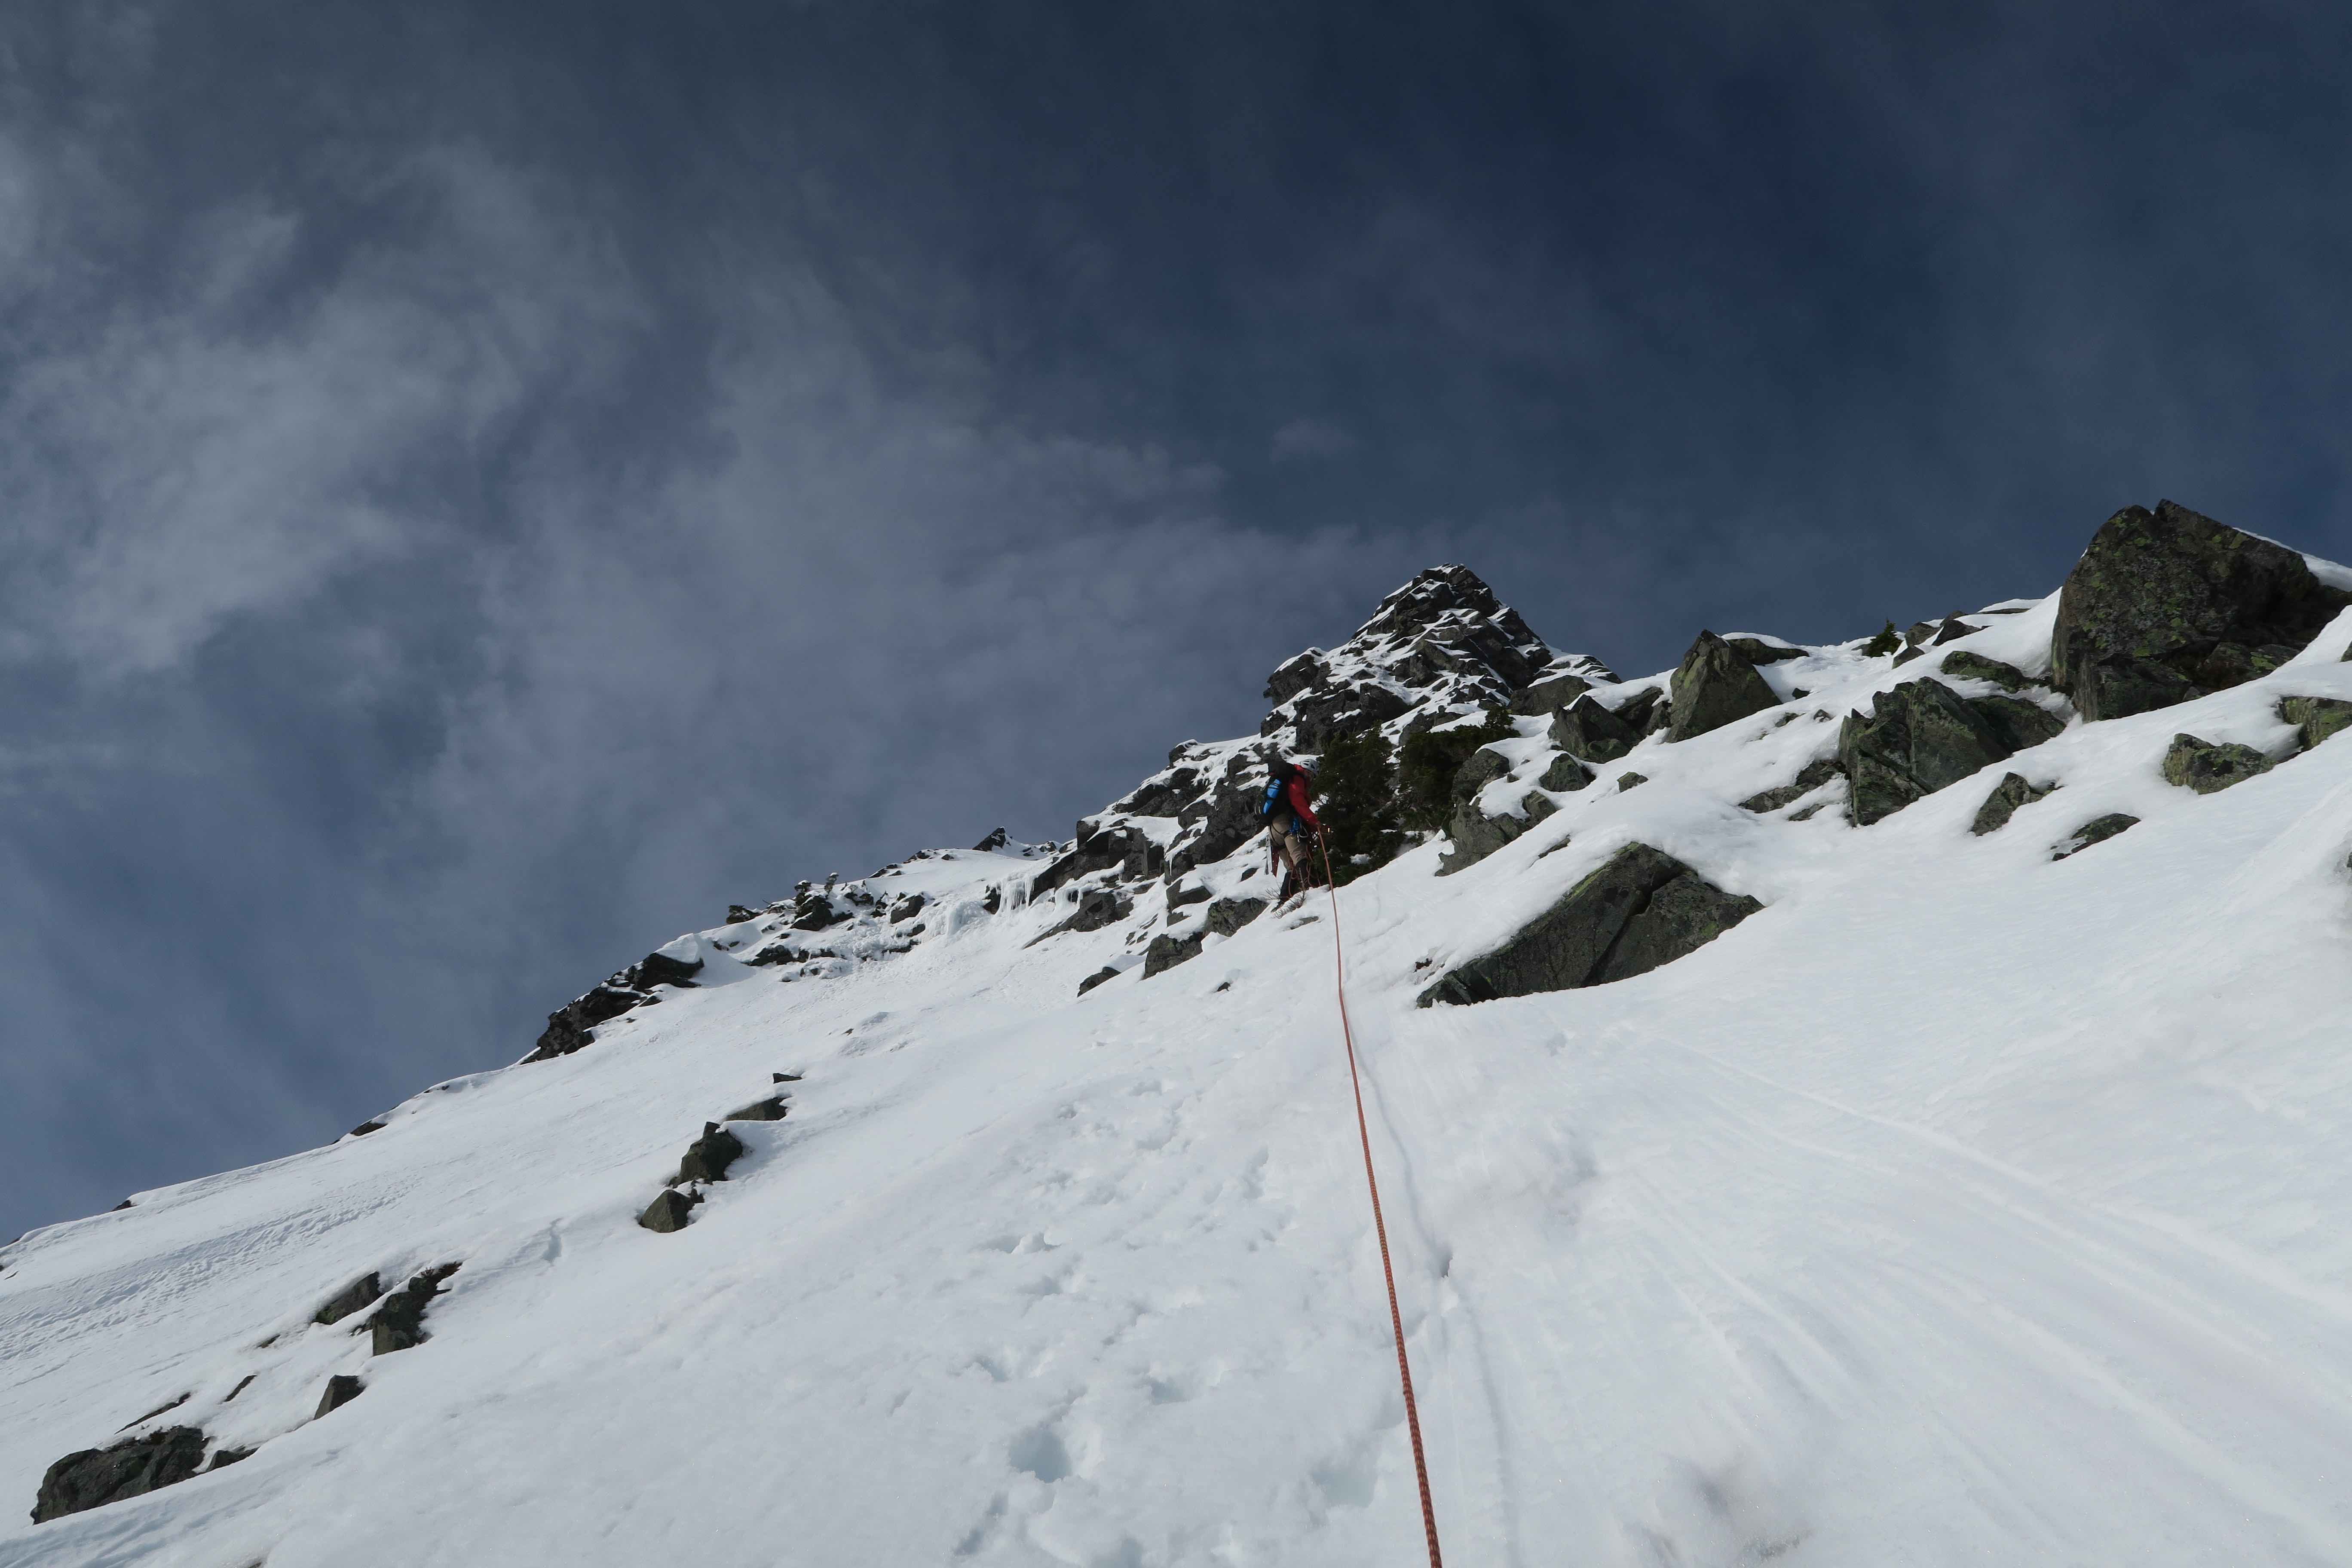
- 5 pitches. Cruxes were mixed climbing (thin snow over low 5th class rock) on our 1st pitch, and a short but very vertical 10 foot section of water ice on our 4th pitch.
- Carried over (bringing everything but the snowshoes) and descended the rappel route south of the summit. Just one 60m (double-rope) rap there, plus a fair bit of steep snow down-climbing.
- To our surprise, it turns out Colin Haley and Alex Honnold climbed the route the day before us. We quite literally walked in their footprints at times.
Elevations
- parking lot: 3280’
- Source Lake: 3750’
- Thumbtack: 5100’
- route base: 5600’
- summit: 6238’
- rap station: roughly 6000’
Times
I would recommend 5:00am start at Alpental. We intended that, but small snafus made us start closer to 6am. Once we were going, we were fortunate to have everything go very smoothly for us, with almost zero needlessly-lost time, giving us a car-to-car time of 11h20m, broken down as follows:
- 3 hours for approach (50 minutes parking lot to Source Lake, 1h10m Source Lake to Thumbtack, 40min Thumbtack to route base, caching snowshoes near a tree on the way)
- 20 minutes gearing up at the base
- 4h10m for both of our rope teams to climb 5 pitches
- 2h30m for descent (30min to coil ropes and scramble down to rap station, another 30min at rap station replacing old tat, tying ropes together, and tossing them, then 40min for all 4 people to rappel, another 40min slowly plunge-stepping very steep snow to get back to our cached snowshoes)
- 1h20m snowshoeing out from there
Gear notes
- Snowshoes for approach (Some kind of floatation is essential. Skis would have been more fun for the descent, but would mean more weight, as I’d probably carry mountaineering boots in my pack, and cold toes trying to switch boots at the gear-cache point.)
- avy beacon/probe/shovel (as always, this philosophy: http://avyupdates.blogspot.com/2012/03/in-case-im.html)
- pair of ice tools (I was glad to have two tools at the cruxes, even though a mountaineering axe would have plunged better in the snow on the rest of the climb. I might recommend removing any finger-rests or protrusions from your ice tools’ shafts before going on this climb, if your tools allow it.)
- crampons (steel, very secure boot-fit, and horizontal front-points)
- 60m rope
- set of nuts (only used smaller to medium sizes)
- cams: BD #1 and smaller. The little blue BD #0.3 was especially useful for me. Opportunities for rock pro were somewhat rare, and the few decent cracks that did exist were quite small.
- 2 or 3 pitons: knifeblades or bugaboos, for cracks that are too thin for nuts (good advice on pitons: http://www.rescuedynamics.ca/articles/pdfs/Pitoncraft.pdf)
- 3 or 4 ice screws (two for a belay anchor, plus one or two for leader-pro)
- pickets: we brought 4 per rope team, but the snow often wasn’t strong or deep enough to place them. I’d bring 2 per rope team next time.
- slings: 4 singles, 5 doubles, seemed about right
- cordelette for rigging some anchors
GPS Track
Here’s my gps track from the day. The GPS goes a bit crazy on the climbing/descending parts of the route, so ignore the squiggles there, and just use for info on the approach.

Approach
Park at the very end of the Alpental Road so you can take the winter route directly to Source Lake. No parking pass of any sort is needed here, since the ski resort owns this parking lot. That route begins as a groomed cat track going past the ski resort’s explosive storage shed, and eventually becomes just a skier’s skin track, and stays on the west side of the valley’s bottom the whole time. You do NOT want to park at the Snow Lake trailhead or use the Snow Lake trail for approach, it adds unnecessary distance in the winter.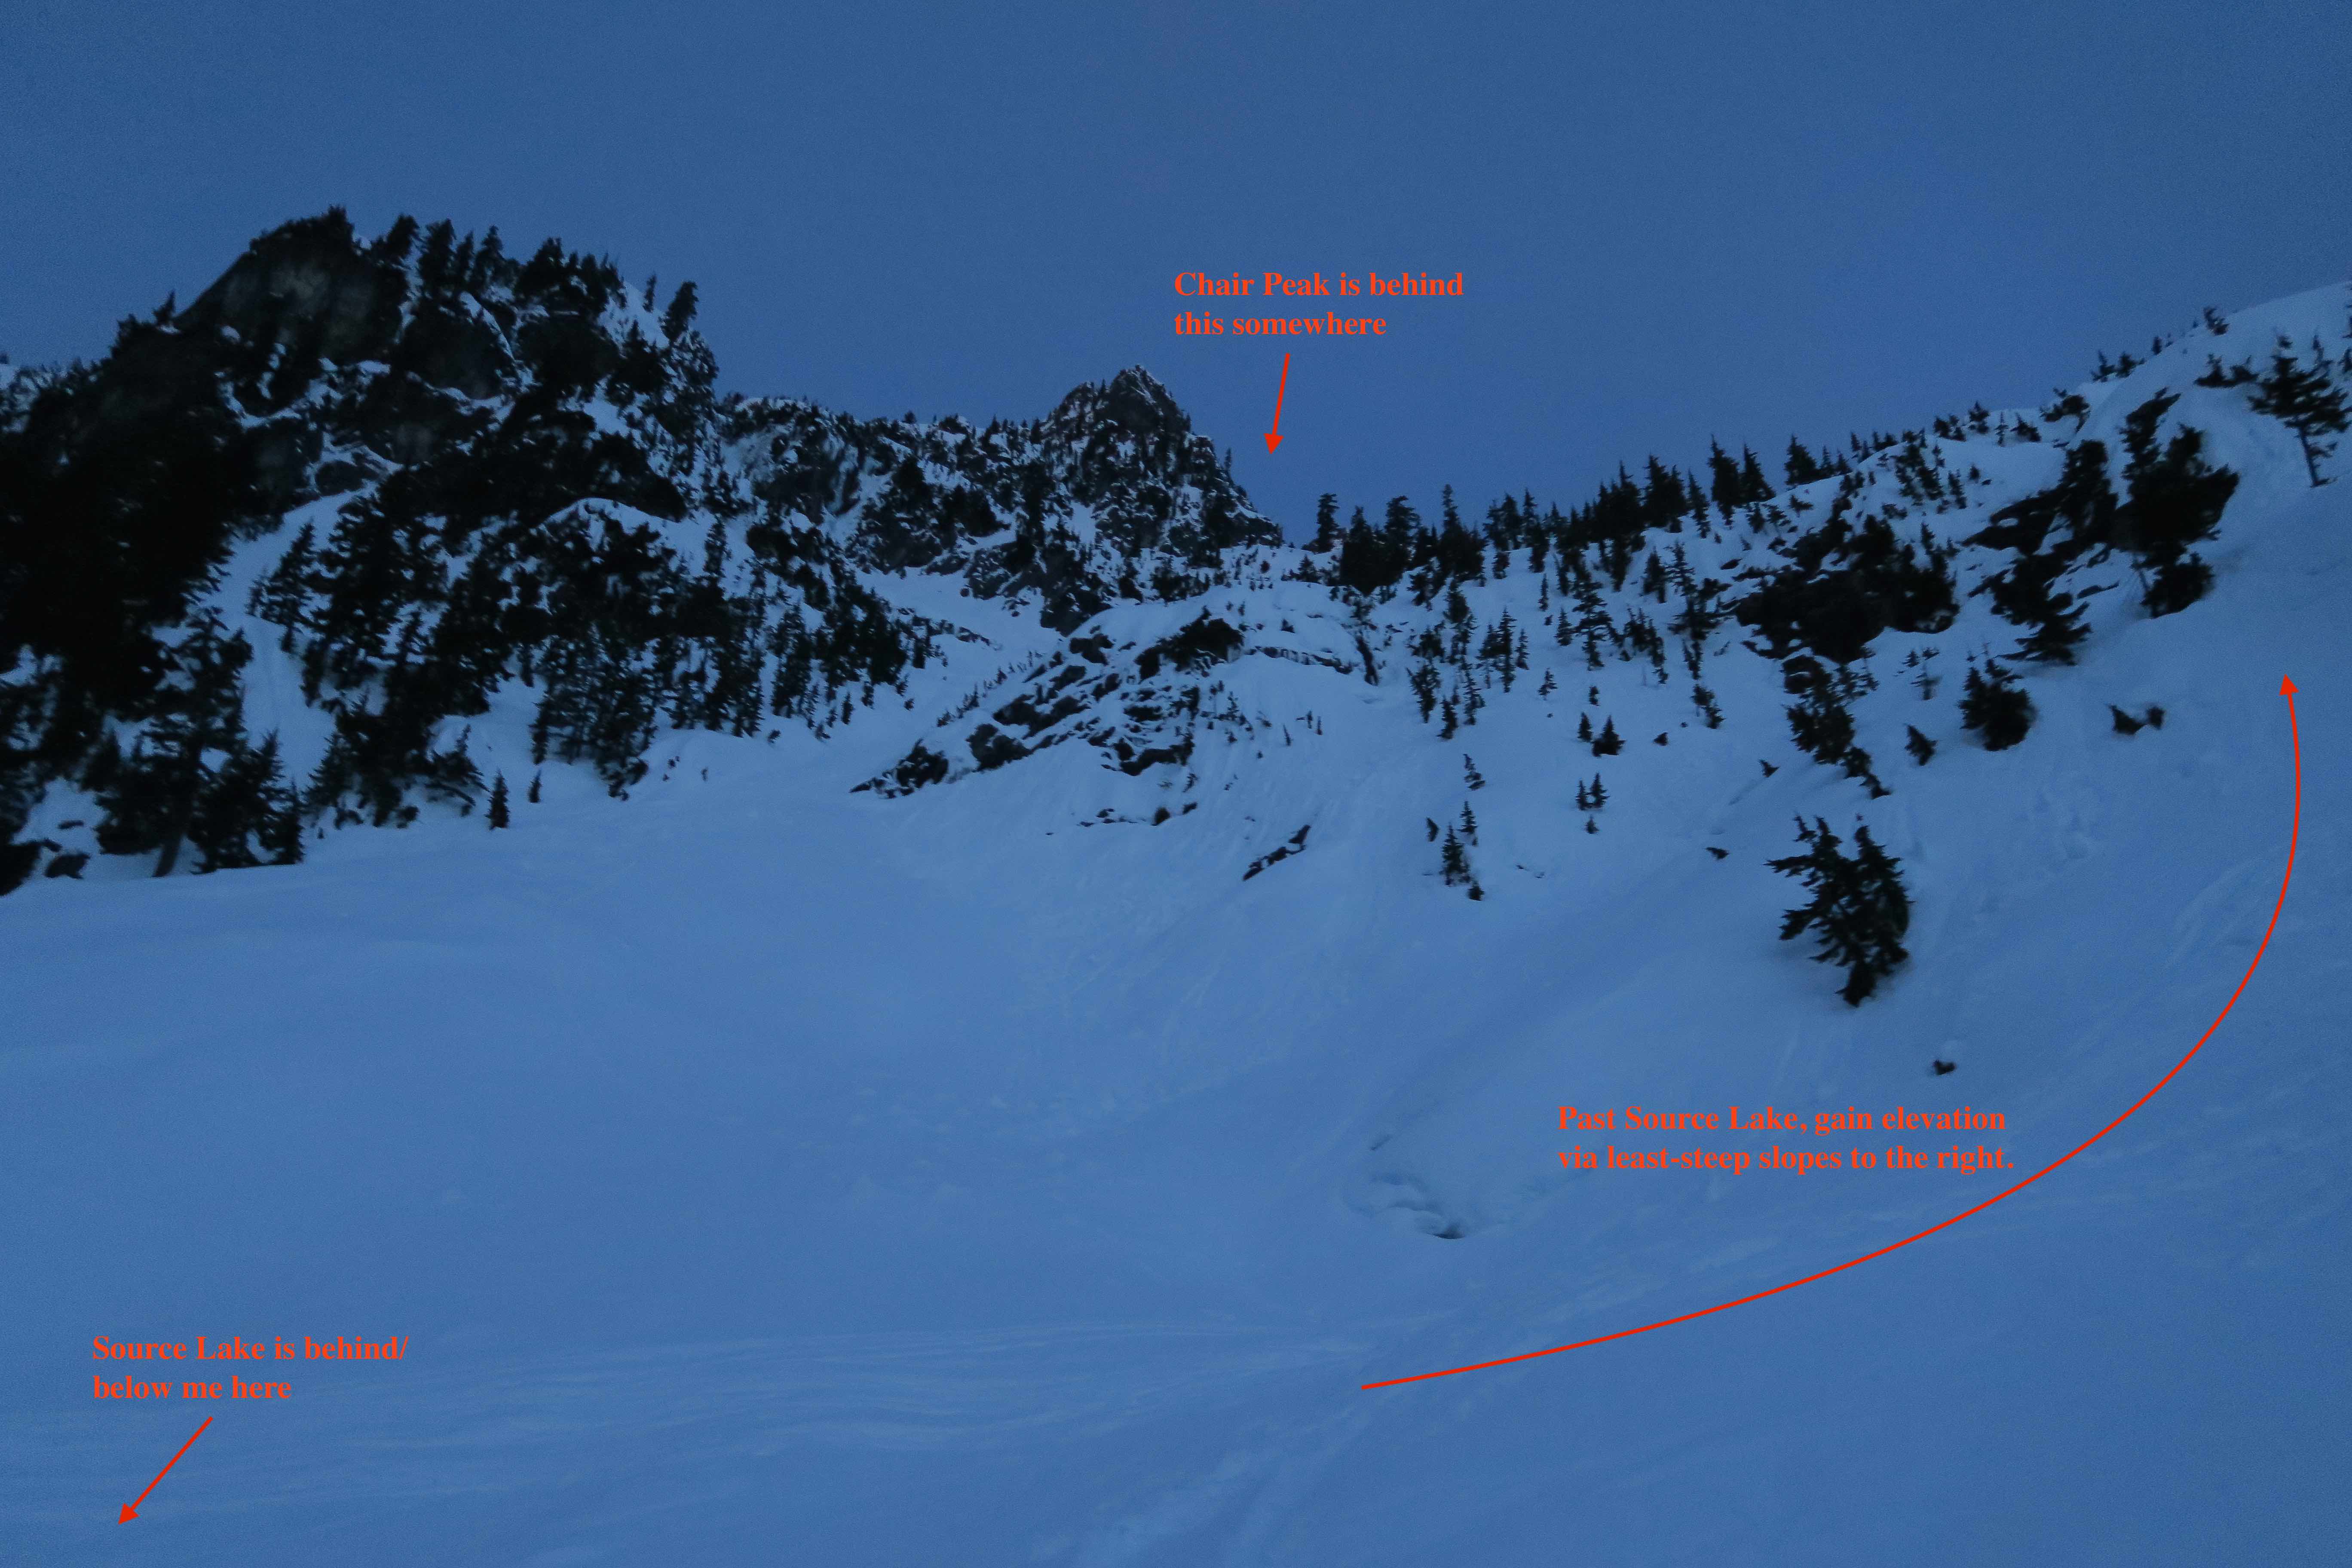
After passing Source Lake, head uphill, but not quite straight at Chair Peak. Veer right and follow the path of least resistance (i.e. the least steep slope) to gain some elevation. When it looks easy to turn left and head straight at Chair, do so (around 4500’-ish.)
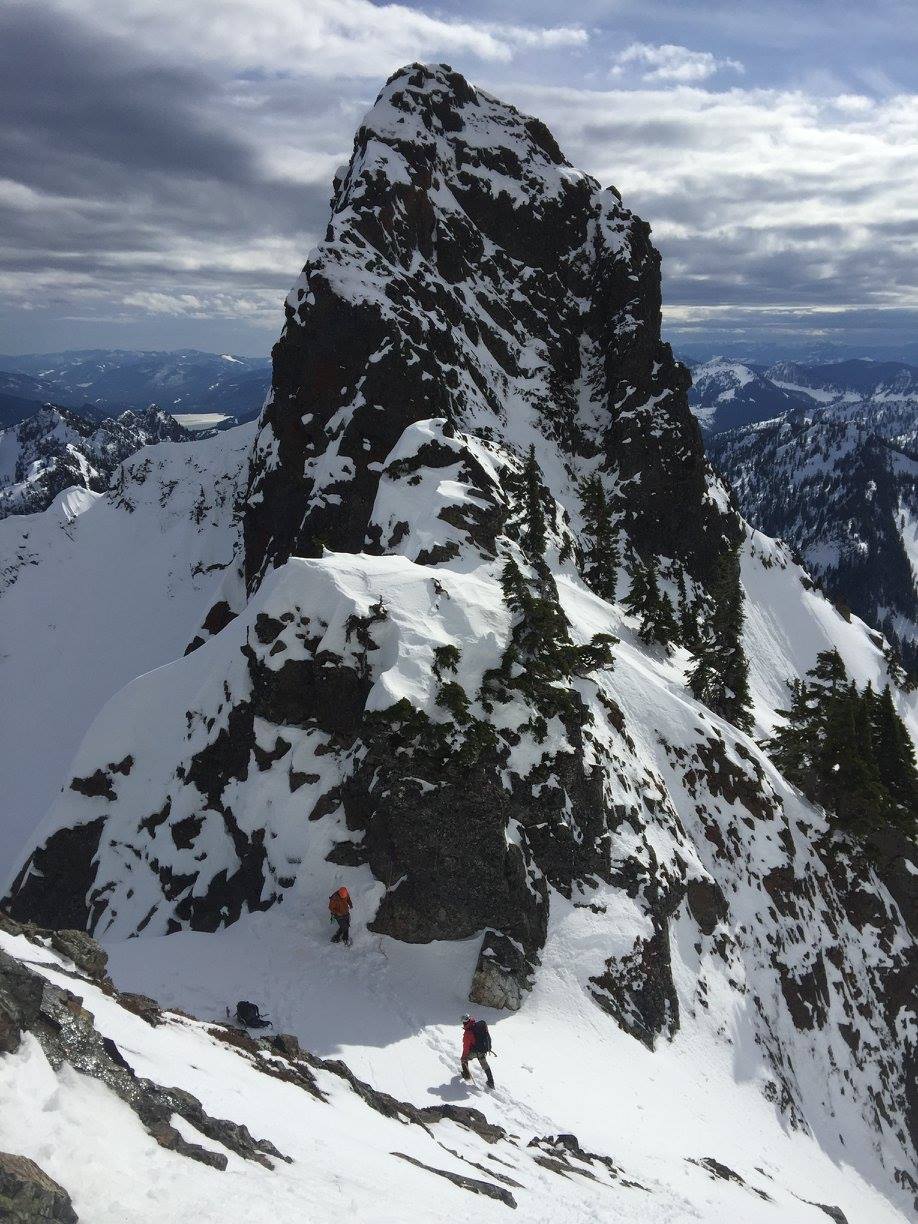
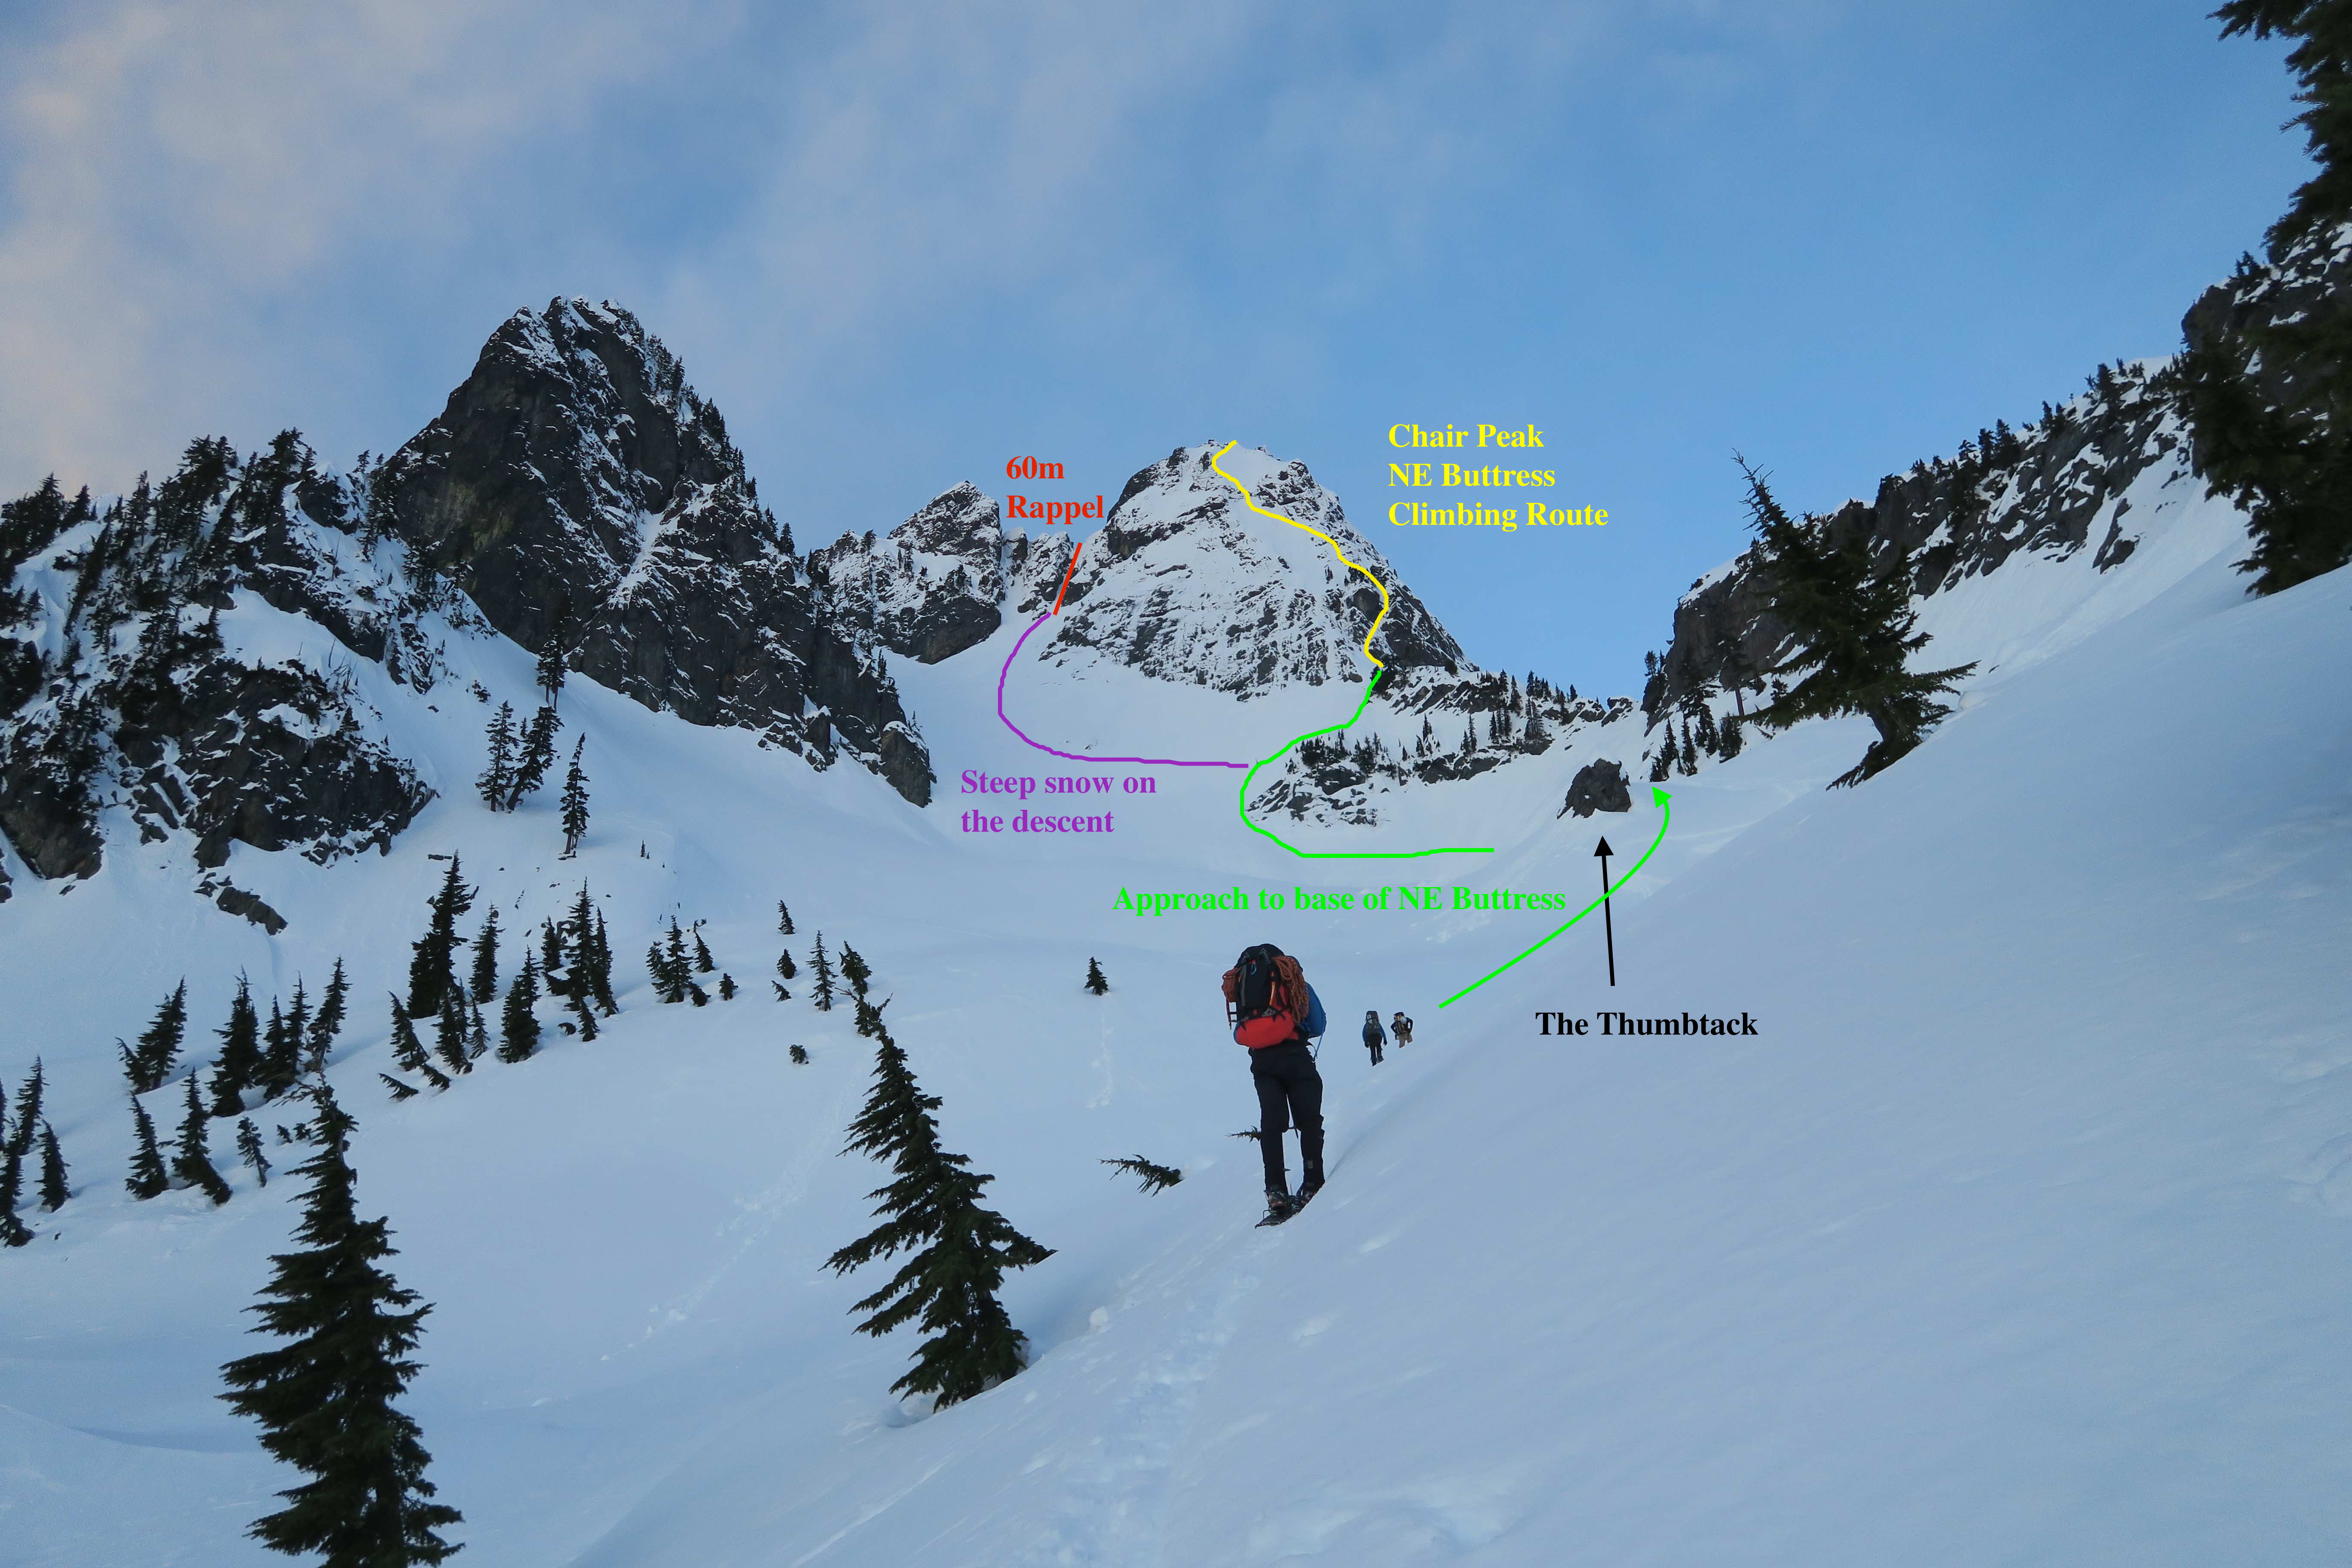 We passed by the Thumbtack, and picked a lonesome little “Charlie Brown” pine tree in the bowl that was roughly at the center of the Y that would be the intersection of our future paths up to the route base (looker’s right) and down from the rap route (looker’s left.) We cached our snowshoes at that Charlie Brown tree, pulled out helmets and one axe each there, and booted up the remaining steeper snow slope. Back in summer there had been a section of 3rd class rock to climb just before the route’s base, but this time that was entirely filled in with a big snow drift, so we could simply walk up.
The Climb
 Out of the pitches we climbed, only the 1st and 4th really required being roped up, but in my opinion it’s simplest/easiest/most-efficient here to just stay roped up and pitch the whole thing out. You can move through the easy pitches really quickly anyway. Taking time to transition to simul-climbing or even unroping early probably wouldn’t provide enough time-savings to be worth the hassle.
our P1: (low 5th class mixed climbing, 60 meters, tree anchor at end)
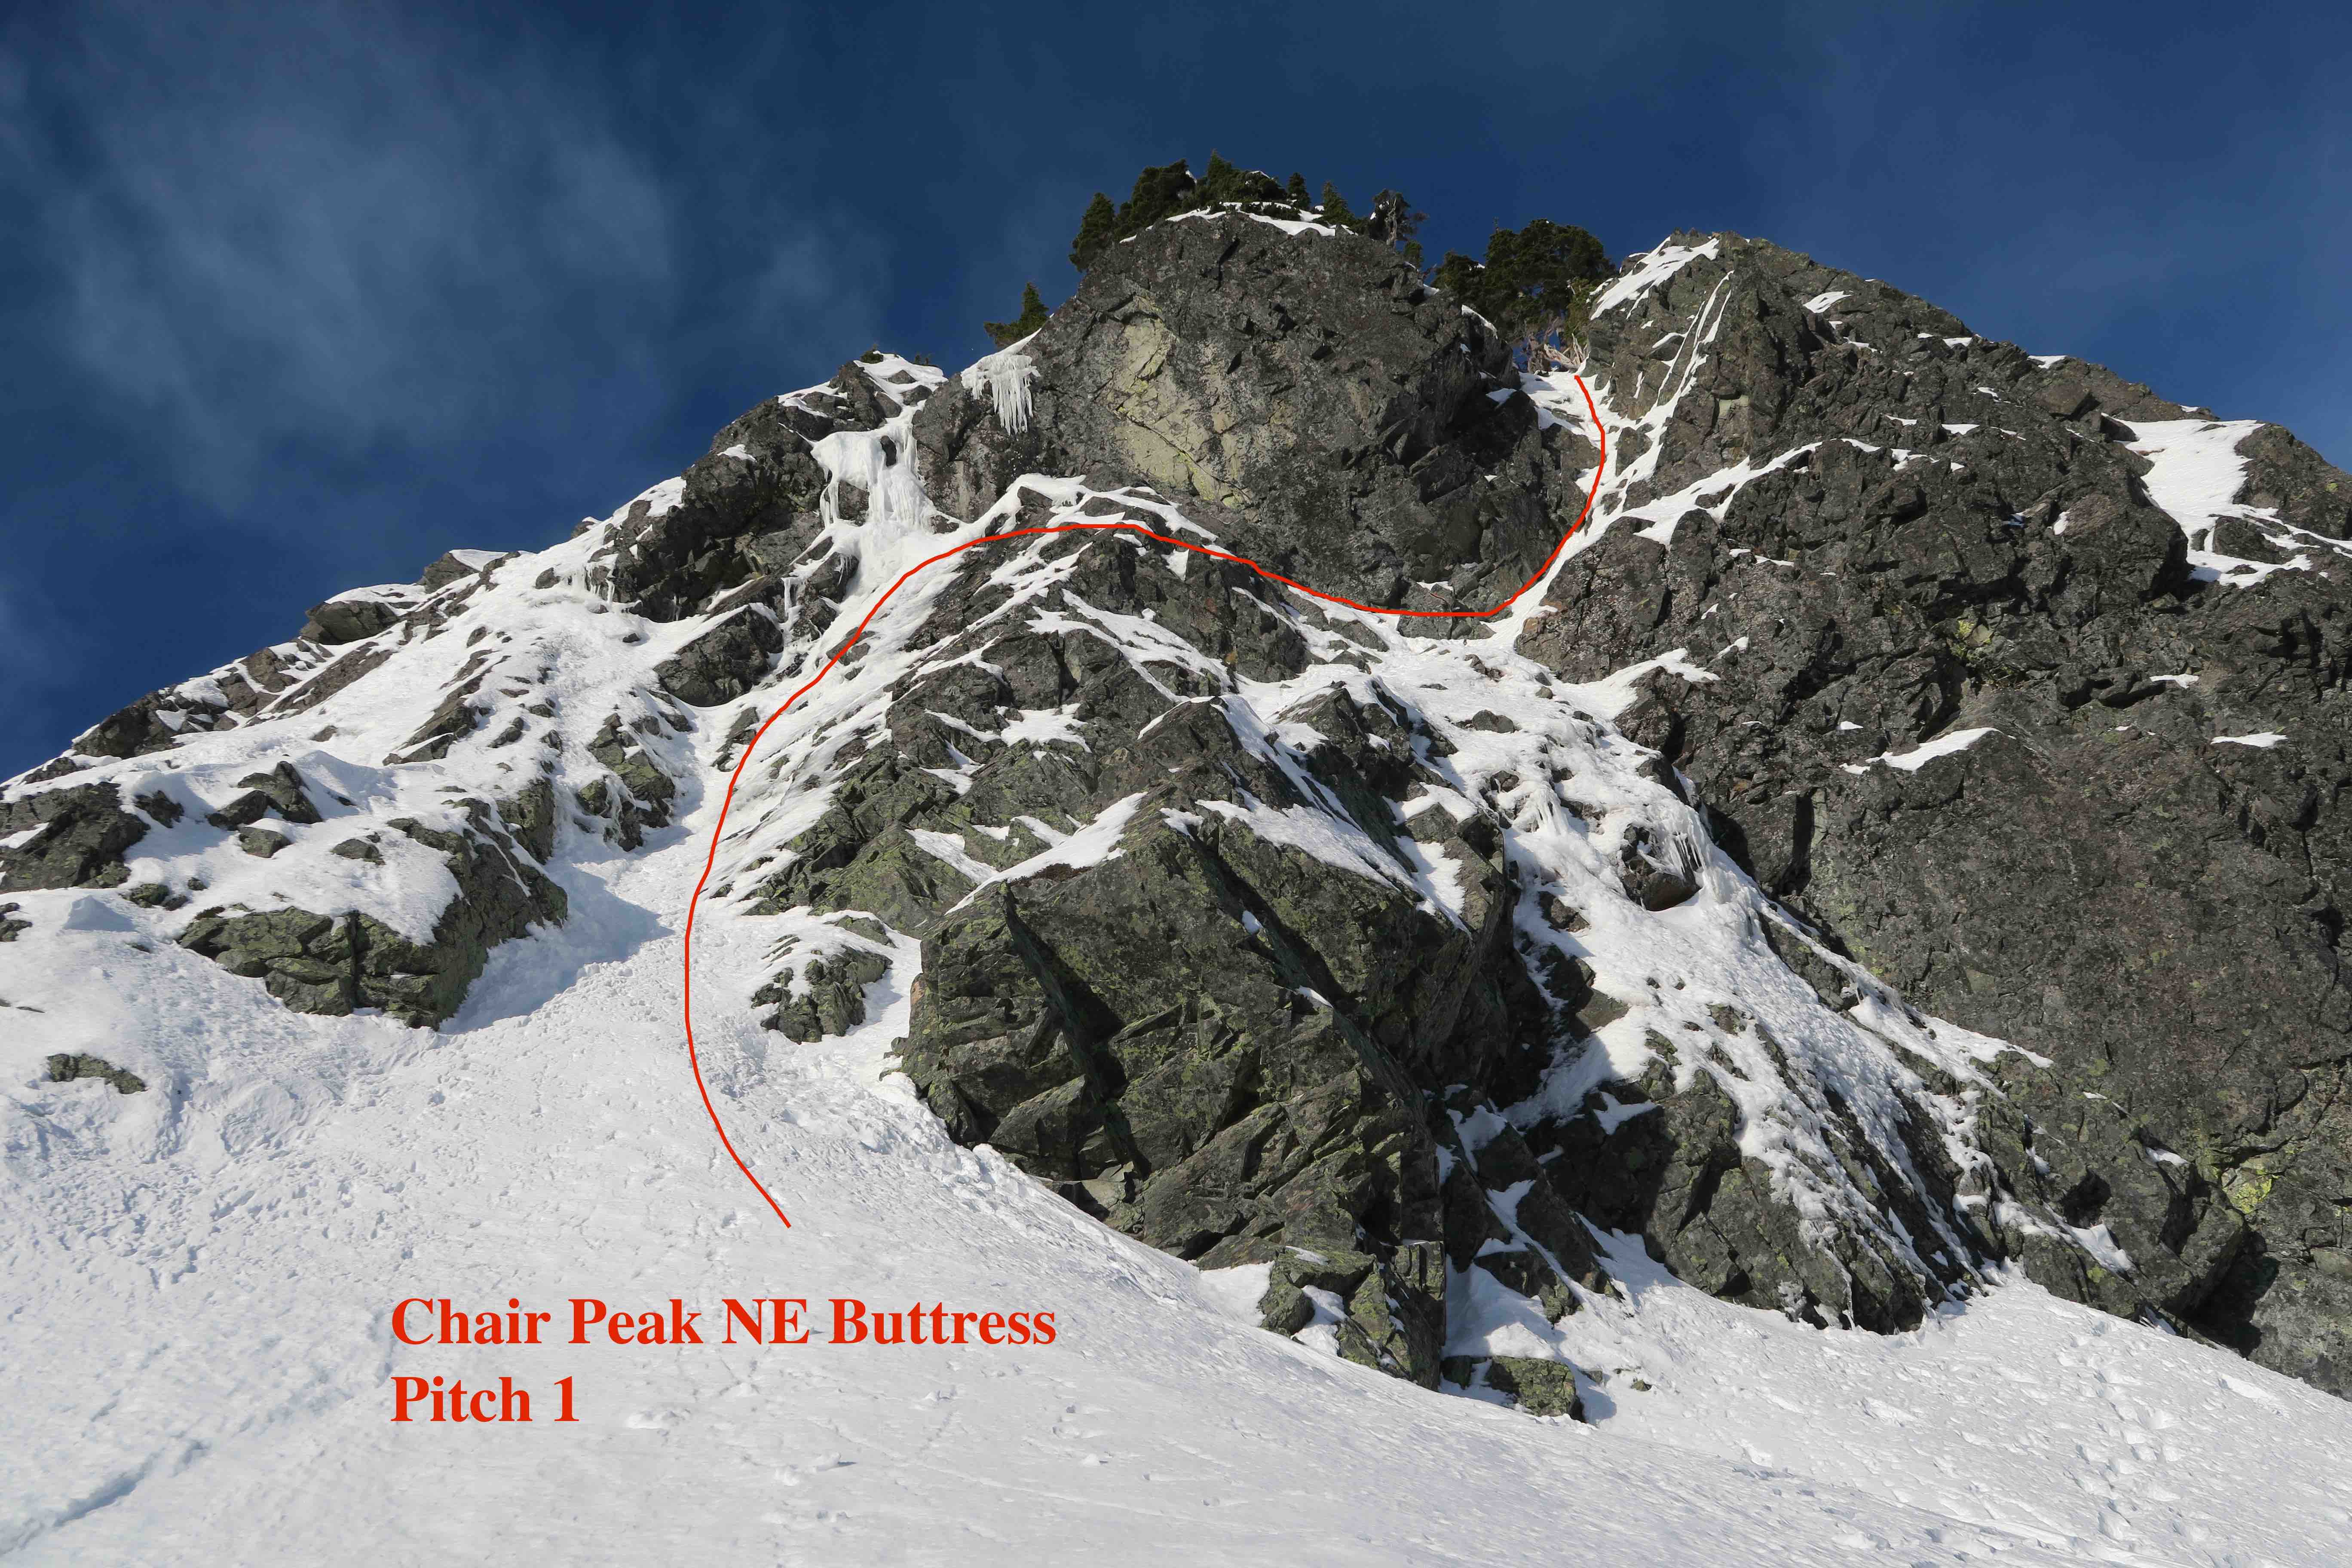 This is the blocky S-shaped gully (aka open book) that every route description has a photo of. It goes up, curves to the right, and straightens up again to end in a clump of trees. For us it was mostly mixed climbing, with thin unreliable snow over low 5th class rock. Doing it as a single pitch all the way to the trees is a rope-stretcher, a full 60m, but very doable. Extend all your pieces with double runners. Many other route descriptions encourage breaking this up into two 100’ pitches, so do whatever makes you happy.
our P2: (moderate snow, 60 meters, tree or rock-horn anchor at end)
 Continue up through the middle of the clump of trees, slinging at least one of them before you leave them behind. After that, it’s an open snow slope with not really any pro, but not really any need for pro either. End at either a lone pine tree, or the rock horn just beyond/above it.
our P3: (moderate snow, 60 meters, use ice screws for anchor at end)
 From the top of P2, above you and slightly left you’ll be able to see the rock band that adds a more vertical step to the otherwise consistently sloped snow, with a short pillar of water ice formed right in the middle of it. Climb P3 by angling up and towards that ice step, you should be able to get fairly close to it. Down-slope of the visible ice, I found that if I brushed away the snow I was kick-stepping up, there was thick ice buried there too, so I used a pair of screws as a belay anchor there.
our P4: (10 feet of vertical water ice, roughly 40 meters overall, challenging to find a good anchor to end at)
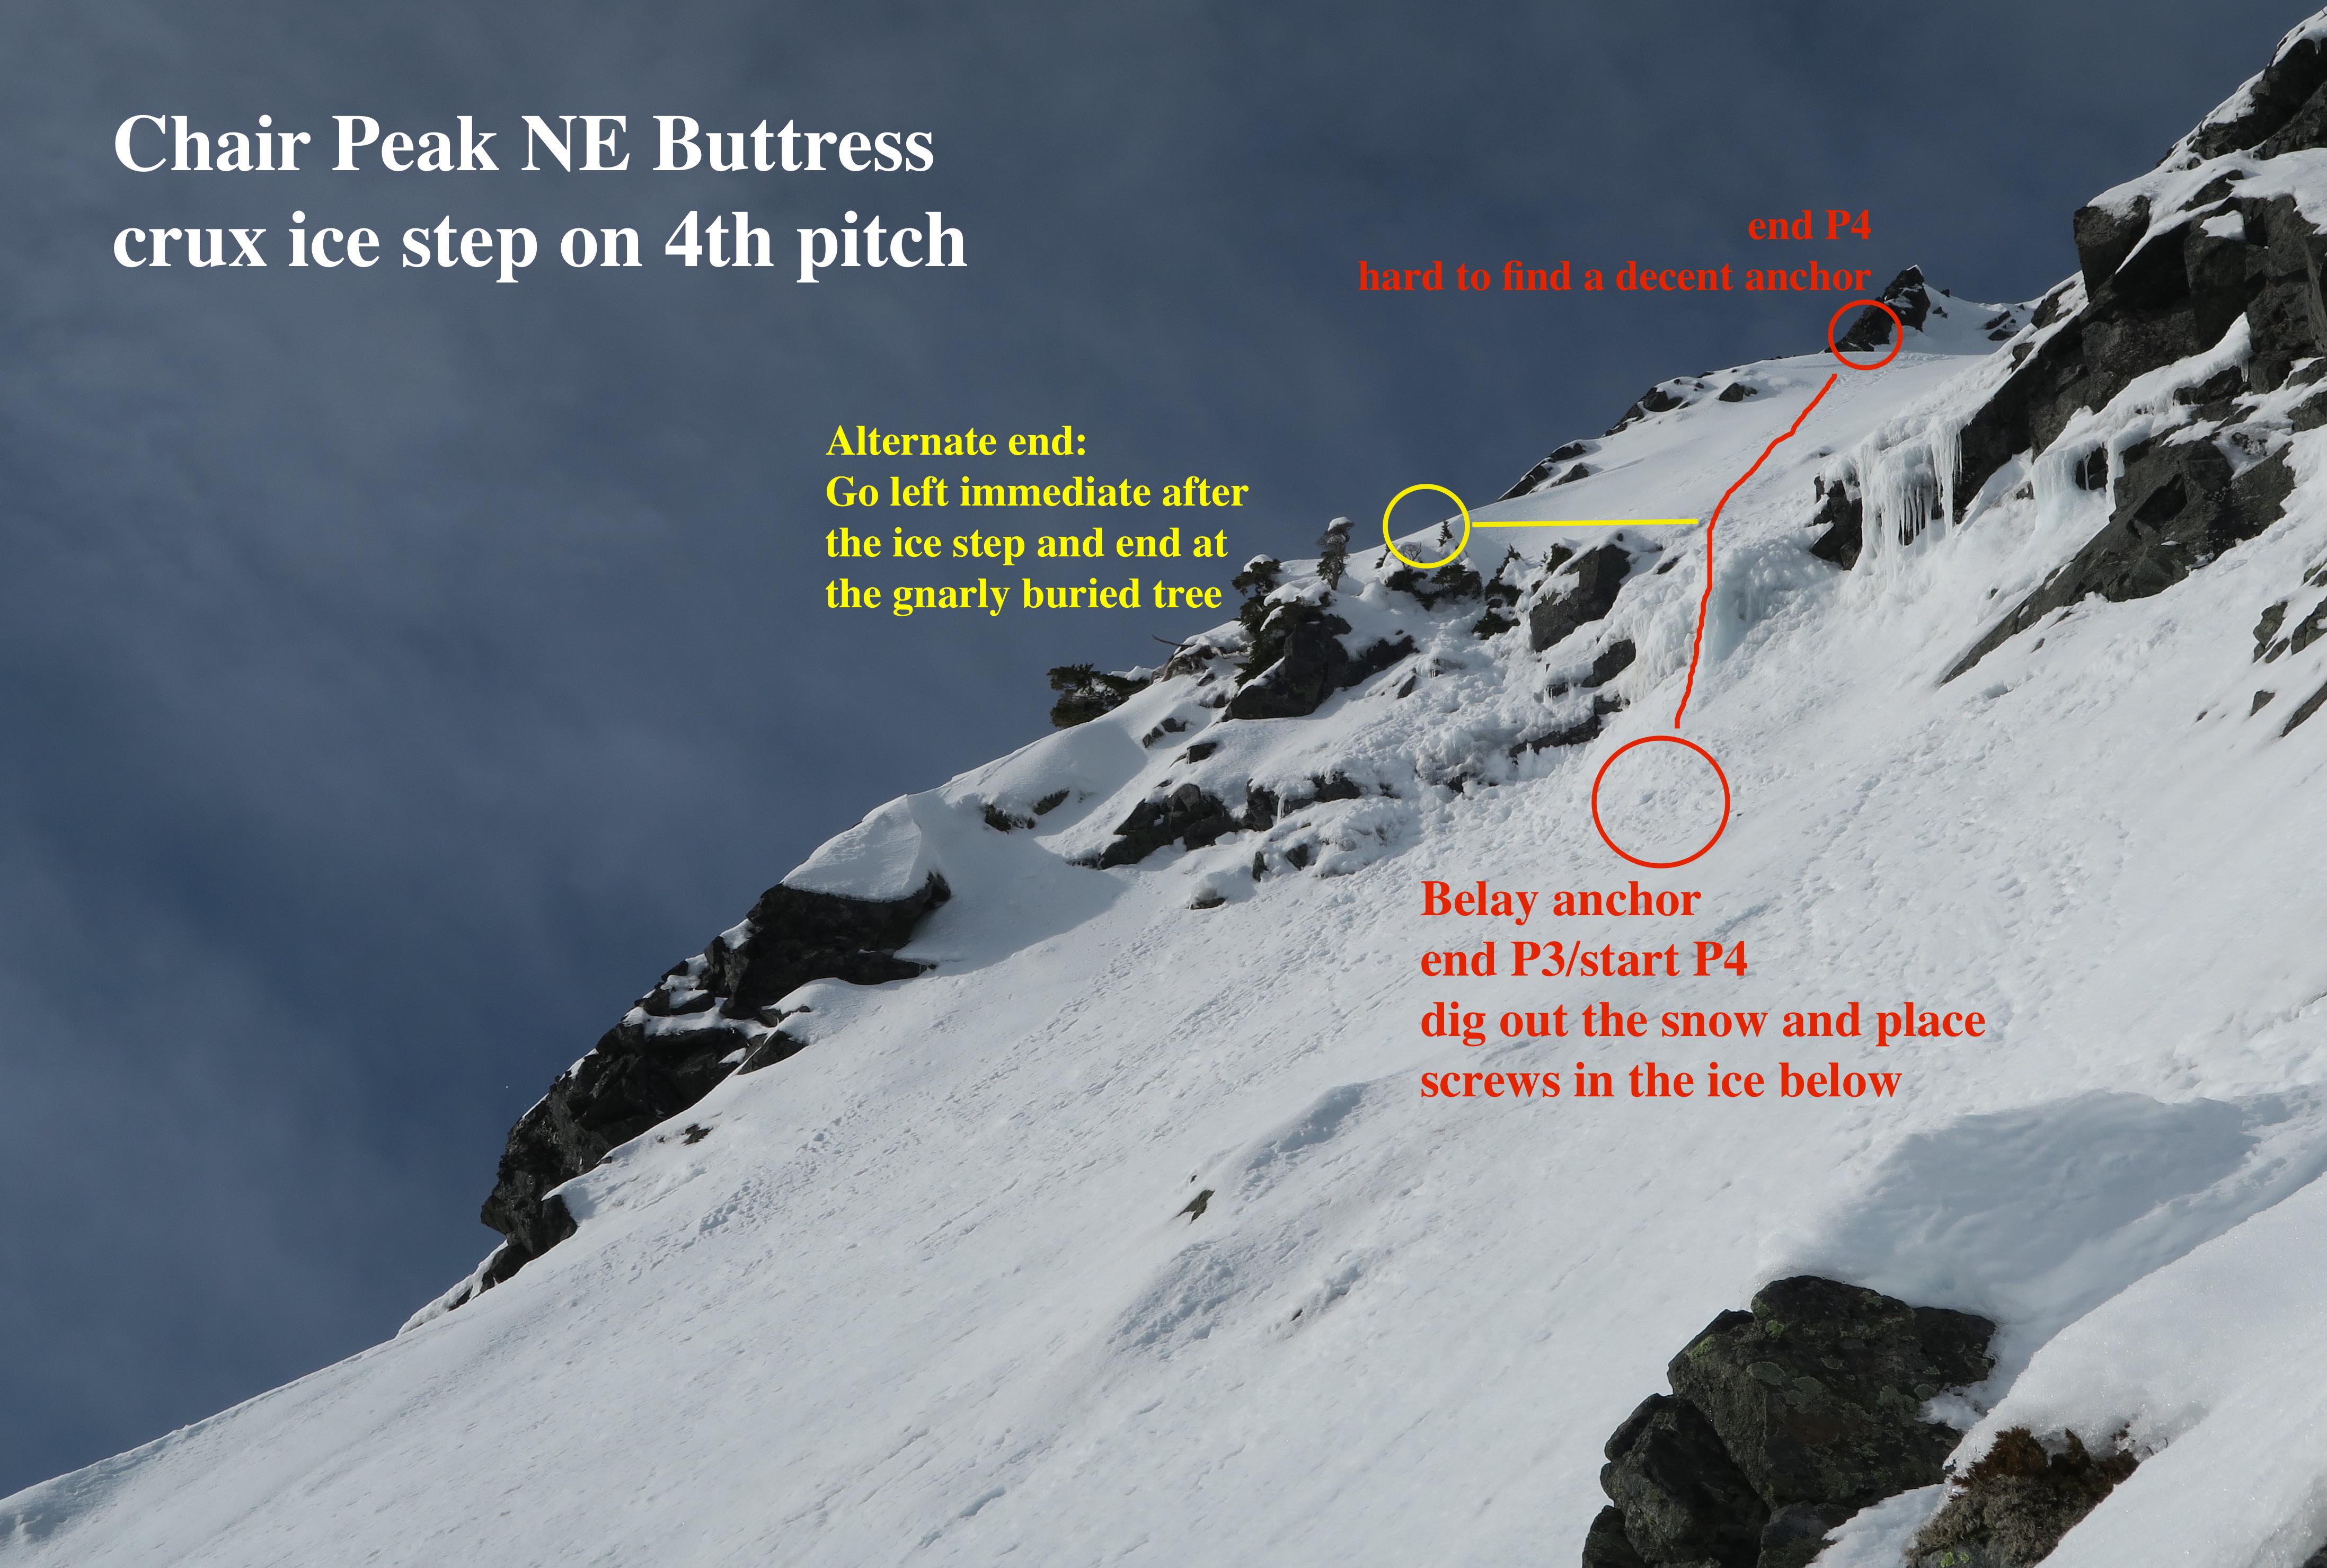 Ah, the crux ice step at last! Having just come back from 4 days of top-rope ice practice in Ouray, it was up to me to lead this, and even then I still freaked out a bit. Stupidly, I had only brought two screws total in my rack, since I knew the ice step would be short. I had not foreseen that the belay anchor before it would be in ice, using up both screws and leaving no pro for myself as the leader. Lacking other options, I tried to place a bugaboo piton in the rock to the right of the ice pillar’s top. It was an awkward position, and the piton placement ended up being just slightly less than terrible. Pulling myself up over the top of the ice pillar was the hardest part for me, but I took it slowly and carefully, and managed to get through it. Above that, I kicked steps up moderate snow for probably 35 meters until I found a place in the rock on my left that wasn’t complete shit, and built a 3-piece anchor consisting of 1 micro-cam, 1 better-placed piton of mine, and 1 vertical picket in nearby snow. I belayed off my harness instead of the anchor, with my butt firmly in a bucket of snow, in an attempt to protect the anchor from ever having to hold load. This worked out just fine. An alternative way to end this pitch might have been to turn left immediately after getting over the ice, there’s a gnarly tree buried under the snow somewhere over there. If you can find it, slinging it would make for a better anchor, and leave P5 to be 60m of moderate snow.
our P5: (moderate snow, roughly 40 meters, tree anchor at end)
 Simply kick steps up whatever’s left of the snow slope above you. End the pitch at a tree just below the false summit. Once you’re both up, you can unrope, leave the rope at that tree, and scramble the remainder to the summit. You’ll come back to where you unroped when you descend. Be mindful of significant cornicing on the summit!
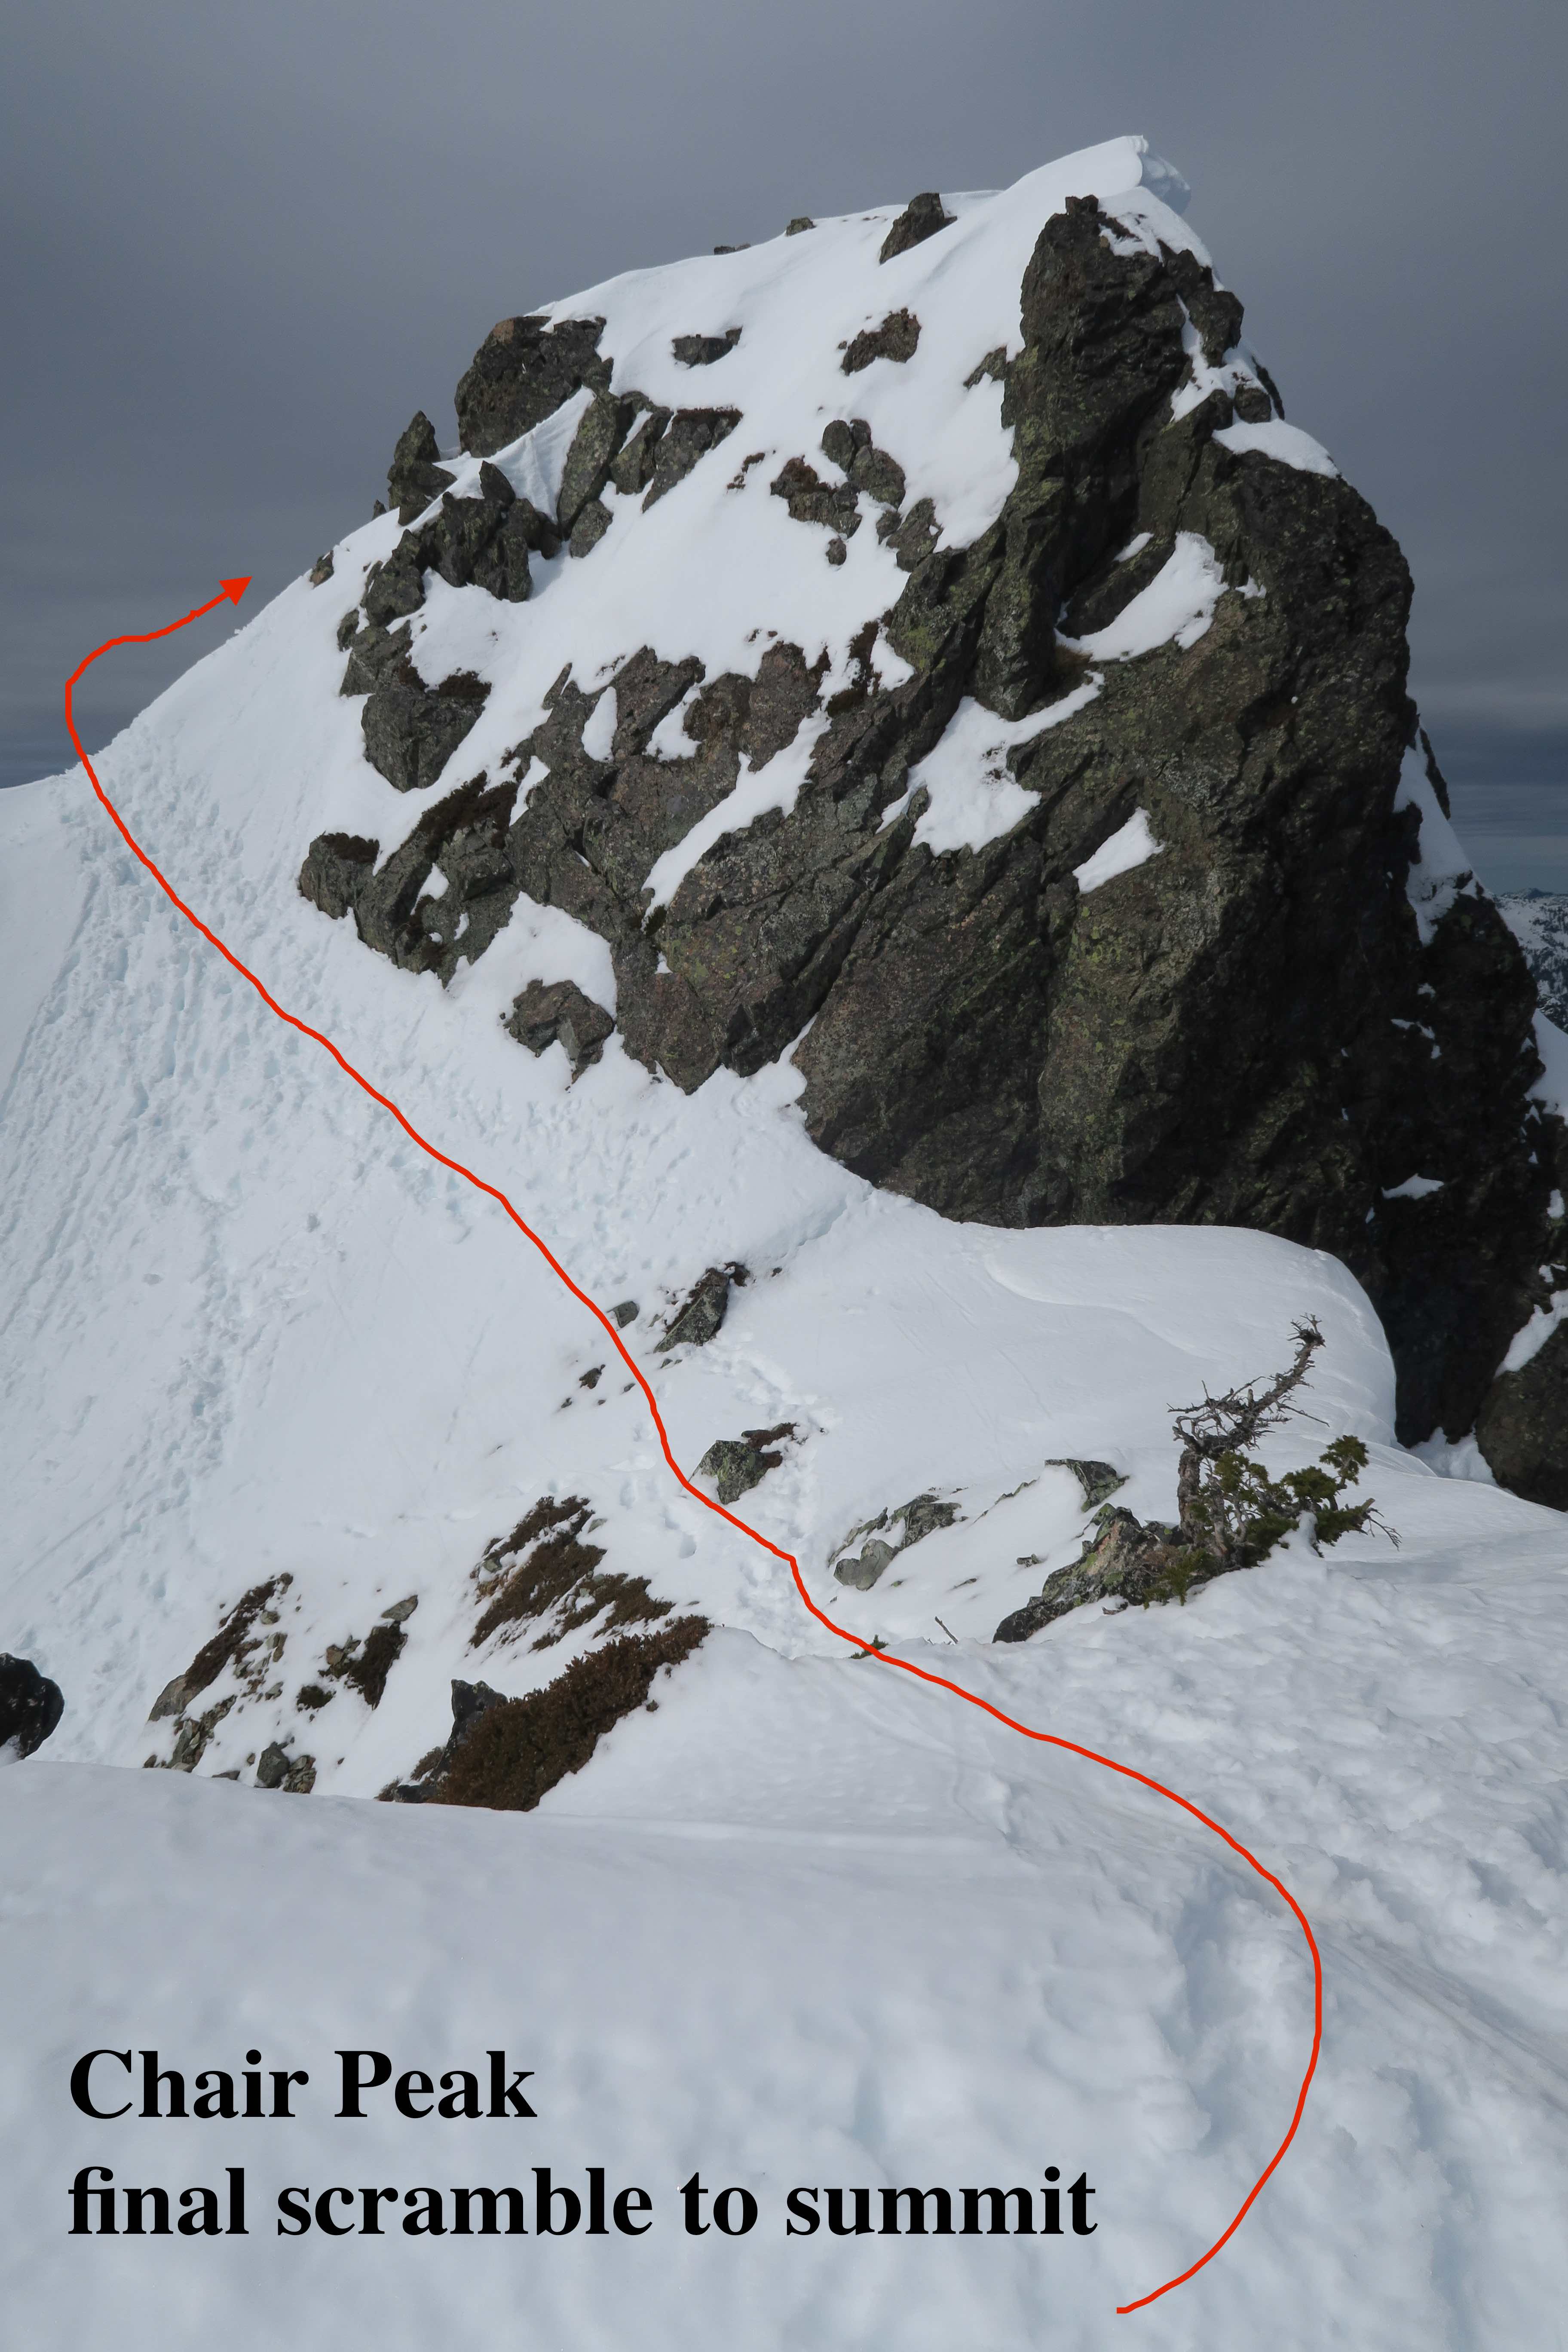
Descent

When you’re done enjoying the views from the summit, return to where pitch 5 ended, and look south. At the risk of writing like Fred Beckey, I’d say there’s an “obvious” gully descending due south, passing between high rock walls. Scramble down this. As soon as the rock walls let you out, the rap station should be in sight. (In other words, take the very first left the gully allows you to.) I’ve heard of other parties having trouble by descending too far/too right when the gully opens up, but it must have been a low-visibility day for them to not notice the rap anchor they passed there. The rap anchor is three old rusty pitons with a rainbow of webbing rigging it all together with a pair of aluminum rappel rings. If you’re feeling generous, bring a knife and 20ft+ of 7mm cord; you could cut away all that webbing and rig it more like a cordelette anchor.
From the rap anchor (the three old pitons) one 60 meter rappel (so one double-rope rappel) will get you over the initial cornice at the top of the rap gulley, and deposit you where the rap gully opens up and ends, allowing you to take shelter off to the side of the gully’s mouth, just incase the next rappeller kicks down anything. There’s still a lot of steep snow below you once you’re off rappel, but it is reasonable to either plunge step it gingerly, or down-climb facing in if that makes you more comfortable. Grab your snowshoes, and hike on out.

Really appreciate your detail Rob, your beta is rock solid!:)
-brad
Pingback: Chair Peak Northeast Buttress / 座椅峯東北拱壁 | One Hike A Week