
The multipitch sequence makes sense when moving through a long stretch of terrain (hundreds of feet) with serious fall-hazard, as most rock climbs do (and we’ll get to that multipitch sequence later,) but on some climbs / some situations, there can be a shorter stretch (e.g. less than 200′, or even <100′) of terrain with serious fall-hazard which we protect with a “fixed-line”, such that the rope has a static connection to anchors at either end, the rope does not move, and climbers travel along that fixed-rope.
I climb a lot in Washington’s Cascades, and I do a lot with the Seattle Mountaineers. So, often enough, I end up having to manage a group in terrain that’s a little too high on difficulty or exposure to be something I’d want to scramble unroped, but not long or hard enough to treat like a full-on multipitch rock climb either. This middle ground can be an excellent time to make use of a fixed-line, particularly if your group-size is any larger than a party of two. By “fixed line”, I mean a situation where you or someone in your group has taken a climbing rope, and fixed it in place, with a hard-knot to an anchor at at-least one end, though almost-always preferably both ends. The rope doesn’t move, but people move along it.
Terminology
I like to call the setups in this post “fixed lines.” I’ve also heard people use “hand lines” and “static lines” as synonyms. The problem with those other two terms is that they’re overloaded, they’re both terms that have second meanings. A “hand line” may also refer to a rope that you simply grab with your hands but that you’re not connected to at all, where it’s not exactly PPE (Personal Protective Equipment.) I think of those “hand lines” as retired climbing ropes tied around a tree on some cragging approach with a scramble move where having something extra to grab is really helpful, but not there as technical fall-protection. A “static line” may also refer to a category of rope-construction, ropes that are built to behave as static (e.g. for hauling, or rescue) and not dynamic (as ropes built for catching falls & absorbing energy must be.) It is too ripe for confusion to say “let’s use a static line” while the rope you’re using is constructed to be a dynamic rope. So I suggest we all call these setups “fixed lines” 🙂

As the leader: Setting up a fixed line
Connection at the Anchor
My favorite way to connect a fixed-line to an anchor is to have a clove-hitch on a locking-carabiner positioned to actually hold any loads, but with enough tail on the slack side of the clove-hitch that I can tie a figure-8 on-a-bight in that tail as a backup knot, and clip that to the same anchor with a separate carabiner. You don’t have to do it this way, you could use any climbing knot designed to hold a load (e.g. figure-8, bowline, alpine butterfly, etc.) But the big advantage of using a clove-hitch is that a clove-hitch can be much easier to untie after having been weighted. Later when taking down the fixed line, after multiple people may have weighted it, as long as you can push the clove hitch off the nose of the carabiner it was on, the knot just goes away, you don’t have to fight to untie it. Also, for neatness points, try to clip your clove-hitch so the the load-strand within the hitch is closest to the carabiner’s spine.


Don’t want to carry a ton of lockers into the alpine? Before setup, ask each member of the party to contribute one locker towards anchoring the fixed-line, and suddenly you’ll have plenty of lockers. Or, remember you can always make a locker out of two opposite-and-opposed non-locking carabiners. Or, depending on your risk-tolerance, it could be a judgement-call as to whether the backup knot’s separate carabiner is locking carabiner or a non-locker.
Is that backup knot & it’s second carabiner even necessary? If we are theory-crafting, in theory that backup knot will never see any load. In practice though, backups are a really good thing. Humans make errors. Every so often I see someone who thought they tied a clove, but actually tied a munter-hitch; yikes!! Or maybe the clove is tied successfully, but the gate of that locking-carabiner gets dragged against rock in a really unlucky way that unscrews it and pushes the gate open. In my opinion, it’s worth throwing in a backup knot every time. Plus, if you train yourself to do the backup knot every single time, it ends up taking less time to just add the backup knot than it would to stop and ponder the decision “should I do it this time or not…?”
Gear necessary for a fixed line
- Group gear:
- any climbing rope. If I’m on an alpine climb where I’ve brought a rope for some other purpose, I’ll just use whatever that rope is. If it’s an objective where I’m only bringing the rope because of this fixed-line, I’ll tend to opt for a skinny rope to save weight, (e.g. a rope vaguely in the ballpark of 8.0mm diameter, and it’s okay to use a single strand or rope that’s rated “half” or “twin”, since it’s scramble terrain, not some vertical upper-fifith-class, so it’s not going to have to catch any big falls.) I’ll research pretty hard to find out what length of rope is necessary to protect the section I’m aimign to use it for. If no such beta is available, I may default to brining a 60-meter rope. Often longer is better, so that one stretch of fixed-line can actually reach where you need it go. There’s plenty of cases where you can make things work with a shorter rope, or tie two 30-meters together to make 60 meters, but shorter ropes risk more shenanigans, and possibly even time-delays, if you have to set it up more than once to cross a longer distance.
- two cordelettes, or any material to make two anchors out of
- four locking carabiners, since there’ll be two knots on separate carabiners at each of the two anchors (optionally, you could use non-lockers for the backup knots)
- on a case-by-case basis: maybe a small amount of trad gear, extra slings, maybe even pickets, etc.
- Personal gear: (every person who’s going to utilize the fixed line should have…)
- a hero loop: At least one hero loop. (a small loop of cord they can make a prusik out. 6mm accessory cord tied with a double-fisherman’s knot so that the loop is about 1’3″ end-to-end works really well. A a cut single strand of 6mm cord about 4’3″ long will form about the size loop you want.) As a rule, I always always always carry two hero loops on the back of my harness no matter what kind of climbing I’m doing, and I rather think that everyone else should do the same.
- a personal anchor / personal tether
- at least one locking carabiner, though having two or more is probably more convenient
- optionally, a long prusik loop, like the “waist prusik” piece of a texas-prusik set. (e.g. a 7-foot straight section cut of 6mm cord, then tied into a loop, will form a nice length for a “long prusik”)
Setup Sequence
Before setup, the preparation:
- The first & trickiest decision is to decide where the fixed-line should go. Particulary, where exactly to put your first anchor, and thus start your fixed-line from. Prior research & beta helps a lot here. Otherwise: if you know where you need to go, and where the location of the fall-hazard of concern is, you’ll have to eyeball how close to all that you’ll need to be for your length of rope to entirely reach. Then, search for something that can actually be used as an anchor. Anything you might use as an anchor in the alpine is valid: a rock horn you could sling with a cordelette, or a buried picket, or multi-piece trad anchor, etc.
- I, as the rope-lead who is going to set this up, will gather enough gear from everyone else so that you’ll have enough for the anchors at both ends, the locking carabiners, etc.
- I’ll build the anchor for this starting-end of the fixed line. I’ll recruit a belayer, and have them flake the rope right next to the anchor.
- I’ll talk through the setup-sequence I’m about to use with my belayer, so they know everything to expect, before I get further away from them.
The setup sequence that I typically do is fairly similar to the multipitch sequence, but modified slightly so that I, as the rope-lead setting this up, am personally doing all the anchor-building and rope-connecting, so that I am in control of each part, I know it’s all done the way I want, and I don’t have to having a distant-yelling-conversation with someone else about how to do a step.
- Fix the “bottom” end of the rope. Rather than have the belayer tie-in to a rope-end, instead I’ll affix the “bottom” rope-end directly the anchor I’ve just built. I want a clove-hitch on one locking carabiner ready to hold the load, and a long enough tail beyond that clove-hitch that I can tie a figure-8-on-a-bight and put that on a separate carabiner, also directly affixed to the anchor. It may be easier to tie the figure-8 first and the clove second, guaranteeing the tail length is right on the first try.
- Next steps are exaclty like the normal multipitch sequence for a while: I, as the rope-lead, tie in with a re-woven figure-8 on the “top” rope-end. I have my belayer connect themselves to the anchor (since they’re not tied into the rope, they’ll have to use a PA, or perosnal tether, and a locker to connect themselves to the anchor.) I have my belayer put me on belay.
- We do our safety-checks of eachother, and have the “On belay?” “Belay on!” conversation.
- I’ll lead out, placing leader-pro if that’s relevant to the situation here.
- End the pitch: When I arrive at the place where I want the fixed-line to end, I’ll build the anchor that’ll go there, clip in with my PA/personal-tether, and shout “Off belay” to my belayer, and wait for them to respond with “The belay is off.”
- Getting slack out: It’s likely that the climbing-rope I’m using is longer that I need for the fixed-line setup, but I do want to get that slack out. Before I affix the rope to this second anchor I’ve built, I’ll pull any extra slack over to me, and flake it on the ground near me. Before-hand, I’ve asked my belayer to watch for the rope to come not-quite-tight to the original anchor, and when it does, they just shout “That’s me!!” but not change anything about the anchor they’re at.
- Now fix the “top” end of the rope. Once I have all the slack near me, and my belayer has told me that I’m more-or-less pulling on the other anchor, I’ll let a tiny bit of rope back out (just a foot or so, so it’s not taught) and then finally affix this side of the rope to the anchor I’m at. Again, a clove-hitch on a locker positioned to hold the load, and a figure-8 on-a-bight on a second carabiner as a backup knot.
- Tell people the rope is fixed and ready for them, and they can put their prusiks or PA’s or whatever on it, and climb when ready.
If the plan to is for people to travel back across the fixed line back to the start in the fairly-near-future, then when they arrive at the end, they don’t have to undo their prusik-hitches at all, they can simply unclip from them. When it’s time to prusik back, they just clip back in to their prusik. That saves the time of having to re-do them. Though it does mean that people have to travel in last-in-first-out order on the return trip to get to use their own prusik hitch.
Later, when it’s time to take down the fixed-line: I’ll send everyone but me back to the 1st anchor, so I’m alone at the 2nd anchor. I’ll tie back in with a rewoven figure-8 using the “top” end of the rope. Once everyone’s off the fixed line, I’ll take out the clove & figure-8 that had been affixing it to the anchor. I’ll have my belayer pull all slack to them, until I say “That’s me!”, then they’ll put me back on belay. I’ll clean this 2nd anchor, and have them belay me as I climb back to the 1st anchor.
Obviously, (like everything in climbing), this certainly not the only sequence or way to setup a fixed line. There are thousands of right answers. This is just the particular sequence I’ve settled on using myself, because it offers me so much control over so many pieces, which is useful when I’m the more-experienced person taking out less-experienced climbers.
Moving on a Fixed Line: Three Categories
What should the participants do once the fixed-line is setup? Broadly speaking, fixed-lines setups fall into one of three categories, which I’ll call: horizontal, sloped, and vertical. Each category has different rules about how people can safely move along it.
Horizontal
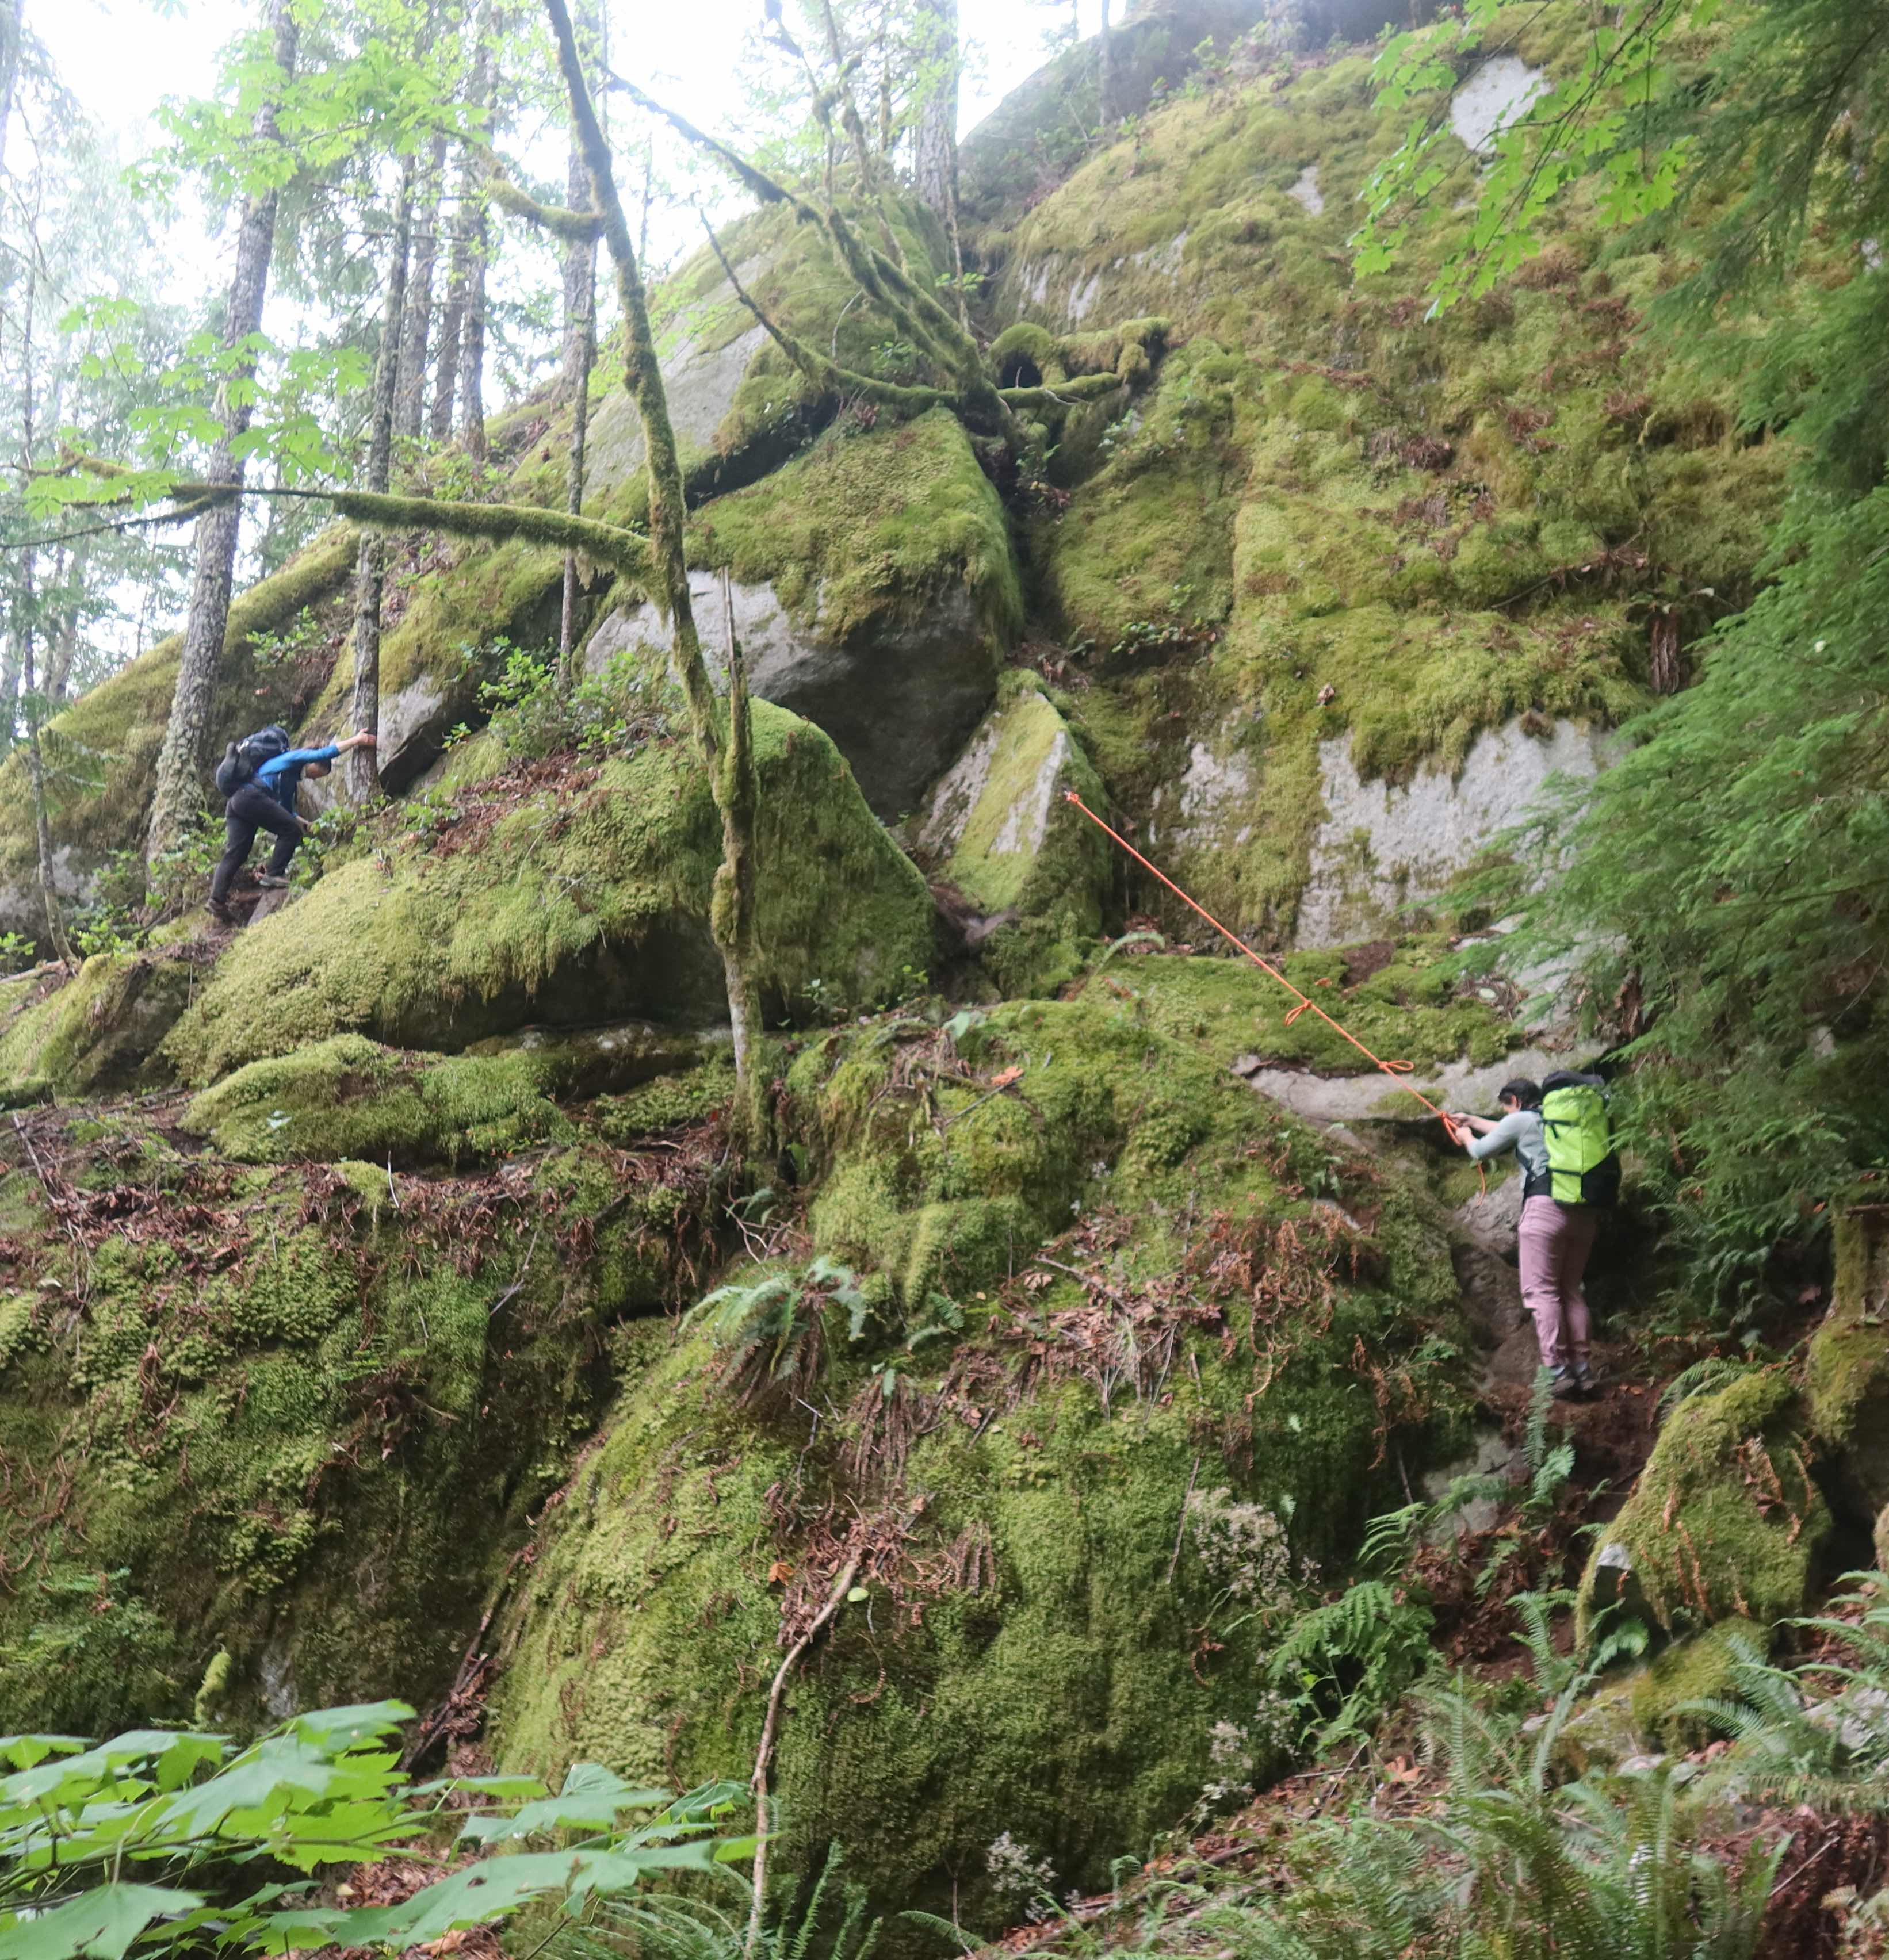
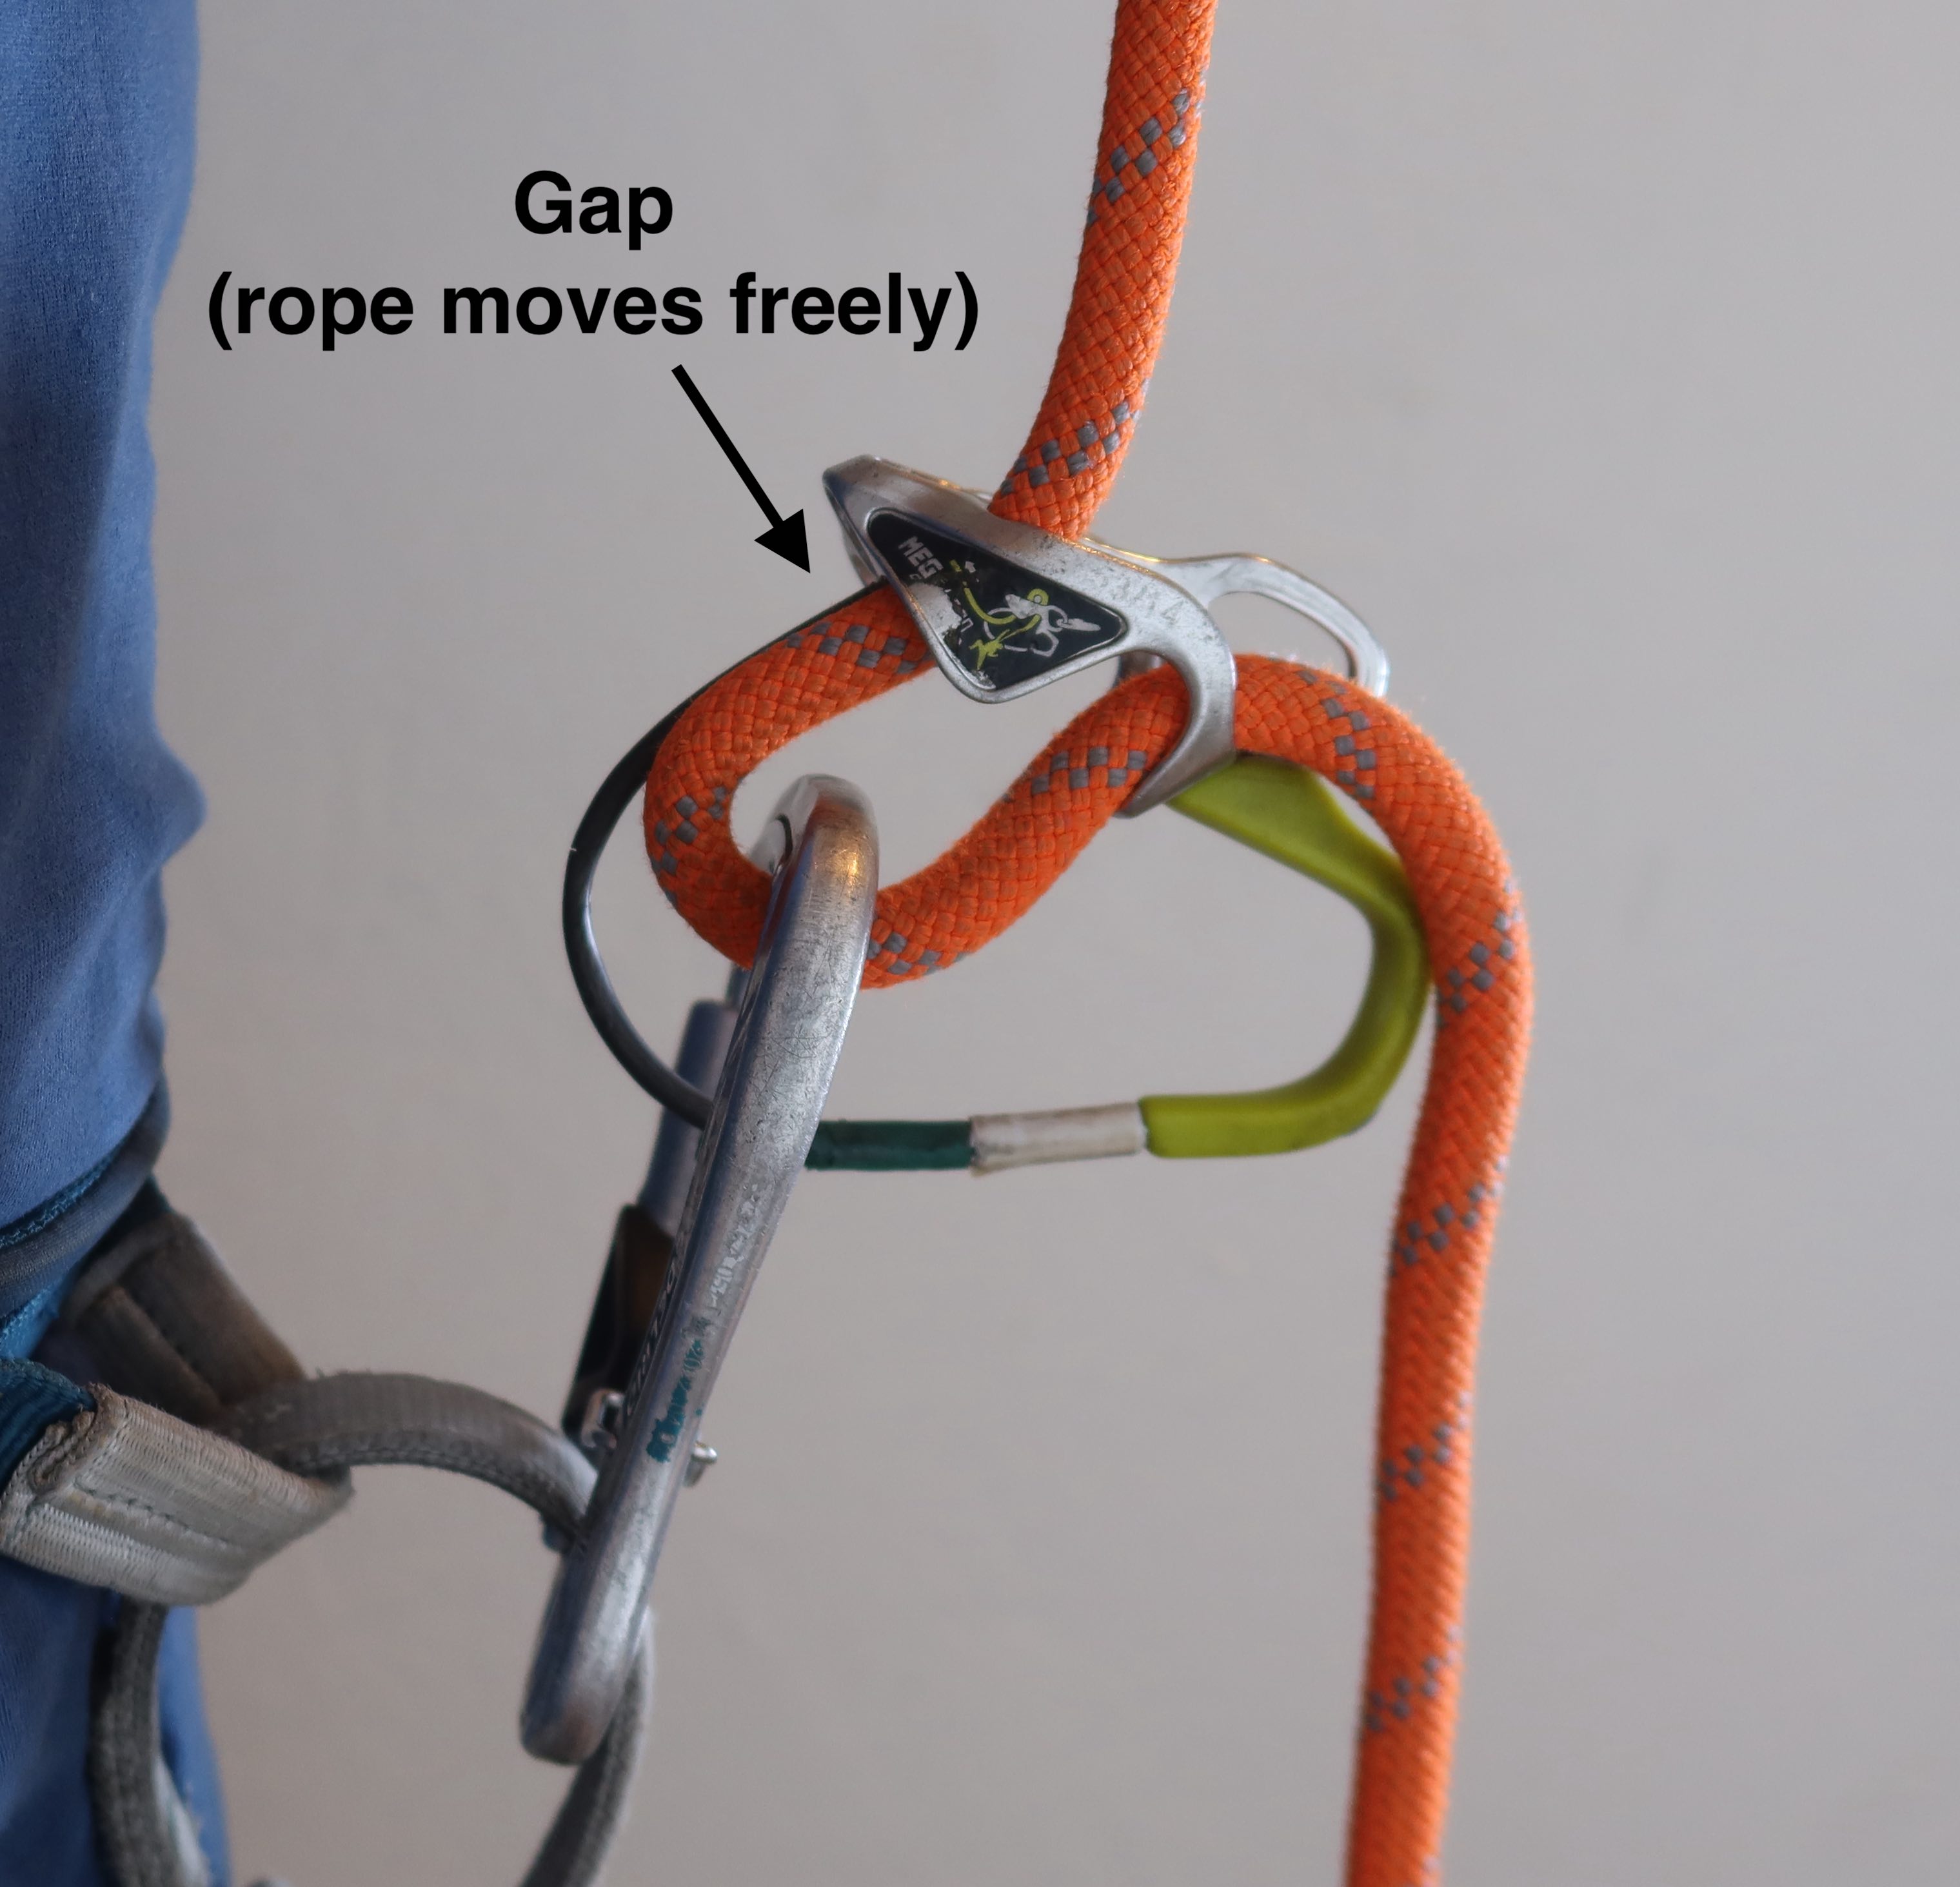
(a) Traveling along a horizontal fixed-line, where the climber’s connection is their PA and a locking carabiner to the rope. (Slides easily, which is both a pro & con.)
Sloped
I’m using the word “sloped” because I wanted a single-word that was easier to say than saying “for all those slope-angles that aren’t horizontal and aren’t vertical.”
(b) Traveling along a sloped fixed-line (or a vertical one where good climbing holds are available,) where the climber’s connection is a prusik-hitch to the rope. (Ideally, extend your connection using your PA and a locking carabiner to clip that prusik.) Similar to this video: https://www.youtube.com/watch?v=_8IwhJUjkd8
Vertical
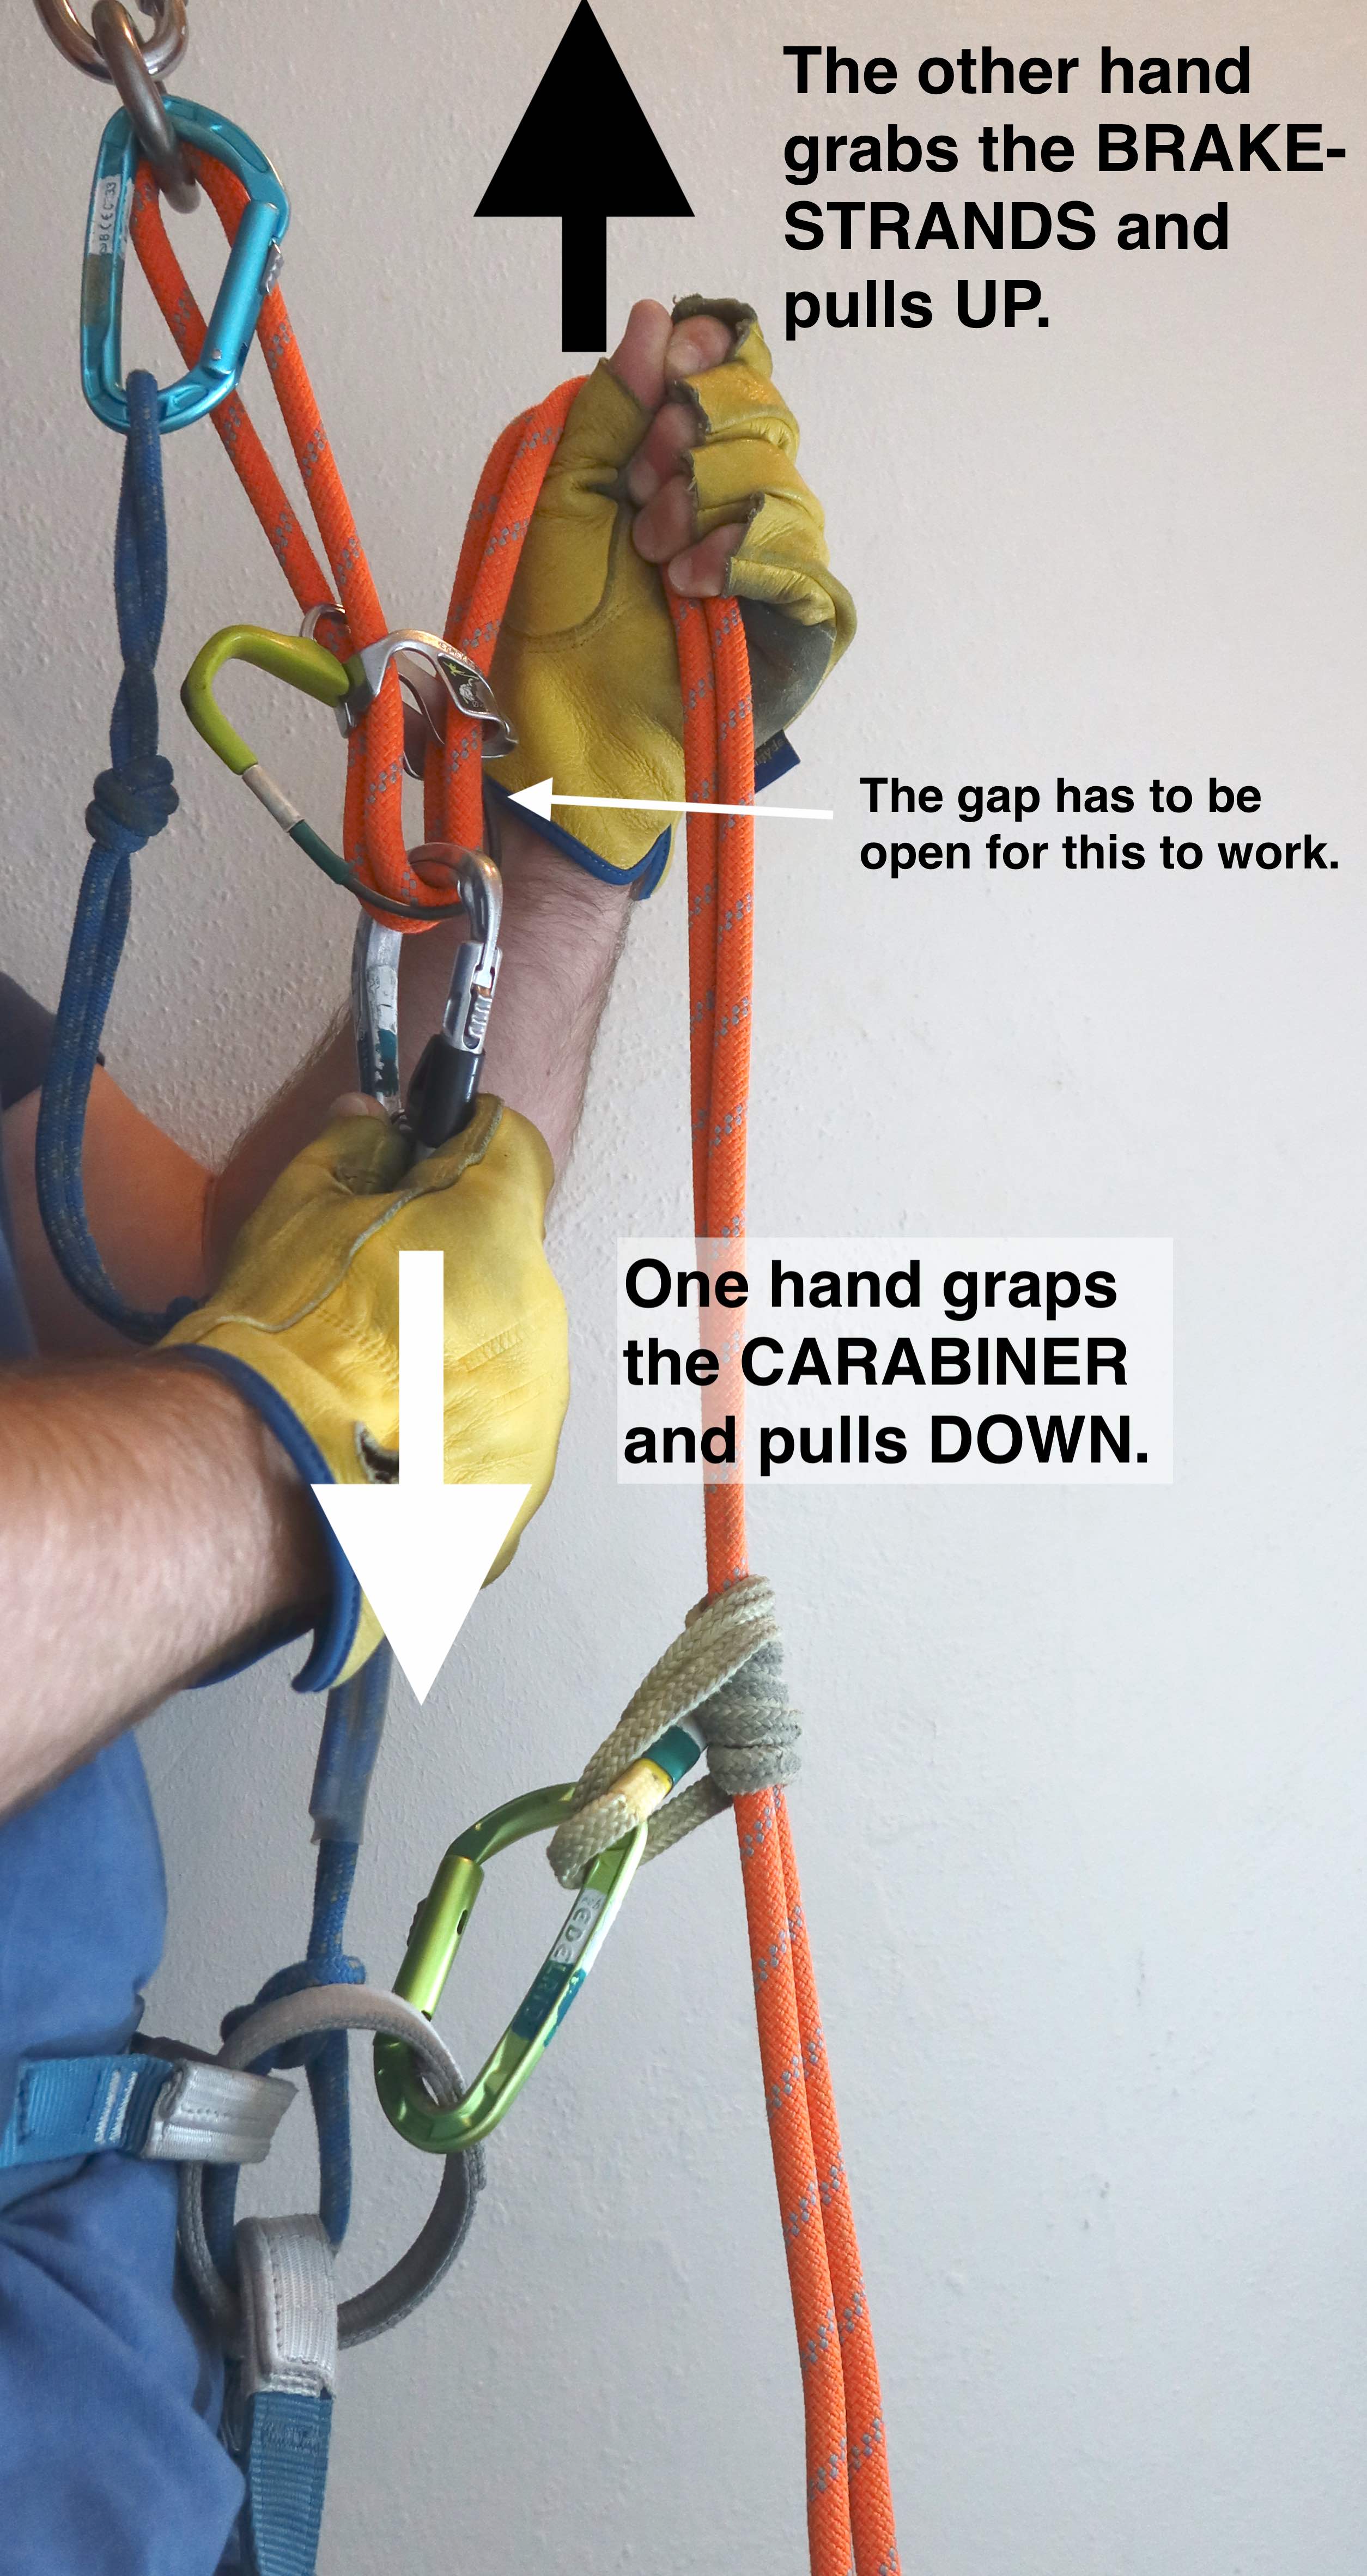
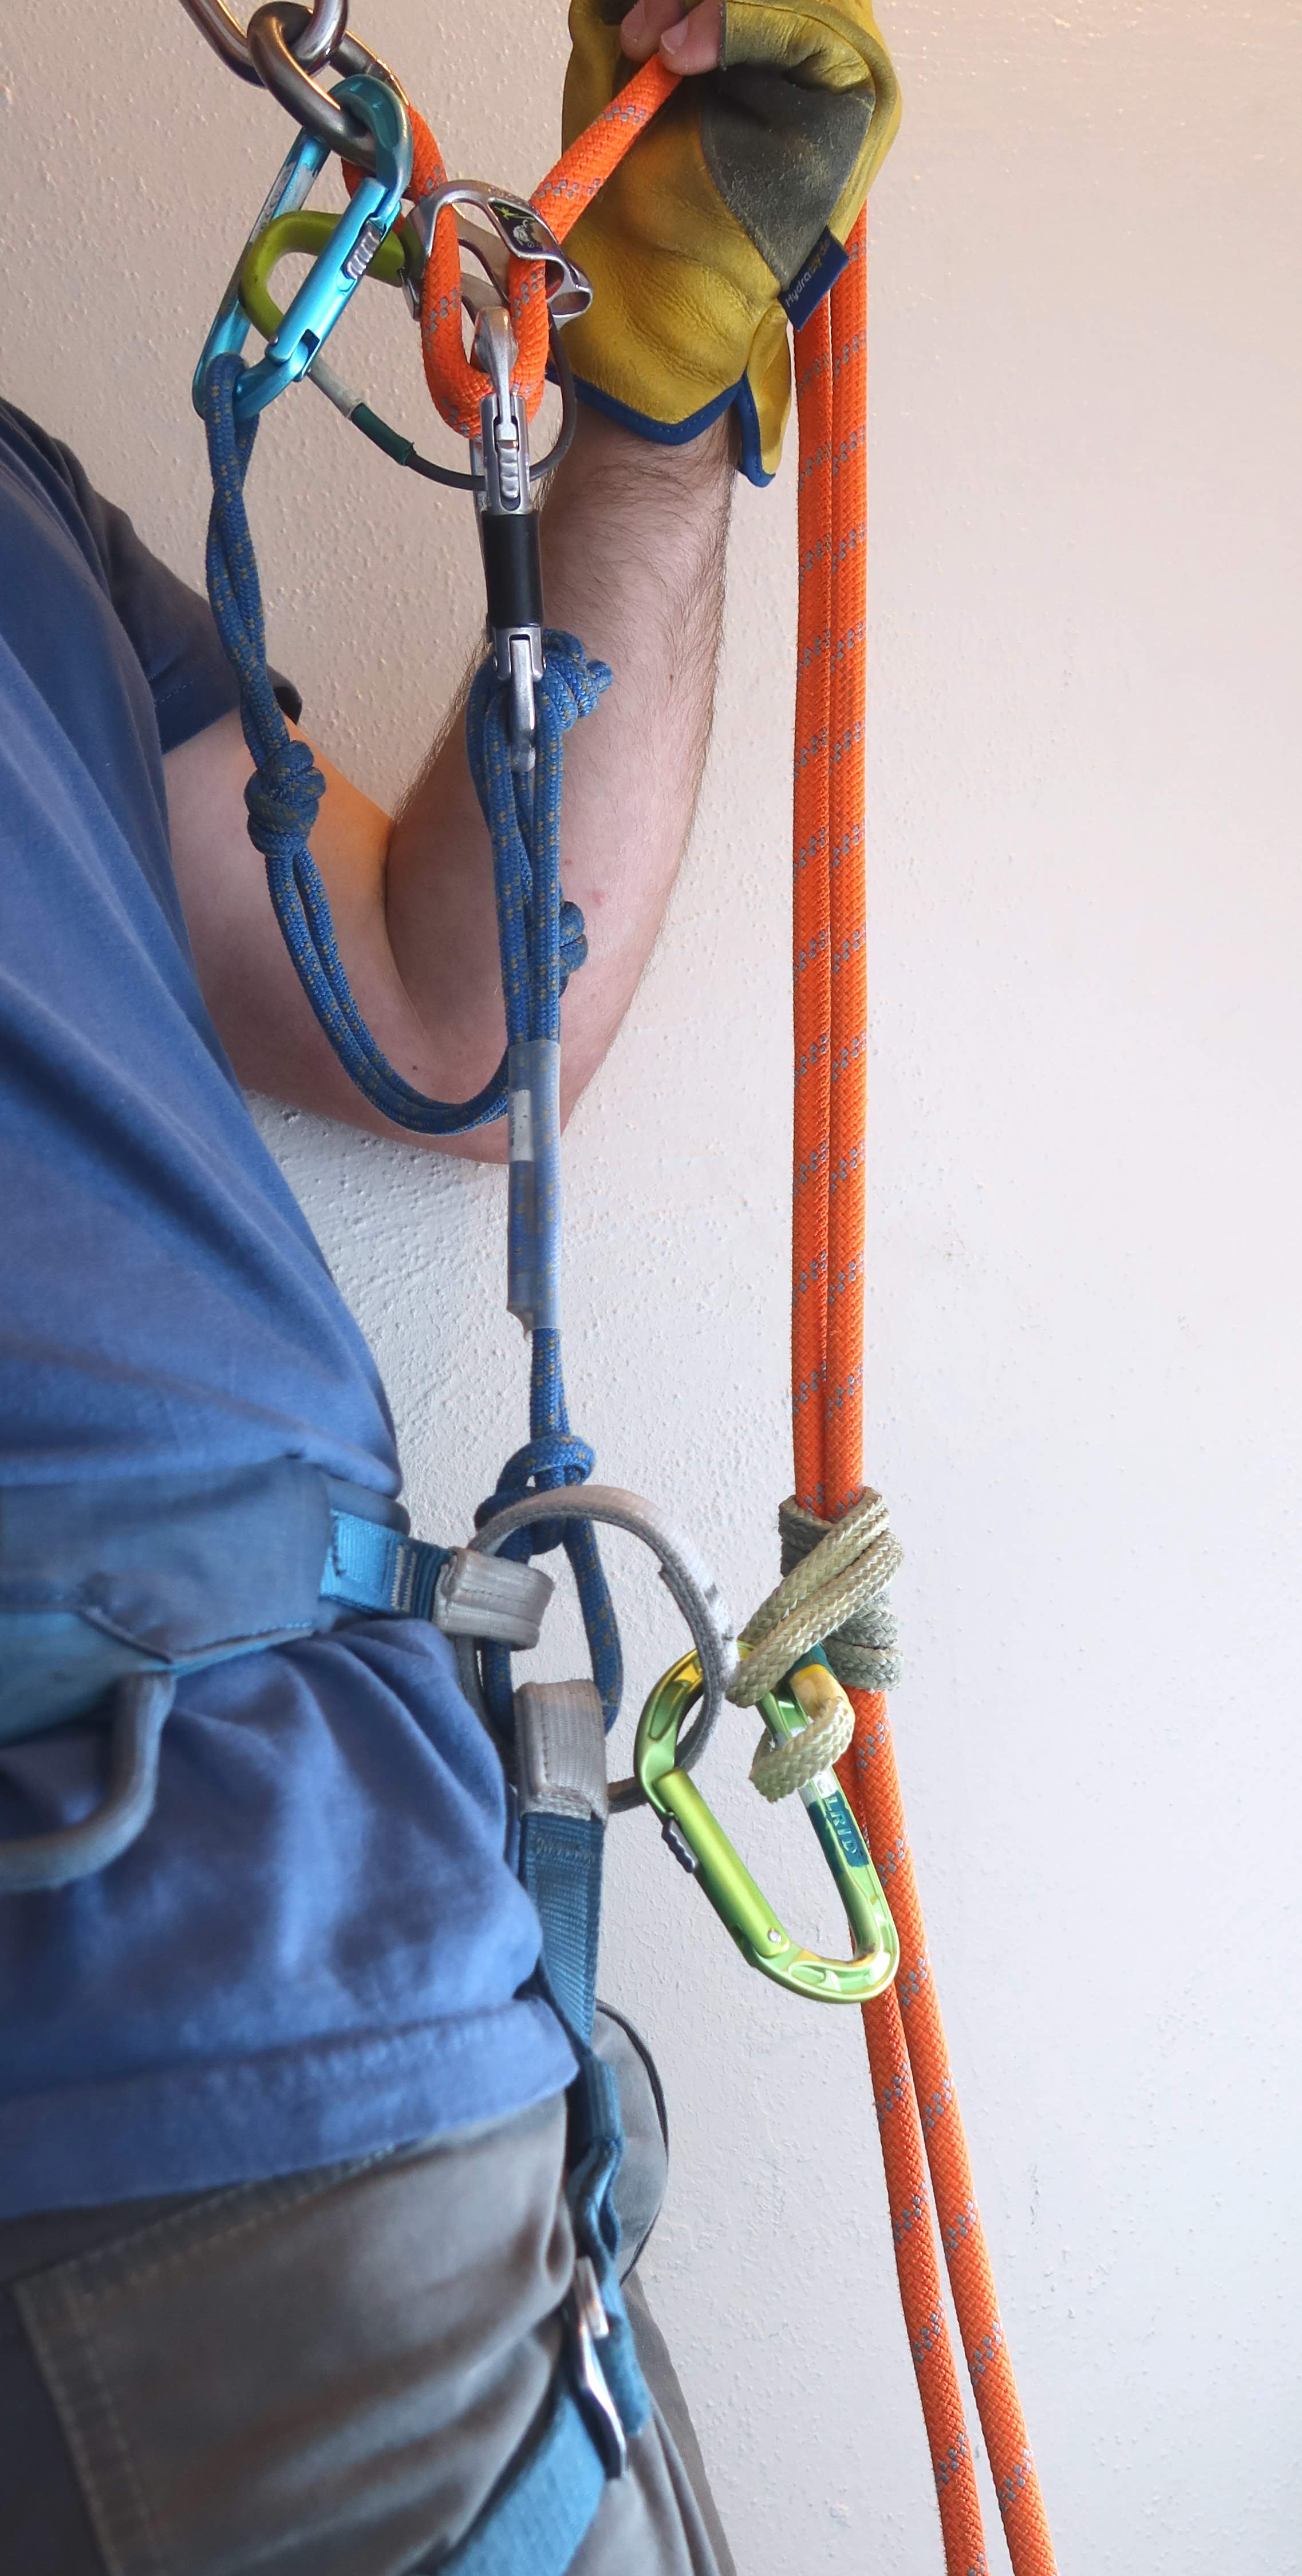
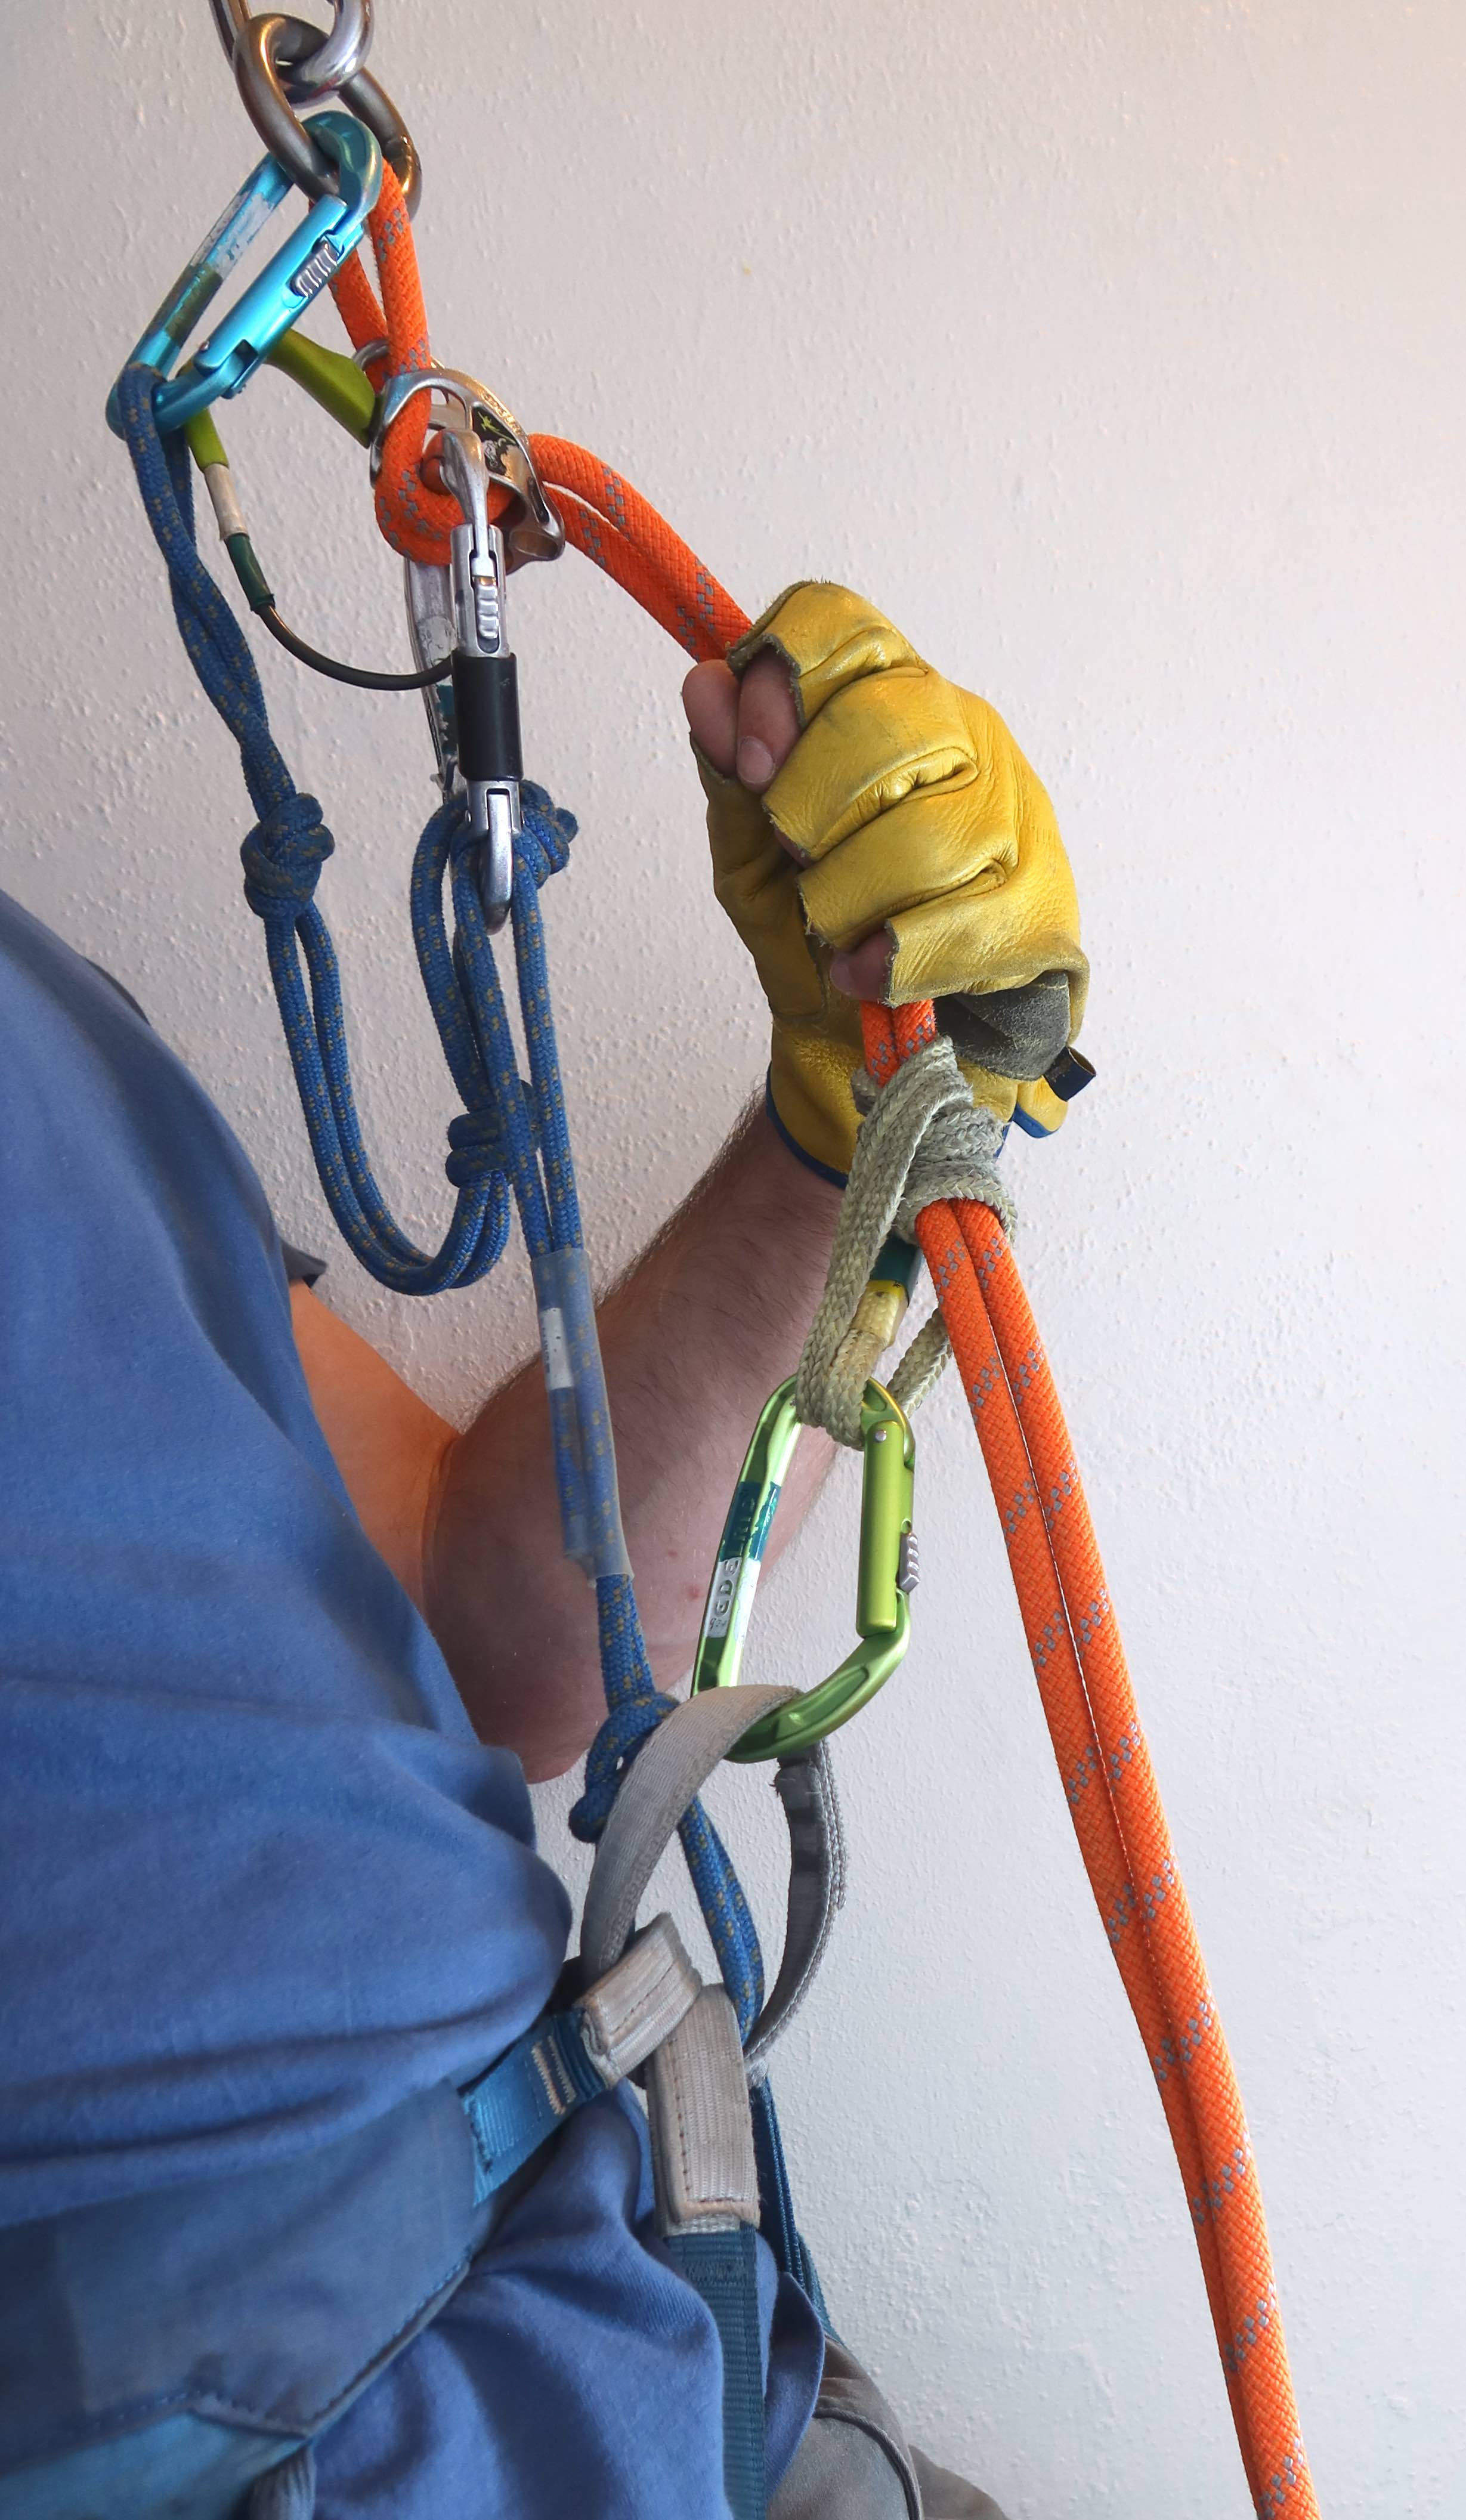
(c) Ascend a vertically-hanging rope, in the event that you’re forced to the climb the rope itself, (e.g. when the rope is vertical, and there are no good climbing holds on the wall. This is more of a self-rescue skill, less a typical travel skill.) https://www.dropbox.com/s/amzab0vuifhrlmp/2023-03-01%2020.24.42%20ascending%20a%20fixed%20rope%20with%20rock%20climbing%20gear.heic?dl=0
- About ascending a vertically-hanging rope: About half the students have glacier-travel experience and have done this before. However, in the glacier travel scenario, people carry different prusiks in specialized lengths specifically for doing this, and that’s not a piece of gear we typically have on a rock climb. Instead, focus on improvising a way to ascend a vertically-hanging rope using only the gear that was required on the Course Gear List. One option for a setup I would encourage:
- attach your Hero Loop to the rope as a 3-wrap prusik
- use your PA, and clip into that prusik with a locking carabiner. So far this setup serves as the equivalent to the “waist prusik” from glacier travel.
- If you have a second hero loop (everyone should now, since one was required in the gear list, then I gave out those orange ones as a second one to everyone,) also attach that 2nd hero loop to the rope (below the first one) also as a 3-wrap prusik.
- Take a double-runner, and girth-hitch it around one of your boots. Slide your hand up that double-runner to about the height of your knee, then tie an overhand in it to create a clip-in point. Clip that to the 2nd (the lower) prusik hitch that’s on the rope (this carabiner can be a non-locker.) This setup serves as the equivalent to the “foot prusik” from glacier travel.
- As you ascend, add backup knots on the climbing rope itself below you, so that something would catch you if a prusik fails. You can do that “rolling clove” strategy, or you can keep accumulating multiple figure-8-on-bights on a big locking carabiner on your belay loop.
- This video shows a lot of this really well: https://www.youtube.com/watch?v=CKOZDe0J4bI But note there are some differences between what she does, and what I’m recommending. First, she uses different types of friction hitches. (“Friction hitches” are a broad category, and specific types of friction hitches include the prusik and the autoblock which you’ve learned, and also the klemheist, which I wasn’t intending to teach in this course. Also, she uses the term “French Prusik”, which is actually just a synonym for the autoblock hitch.) I’d recommend using simple 3-wrap prusiks for both friction hitches, instead of what she’s doing. Also: You’ll almost certainly want more extension between the higher-prusik and your harness, thus my recommendation to extend it a bit with your PA.


