
If you clip bolts outside, here’s some base knowledge you should have about the bolts you are clipping, and what to look for.
Keep in mind that almost every bolt you clip outdoors could be described as “abandoned hardware on public land.” You should be treating them with the same mindset you use for webbing rappel anchors that you happen to come across. Someone put it there, maybe recently, maybe long ago; maybe they used great materials, or maybe they used materials that weren’t designed to last; maybe the years have been unkind to the material and it has degraded. (For webbing rappel anchors, “degraded” could be UV-light bleaching, or getting chewed on by a rodent, etc. For bolts, the concern is rust, or mechanical parts loosening.) In any case, the person who put it there is long-gone, and it is your responsibility as the person who is here right now, about it use it right now, to be able to inspect it a little bit, and be able to make a judgment call about how much to trust it. Yes, there is a difference between webbing rappel anchors and bolts, in that webbing rappel anchors are quite simple to replace, and anyone carrying a bit of spare webbing or cord can do so; whereas bolt-replacement-work is highly technical & involved, requiring specialized-tools, specialized-skills, and an immense amount of time. But at least being aware for the state of a bolt is still an important skill, and may change how you choose to use it, or what you would tell others about it, even if you cannot change the bolt at the time that you’re using it. Hopefully, this post gives you a little more awareness about what you could/should inspect, as a user of existing bolts.
- Parts of a bolt
- Metal types
- Know some common sizes
- A few common bolt-types, just to know
- Recognizing “bad bolts”
- It’s a spectrum: How “bad” is that “bad bolt”?
For even more information, you could check out HowNot2’s bolting bible, which is an absolutely phenomenal resource, and probably more accurate than anything I describe here. But I also know it’s a lot, more than someone who just clips bolts probably wants to read. I’m hoping my page here is a less-overwhelming amount of information to absorb, targeted at an audience that clips bolts, but isn’t in the business of placing bolts.
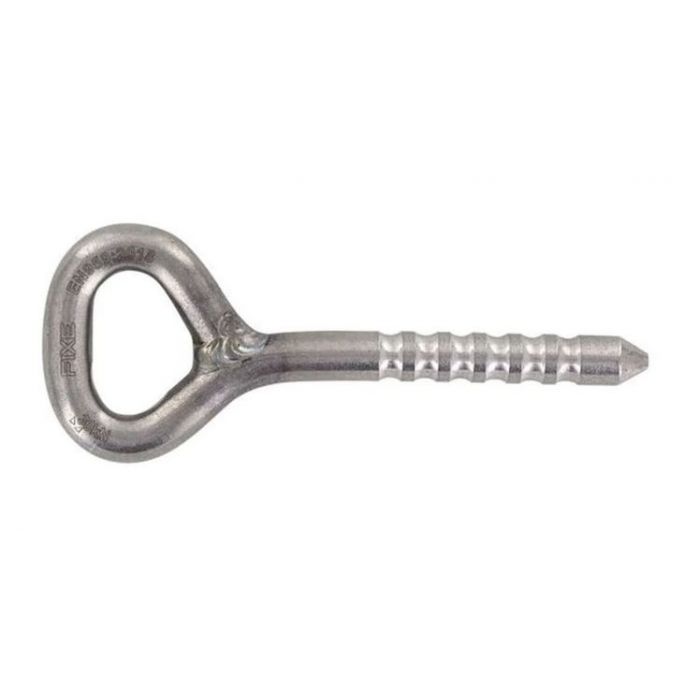
Parts of a bolt
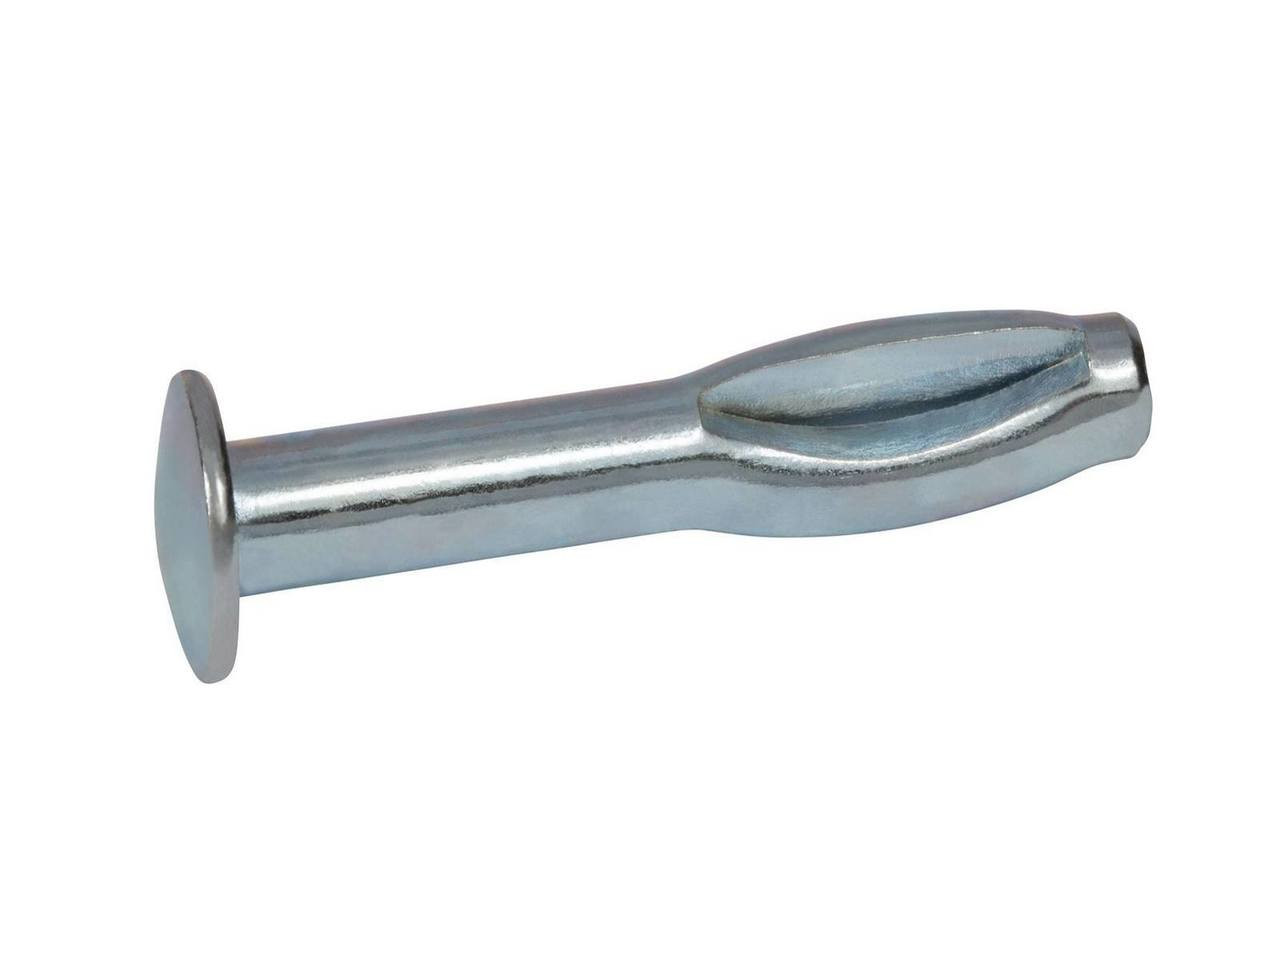
As a climber, you are used to seeing the part of the bolt that is outside of the rock, such that the bolt looks something like this:

However, to have a better awareness & understanding of the bolts you are clipping and trusting your life to, you should at least be able to name & identify the separate parts you are seeing here: the bolt’s hanger, vs shaft, vs nut.

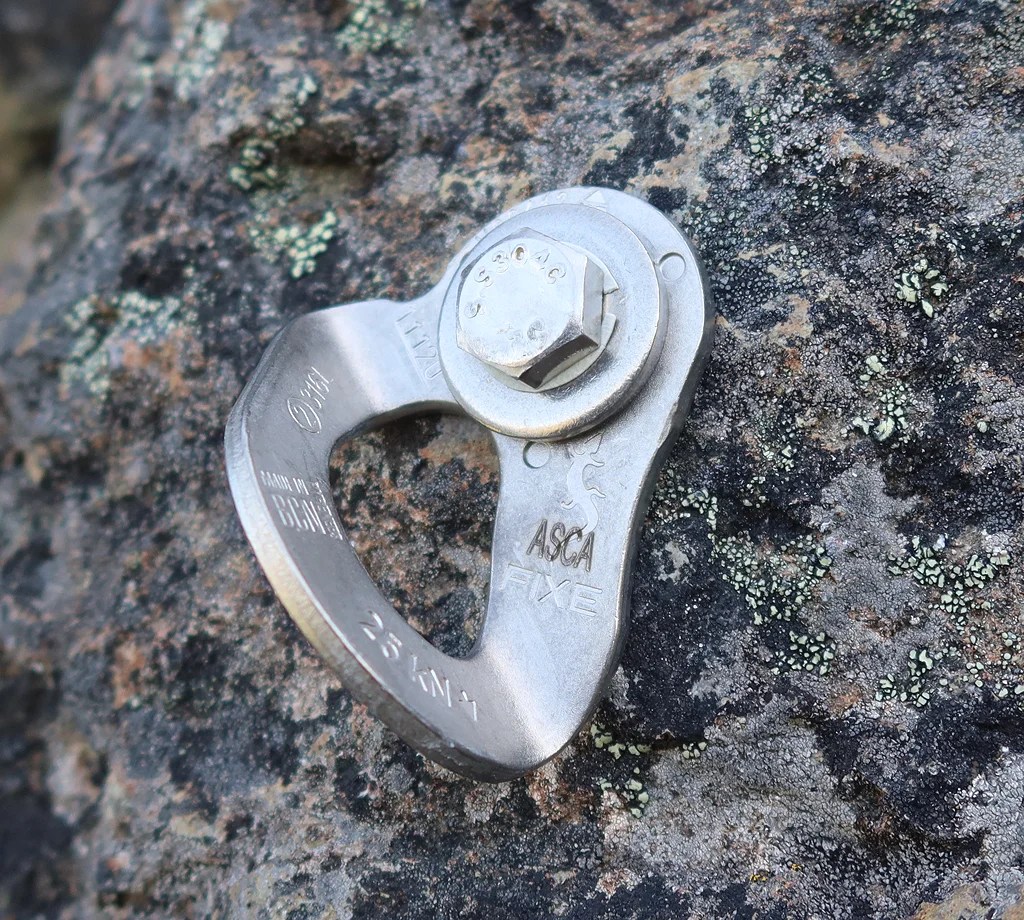
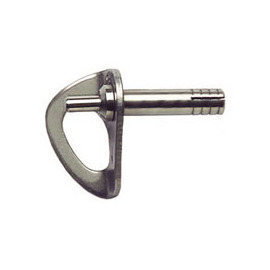
(For the sake of example, I’m showing a wedge bolt here. A wedge bolt is just one type of climbing bolt; not all climbing bolts are wedge bolts. But wedge bolts are very common, and fairly simple, so it’s a good place to start.)
Parts:
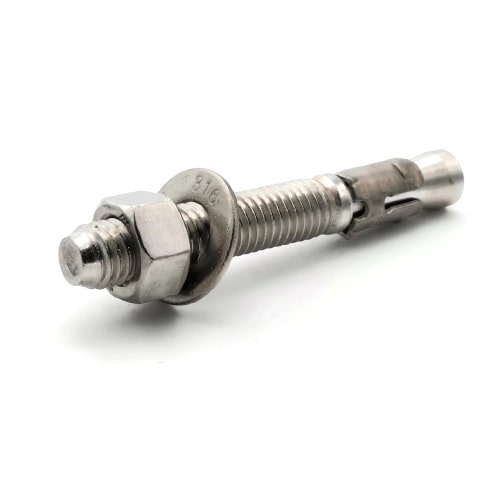
- the bolt’s shaft –> This is the main body of the actual bolt: it’s the threaded rod, and the expansion mechanism that does the work inside the rock.
- the bolt’s hanger –> The hanger is effectively just a connector: it’s just a piece of metal with two holes in it, one hole that matches the diameter of the bolt-shaft, and one hole that’s a convenient size & shape to clip a carabiner through.
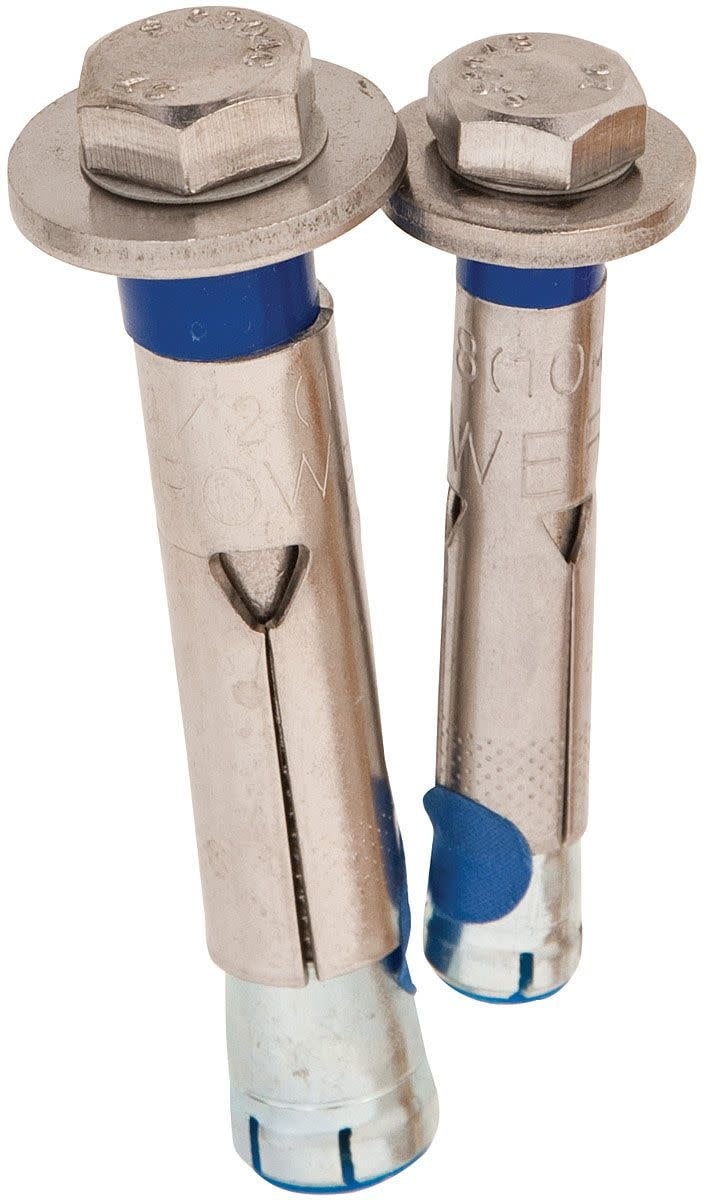
- the bolt’s nut & washer –> These go on the outside of the hanger, holding the hanger on the shaft of the bolt. Also, the nut is what makes the expansion-mechanism actually expand. When the nut is turned with a wrench, it pulls the bolt shaft outward, forcing the cone into the expansion-clip, causing it to expand outward side-to-side within the hole in the rock. This little animation shows that well:
Look again at the view you typically see of any climbing bolt as the climber. Notice how much of what you are seeing is just the hanger. Notice the bolt’s shaft, and the nut & washer on the shaft too, and how little of the visual field they take up here. When you attempt to inspect a bolt, make sure you are noticing the bolt’s nut, shaft, and hanger all separately. It’s easy for novices to only notice the hanger, and only comment on the hanger, even referring to the hanger as “the bolt.” While the hanger is indeed an important part, the condition of the bolt’s main body–the shaft & nut–is arguably even more important as a place you should be focusing your attention on when inspecting a bolt overall.
Metal types
For the purposes of climbing, there are four types of metal you should know a little about: aluminum, plated steel, stainless steel, and titanium.
- Aluminum –> Aluminum’s biggest advantage is that it’s lightweight. It also doesn’t rust. However, it’s not the most durable: if something abrasive rubs against it with a lot of pressure, aluminum will wear away faster than other types of metal. Raw aluminum is a dull whiteish-grey, but it’s very common to see aluminum in all sorts of fun colors thanks to “anodization” (an electrochemical process that adds a fairly durable outer layer to the aluminum, which can hold a color dye to the surface better than paint.) Most of the climbing hardware you own & carry around is aluminum; it was designed that way because it saves weight. Your carabiners are aluminum. Trad gear like nuts & cams are mostly aluminum (though with some steel parts. e.g. a nut is aluminum for the actual nut part, but then has a steel cable running through it for clipping. Cam lobes are aluminum, but the axles those lobes pivot around are steel.)
- Raw steel –> Steel is strong and durable, and is cheaper, costing roughly one-third as much as aluminum, but also steel is also almost three times heavier than aluminum. Steel is great for a lot of fixed infrastructure that we’re not carrying around (and thus don’t care about the weight,) like climbing bolts that just stay in the rock. However: steel does rust anywhere moisture is present. Raw steel left outside would rust away into something dangerously unable to hold loads after some number of years. In order for life-safety equipment to be made of steel and left outside, something needs to be done to attempt to reduce the chance of it rusting. Hence the next two broad categories of steel:
- Plated Steel –> One way manufacturers try to stop steel from rusting is to coat it in something to protect it. In this case, finished steel parts are coated in zinc. “Plated Steel“, “Galvanized Steel,” and “Hot-Dip Galvanized” all refer to a steel part coated in zinc, and often any of those three more-specific terms are lumped together and all referred to as “plated steel,” since the resulting difference between them is how thick the zinc coating ends up being (zinc-plated refering to the thinnest zinc coating, and hot-dip galvanized referring to the thickest zinc coating.) However, regardless of the thickness of this zinc coating, the fact is that climbing hardware gets beat up: it gets banged against rock on its way to installation, scraped against metal tools during installation, or another metal thing grinds against it under weight (when a climber clips a metal carabiner and weights it), or a dusty rope gets dragged over it with a sandpaper like effect. Scratches are inevitable, and as soon as a scratch goes through the thickness of the thin zinc coating, then the rusting process is able to begin, and it’s all downhill from there. In other words, virtually all plated steel climbing hardware is going to end up rusty and in bad shape eventually. In unfavorable conditions (crags that get a lot of moisture, like a rainy season), “eventually” could be like 5 years. In favorable conditions (i.e. in a very dry environment), “eventually” might be a few decades. “A few decades” might sound like a timeframe you don’t have to worry about, but it’s a mistake. Unfortunately, a lot of bolts were placed in the early 2000’s, and 1990’s, and 1980’s, and 1970’s with that kind of mindset, it’s now a major problem. In the scale of climbing history, “a few decaces” or less is unnacceptably short for “permanent” life-support hardware. Bolt-replacement done the right way takes many times more effort than it took to place the first bolt originally, and no one is doing so except a few unbelievably generous volunteers. All that is to say, the climbing community has (hopefully) finally learned a lesson: plated steel (of any type) should definitely NOT be used for bolts themselves (as bolts in the rock are very hard to replace.) As for the easier-to-replace outside-the-rock anchor components, like chains & quicklinks on permanent anchors, it’s arguably “okay” to use plated steel, though personally I’m a fan of avoiding plated steel altogether and using only stainless for everything. More on that later…
- Stainless Steel –> Another way make steel resistant to rusting is a change to the chemical recipe that makes up the steel in the first place. By adding certain amounts of chromium (and possibly other ingredients) to the recipe before the steel is formed, the resulting alloy has a new behavior: it will form a passive film on its surface as a reaction to oxygen. Since this chemical property of the steel alloy itself, and not just a coating, it doesn’t matter how deep a scratch happens, or gouge, or even a cut all the way through: the chemical property is throughout the steel itself, so any exposed surface that doesn’t yet have that passive film goes ahead and forms that passive film in the presence of oxygen, effectively healing its corrosion-resistant coating. Stainless steel can have an expected lifespan of 100+ years, even in a wet environment, and therefore stainless steel should be the default choice for any bolts placed in the modern era. (As long as it’s not a salty wet environment! Crags within a few miles of oceans or saltwater seashores are the exception here.) The downside of stainless steel is that it costs twice as much as plated-steel. For self-funded volunteers, if you’re just talking about one bolt, it’s easy to choose the $6 stainless-steel bolt instead of the $3 plated steel bolt because it’s the right thing to do, as a single $3 difference is no big deal. There’s more temptation to do the wrong thing when buying a hundred bolts at the time, where a hundred plated bolts cost may $300, and a hundred stainless steel costs $600, seemingly and arbitrary $300 more. So everyone should be using stainless steel, but you’ll still find “modern” bolts in plated hardware, which is very-poor-form. For you, as a user, it’s worth at least being able to identify which type of steel you’re seeing, just to know, and to add useful information if telling anyone else about the state of the bolts you’ve found.
- Titanium –> Titanium is expensive, often twice as expensive as even stainless steel. It’s lighter (not that that matters much for permanently fixed things like bolts.) Its biggest advantage though , is that it offers the most extreme rust-resistance. For environments where salt could be present (e.g., crags within a few miles of oceans or saltwater seashores), titanium becomes the only acceptable option, as even stainless steel can’t resist rust long term in the presence of salt.
Identifying Plated Steel vs Stainless Steel
Focusing on just plated steel vs stainless steel: You’ll come across plenty of plated steel out there in the wild, and most of it is still plenty safe at the moment, but it’s good to learn to identify the subtle difference between the appearance of plated-steel and stainless-steel, just to have the best awareness.

Identifying if the steel in front of you is plated steel or stainless steel:
- shape –> The shape of the object, or what the object is, does NOT tell you anything about whether it’s plated steel or stainless steel. The exact same objects could be made out of either material.
- presense of rust? –> In the wild: if something has started to rust, then it almost certainly was plated steel, that’s easy enough to identify. On the other hand, a complete lack of rust doesn’t really give you information one way or the other, it could be stainless, or it could be plated steel that just hasn’t started rusting yet, so you’ll need to look for other cues.
- color –> There is sublte a color / appearance difference that’s often the first & best clue for telling the difference. It’s relatively-easy to see when you have plated steel and stainless steel objects sitting next to eachother, but much harder to see if you’re looking at one or the other without the other present as a reference. Both types of steel are silvery in color, but plated steel’s silver is kind-of-aggressively bight, a “white” shade of silver, and sometimes has a very slight rainbow irradescense to it. (Note the slight rainbown sheen on the part of the hanger that’s catching the light in the example-picture above.) Stainless steel’s silver is a darker shade of silver; it’s silver but with overtones of dark colors. Stainless steel will often be polished, and thus have a relatively-better reflective surface for reflecting the colors of its surrounding enviroment to you. (Back to plated: Hot-dip galvanized will often be a drab dark grey instead, with no shine at all.)
- markings –> Look for stamped or laser-etched markings on the steel. If those markings include “316” or “304”, those refer to specific sub-types of stainless, and give you near-certainty that the thing you’re looking at is indeed made of stainless steel. If it’s a metric part (like a 10mm bolt or nut), it might be stamped with “A2” or “A4”, which effectively mean the same thing as “304” and “316”, respectively. If the thing you’re looking at does NOT have a marking that indicates that it is stainless steel, it’s highly likely it is infact plated steel. Stainless steel is more expensive, and manufacturers want you to know you are getting those advantages so that you’re willing to pay extra for it, so if something actually is stainless, they’re almost certainly stamp it to say so.
- magnetism –> If for some reason you are carrying a magnet around: plated steel will always attract a magnet, versus stainless steel which may or may not attract a magnet, depending on variety. I hear about checking to see if a steel object is magnetic, but in practice I don’t find it all that useful of a test, because (1) I usually don’t have a magnet in my pocket I can whip out and check a bolt with while climbing, and (2) it’s not that conclusive of a test anyway.
Galvanic Corrosion
This section on “galvanic corrosion” is a bit of a geek-out on a topic you, someone who’s just clipping bolts, probably don’t really have to think about. Feel free to scroll ahead and skip this one.
“Galvanic corrosion” is a term for a chemical process that can occur when two different types of metal are directly touching, within a solution that can carry an electric charge (e.g. water,) causing one of the metals to rust at an accelerated rate. Mixed types of metal in contact have an electropotential difference between them, causing ions to move from one to the other, making one of the metals rust slower-then-normal, and making the other metal rust faster-than-normal. In short: if two different types of metals are touching, and they get wet, one of them ends up being the loser and can rust much more rapidly than it would have otherwise.
Which type of metal “wins” (the cathode) and which type “loses” (the anode) with be defined by which metal type has the lower anodic index:
| anodic index (V) | |
|---|---|
| will act as a cathode (the winner, rusts less) | |
| ↑ titanium | -0.30 |
| ⏐ stainless steel | -0.60 |
| ⏐ aluminum | -0.90 |
| ↓ zinc plated or galvanaized steel | -1.20 |
| will act as an anode (the loser, rusts more rapidly) |
For example, if the two types of metal that are touching while water is present happen to be stainless steel and plated steel, then stainless steel will act as the cathode (the winner) and be unaffected, whereas the plated steel will act as the anode (the loser) and will be the metal that rusts much more rapidly than it would have otherwise.
How much do we have to worry about galvanic corrosion? In the context of climbing hardware, there are two possible ways to avoid this problem:
- Don’t mix metals. If all the metal components touching eachother are the same type of metal, then there’s no electropotential difference between them since they are the same, then at least galvanic-corrosion plays no part (we only have to worry about whatever the regular corrosion potential for that metal type would be.) (Fortunately, as far as I undertand, difference within stainless steel (e.g. 316 vs 304) is not enough of a difference to cause galvanic corrosion, so I think it’s okay to mix 316 and 304 without worry.)
- Or: Don’t have any water involved. Mixed-metal-types can touch without any galvanic corrosion taking place as long as they stay perfectly dry. For something that spends most or all of its life indoors & dry, there’s no worry about galvanic corrosion. Your nuts, cams, and even carabiners (steel gates) are all made out of mixed metals, with aluminum parts and steel parts directly touching. If they happen to get wet one day outside, but you take them home, dry them out, and store them in a nicely dry room, then they’re totally fine, there’s no long-term wetness that would allow any galvanic corrosion to occur. But for something that live outside permanently: it’s going to experience a lot of wet days. It’s going to get rained on, and it’s not like it gets moved to a dry enviroment in the days following the rain. The biggest concern is about small locations that are capable of holding water, like the inside of a bolt-hole, or the microscopic gap between the back of the hanger and the rock-surface. Mixed-metals within the components of the bolt itself (shaft, hanger, washer, nut) are pretty bad news for the health of that bolt.
Outside of the bolt itself though, when it comes to external anchor-hardware hanging from the hangers: galvanic-corrosion is still possible, but as far as I understand, it’s much less of a concern. The small metal point-of-contact between, say, a stainless-steel quicklink and a plated-steel chain hanging from it, is signififcantly less likely to hold water long-term than the inside of a bolt-hole is. Wet less often means galvanic corrosion is possible less often. Also, the replaceability of those external components is much easier. If an external component like a plated-steel lower-off carabiner gets horribly rusted, pretty much anyone with a crescent-wrench and a replacement-part can change it out in about a minute. Versus if some part of the bolt & hanger assembly is badly rusted and needs replacement, then you need someone with specialized skills and like 10 pounds of specialzed tools to come spend an hour on it.
Long story short: you don’t really need to worry about galvanic corrosion.
Another Concern with Plated Steel: Zinc Leaching
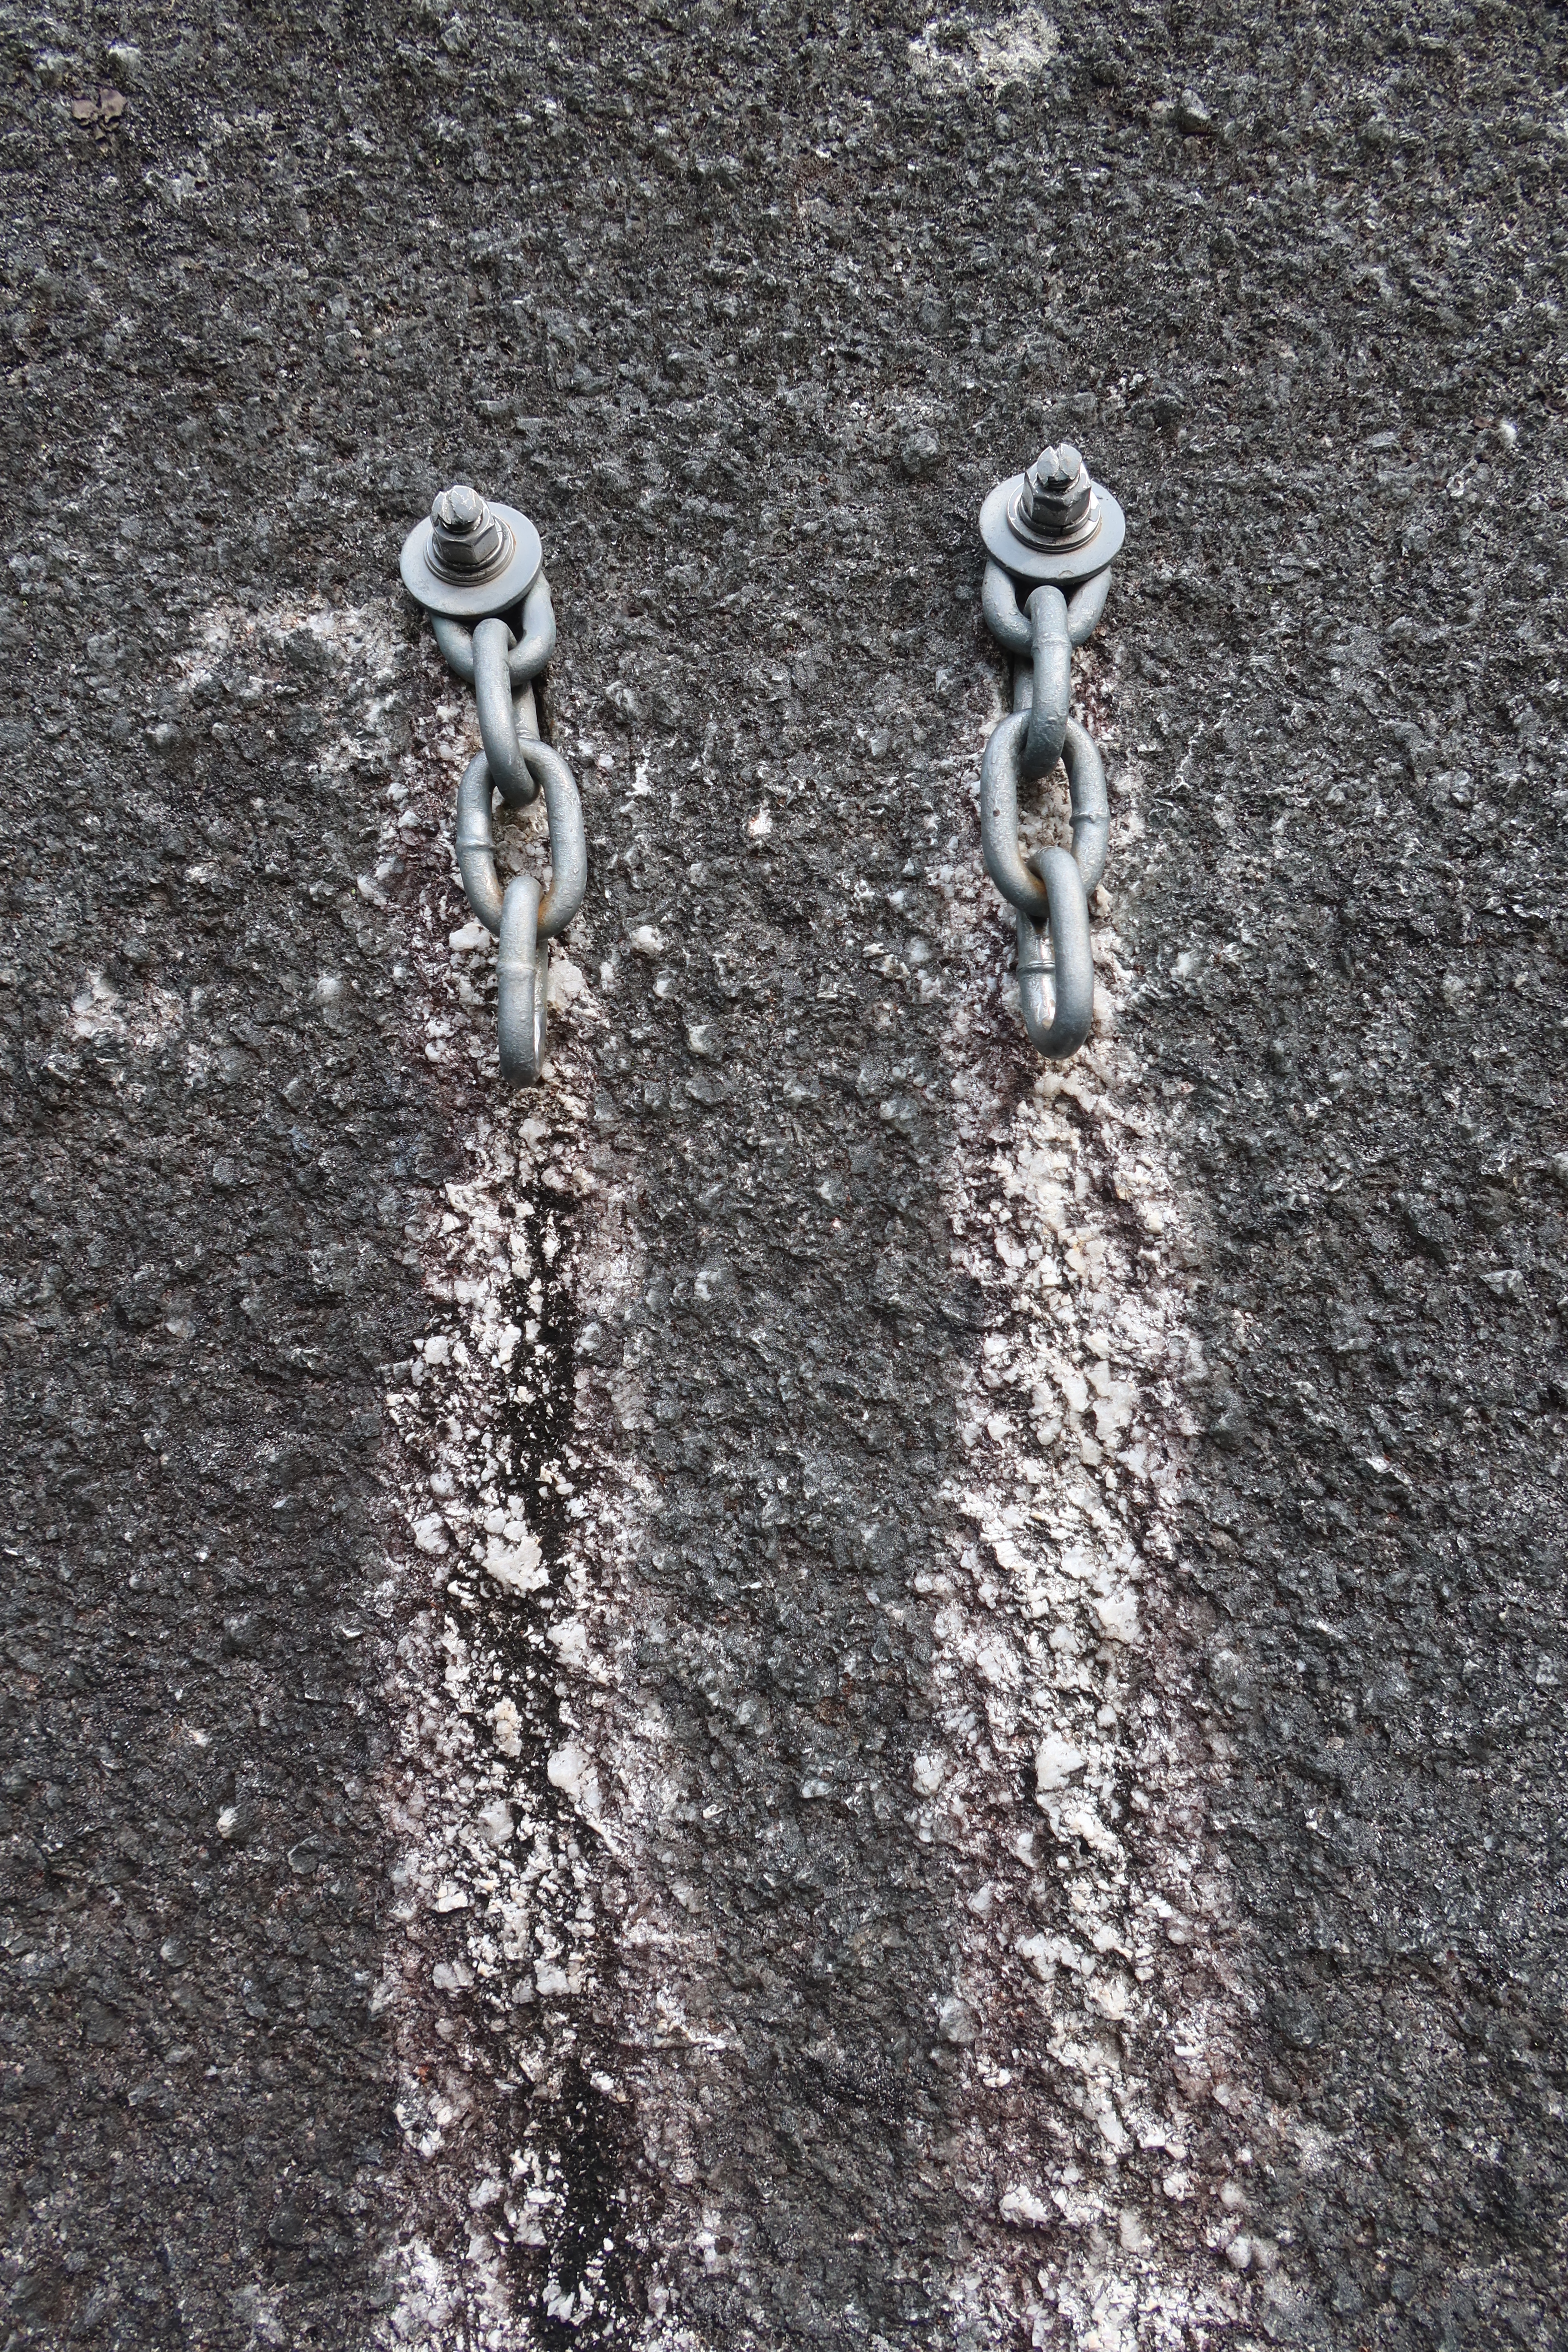
Yet another reason to dislike plated steel is that the zinc-coating tends to leech off of the metal and run down the rock over time, as the zinc-coated hardware gets rained on. The zinc run-off will kill natural lichens and discolor the rock, in a way that I find very visually garish and ugly. To minimize the visual impact of bolts, if all of the parts were instead stainless steel, so that none of the parts were zinc-coated, then we wouldn’t get this zinc-runoff-discoloration.
Know some common sizes
Bolts are measured by shaft diameter and length. (e.g. 3/8″ x 3.5″) As someone who is inspecting & clipping bolts (and not placing them,) it makes sense to focus on diameter. (Diameter makes a bigger difference to ultimate-braking-strength. Length is not always determinable once a bolt is placed, though some shaft-ends are stamped with a letter code that indicates length. If the installer chose a sensible diameter, it’s usually reasonable to assume that they also chose a sensible length.)
By modern standards, a diameter of 3/8″ or larger is great, whereas anything skinnier than 3/8″ is considered sketchy. (And in addition to simply being smaller than we’d prefer, diameters less than 3/8″ also tend to indicate that the bolt was placed in the 1980’s or earlier, back when those diameters were considered acceptable, so the bolt may also be quite old.) Some typical bolt diameters:
| Bolt Shaft Diameter | Trustworthy? | Nut (Wrench) size |
|---|---|---|
| 1/4″ (6.35mm) | 🔴 | 7/16″ (~11mm) |
| 5/16″ (~8mm) | 🟠 | |
| 3/8″ (~9.5mm) | 🟢 | 9/16″ (~14.3mm) |
| 10mm | 🟢 | 17mm (11/16″ SAE will fit too) |
| 1/2″ (12.7mm) | 🟢 | 3/4″ (~19mm) |

This is a bit above-and-beyond, but if you really want to get good at recognizing bolt shaft diameters, I found that I learned best by actually holding each of these sizes in my hands. If you wanted to do this, you could put together your own little “get a feel for size” collection of example-hardware. They don’t have to be actual climbing bolts if you’re just using them as examples to hold & feel, as generic hardware store bolts have the same dimensions. As long as you’ll NEVER put these things actually in the rock, you can go to a hardware store and buy:
- 1/4” diameter bolt (and a nut that fits on it)
- 3/8” diameter bolt (and a nut that fits on it)
- 1/2” diameter bolt (and a nut that fits on it)
- try to get each of the above in plated steel (might be labeled “zinc” or “galvanized”) and also one or two of the above in stainless steel (preferably one of the larger-diameter bolts) so that you can hold both metals in your hands and learn to recognize the subtle color difference
- a tiny 1-liter stuff sack, or a reusable silicone ziplock bag, both make extra carrying cases to store your little “get a feel for size” collection.
A few common bolt-types, just to know
Here are picture examples of Wedge, Sleeve, Button-head, Nail-drive, Glue-in, and Concrete screws; in order to help you be able to identify the exact type of a bolt you may encounter. Why do you need to know? Almost all these types are trustworthy (buttonheads being the primary exception). Awareness of different types gives you a better foundation for awareness of how to assess the health of bolts within each type. Also, if you are ever reporting a suspected-bad-bolt to someone else or a local-climbing-organization that might do some bolt-replacement work, they’ll need to know exactly what type of bolt it is, as that will define a different set of bolt-replacement-tools they’ll need to bring along in order to do that work.
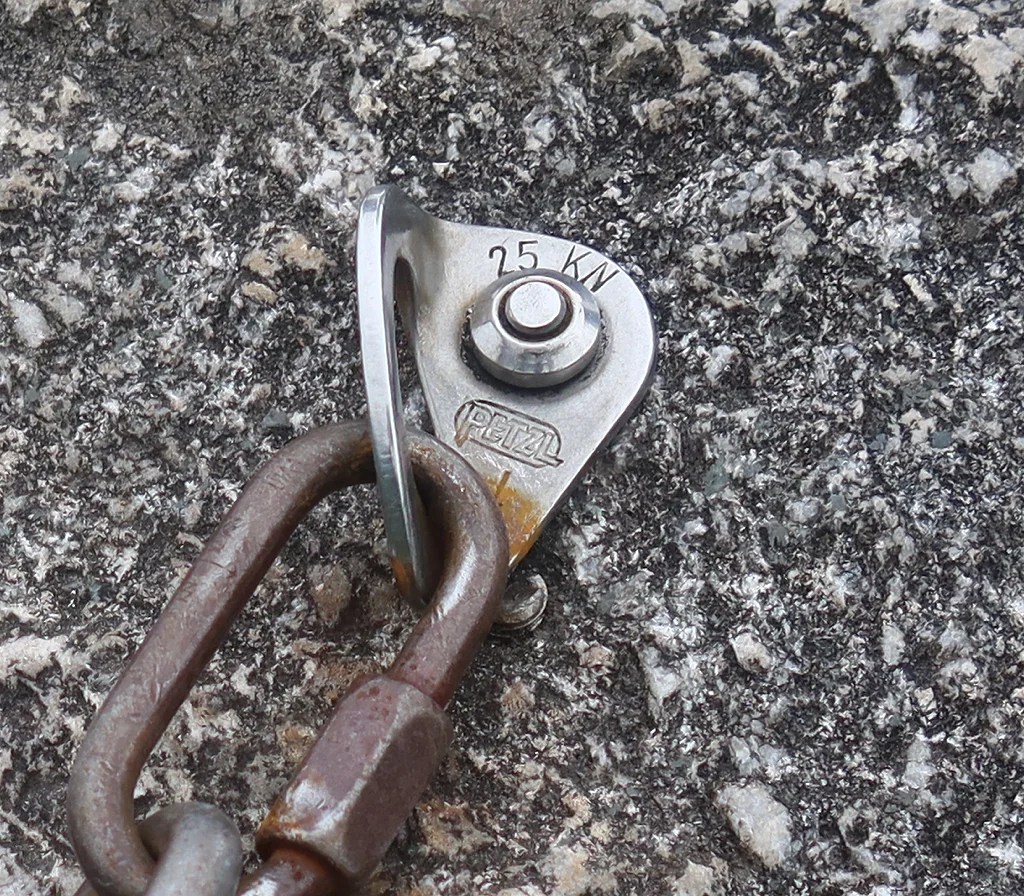
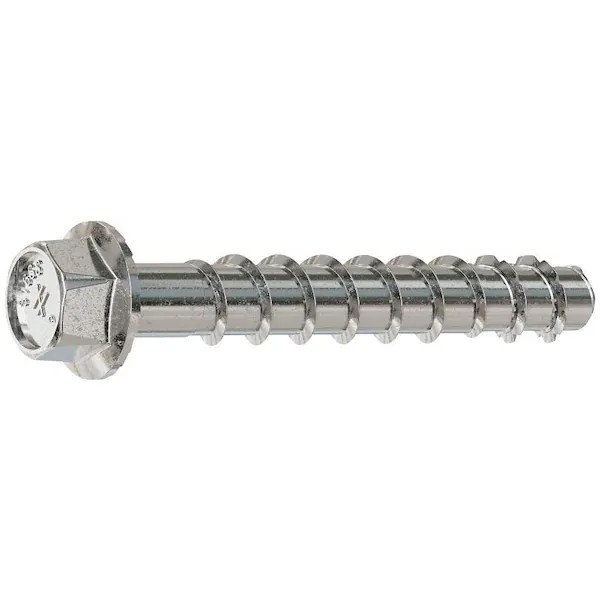
Wedge Bolts
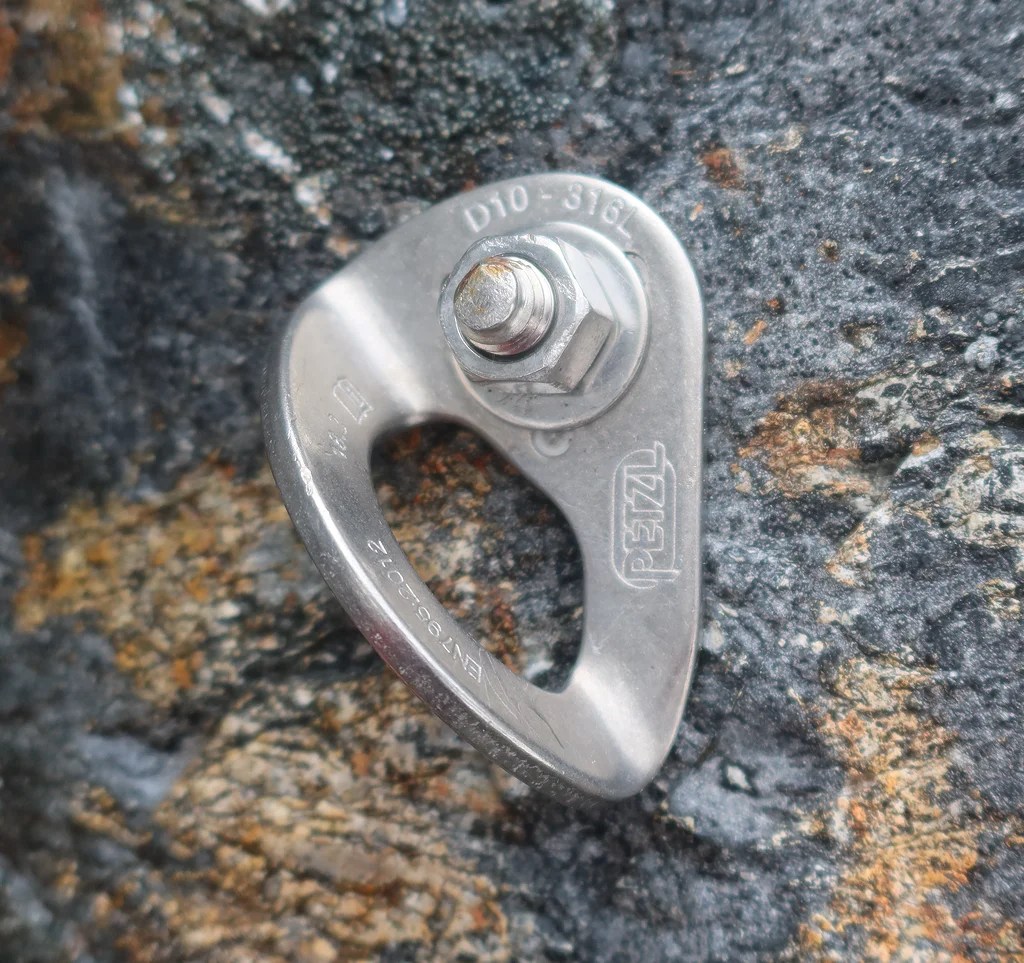
A nice modern wedge bolt. Wedge bolts are by far the most common category of bolt I’ve seen in areas I typically climb at (around the Pacific Northwest.) I can tell that this is a wedge bolt because the bolt shaft’s threads are visible outside of the rock, sticking up ideally ~3 threads above the nut. The hexagonal nut would have been tightened by a wrench to a specific torque value to make the mechanics of the expansion-cone and expansion-clip deep inside the hole do exactly what we want them to do. Also, I can tell that all the parts here are stainless steel, partly out of keen familiarity with the “slightly darker grey” color of stainless steel (as opposed to plated steel), but the bigger clue comes from what’s stamped on the hanger: “316”, which tells me that the hanger is indeed stainless steel. (Okay, there is a tiny bit of rust at the outside tip of the threaded rod, but that’s likely because it was hammered in with a non-stainless-steel hammer, and a bit of the hammer’s metal transferred there during the hammering process. Assuming that is indeed the case, this bolt will not rust any further during its lifetime, and it’s all fine.) Also stamped on the hanger is “D10″, suggesting that the hanger’s bolt-hole diameter is a metric 10mm. Eye-balling the bolt shaft, my best guess is that it’s 3/8″ diameter, which is indeed a perfectly happy bolt size, but we’d only know that for sure if we had a specific wrench size with us to do a test-fit on the nut, to see if the nut is exactly 9/16″, which would proove that the bolt shaft is indeed 3/8”. It is important that bolt-shaft-diameters and hanger-hole-diameters are a close match, less than a milimeter apart. Since 3/8″ is about 9.5mm, it’s very common and perfectly good to use with a 10mm hanger-hole-diameter. Everything about this bolt makes me happy!
Sleeve Bolts
Here’s an excellent sleeve bolt example. In contrast to the wedge bolt shown prior to this, where you could see the threads on the bolt-shaft outside of the rock; sleeve bolts entirely hide their threaded parts inside the rock, and inside a metal sleeve. What’s visible outside of the hole is still a hexagonal head that a wrench can be used on to tighten the bolt and engage its expansion mechanism, but the hexagonal head is not itself a nut. The hexagonal head is not threaded onto a threaded rod, it is part of the threaded rod: turning the head turns the entire threaded rod, since they make up the same part. Inside the bolt hole where we cannot see, at the deepest end of the bolt shaft is the real nut, the thing that’s actually threaded to move along the threaded-rod, though it’s a strange-looking nut because the nut’s outer-surface is not hexagonal like we usually think of nuts, instead the nut’s outer surface is more of a smooth cone shape. Turning the threaded rod sucks that cone-shaped-nut inside a metal sleeve, forcing the sleeve to expand, creating the expansion mechanism that gives this type of bolt its strength. This is probably easier to understand if you see it rather than read about it, so if you’re curious, watch this video about sleeve bolts: https://www.youtube.com/watch?v=AK7XaWmarzw (The most common & most trusted brand of sleeve bolt is the “Fixe 5-piece bolt”, which is a bit of a misnomer because it’s made of more than five pieces.) Sleeve bolts are an excellent type of bolt for climbing, as long as they follow the basic rules about diameter (3/8″ or larger) and metal-type (all stainless steel.) The bolt in the picture above is all stainless steel: notice the “304” stamped on the hex head, and the “316” stamped near the upper-left side of the hanger. In some minor nuanced ways, sleeve bolts might actually be “better” than wedge bolts: it’s nice that their hex head sticks out from the rock less than the threaded-rod end of wedge bolts, making it less likely to get in the way of a of a carabiner getting pulled in an odd direciton on the hanger; it’s nice that their sleeves spread out the expansion-force on the rock around them over a larger surface area (though that only matters in softer rock types, like sandstone), and it’s nice that although their removal requires a few more specialty tools, it can be removed with entirely non-battery-operated tools, which is important for wilderness-area maintenance. Still, wedge-bolts remain more common because they are very reliable, their threaded-part is outside of the rock where it can be visually inspected easily over time, and perhaps most significantly: they are slightly cheaper. (After all, how much money have you actually donated to a local-climbing-organization doing bolt-replacement work?)
Button-heads (a.k.a. “split shaft” bolts)
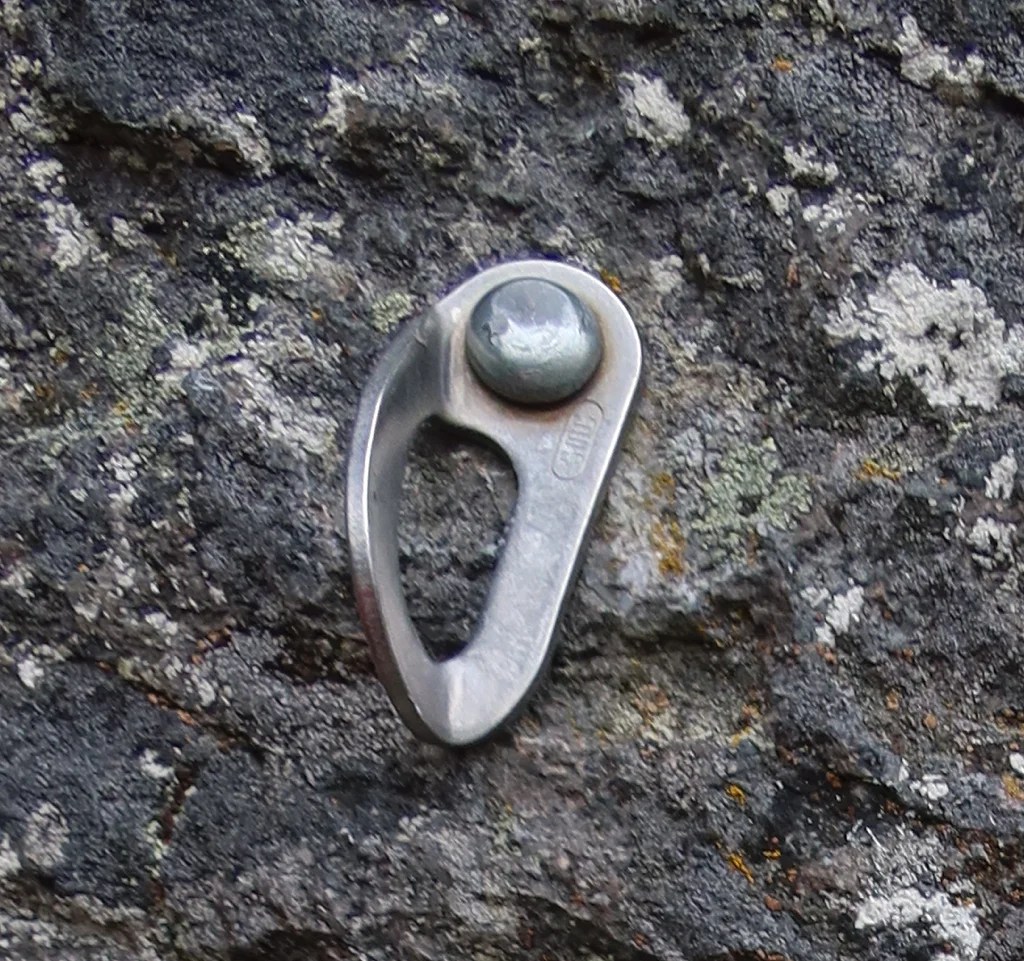
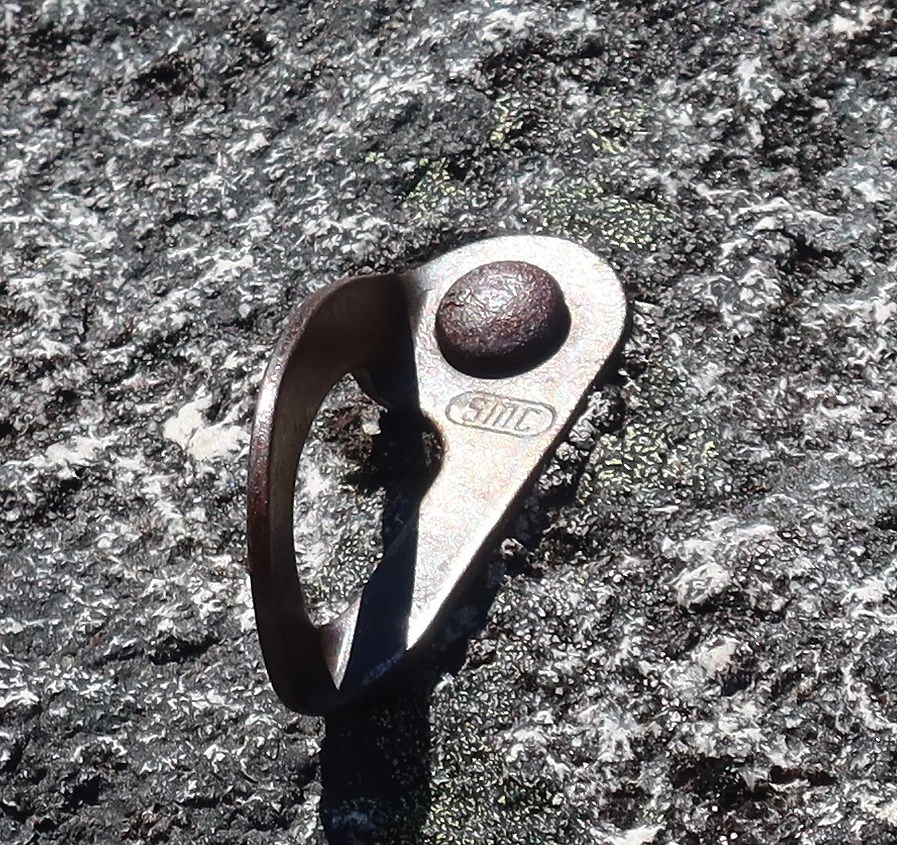
Okay, buttonheads… (Sometimes also known as “split-shaft bolts”.) Buttonheads are not good. Once upon a time buttonheads were considered “bomber” if they were brand new. However, they were primarily placed during the 1980’s or earlier, so they’re horrifically distant from “brand new” now. You can identify a buttonhead by the rounded top to their bolt shaft, which looks very similar to a snap-button on a coat. Notice there’s nothing hexagonal here, which tells you there was nothing that a wrench could operate on, so there is no torque-based expansion mechanism involved. Buttonheads are simply pounded into a drilled hole with a hammer, and that’s it. They’re just a pressure-fit in there; there is no additional wrench-activated-expansion-mechanism. They’re more akin to just a nail in the rock. They can be removed with an outward pull that’s simply on-par with the hammer force that drove them in. Furthermore, the bolt shaft was almost always made with non-stainless-steel, so it’s almost certainly been eaten away by some amount of rust. (These two buttonhead photos are real buttonheads I’ve found in the wild within the last five years: one in Tieton, and one in Darrington. Though in both cases, it looks like they used to be part of a prior two-bolt anchor, and then another newer two-bolt anchor was placed right next to them, as part of anchor-replacement work that didn’t end up removing the old hardware. This is why you need some awareness of bolt-types, since the old bad buttonheads are still there, right next to newer bolt types, and you should pay attention to which specific bolt you are clipping: there are now four bolts at that anchor, and you shouldn’t be clipping the buttonheads if you don’t have to.)
Going slightly off-topic from the buttonheads themselves, I also want to talk about the hangers that happen to be on these two specific buttonheads: They are both “SMC” hangers (from the Seattle Manufacturing Corporation; a great gear manufacturer, other than that one since-recalled hanger they sold in the 1970’s and early 80’s.) It’s important to know that there are two different generations of SMC hangers: an older generation, on which the letters “SMC” are horizontal, the metal used was plated-steel, and the metal-thickness is thinner than it should have been, so they’re especially prone to breaking. The picture on the right shows one of these old-generation hangers. Versus a newer generation, on which the letters “SMC” are vertically-oriented, the hanger itself is made of stainless steel (though the bolt used with it could potentially still be plated steel), and a thicker metal was used. The picture on the left shows one of these newer generation SMC hangers. If used on a better bolt type than a buttonhead, the newer-generation SMC hanger (the one with vertical letters) could still be considered trustworthy today; whereas the older-generation SMC hanger (the one with the horizontal letters) is rightly-nicknamed the “death-hanger”, and should not be trusted at all. Looking for the text-orientation is the key to identifying which is which.
Nail-Drive Bolts
Here’s an example of a nail-drive bolt. This specific bolt is a model called the “Petzl Long-Life” bolt. This is a relatively rare & obscure type of bolt (or at least anecdotally: I’ve only ever found them in-person at one of the many PNW crags I tend to visit: the Burgers & Fries area of Squamish). This odd bolt does indeed mechanically expand, with a holding power more akin to a sleeve bolt than a buttonhead, even though you can see there is no hexagonal shape for a wrench to work on. In this case, the center shaft is like a nail that’s driven into the bolt as the last step in placement. This bolt design involves a special sleeve that does indeed expand when that center “nail” is driven into it. As they implied with their “Long-Life” marketing name, Petzl only ever manufactured this bolt using stainless steel, so in this case, finding this shape of bolt does indeed assure you that it is stainless steel. (In this photo, you do see some rust on the stainless-steel hanger, but it’s not the stainless steel that’s rusting. Here, the attached quicklink was plated steel, which has rusted considerably, and its rust has rubbed off on the hanger.) I’m not aware of any significant advantages to this type of bolt design over a wrench-tightened wedge bolt or sleeve bolt, though, as long as those wrench-tightened bolts are also made out of stainless steel. When replacement is eventually needed, nail-drive bolts are more difficult to replace than wedge bolts or sleeve bolts.
Glue-In Bolts
Glue-in bolts. Glue-in bolts are not mechanical; they have no moving parts. They do not expand and create any outward pressure to grip the rock. Instead, a slightly larger hole is drilled, filled with a special epoxy (i.e. a kind of glue), and then the bolt is shoved into that glue-filled hole before the glue dries. Once the epoxy dries, it’s not so much that it’s an adhesive that sticks to the metal of the bolt, it’s more that the dried epoxy then very firmly holds its shape, and it has formed around any divots or grooves in the shaft of the bolt, leaving the bolt no way to mechanically come out because of the dried epoxy in it’s way. (Think of a metal key half-turned in a lock, and trying to pull the key out while it’s in that position. The key won’t come out while half-turned, not because there’s something adhesive inside the lock, but because while half-turned, there is no open-pathway for the teeth to travel to pull the key out. Glue-in bolts stay in the rock like a permanently-half-turned key in a lock.) Glue-ins can be very strong, and very long-lived. They are extra-resistant to corrosion, since the original bolt hole gets entirely filled with epoxy, preventing water from getting in and sitting around inside the bolt hole (versus mechanical bolts like wedge or sleeve bolts, that inherently have small spaces inside their bolt-holes where water sits around somewhat permanently.) However, the steps to install a glue-in in the first place are more complicated, with more that could go wrong, compared to a mechanical bolt. (Have to wait for the glue to dry before they can be used; they can’t be immediately weighted, so they kind of have to be installed on rappel or top-rope with something else serving as an anchor; sometimes the glue doesn’t cure correctly, damaged ones are a lot harder to remove & replace, etc.) If all goes well, the resulting bolt placement can be one of the best & most durable options, but they aren’t always worth the hassle.
Concrete Screws

Concrete Screws. Concrete screws are another somewhat-odd and somewhat-rare category of climbing bolt. (At least they are at the time that I write this. I get the sense that they’re kind of a “new” / “experimental” type of climbing bolt, they’ve only started to be used recently, and they haven’t yet been used for climbing long enough to know how they’ll hold up over the long term.) They’re recognizable thanks to their odd-shaped head outside of the rock: it’s a hex head to the bolt-shaft, kind of similar to a sleeve bolt, except instead of having a washer as a separate piece, the head itself has a built-in in flange-shape at the base of the hex-head. These mechanical anchors are, quite simply: screws. They screw into the rock, with their screw threads cutting threads into the rock as they go. This means they’ll only come out if they are intentionally spun enough to fully unscrew them, and it’s easy enough for anyone to visually verify that they’re fully screwed down tight. Like all types of bolts, we’re concerned about the fundamentals: they must be at least 3/8″ diameter in their bolt-shaft, and they must be made of stainless-steel. (I’ve certainly found some out in the wild that were not, that were instead plated steel, which would have a significantly shorter life.) For now, these bolts are new, and plenty solid. It’ll be interesting to see how these bolts rate 10 or 20 years down the line: maybe they’ll eventually become frowned-upon, or maybe they’ll become the new standard. It’s too early to tell.
Recognizing “bad bolts”
- https://www.boulderclimbers.org/news/2023/2/24/how-do-you-assess-bad-hardware-while-climbing
- https://www.petzl.com/US/en/Sport/News/2022-10-26/Aging-Anchors—The-Risks-and-Issues
- https://www.climbing.com/culture/built-to-last/
- https://www.climbing.com/skills/how-to-identify-bad-climbing-bolts/
- https://www.climbing.com/photos/bad-bolts-club-10-sketchy-bolt-types-that-you-might-be-better-off-not-clipping/
- https://www.accessfund.org/latest-news/can-you-trust-that-bolt
- https://www.mountaineers.org/blog/rock-climbing-anchors-bolted-routes
It’s a spectrum: How “bad” is that “bad bolt”?
In a perfect world, every single climbing bolt would be a new, modern, thick bolt, from a well-known & well-trust brand, with no rust on it. That kind of imaginary perfect world would exist if local climbing organizations (LCO’s) and rebolters had infinite time and infinite money so they were able to replace every single imperfect bolt out there. Every rusty bolt should eventually get replaced. However, there are so incredibly very very many bolts out there that are imperfect in some way, and the resources of LCO’s and rebolters are so limited, that tackling every one of them is quite impossible. And since it’s impossible, there has to be some triage, and some degrees of gradation of “how bad is it?”
There are different levels of “bad bolt”. I’m going to make up sort of a traffic-light-color-scale to try to categorize the nuance here as best as I understand it. (Note: I’m making this up based on the best of my understanding. Yes, I am a fairly experienced climber, with a decent-sized foundation of knowledge about bolts, i.e. just enough to sound like I know what I’m talking about, but I don’t know everything, I am not a metalurgist, and I am not a mechanical engineer; I am just one guy spouting an opinion based on half-formed understanding. All this is to say: Don’t trust me blindly. Use this to inform your own opinion-making & bolt-evaluations, but don’t take what I say as gospel, I very well could be wrong somewhere!! Climbing is dangerous, and you alone are responsible for your own decisions and your own safety.)
The scale I’ll use:
- 🟢 Green light → This is good; this is what we like to see!
- 🟡 Yellow light → Sure, it’s not perfect, but it’s probably fine. In an absolutely perfect world, it would get replaced eventually, but it’s pretty far from the top of the replacement-priority-list. You can clip it, and weight it, and fall on it, without stressing too much.
- 🟠 Orange light → It’s on its way to becoming a timebomb, but the day it fails is probably not today. Clip it and use it however much you have to, but if there’s a way to avoid it being the only thing protecting you from serious-fall-potential, that would be prudent. Keep in mind that it is suspect: What would happen if it did fail? What’s the backup? If one of these questionable bolts were to fail, how many other points of protection remain to potentially catch you before a ground-fall? Could you place some trad gear in addition to it? If a reliable-backup is distant or doesn’t inspire confidence, increasing the amount that you’re relying on this questionable bolt, then you are getting into question territory. If you still have to use it, then at least try to be “gentle” with it. (i.e. Really try to avoid taking a whip on it. Keep in mind very rough rules of thumb: rappelling, lowering, & top-rope falls can generate twice your body weight. Taking a lead fall can generate six times your body weight or more. If it’s an anchor you have to lower from or rappel from, avoid bouncing.) Again, think about what’s serving as a backup while you use this. It should definitely be reported so that it’s on the radar for replacement.
- 🔴 Red light → Holy fuck that’s incredibly bad. Go hard on strategies that avoid this bolt at all, like downclimbing, or being clear-eyed about the fact that climbing above this is effectively free-soloing territory. There’s too high a chance it will fail under mere body-weight, so do not lower or rappel off of an anchor that relies on this as a component. This is bad enough that there should probably be a physical sign and/or Mountain Project comment preventing anyone else from climbing this route until that bolt is rebolted.
How good or bad are various situations?
- The bolt is shiny, no rust, looks modern (wedge or sleeve or glue-in. Modern hanger. Bonus-points for reputable brand-name and info stamped or etched on the hanger.) Bolt shaft is 3/8” or thicker. 🟢 (Green)
- “spinners” ->
- Is it just the hanger spinning? If so, it’s a minor concern. 🟡 (Yellow)
- Does the bolt shaft itself spin? That’s a major-concern. 🔴 (Red)
- rust -> Rust does mean a bolt will eventually need to be replaced.
- there’s some rust, but so far it’s only color-change, the hardware would look fine if it wasn’t for that color. And nothing else is wrong with it. 🟡 (Yellow)
- What exactly is rusty?? Differentiate between the bolt shaft, the washer, the hanger, and the chains:
- bolt shaft, washer, & hanger are not rusty, but things attached beyond the hangers (i.e. chains) are rusty.
- if it’s just a color-change on the chains, don’t worry too much 🟢/🟡 (very light yellow, almost green)
- only the washer is rusty, but the shaft & hanger are NOT rusty: not ideal, but also not that big of a deal if it’s just the washer 🟡 (Yellow) (As long as the bolt shaft is not the thing that’s rusting, then it’s likely the portion of the bolt shaft that’s hidden inside of the hole is also not-rusty, and therefore the risk of “hidden worse rusting inside the hole” is pretty low, and the overall bolt is still plenty strong enough.)
- bolt shaft itself is indeed rusty: 🟠 (Orange) (It’s hard to know what’s really going on with bolts where the bolt-shaft is rusty. The big question is: how is the health of the bolt-shaft that’s inside the hole? And there’s not much of way to tell from the outside. It could be no-big-deal: steel can have thin layer of rust on its surface, yet be totally solid and still competely full strength below surface-rust. Or, it could be really really bad, where rust is fully decomposing the steel structure throughout. The tricky bit here is that likely what is happening inside the hole is different/potentially-worse than what we’re seeing on the surface outside of the hole. You kinda have to make a guess about the quality of the metal inside the hole, based on what you can see outside of the hole.)
- bolt shaft, washer, & hanger are not rusty, but things attached beyond the hangers (i.e. chains) are rusty.
- rust has changed the texture or shape of anything here (pitting, cracks, etc.) 🔴 (Red) (Especially if it’s the bolt shaft, where whatever you are seeing going on outside of the hole, it’s likely worse inside of the hole.)
- hanger type
- modern 🟢 (Green)
- not-modern 🟠 (Orange)
- bolt shaft diameter
- 1/4″ 🔴 (Red)
- 5/16″ 🟠 (Orange)
- 3/8″ – the diameter is at least good! 🟢 (Green) (Check all the other criteria here too in order to really assess it.)
- 10mm, 12mm, and 1/2″ bolt shafts – these are all wider than 3/8″, and thus 🟢
- bolt type
- buttonheads – They were considered “bomber” if they were brand new. However, they were primarily placed during the 1980’s or earlier, so they’re horrifically-distant from “brand new.” 🟠 (Orange)
- wedge bolts, sleeve bolts, “Petzl Long-Life”-type nail-drives, concrete screws, and glue-ins: all are good types! 🟢 (Green) As long as they’re good in all the other ways you should check too: minimum 3/8″ diameter, not rusty, no movement at in the bolt shaft itself, etc.
- touch the bolt, pull it side to side, pull on it outwards:
- No movement what-so-ever is a good sign! 🟢 (Green) But not a guarantee. (Check all the other criteria here too.)
- Does the actual shaft of the bolt move at all? 🔴 (Red)
What do you do when you encounter bad bolts?
There are so many good posts out there on the internet with guides to recognizing good bolts vs bad bolts when climbing, with great pictures to help with identification. However, many of those pages don’t go as far as I’d like into the next obvious question: Once you’ve spotted a “bad bolt” — you’re mid-route and face to face with a bad bolt — what should you do??
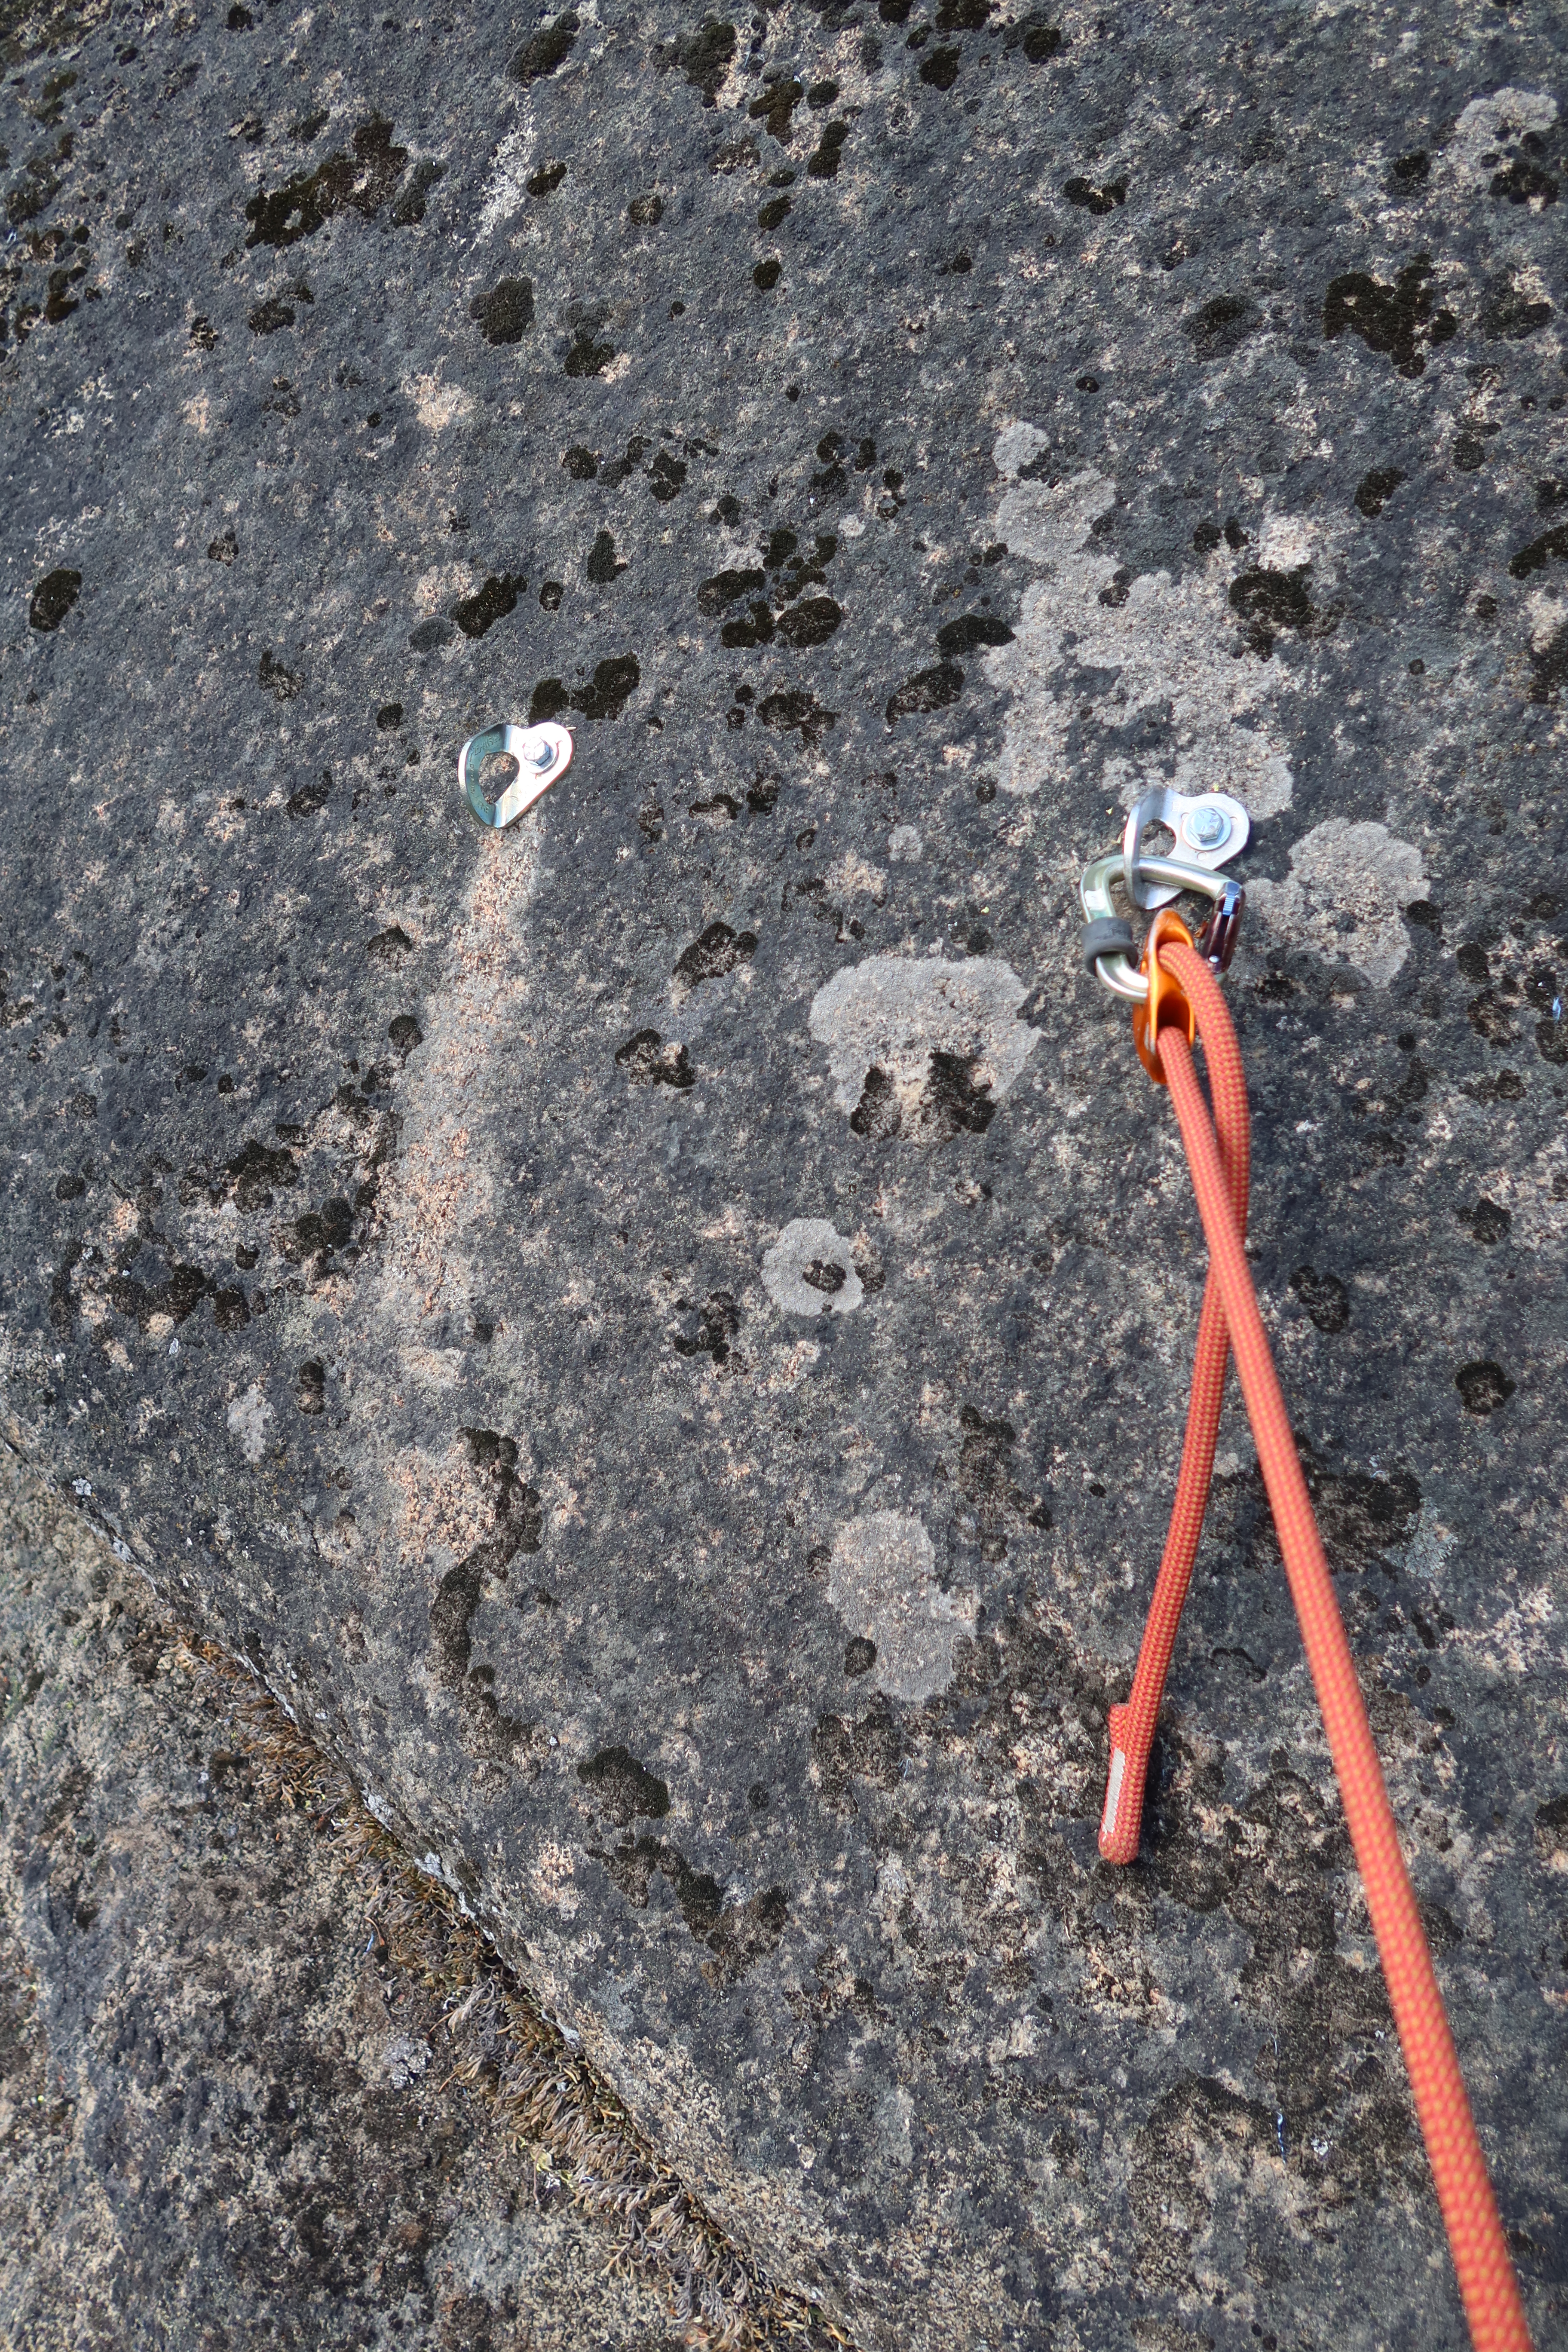
- Get a picture of it! Okay, maybe this isn’t the first thing you do if you were feeling desperate to arrive at the expected-safety of that next clip — but keep this as a todo item in your mind that you at least do later. A picture helps immensely with reporting the bolt, and reporting it with enough useful information (ahem, a picture) is the best way to get a local-climbing-organization or knowledable-rebolter to take action on replacing it so that no body else has to find themselves in the situation you are in now. A picture taken close up, with the camera barely a foot or more away from the bolt, gives the best detail. If you must zoom in from far away, a camera with a physical optical zoom will do better than a cell phone camera. Either way, a second picture of the larger context (i.e. view of the whole pitch, with a mental note
- Decide how much to trust it.
- Make a plan for what you’ll do next.
Report it
Donate money to a local climbing organization. You know how indoor climbing gyms make you pay money in order to climb there, like any normal business? Those fees go to a lot of things (rent and insurance are huge chunks,) but they also ensure there’s a decent budget for maintenance, both parts and staff-hours, so that plenty is done to keep that gym hardware updated & safe. Now think about how exactly how much money you’ve given specifically to the outdoor crag you are climbing at: daily admittance fee? Monthly membership fee? No? Odds you’ve paid essentially zero dollars specifically towards the maintenance of this crag. (Buying a relatively-cheap parking pass from a land-management-organization that doesn’t primarily think about climbing does not count as putting dollars towards the maintenance of this crag.) Now think of how many people use the crag, who’ve all paid essentially zero dollars towards the maintenance of this crag. What kind of budget does the crag have for maintenance, both parts and labor-hours? Effectively zero. You’re entirely relying on volunteers donating time, and shoestring budgets for hardware costs, for all the upkeep of fixed hardware at this crag. (Furthermore: Note how the sprawling size of this crag compare to the relatively-compact space of an indoor climbing gym. And note that hardware left outdoors 365 days a year in all weather conditions has a much harder life than hardware kept indoors in a gym. The maintenance effort to upkeep that hardware is clearly many times larger.)
As far as movement goes, you only have three options:
1) Go up (but climb as if that particular bolt isn’t there).
2) Go down (I.e. down climbing, without clipping the bolt at all)
3) Utilize other pro. Not everyone’s a trad climber, and even if you are and have trad gear with you, odds of a usable crack being nearby are low (otherwise there would have been no motivation to put a bolt here in the first place,) so it’s pretty low-odds that you’re going to get other pro in.
Is it a bolt mid-route, or an anchor?
Never trust a single bolt
