
The Ptarmigan Traverse is an absolutely classic and must-do experience at least once for anyone who’s into mountaineering in Washington state. Some high-level details:
- Technical skillset: In its simplest version, as just a through-traverse (e.g., not yet considering side trips to summit nearby peaks), it can be done with only a “Mountaineers Basic” skill-set: the technical challenges are basic glacier travel and scrambling, and the trip is otherwise essentially backpacking-for-mountaineers.
- Time commitment: While this route has been trail-run in insanely fast times, if this is your first time on it, I’d recommend allocating something more in the ballpark of a 6 or 7-day schedule.
- A car-shuttle is required, which (from Seattle) means nearly 6 hours of driving prior to the boots-on trailhead at the beginning, and nearly 6 hours of driving after the boots-off trailhead at the end. Two cars are required, and each must display a Northwest Forest Pass (or an America the Beautiful Pass).
- Permits: Somewhat astoundingly, this route doesn’t require any camping permits (yet… I imagine some day in the future it will.) What an incredible gift from nature this place is in the first place, and what a privilege it is that we are currently able to recreate there without the hassle of a permit system being needed yet. Popularity is only increasing, and it is crucially important that we each do our part to care for and preserve the land here by doing everything we can to minimize the way our presence impacts it: avoid killing the struggling alpine plants by–as much as possible–avoiding going off-trail and stepping on them, or setting up tents on top of plants, or peeing on plants (which will make a mountain goat eventually dig at that spot, shredding a square foot or so.) Store food appropriately (large Ursacks are ideal) to avoid habituating wildlife, which could lead to area-closures, and you don’t want to be “that guy” that ruins it for everyone else. And practice good backcountry bathroom etiquette (more on that below, but in short: at least pack out your used toilet paper!!) Be thoughtful and continuous towards the land, keep the area just as beautiful for the people who will come after you; and don’t do anything that would hasten or become a reason why a permit system would need to be established.
- The prime time of year to aim for is likely early to mid-July (for the best chances of stable sunny weather, but also crevasses not having opened much yet.) Consider avoiding a schedule that incorporates the July 4th holiday, though, as it is likely that a lot of other people will have the same idea, and many of the camps along the route are limited in space.
- An alternative to the Ptarmigan Traverse: For a similar trip in many ways, another option is the Bacon-Hagan-Blum Traverse, detailed in this video: https://www.youtube.com/watch?v=06M05mRV5pc&ab_channel=TheMountaineers It’s not quite as classic as Ptarmigan, but it is also an outstanding trip of its own, and would be significantly less crowded, even if scheduled over a national holiday.
Contents
- The Route in Photos
- Determining if you’re ready for the Ptarmigan Traverse
- Backcountry Bathroom Etiquette
- A Bit of History
- Trailheads & Car-shuttle
- Camps & Itinerary choices
- More camp location options
- Glaciers
- Gear
- Food
- Le Conte – 7762′
- Sentinel – 8257′
- Dome Peak – 8926′
- Sinister – 8444′
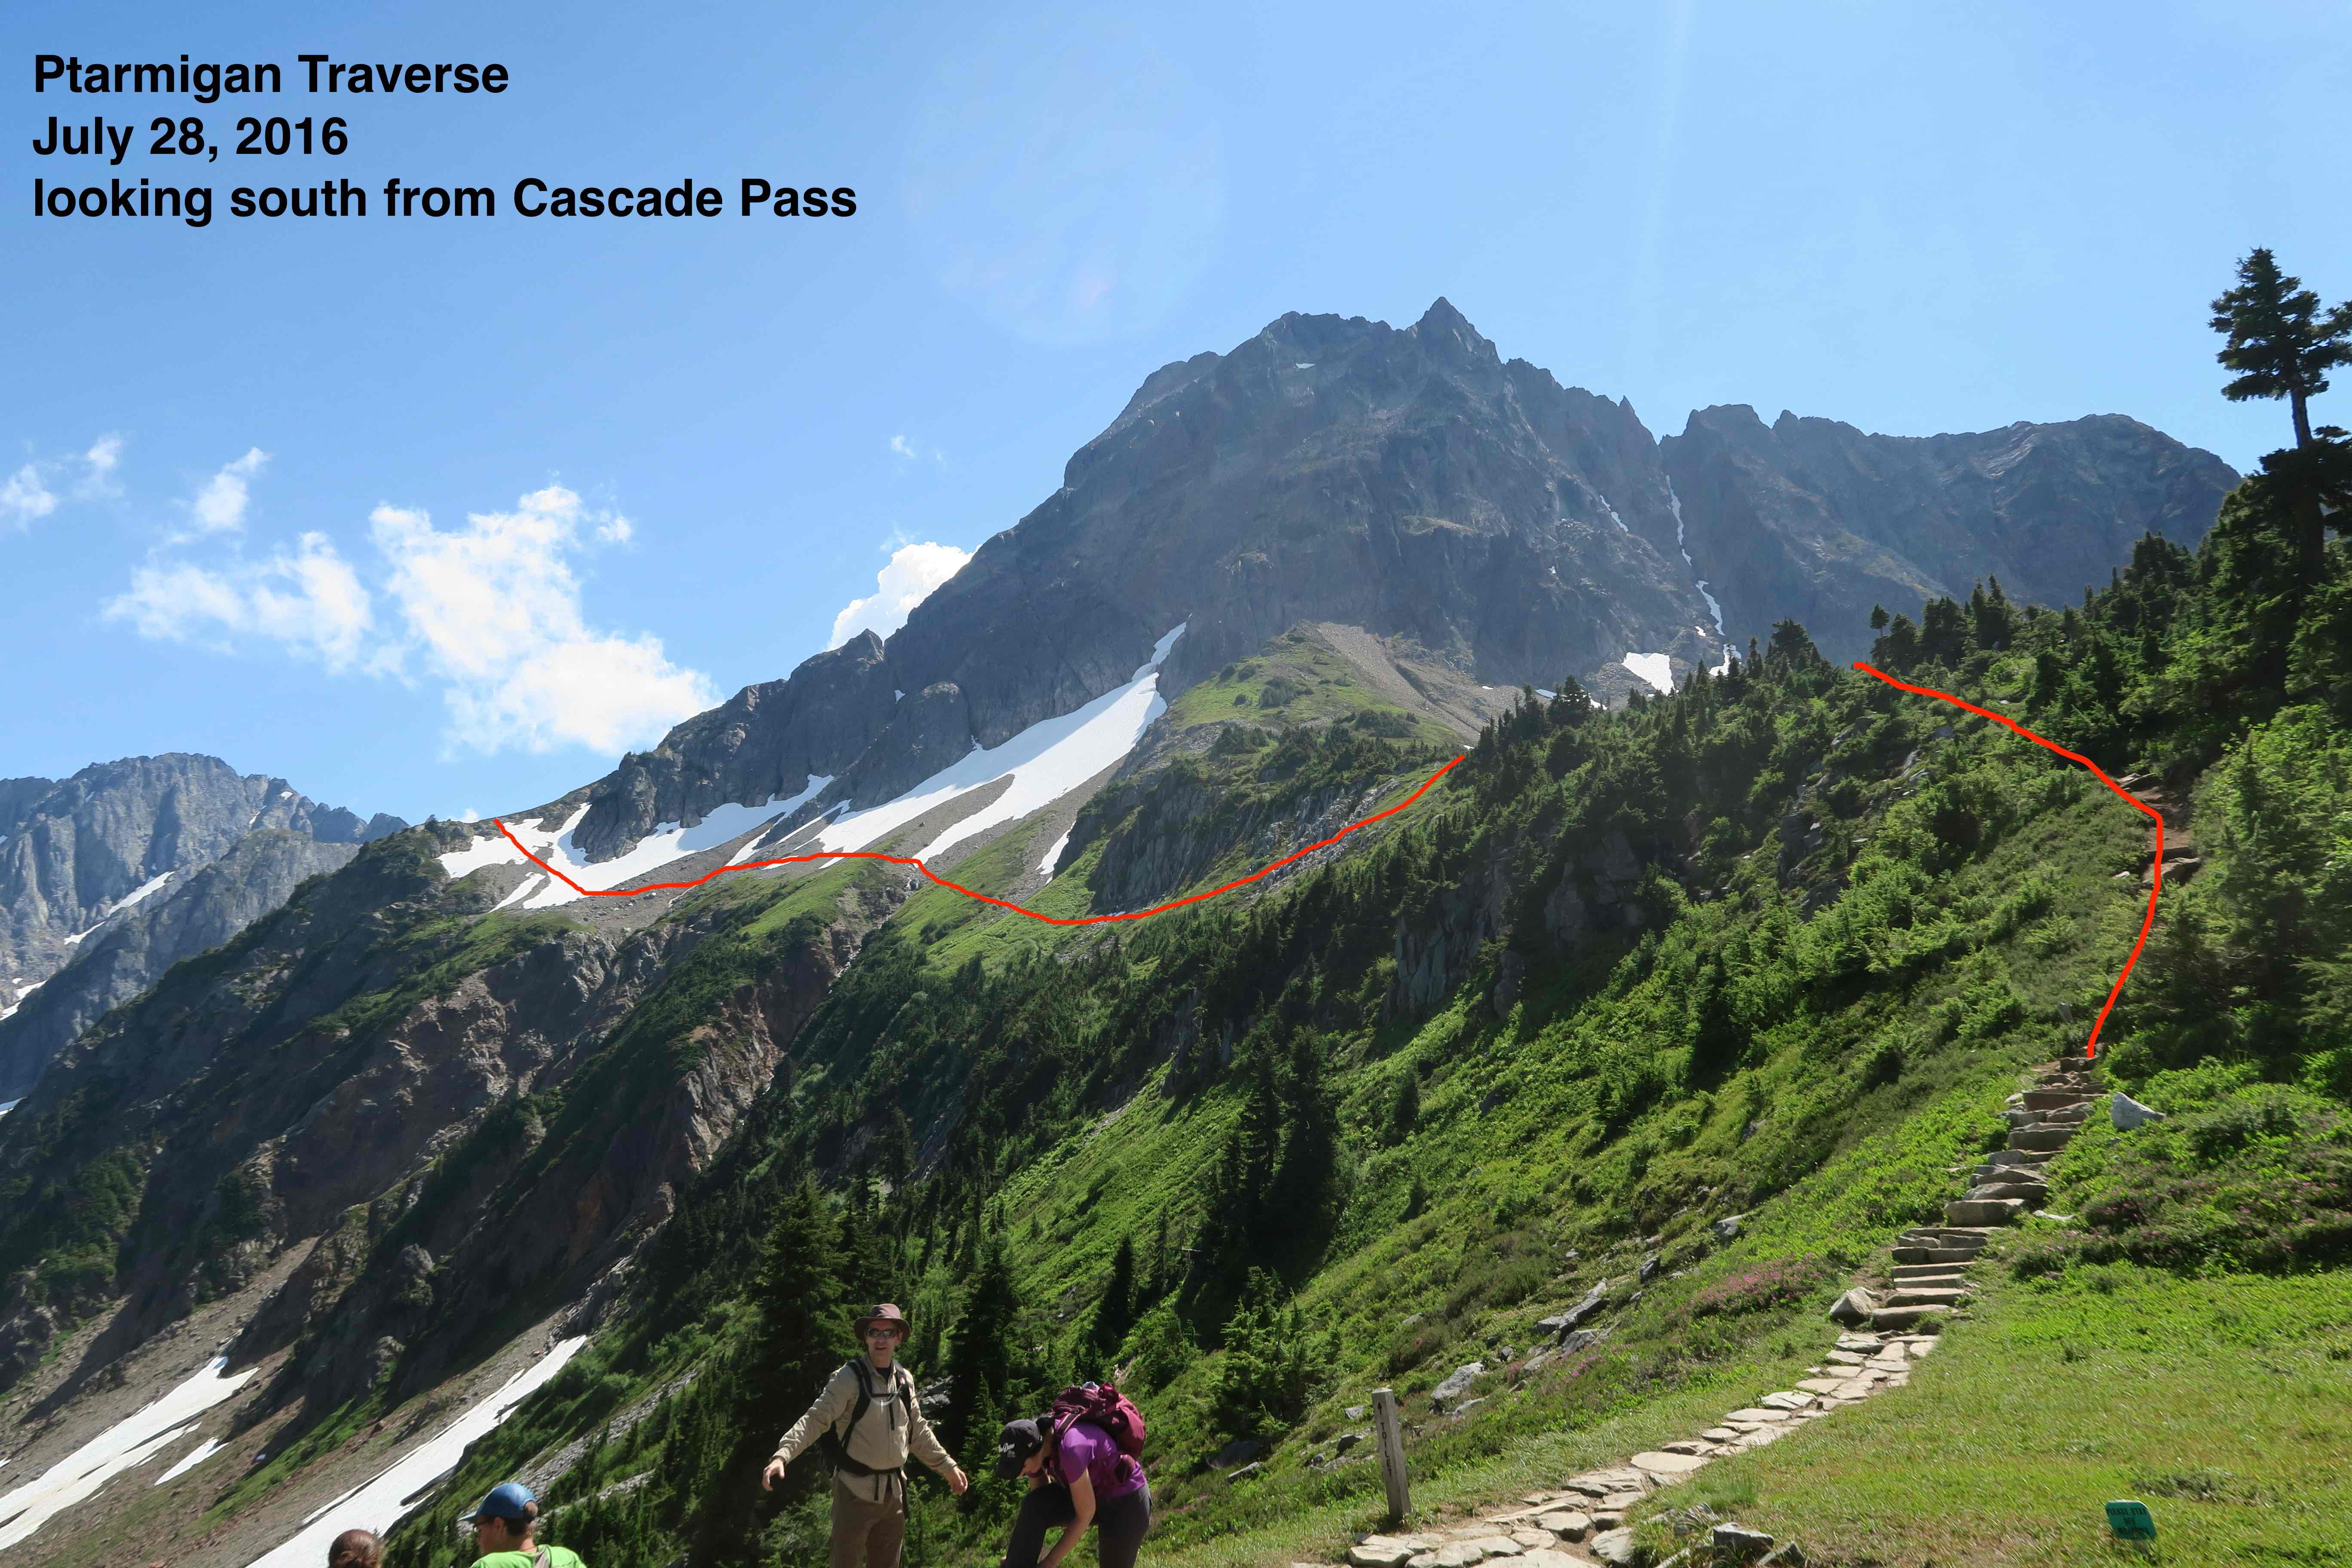
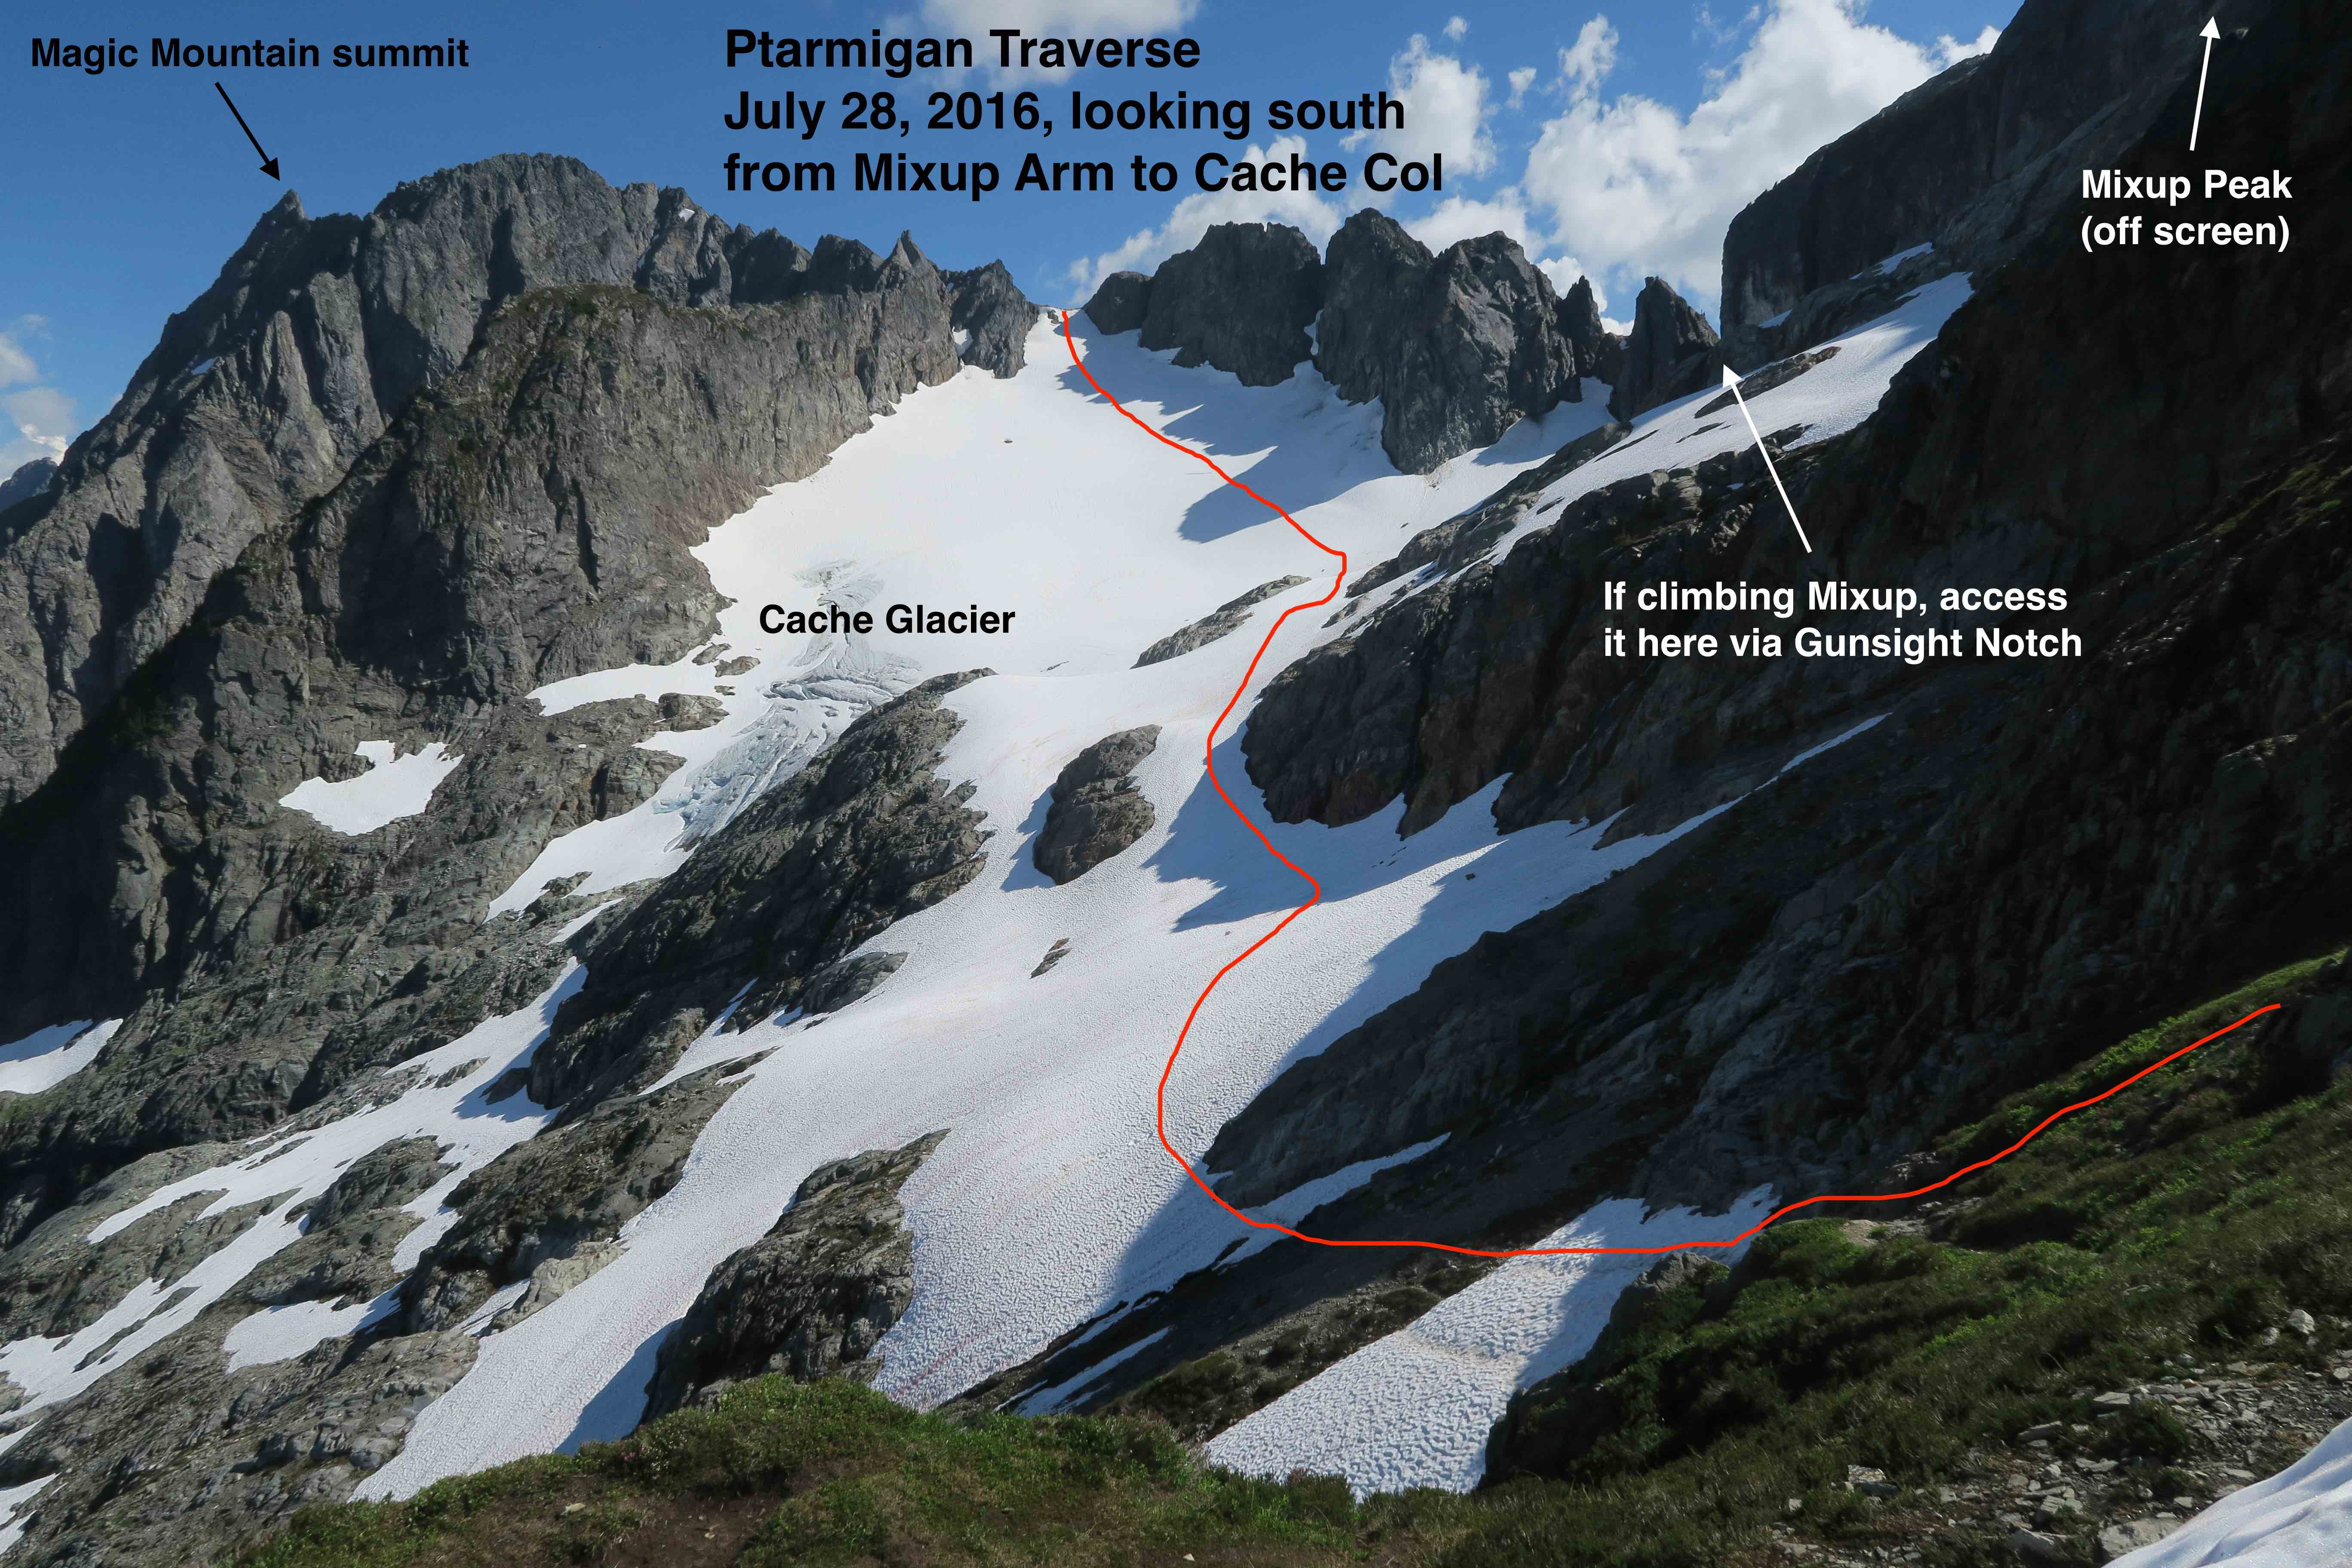
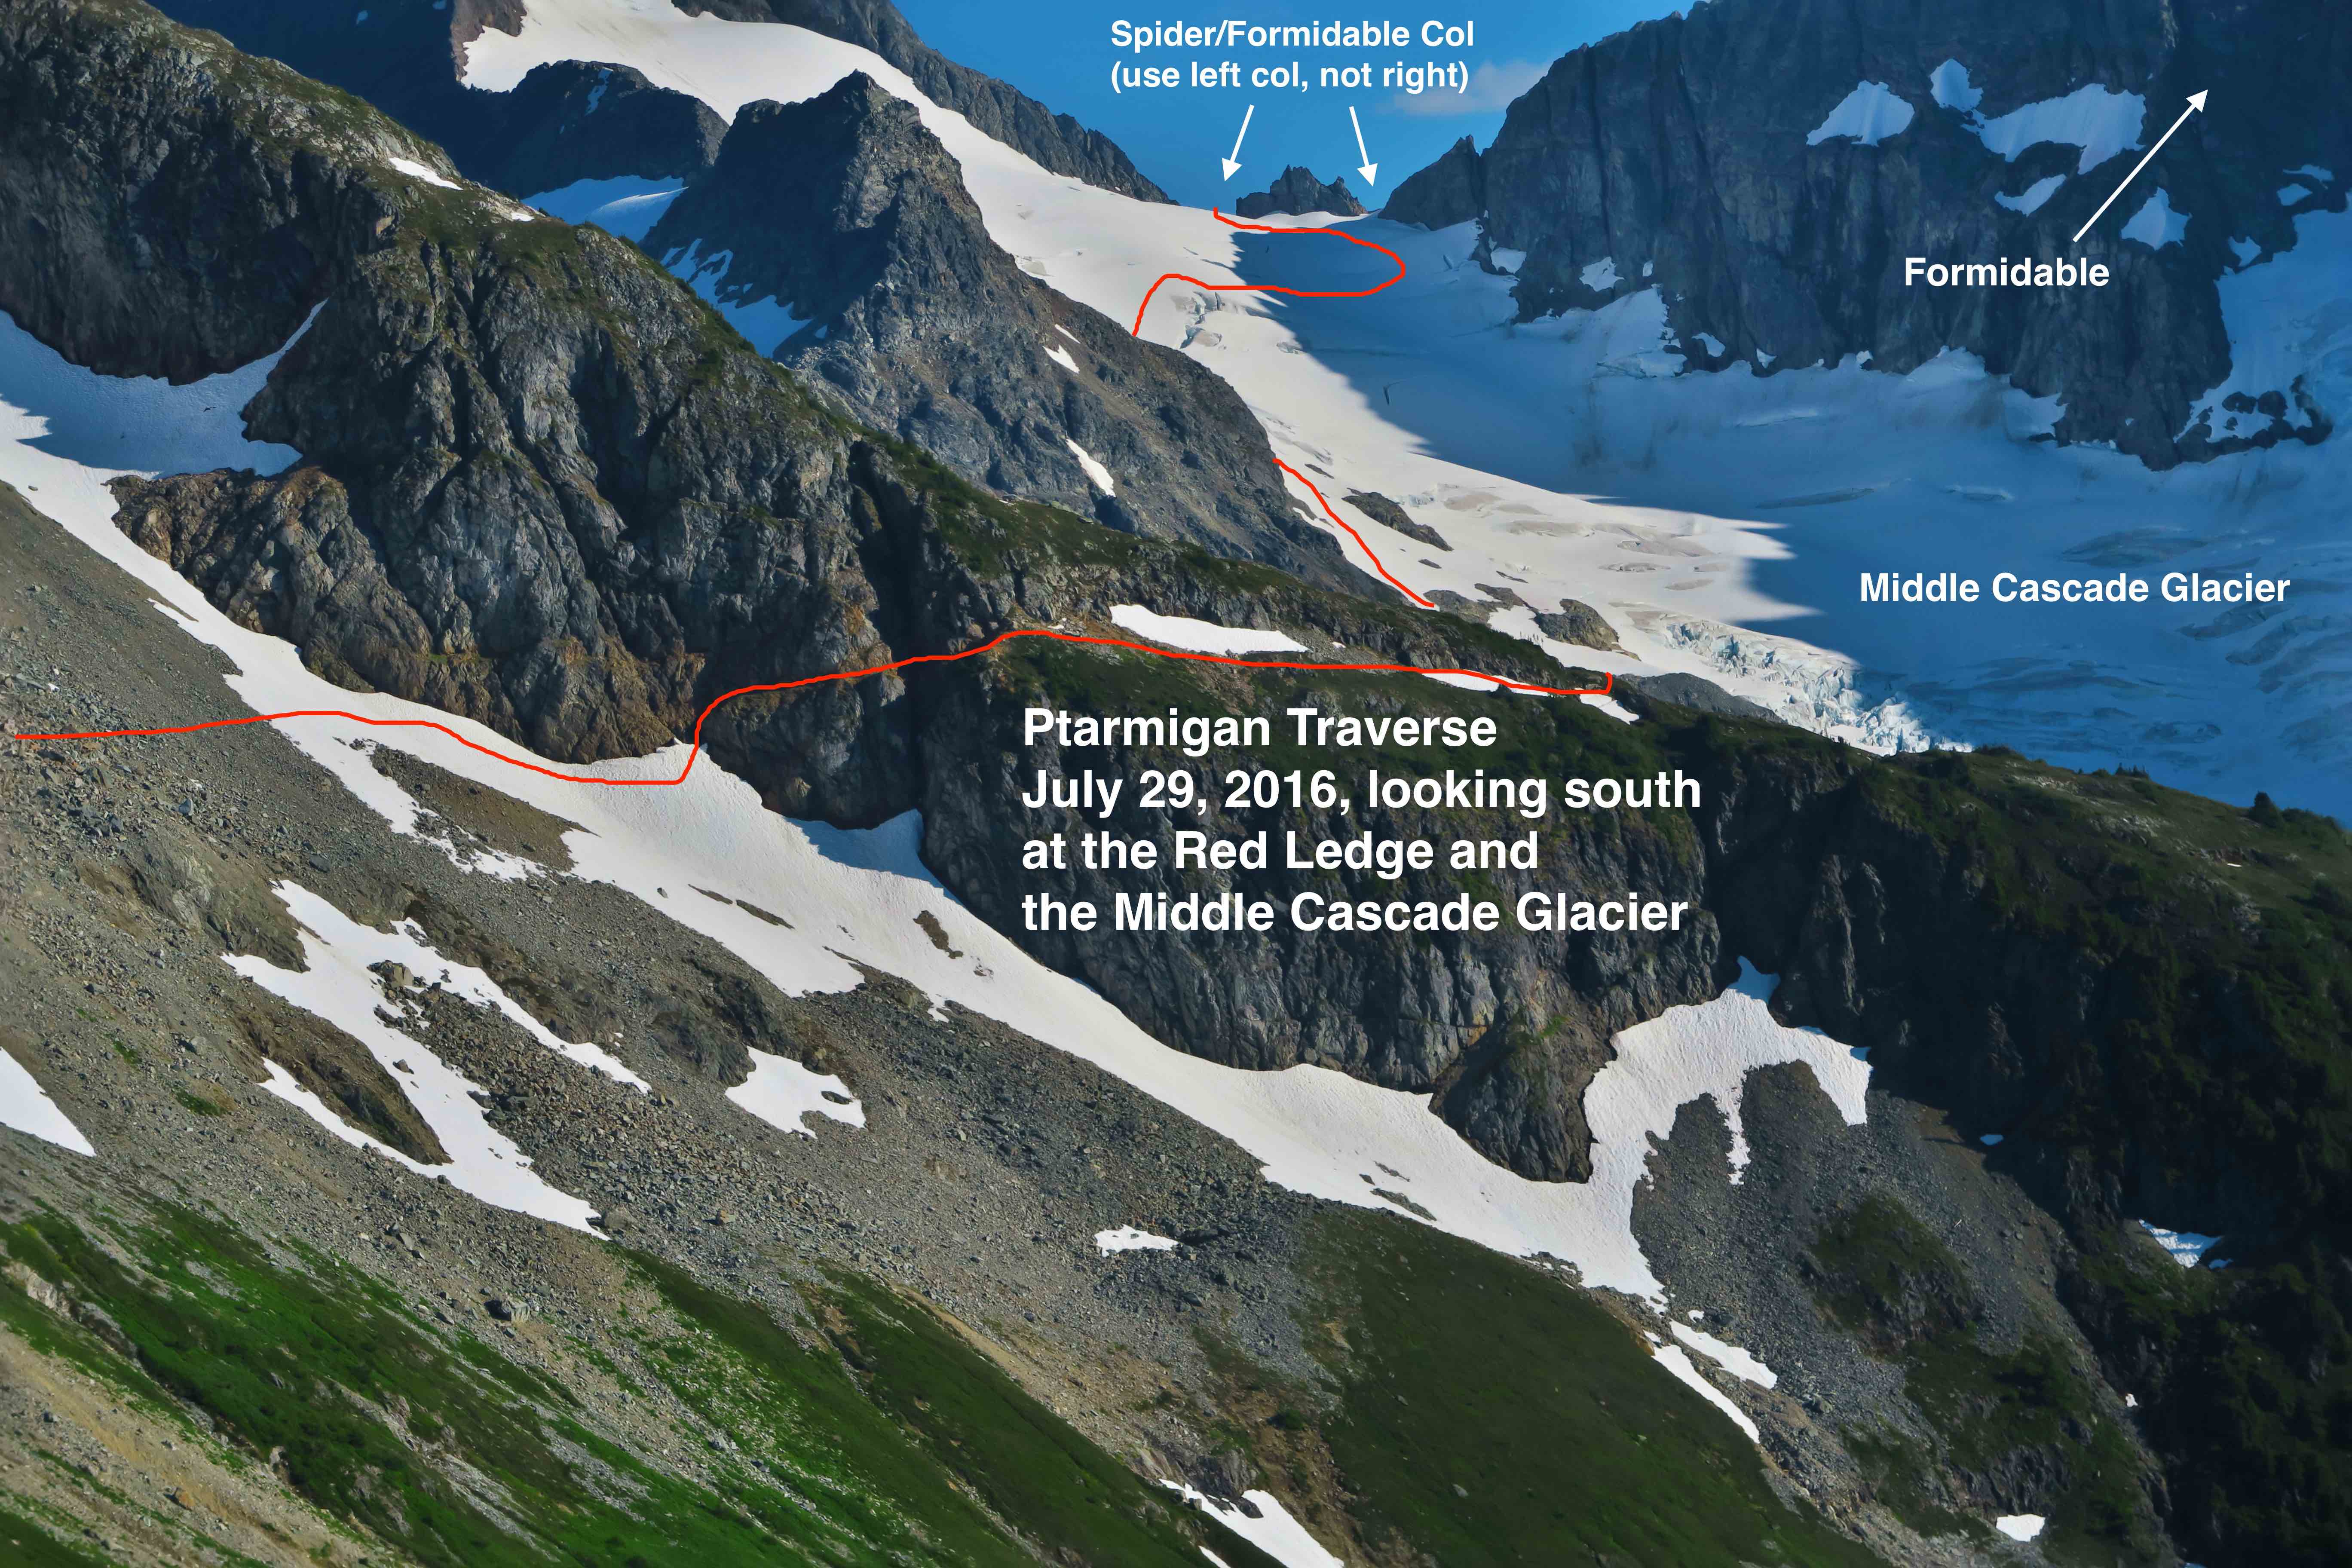
The Route in Photos
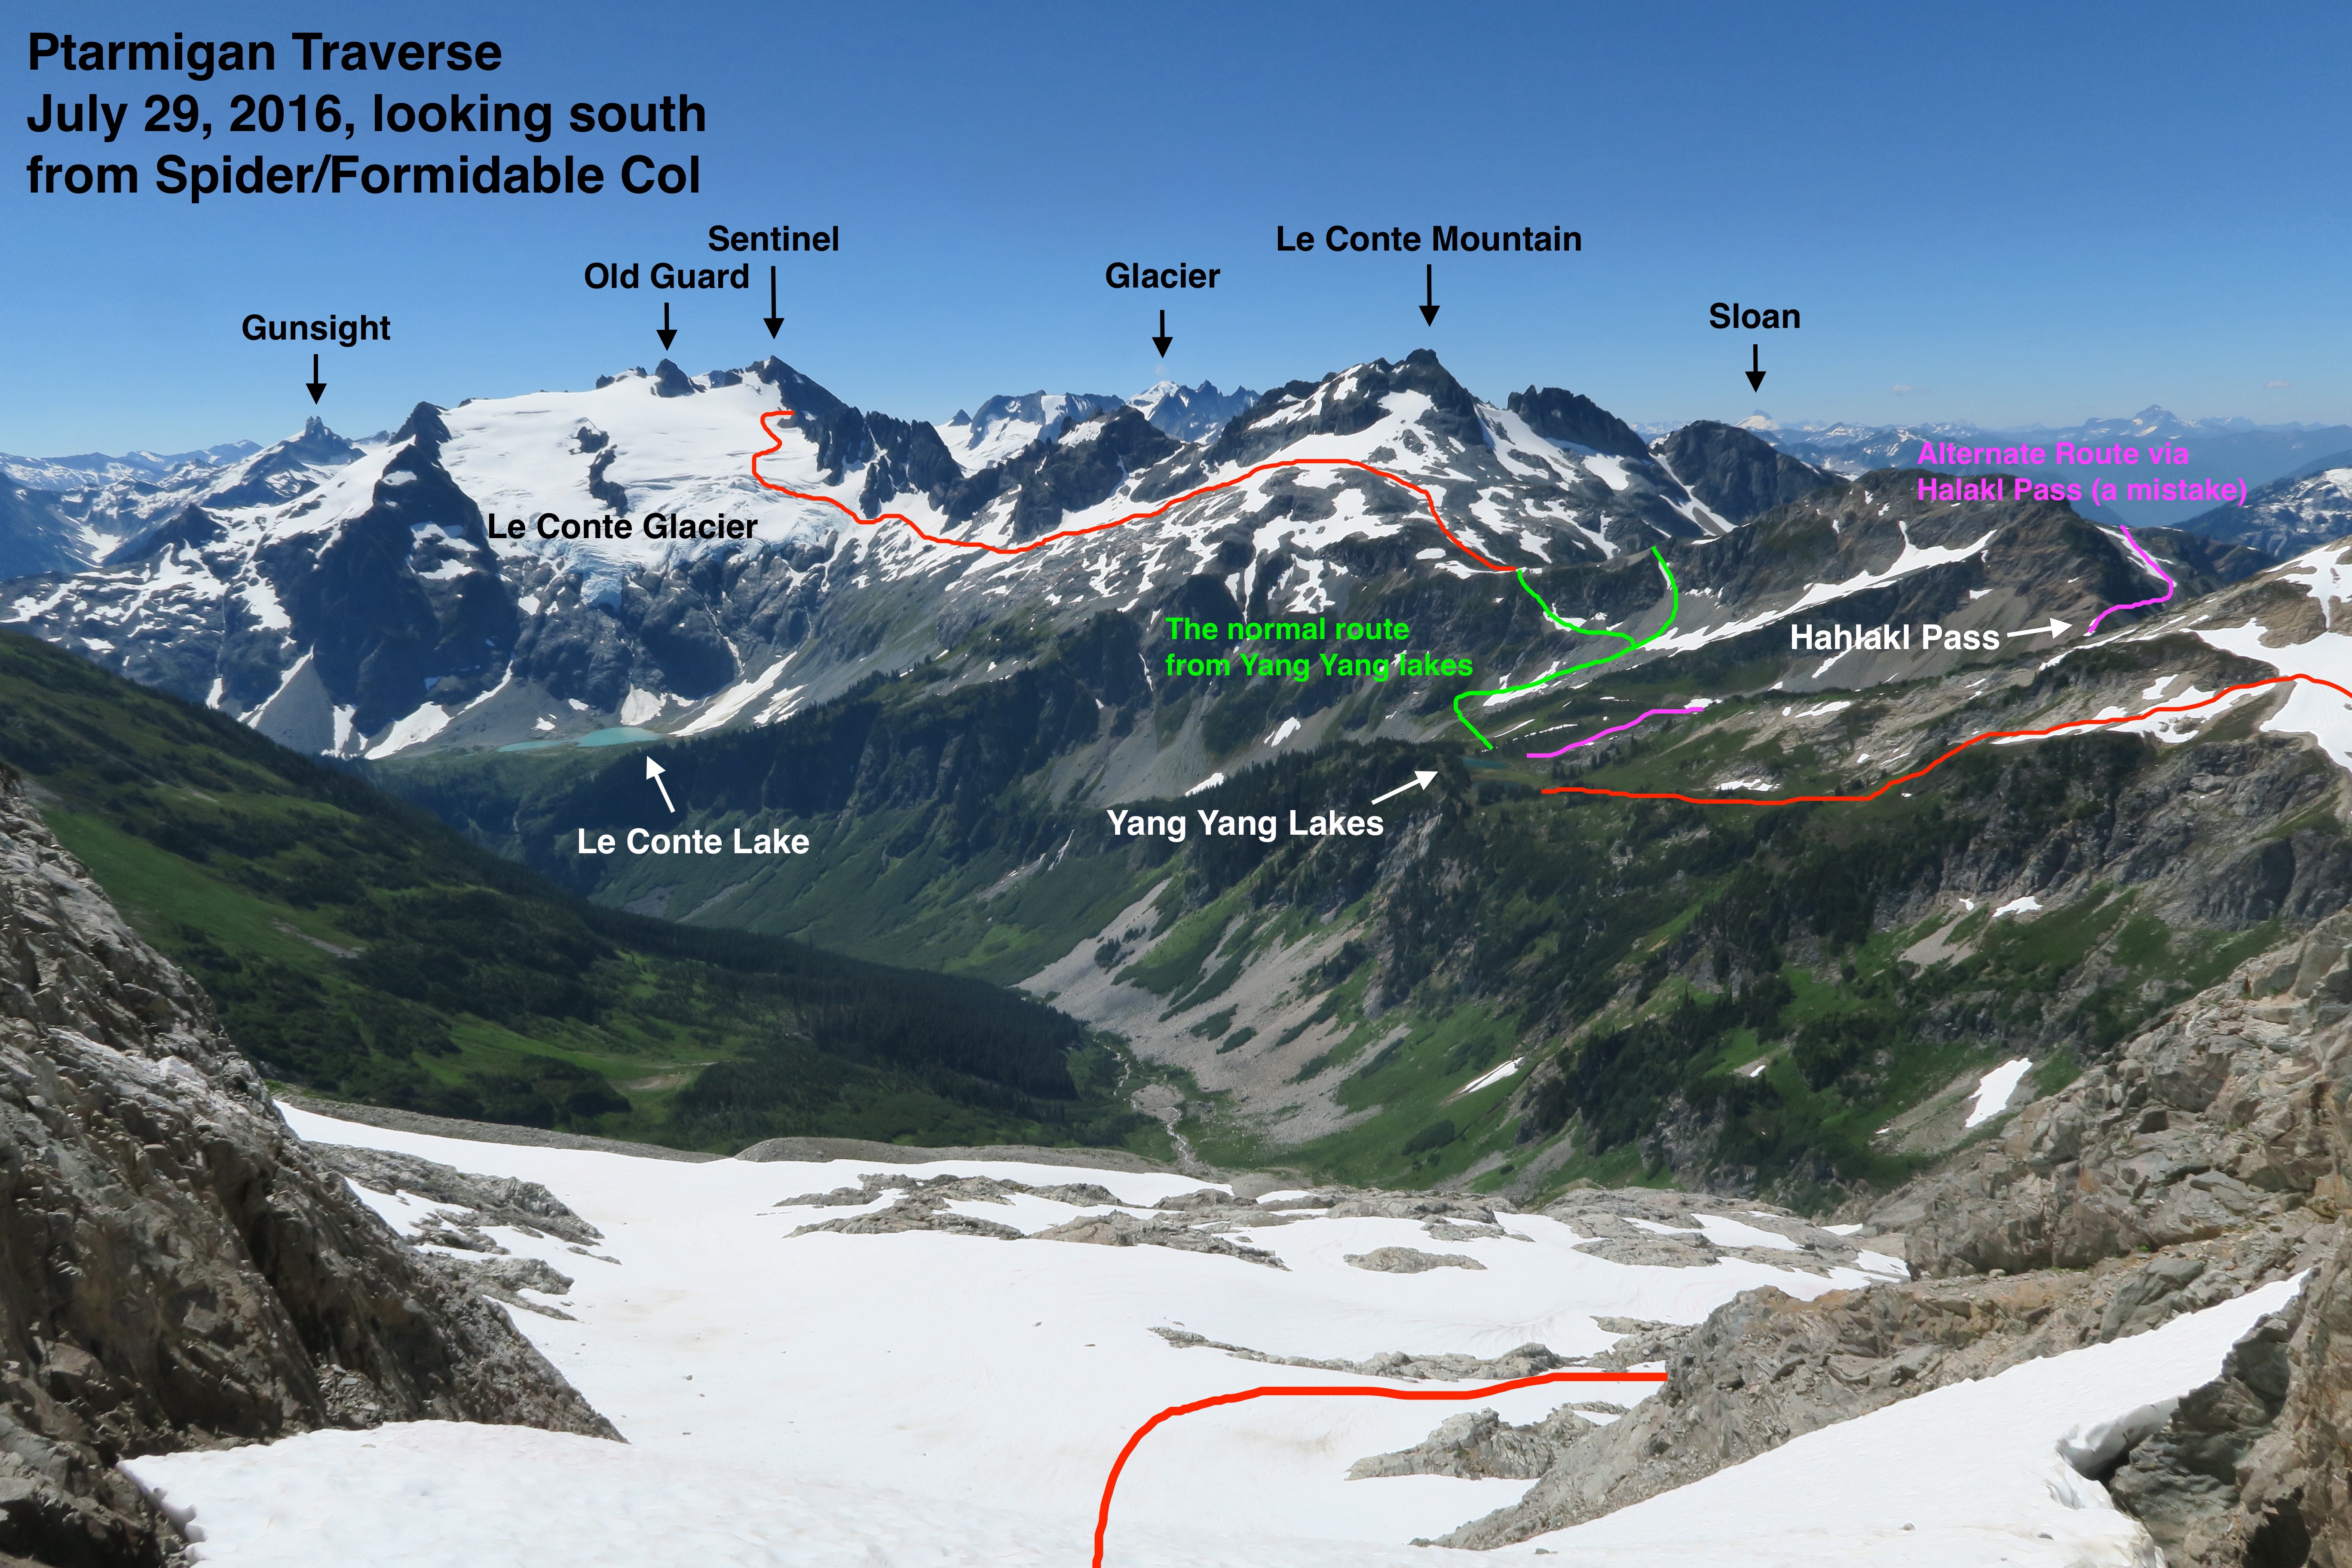
My first time through the Ptarmigan Traverse was in 2016, as a party of 2 with Sherrie. Afterward, I drew some red lines on photos that could be all you’d need for some “tl;dr” / minimalist route-finding beta:


Determining if you’re ready for the Ptarmigan Traverse
You should have a decent bit of glacier travel experience under your belt before setting out on this longer trip. I’d recommend–at the very minimum–having been the leader/organizer (or co-leader/co-organizer) of at least three other glacier-travel mountaineering objectives (e.g. having summited Cascade volcanoes like Baker, Rainier, Glacier; or other classics like Shuksan, Eldorado, Sahale’s Quien Sabe glacier, Sloan, etc.; not counting ones where you were just a participant on someone else’s trip, but counting times where you had an active responsibility in the planning & decision making towards making the trip & summit happen.)
If it helps, a trip that would be the perfect “prior step” in terms of experience before going for the Ptarmigan Travese would be any one of the following multi-day glacier travel trips: Glacier Peak via it’s standard route, Mount Olympus via the Hoh River Trail & Blue Glacier, or the multi-day trip Bacon-Hagan-Blum (which only spends one day on a glacier.)
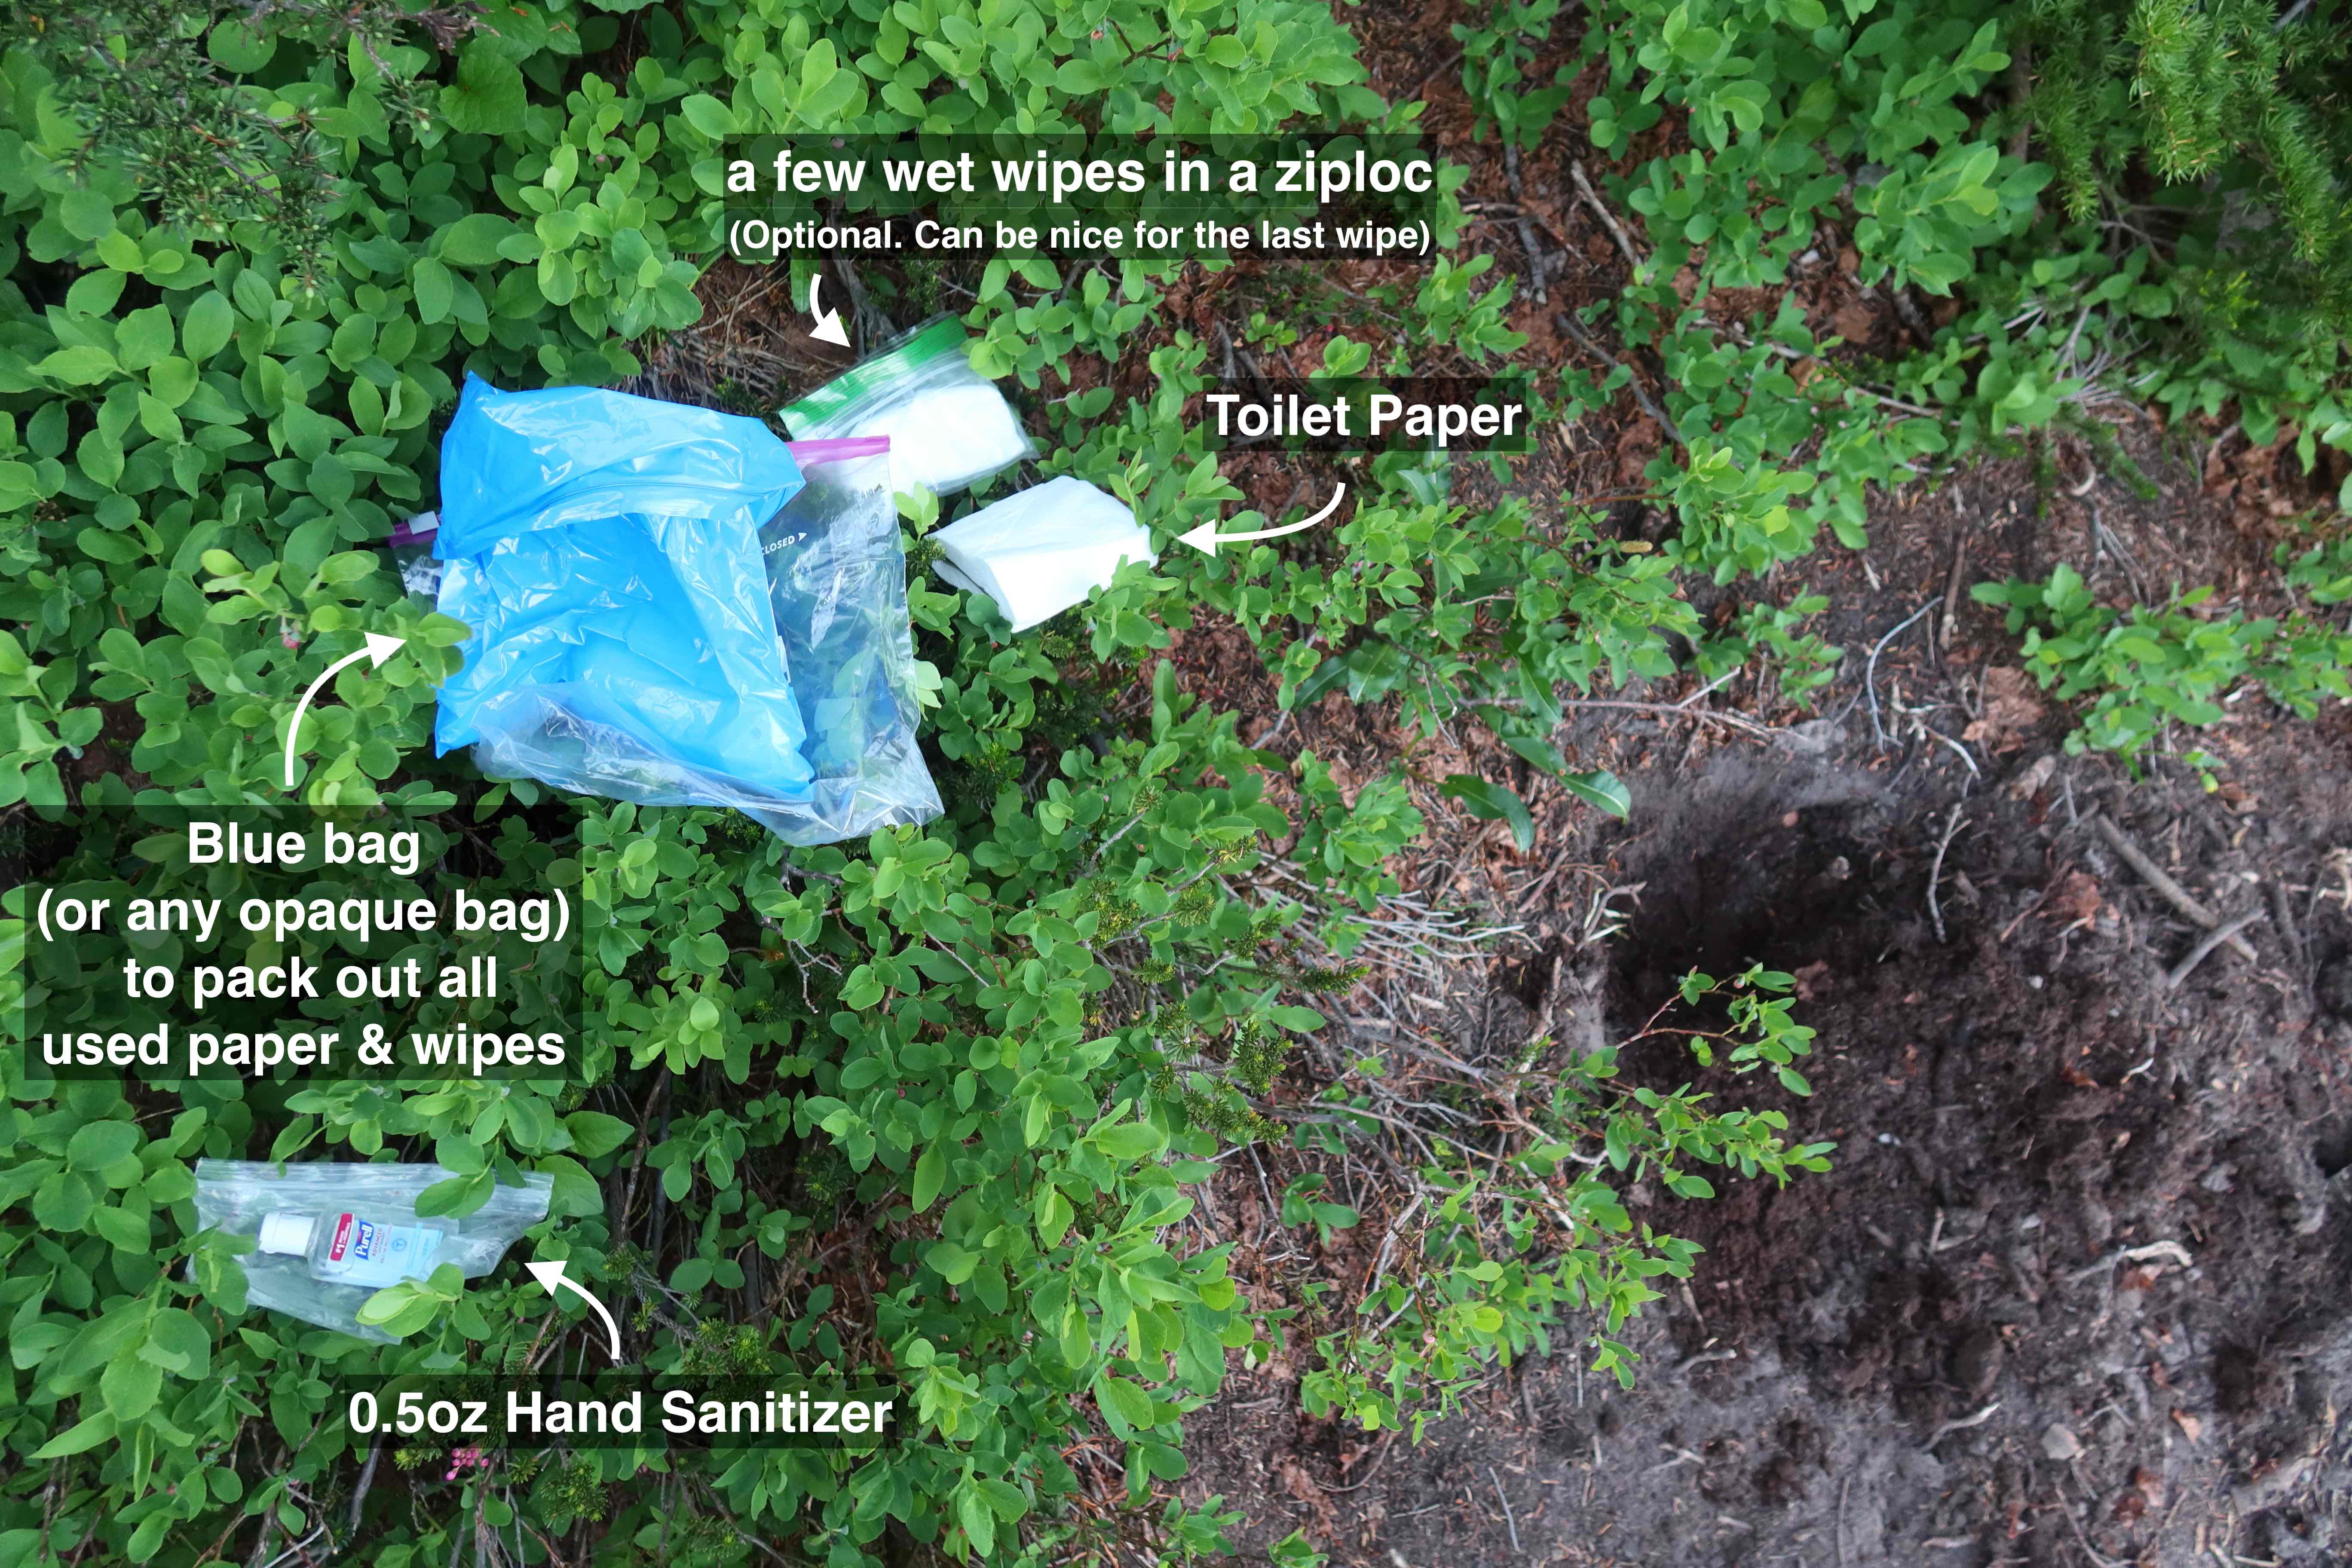
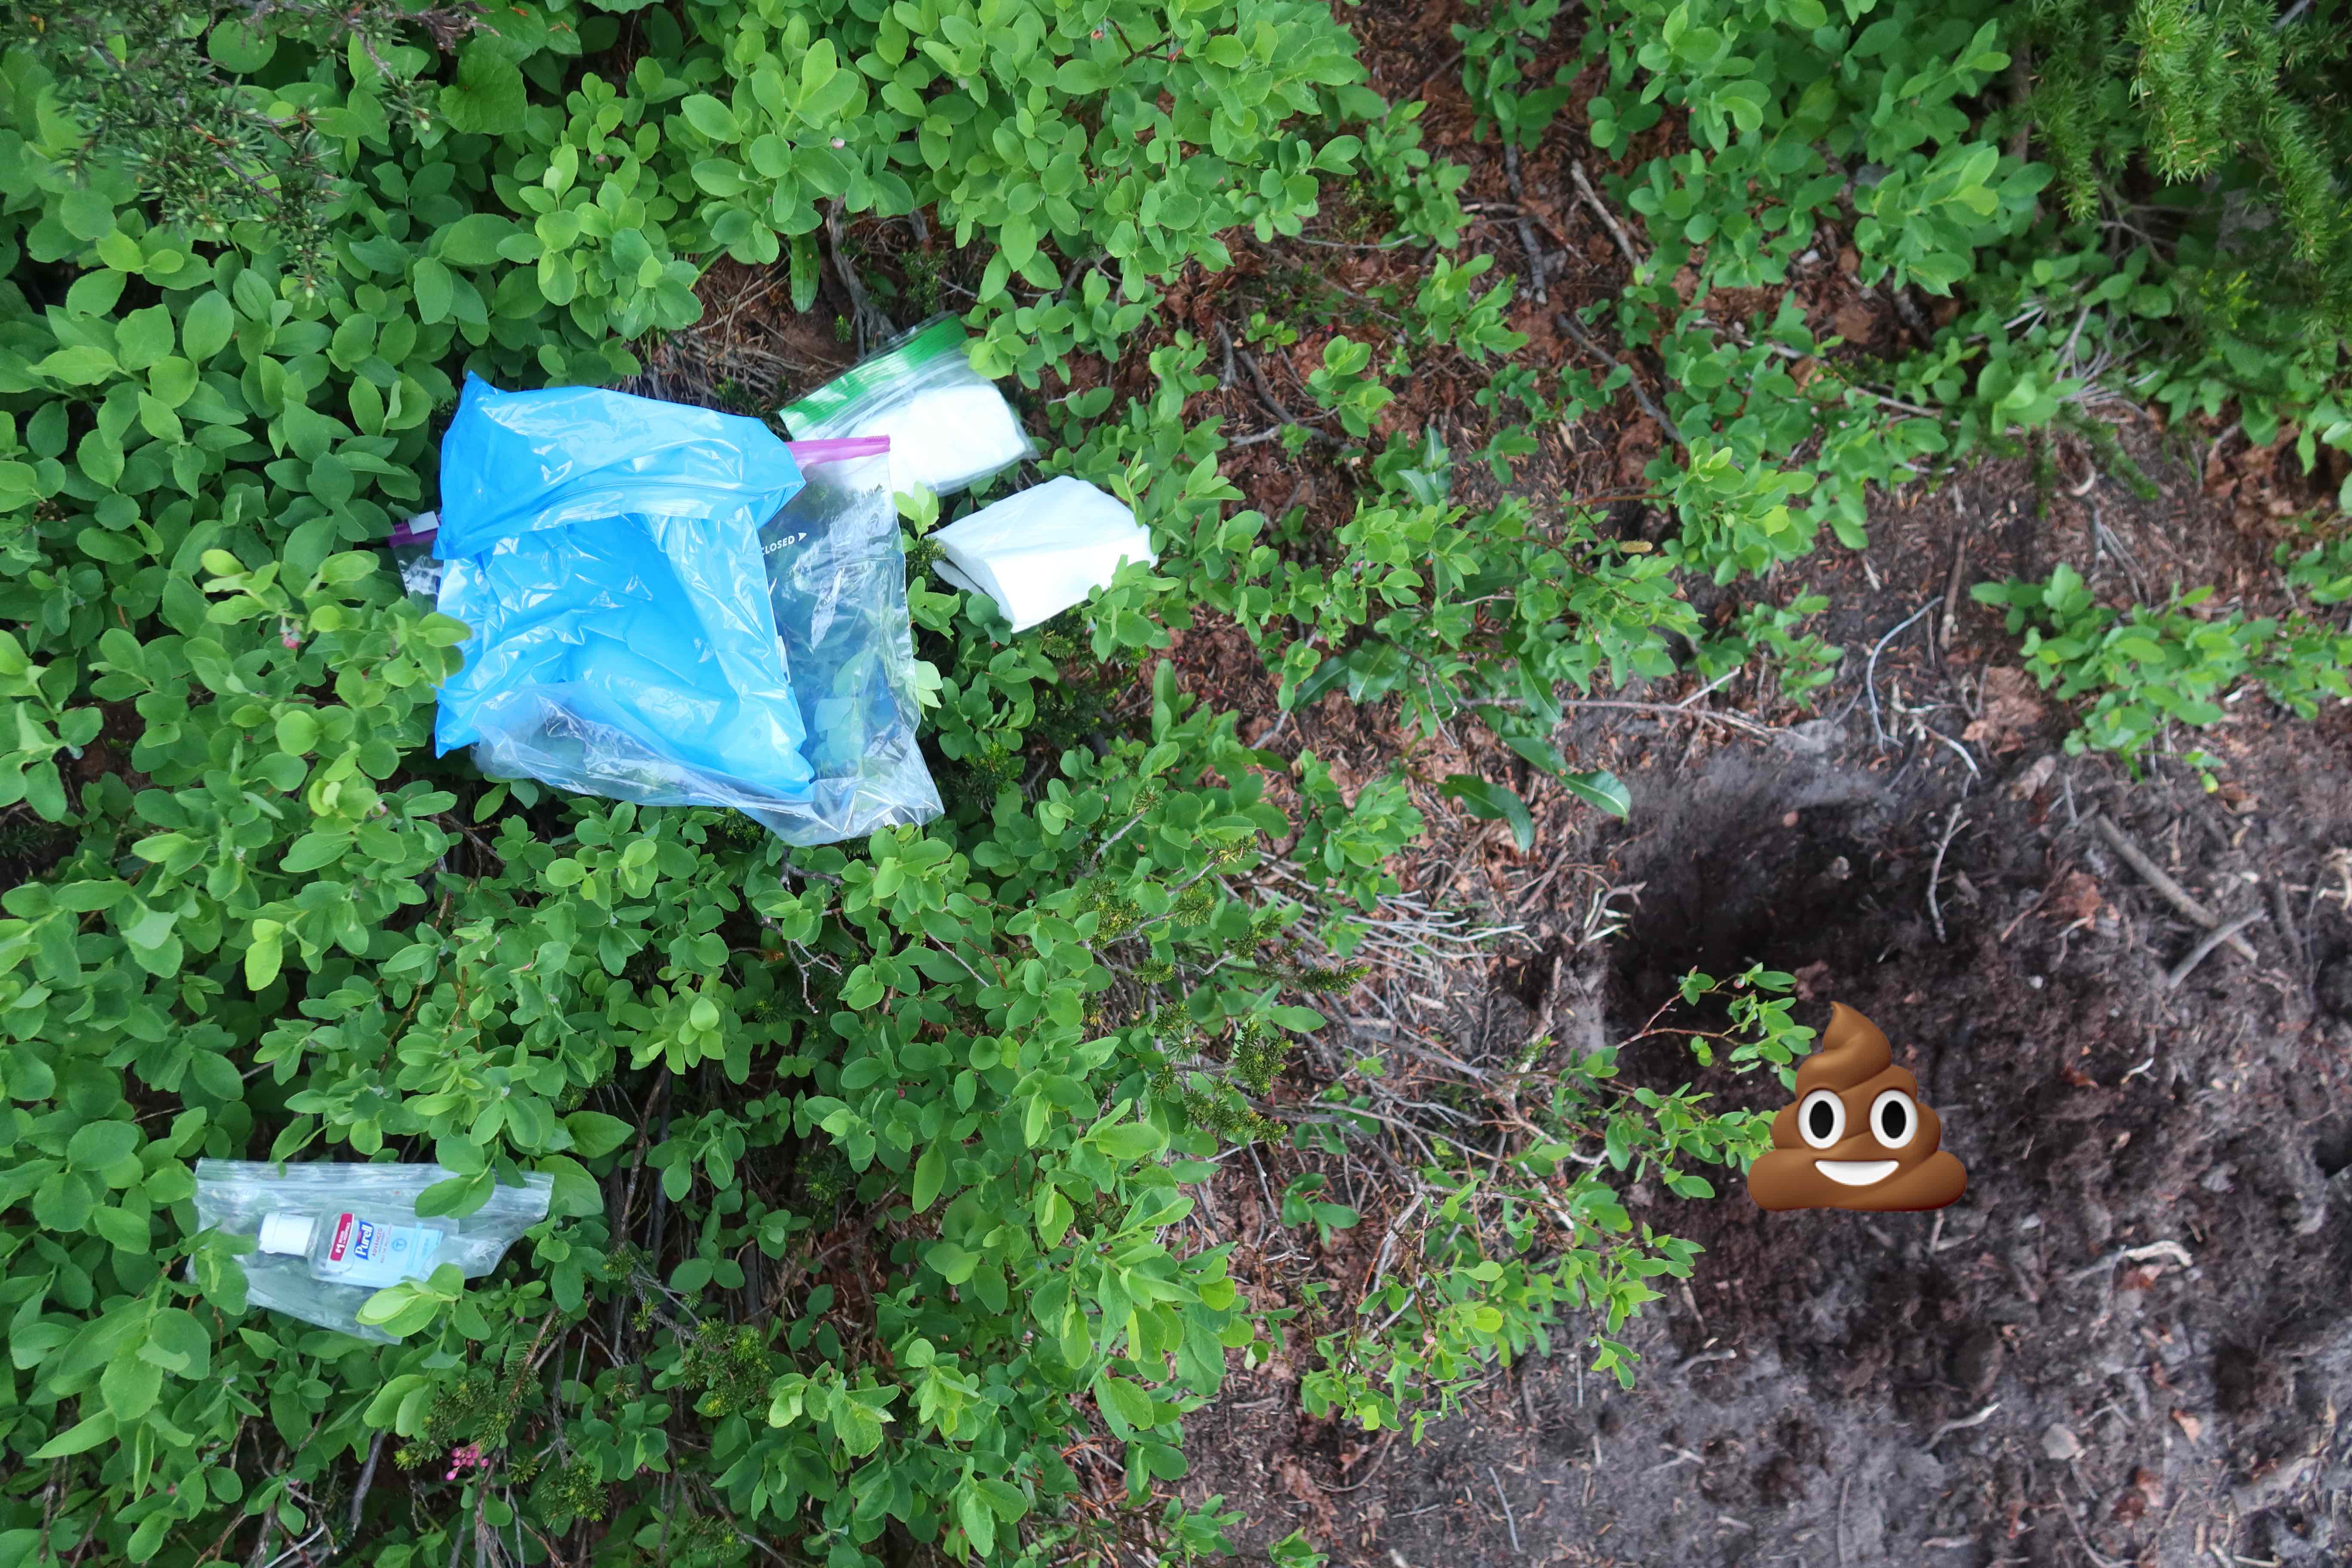
Backcountry Bathroom Etiquette
I’ve seen a few too many clumps of used-toilet-paper left behind on the Ptarmigan Traverse (and unfortunately in plenty of other popular backcountry locations too.) Anyway, it was enough that I’m going to do a PSA about the do’s & don’ts of bathroom etiquette on a trip like this:
Preparation: Pack Blue Bags
Pack a few blue bags, and some extra gallon-sized ziplocs so that you can double- or triple-bag any used blue bags (for obvious reasons, not leaving any chances that a used one could leak or get punctured.) A blue bag that only contains used toilet paper I’m personally okay reopening & adding to a few times, so I don’t necessarily need a new bag every day (I’ll just bring ~3 for a week-long trip), but if a new bag every day makes you happier, go for it, pack however many you expect you’ll need! As for getting blue bags:
- You can pick them up for free at many ranger stations. (But sometimes they’re out of stock. When I’m at a ranger station, I generally try to take a few more than I need for the trip at hand, so that I’ve got a few at home. I pack the ones I’ve got at home for whatever immediate trip is about to happen, then stop at a ranger station and try to get the same number to replenish my home stock. That way I’m never s.o.l. if the ranger station doesn’t have any.)
- For a DIY solution, you can somewhat home-make a blue-bag equivalent by putting a smallish/mediumish brown paper bag inside a gallon ziploc bag, so that the brown paper bag provides the opaqueness, and the ziploc provides the very necessary waterproofness & smell resistance. Of course, double or triple up that gallon ziploc however much makes you feel comfortable.
- You can also buy colored ziplocs in bulk on Amazon. One order of this pack of 100 bags and you effectively have a lifetime’s supply: https://www.amazon.com/dp/B01GT7LQYQ?ref_=ppx_hzsearch_conn_dt_b_fed_asin_title_1&th=1 I bought the 10″ x 12″ ziploc size, which is plenty big enough for either just-used-paper collection, or plenty big enough for the single-use of packing out a full mass of human waste if need be. Either way, it’s going in the trash as soon as I get home.
Going #1 / When you have to pee
Avoid peeing on plants. Instead, find a bare patch of dirt, or gravel, or best yet: a flat or even slightly bowl-shaped rock. The main issue with pee is that it WILL attract a goat, sooner or later (even if you don’t see a goat right now,) and the goat will come dig & shred everything in the area of about one square foot. So if you pee on plants, you’re sentencing those plants to death, by goat-shredding. Also, either pack out your used toilet paper, or use a Kula Cloth so that no toilet paper is needed.

Going #2 / When you have to poop
If there is no or very minimal vegetation around (i.e. at higher elevation alpine camps, including anything above about ~6500′ on this route), then you should fully blue-bag out everything: bag & pack out your own solid human waste, as well as any used toilet paper, of course. I’m sure I don’t have to tell you: triple bag that sh*t (literally.) If the resulting bag is small enough, sometimes you can shove it inside the heavy-duty foil pouch that previously-consumed dehydrated meal came in, which makes an excellent durable and smell-resistant outer container around your poop-bag. Or, an empty Pringles can serve as a nice single-use hard-sided tube to store a used blue bag inside of. You might as well tape the lid shut. Once back in civilization, just throw the whole container out in your household trash. (And maybe take the trash out sooner rather than later.)
IF there is a healthy amount of vegetation around (e.g. the presence of at least a few trees is a good rule of thumb,) then the land is going to be capable of breaking down the biological material are about to leave behind, meaning it is okay to bury your human waste, but you should still pack out all used toilet paper. I’ve seen a lot of instances where wildlife comes along a day or two after someone has buried their poop, and digs back up exactly that same spot. Animals are curious, and can smell that something is different here, even when buried. A decent bit of left-behind toilet paper I’ve found looked like it had been buried, and then dug back up. Please don’t be a part of creating that trash. Longer term: Your poop will decompose and turn fully into new soil faster than manufactured paper toilet paper will. (In a well-vegetated area, poop will generally fully decompose and turn to dirt in slightly less than a year. In the same spot, toilet paper can take almost 3 years.) Alternatively, some people minimize or forgo the use of toilet paper entirely with the use of a portable bidet. (I haven’t personally nailed the use of a portable bidet yet, but I applaud the people out there who have figured it out.)
Be sure to pick a spot that is >200′ away from any existing campsites, trails, or water-sources (lakes or streams.) (To get a sense of 200′, that’s twice as far as the full-length of a 30-meter glacier rope. Further is better. The distance helps avoid contamination of water sources that are likely somewhere somebody downstream is using as a source of drinking water. The distance also helps spread out these poop spots over a much larger area, reducing the probability that someone else arrives at your same spot when they’re going through the same thought-process.)


Or for more information, here’s a fairly comprehensive video on the topic of pooping outdoors from Miranda & REI: https://www.youtube.com/watch?v=PbAMO7gSEOI&ab_channel=REI
A Bit of History
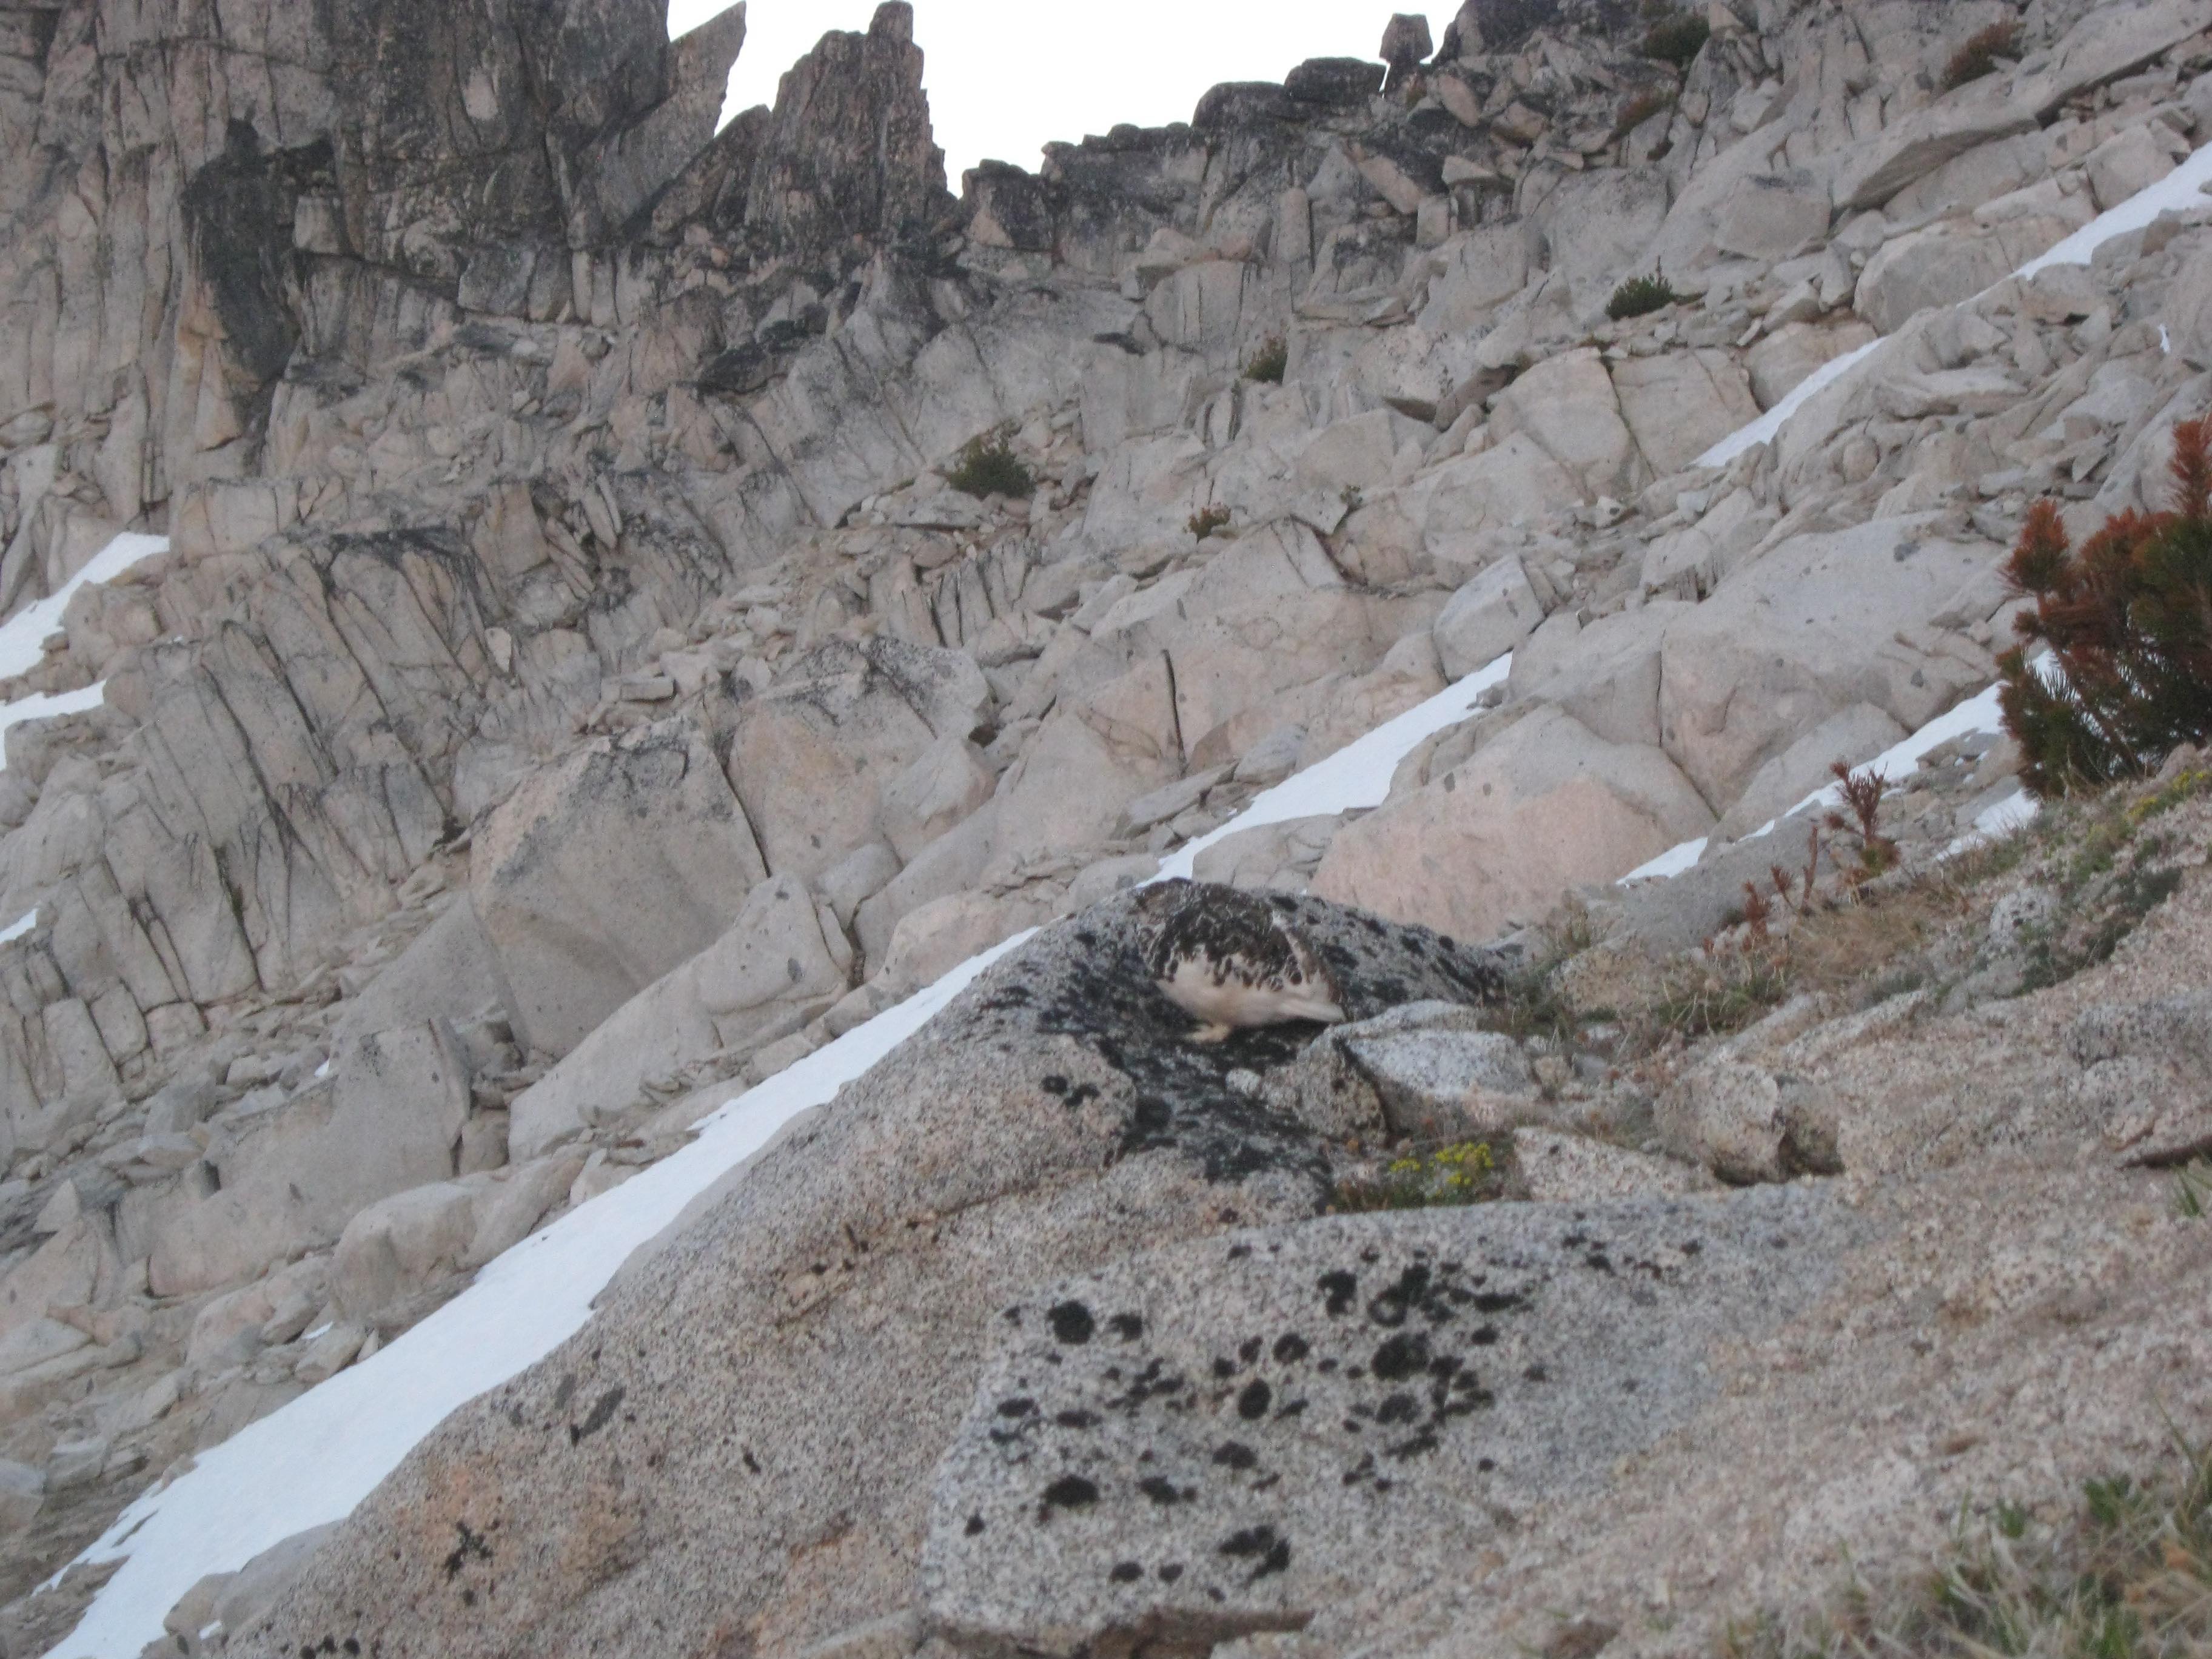

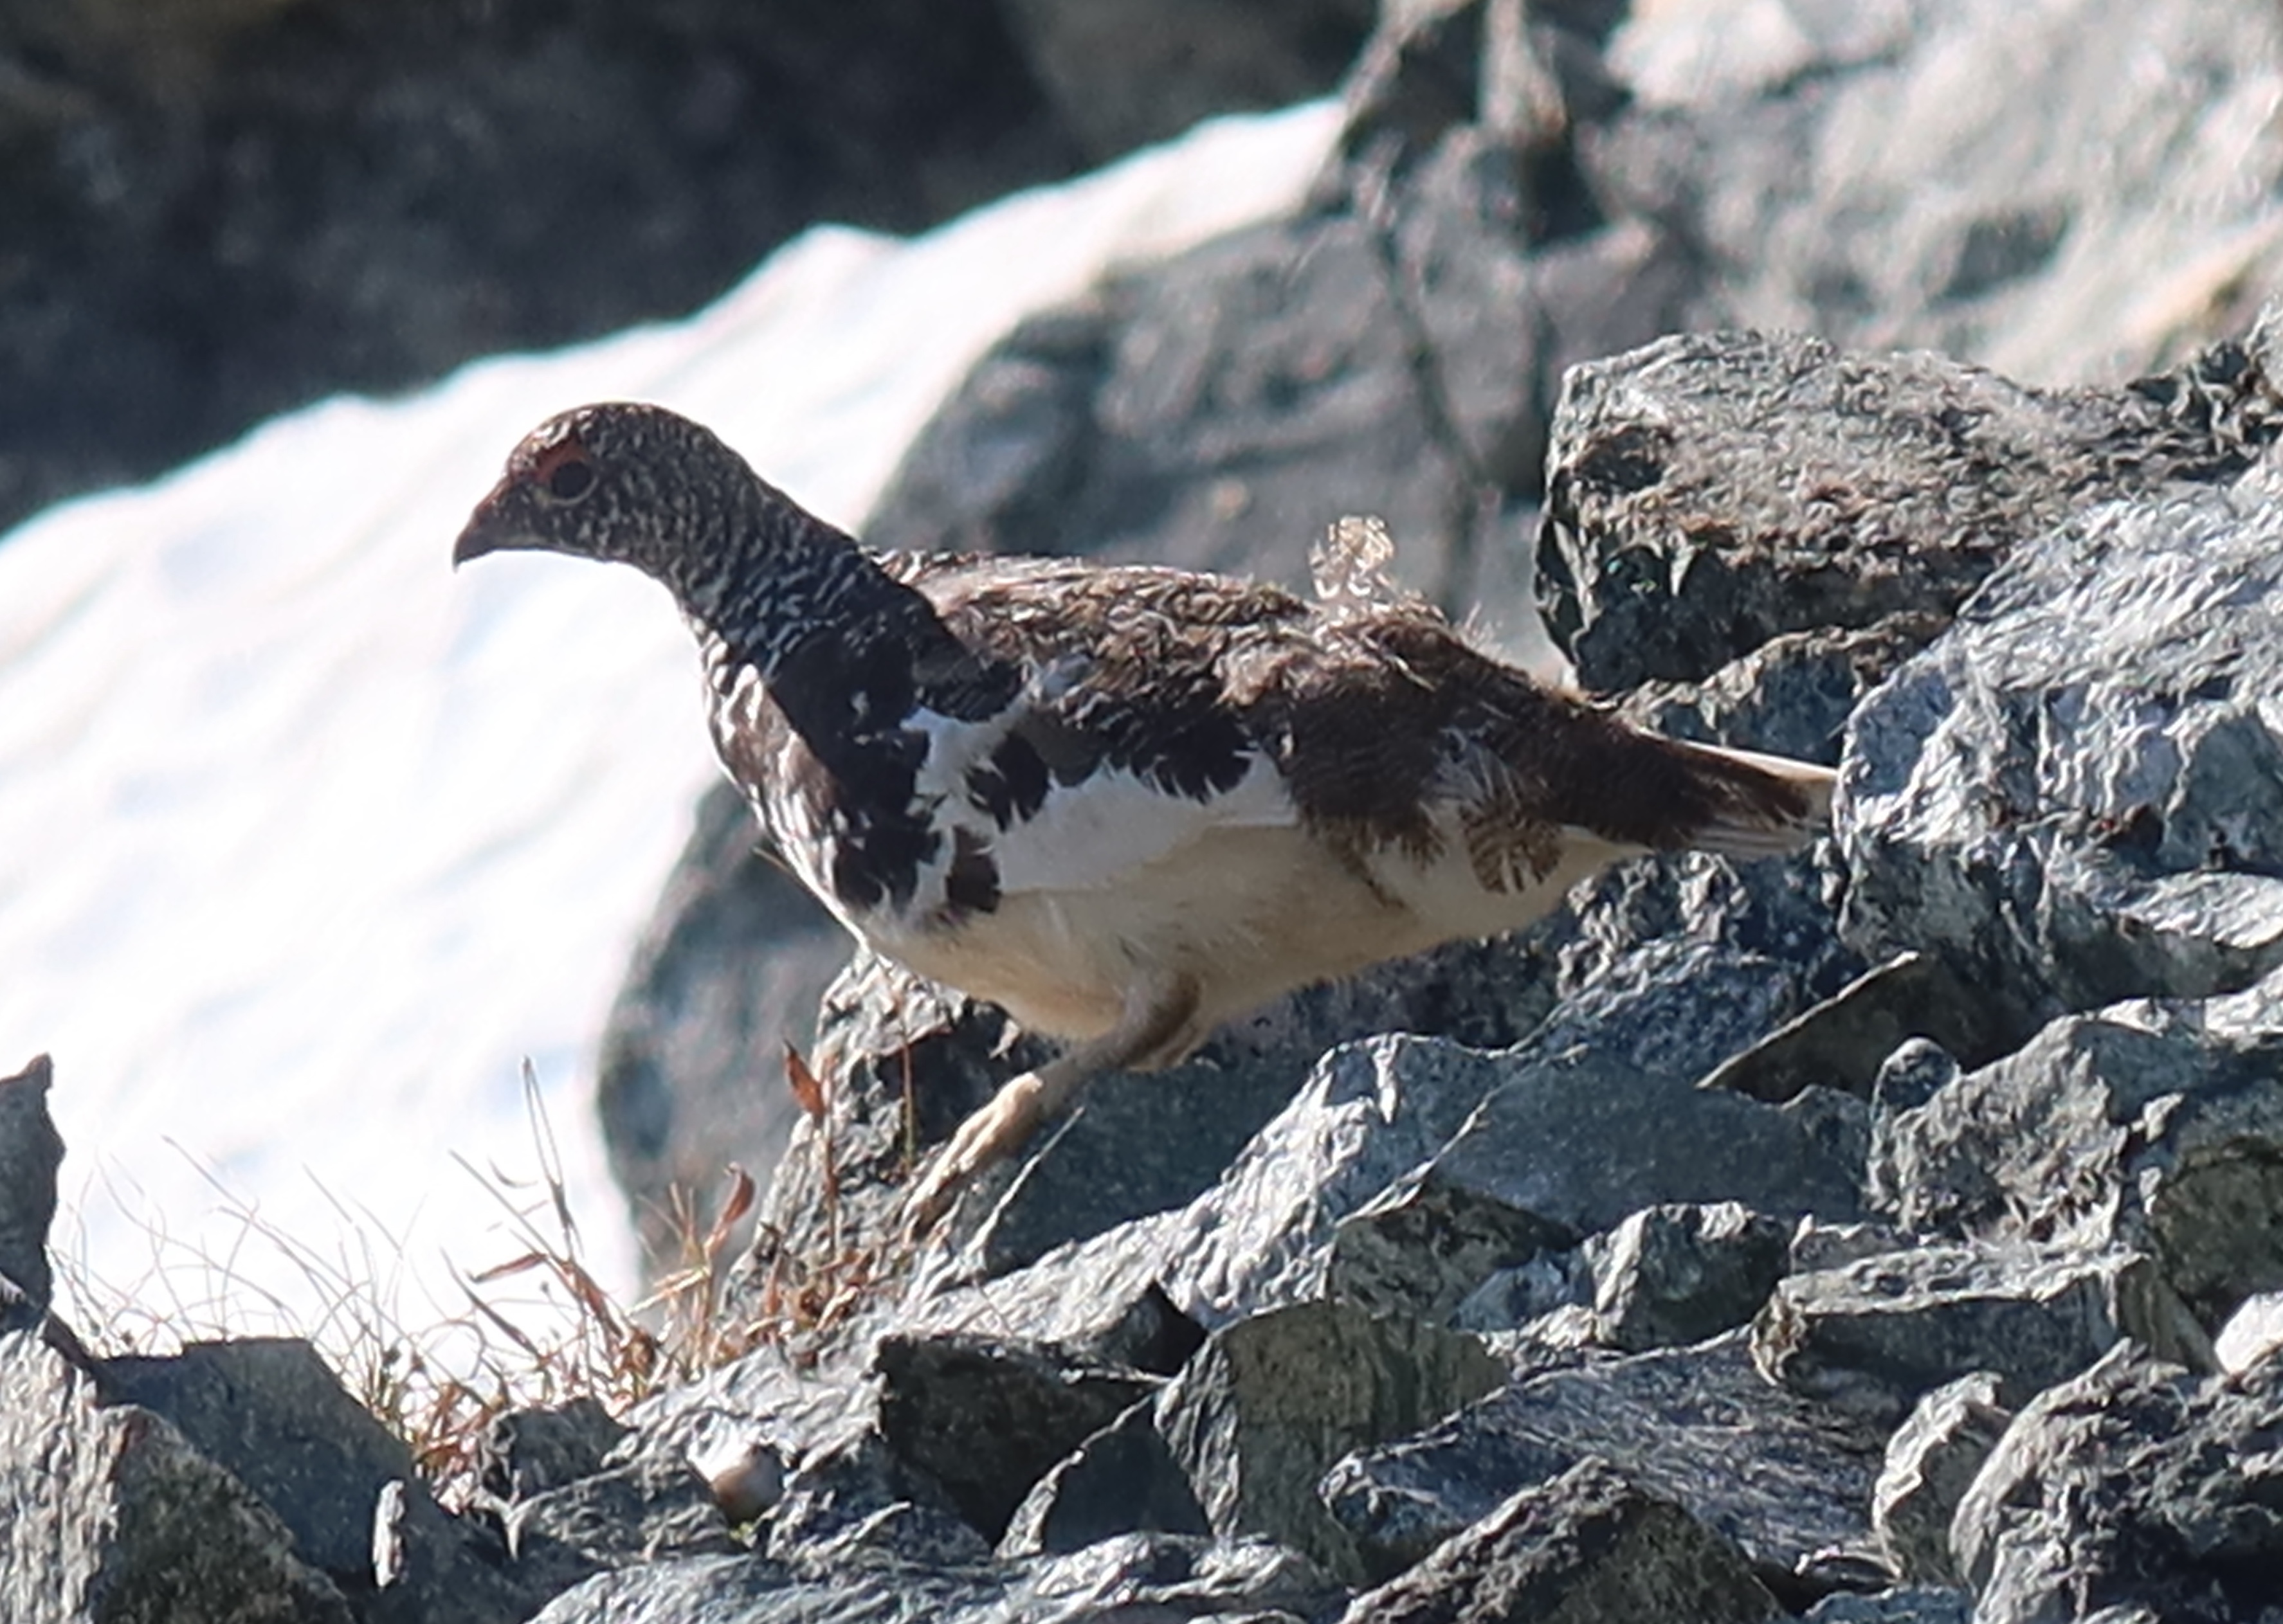
A ptarmigan is effectively “a mountain-chicken with the power of invisibility.” Ptarmigans change their color twice a year, between a mottled brown & grey that visually blends perfectly with rocks in the summer, and a solid white in the winter. The Ptarmigan Traverse is indirectly named after these very cool alpine birds. More precisely, an old local climbing club had named themselves “The Ptarmigans” after the bird, and then this traverse is named after that club, as they were the first documented group to discover this specific route of passage and travel it.
Around 1934 in Seattle, a subgroup within a local Boy Scout Troop called themselves the George Vancouver Rover Clan, a group of youths summitting peaks in the Cascades with homemade mountaineering gear and often signing summit registers with the initials “GVRC”, with mentorship from Ome Diaber (who was also the founder of Seattle Mountain Rescue.) In 1937, when the Boy Scouts national headquarters caught wind of the “dangerous” alpine activities that were occurring on Boy Scout-sponsored trips, they perceived them as too risky, and tried to set strict limits on how far a “Rover” could rove up into the mountains. In order to continue having freedom in the mountains, the subgroup was forced to split away from the Boy Scouts, and renamed themselves the “Ptarmigan Climbing Club”. In July of 1938, four youthful members of this club drove a Ford Model A to the Sulphur Creek trailhead (that’s one valley over from Downey Creek, which is the modern access to their same route), and set off with what sounds like 10 days’ worth of food, and had a 13 day trip. They went south-to-north, through a section of the Cascades with no previously documented passage, and made it all the way through to Cascade Pass, including tagging summits of Johannesburg, Sahale, and Boston peaks while there, before turning back and having to return all the way back to their southern trailhead at Sulphur Creek, as they only had the one car.
For more of the story, listen to Jim Nelson talk about the history of the original Ptarmigan Traverse in this recorded presentation: https://www.youtube.com/watch?v=iAKfnavelgU&ab_channel=TheMountaineers or read the old article “The Ptarmigans And Their Ptrips” in the 1957 Mountaineer magazine.
Trailheads & Car-shuttle
The standard trailheads are:
- North end: the Cascade Pass TH (google maps link, WTA link, road status: find “Cascade River Road”)
- 3600′. 48.4753, -121.0754
- South end: the Downey Creek TH (google maps link, WTA link, road status: find “Suiattle River Road”)
- 1450′. 48.2588, -121.2235
The Ptarmigan Traverse is most-commonly done in the north-to-south direction, primarily because the Bachelor Creek / Downey Creek trail sections at the southern end are a bit long & tedious, and used to be rather bushwhacky, making it preferrable to dispatch that section going downhill & with a lighter pack, rather than slowly hoofing your way uphill through it with you first-day extra-full pack. Also, the north trailhead (Cascade Pass TH, 3600′) is higher than the south trailhead (Downey Creek TH, 1450′), so the north-to-south direction means slightly more downhill than uphill in the end.
If you live in Seattle, the car-shuttle logistics consume about 6 hours at both ends of the trip:
- Before starting, car shuttle set up:
- Drive Seattle to Downey Creek TH, and leave one car there (about 3 hours)
- In whatever car will be left at the Downey Creek TH, everyone will definitely want to stash a full change clean cloths, change of shoes, bags for receiving smelly clothes, optionally wet wipes, etc.
- All people & gear pile into one car, and drive to Cascade Pass TH (about 2.5 hours away)
- Optional: if you want a last meal in Marblemount, it’s about a 1.5 hour drive from Downey Creek TH to Marblemount. Last time I was through there, Mondos Restaurant opened at 10:30am. Then from Marblemount to the Cascade Pass TH is 1 more hour of driving.
- At the end of your trip:
- Drive from Downey Creek TH to Cascade Pass to retrieve the car left there (about 2.5 hours)
- Drive home, Cascade Pass to Seattle (about 3 hours)
Camps & Itinerary choices
The most commonly used camps are: (Laid out in a 5-day itineray here, to give an example of the just-through-traverse without any side-summits)
- Day 1 to Kool-Aid Lake (can be reached in about ~6 hours from Cascade Pass TH)
- Day 2 to Yang Yang Lakes
- Day 3 to White Rock Lakes
- Day 4 to perhaps Cub Lake (or earlier option: Itswoot Ridge. Or later option: a forest campsite near Bachelor Creek)
- Day 5 exit the remainder down Bachelor Creek & Downey Creek to the car
👆 The itinerary above gets you through in 5 days. If you really wanted to shorten it (though IMHO it would be a missed-opportunity to be more-rushed and spend less time in this beautiful area,) if you did the car-shuttle setup the day before starting so that you could start from Cascade Pass TH relatively early in the morning on your Day 1, it is possible to get all the way to Yang Yang Lakes in a long first day (but doing so wouldn’t be my favorite.)
In my opinion, it’s better to instead add a day or two! An added day or two may be necessary in order to accommodate certain side-trips to summits. Most notably: Dome Peak!! It’s well worth summitting, and is worth adding a full day to your schedule for. Here are two ways you might consider revising the itinerary above to include Dome Peak:
- Use Day 4 to move camp from White Rock Lakes to Itswoot Ridge, leave camp in place on Day 5 and do a side-trip to the summit of Dome with light day-packs, then on Day 6 hoof it all the way out from Itswoot Ridge to the Downey Creek TH.
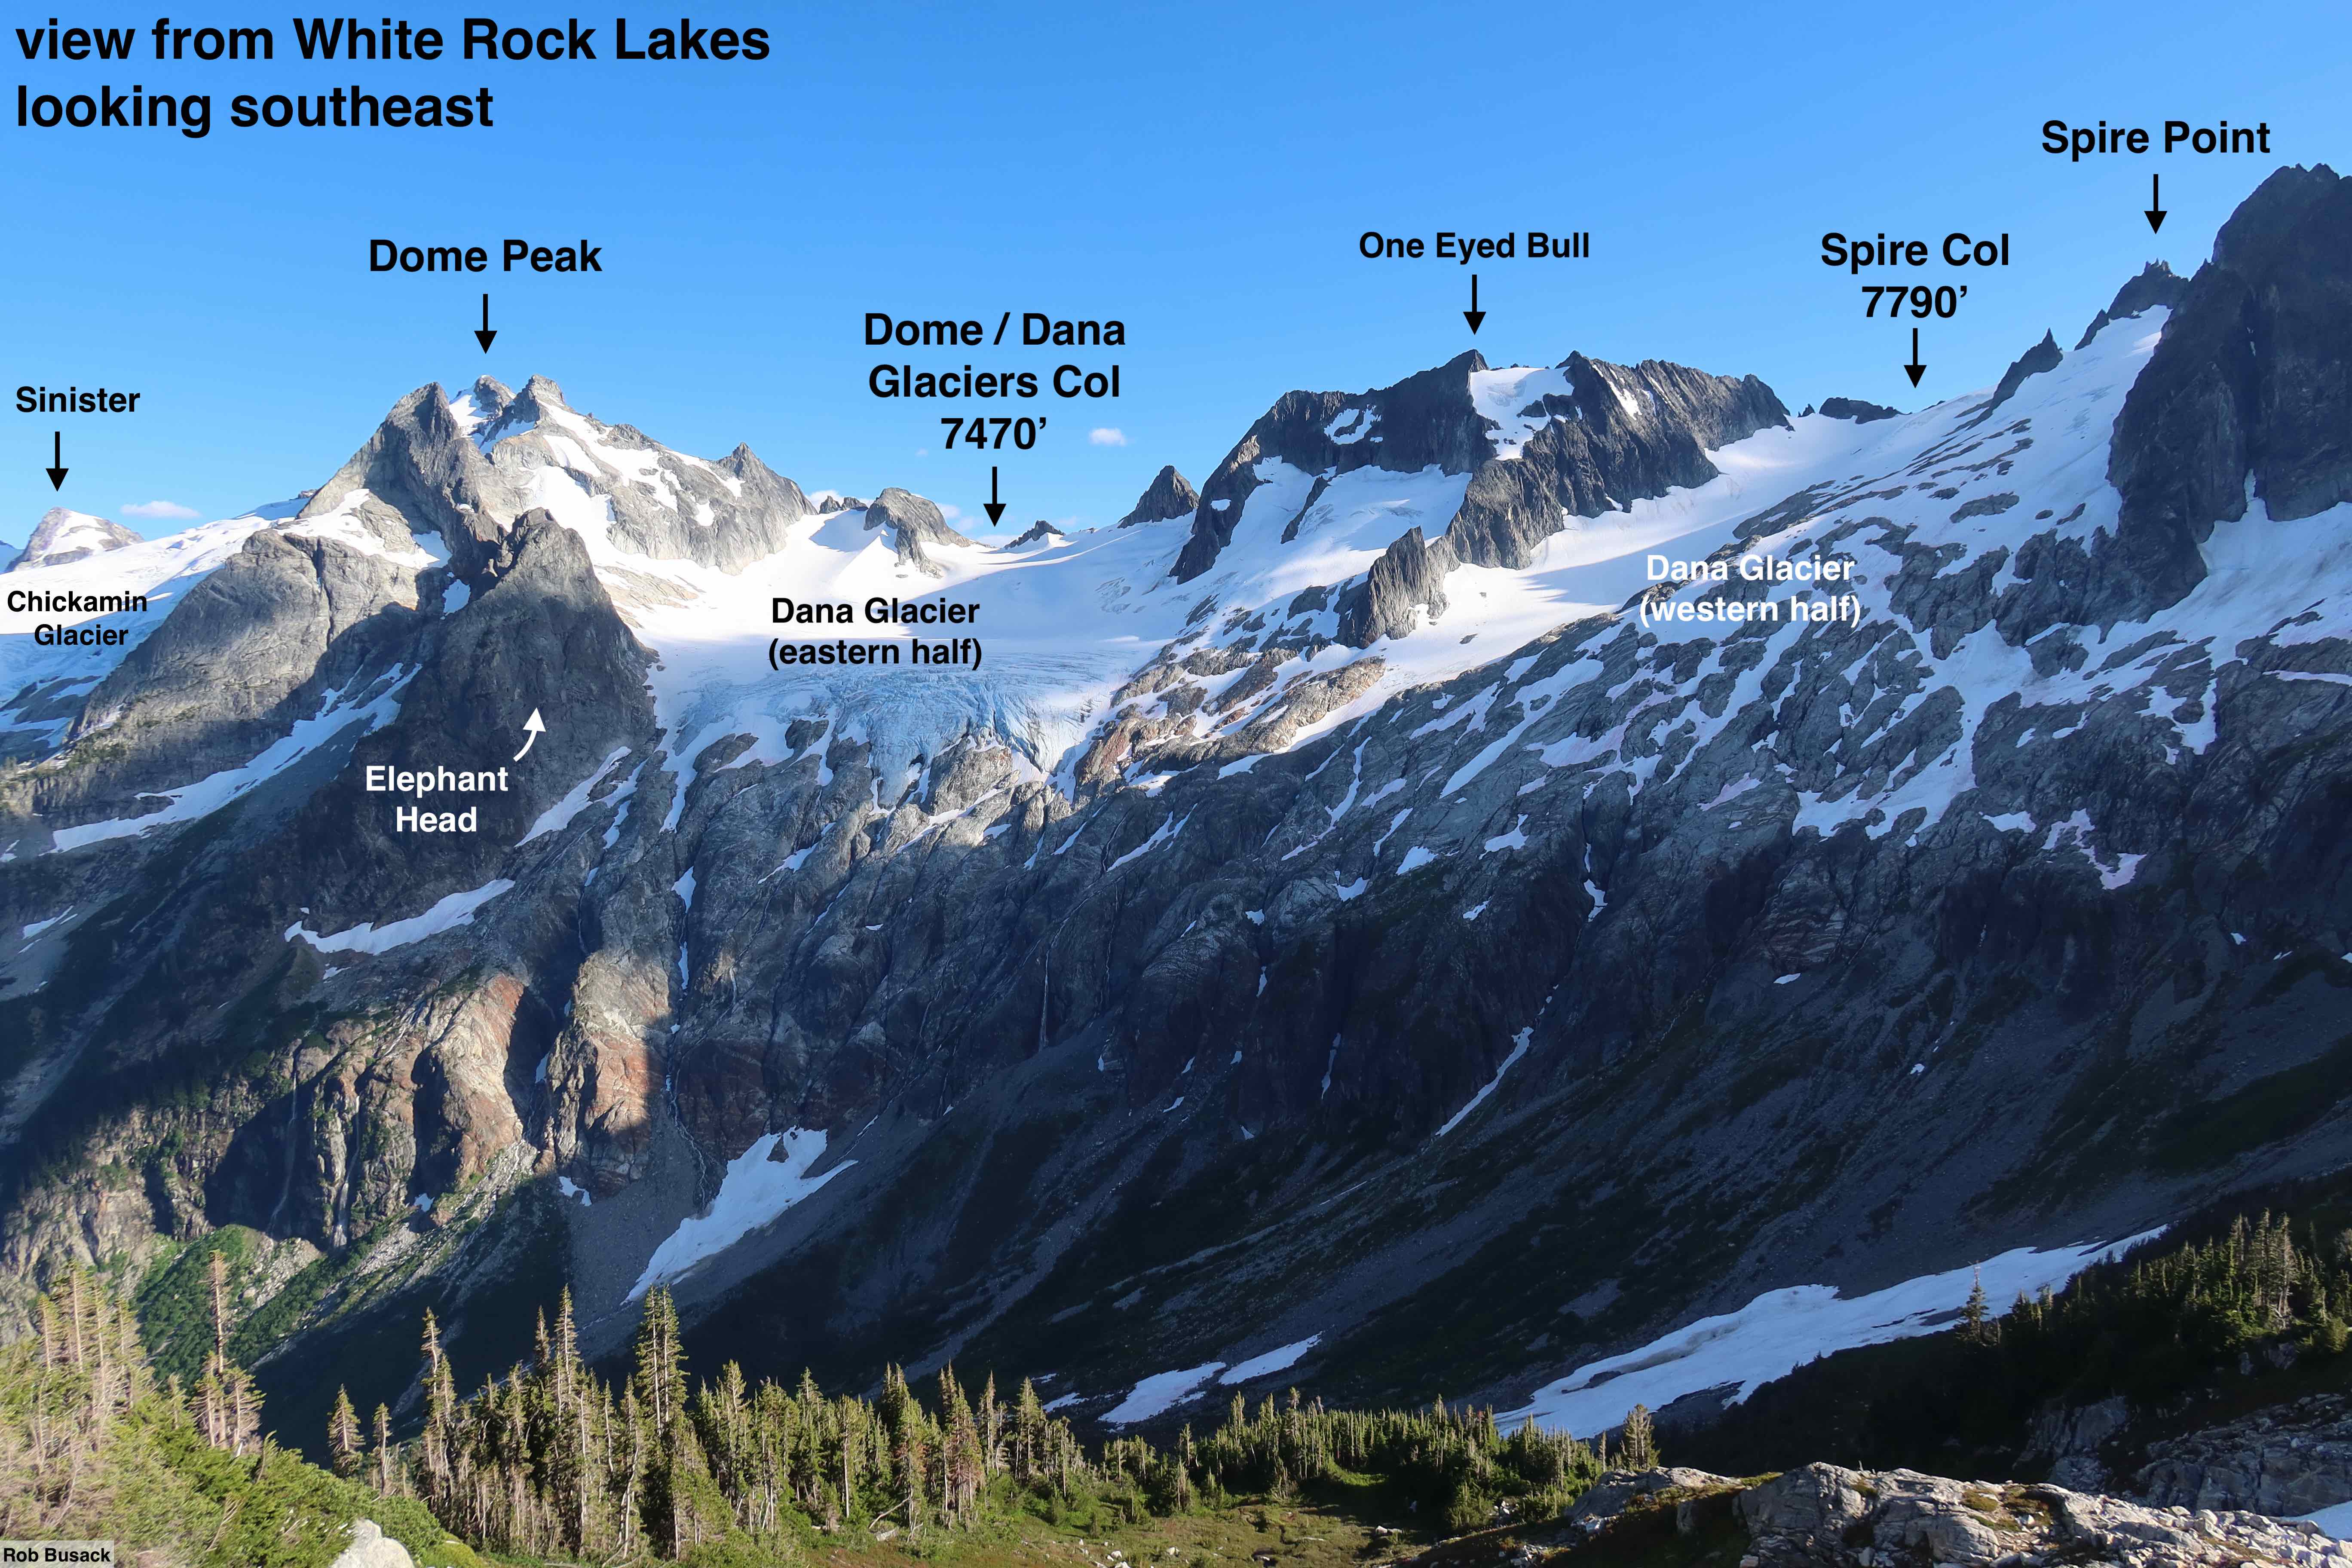
- Or, camp high, at one of the two cols that are on the way to summit Dome. Either the Dana Glacier / Dome Glacier col at 7470′, or the Dome Glacier / Chickamin Glacier col at 8550′. Use Day 4 to move from White Rock Lakes to one of those high camps, and use the afternoon hours of that day to tag the summit of Dome Peak. Then use Days 5 & 6 to cover the remaining distance to the Downey Creek exit.
Whether you are going for side-summits or not, you might consider incrementing your planned day-count yet one further more still. Having one more extra day of flexibility would allow you to change your plans while in the field in the event of an unexpected day of bad weather, or any other unforeseen reason. Having that flexibility ups your odds of successfully summitting peaks like Dome. And even if you don’t need a spare day for bad weather or whatnot, if you’d simply like to incorporate a rest-day in the plan, then I’m just saying: it would be a real privilege to get to linger at White Rock Lakes for an extra day, it’s an absolutely stunning place!
More camp location options
Beyond the most common camp location listed above, there are many other possible places to camp, which you could build other more-creative itineraries around. Listed from north to south:
- near Cache Col –> Cache Col marks the boundry of the National Park, so you would need ranger-issued permits to camp anywhere before it, but as soon as you step through the Col, you’re in Mt Baker National Forest / Glacier Peak Wilderness area, where permits are no longer necessary to camp. A number of large rock rings can be found near the col, at ~7000′, just up and left (east) from Cache Col’s low point. Running water is somewhat improbable, but might exist nonetheless about 500′ feet of travel away from camp, just before the trail ahead descend below 6900′
- at Kool Aid Lake –> at 6100′. 3+ established tent sites, small lake & nice outlet stream provide easy water. A few small trees, generally under 10′ tall. Delightful spot, with incredible views.
- after the Red Ledge but before the Middle Cascade Glacier –> the route traverses through a meadowy & rocky stretch around ~6500′. Campsites are not as obvious or established here, but there is plenty of possibility to come up with something comfortable if you look around a bit, and the probability that a stream of water is nearby is quite high.
- south of Forbmidable –> around 6900′, after having passed through the Spider-Forbmiddable Col and descending to relatively flatter snowfields, camping on snow would be possible, or possibly in an existing rock ring if you look around hard enough. This is a relatively uncommon camp location, it only really makes sense if you’ve specifically included a summit-attempt on Formidable in your plans.
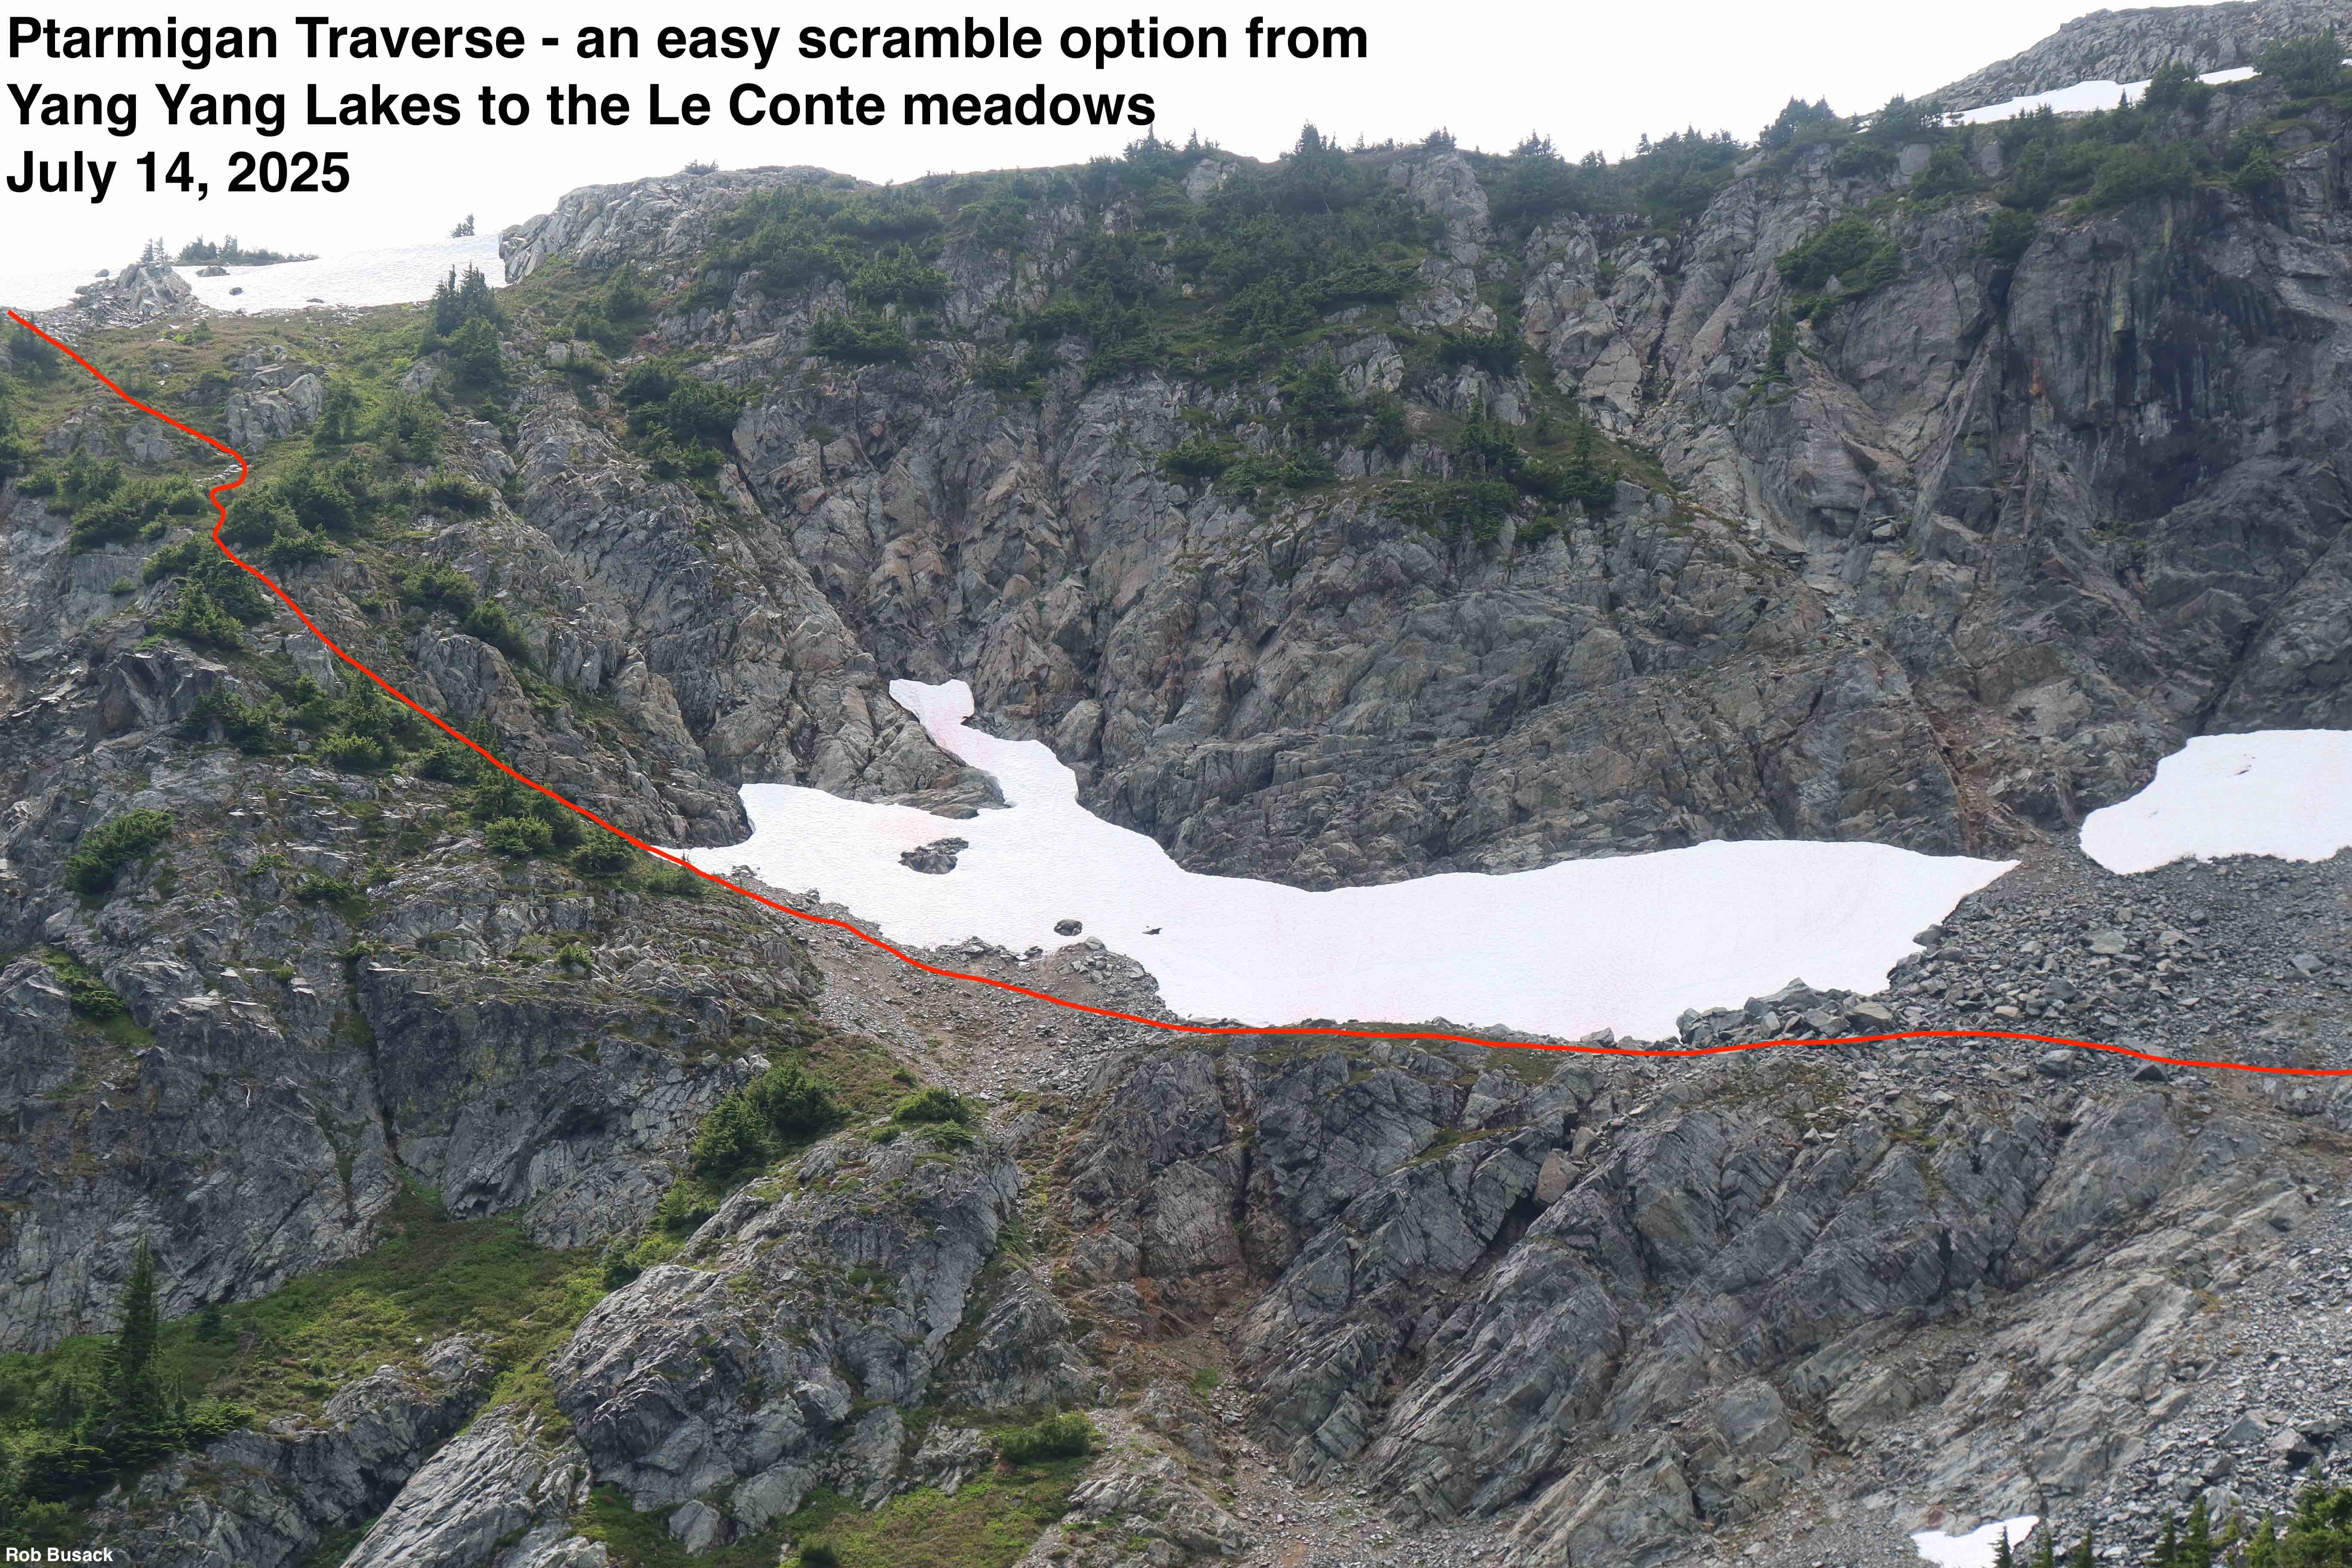
- Yang Yang Lakes (pic 1, pic 2) –> at 5840′. A number of very well-established & comfortable campsites exist, particularly at the south end of the south lake. This camp borders on sub-alpine: taller trees provide a lot of shelter and makes it possible to hang a bear-bag high enough that it doesn’t necessarily have to be an Ursack. But it is perfectly on the border of alpine where you still get absolutely fantastic sightlines through the surrounding meadows, glaciers, and looming peaks. Of course plenty of water access thanks to the lakes.
- Le Conte ridge-top meadows –> at 6500′, on top of the ridgeline that the route gets on top of just past Yang Yang lakes, cute little meadows and a small tarn offer the potential of ridge-top camping. Too early in summer (i.e. June) the grassy spots may still be snow-covered or soggy; but by July, flat grassy spots like 48.3867, -121.0590 would allow pitching a tent. Lovely if the weather’s nice. Exposed if the weather’s not.
- at the Le Conte / Sentinel Col –> at 7300′, at the top of the Le Conte Glacier, as you turn west and step off of the glacier through that col by Sentinel, the snow just before stepping on to the rocks there is flat, and would allow for camping on snow. There may also be a rock-ring or two towards the higher northern edge of the col, but I didn’t closely verify. So you may or may not be camping on snow, and you would have to melt snow for water, so it wouldn’t be the most comfortable. This spot would serve a lot better as a lunch spot than a camp spot.
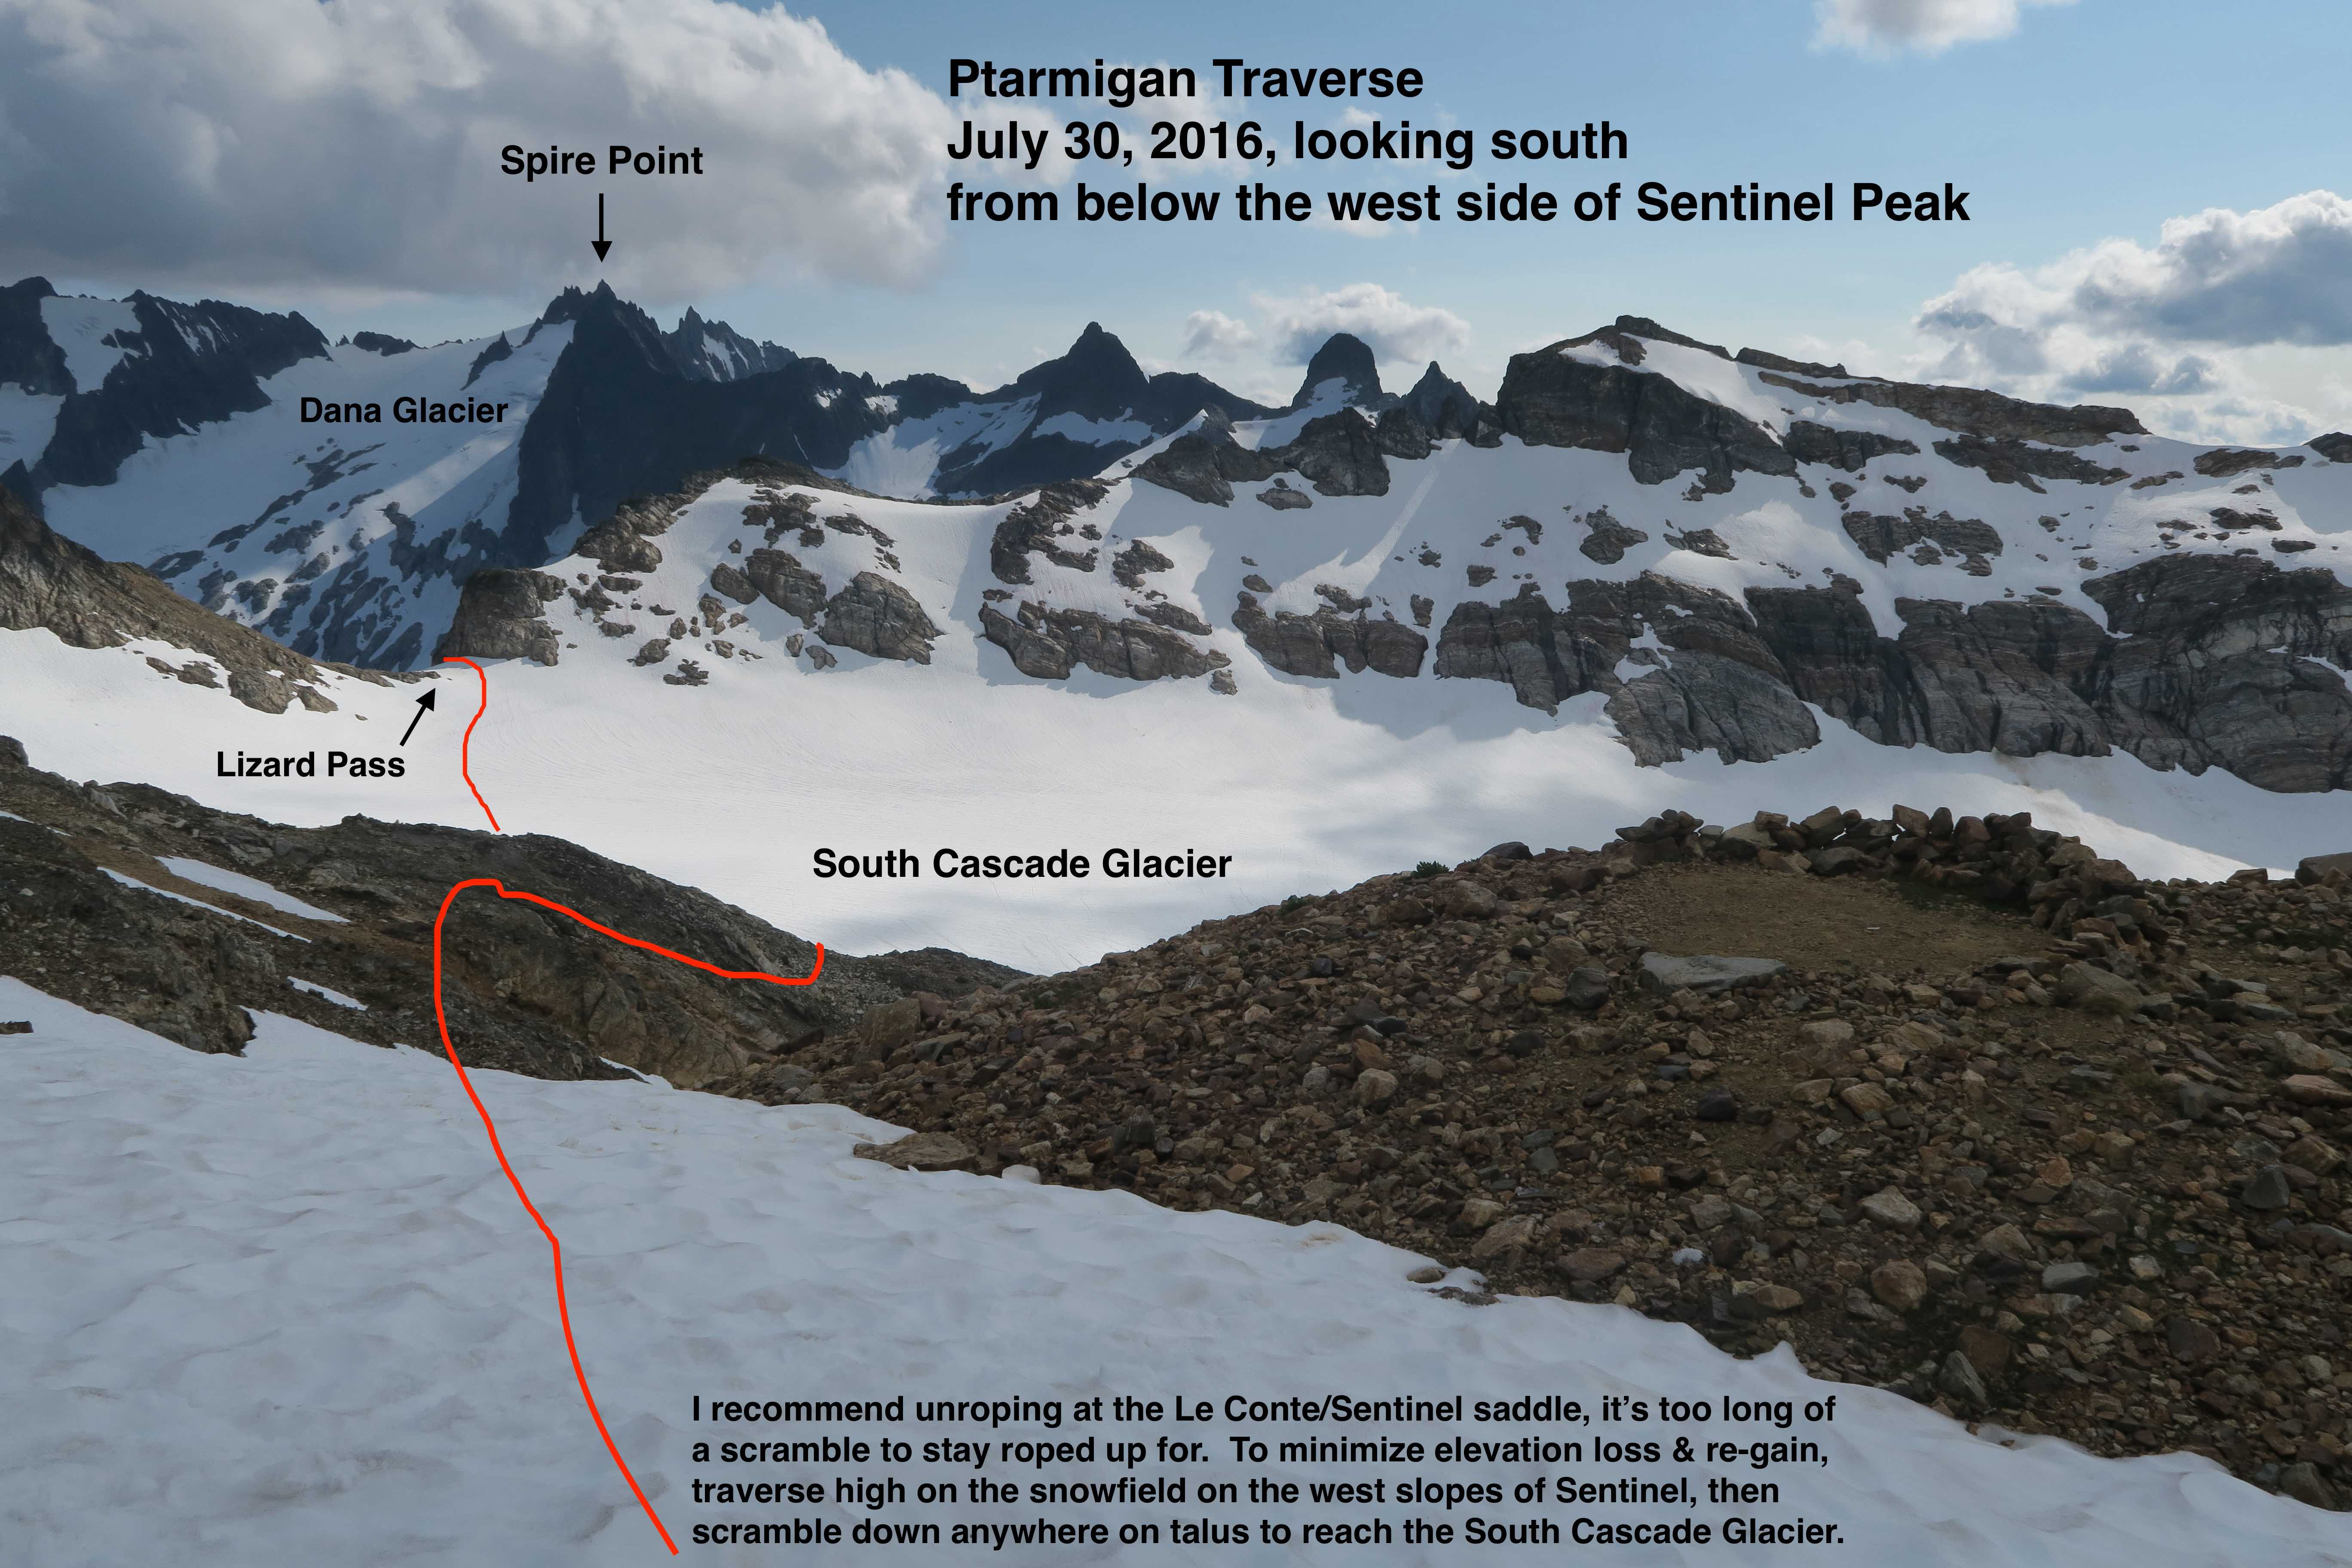
- large rock ring or two SW of Sentinel, overlooking the South Cascade Glacier –> at ~7100′, at 48.3532, -121.0468, there’s a large rock ring or two. A nifty position overlooking the South Cascade Glacier, and reasonably good odds of finding a trickle of running water somewhere nearby, but an otherwise harsh location surrounded by only brown rock, dirt, and snow. Only two hours of travel beyond this would arrive at the even-more-scenic White Rock Lakes.
- White Rock Lakes (pic 1, pic 2) –> 6200′. Perfect in every way, it doesn’t really get better than this.
- the Dana Glacier / Dome Glacier col –> at 7470′. Two small rock rings exist (maybe more if you explore a little further away.) Plenty of flat snow for many additional tents if need be. No plants up here, and running water wasn’t immediately visible, but I’ve heard rumors of people finding running water around 300′-500′ away horizontally, exploring the snowfield-to-rock edge to the south.
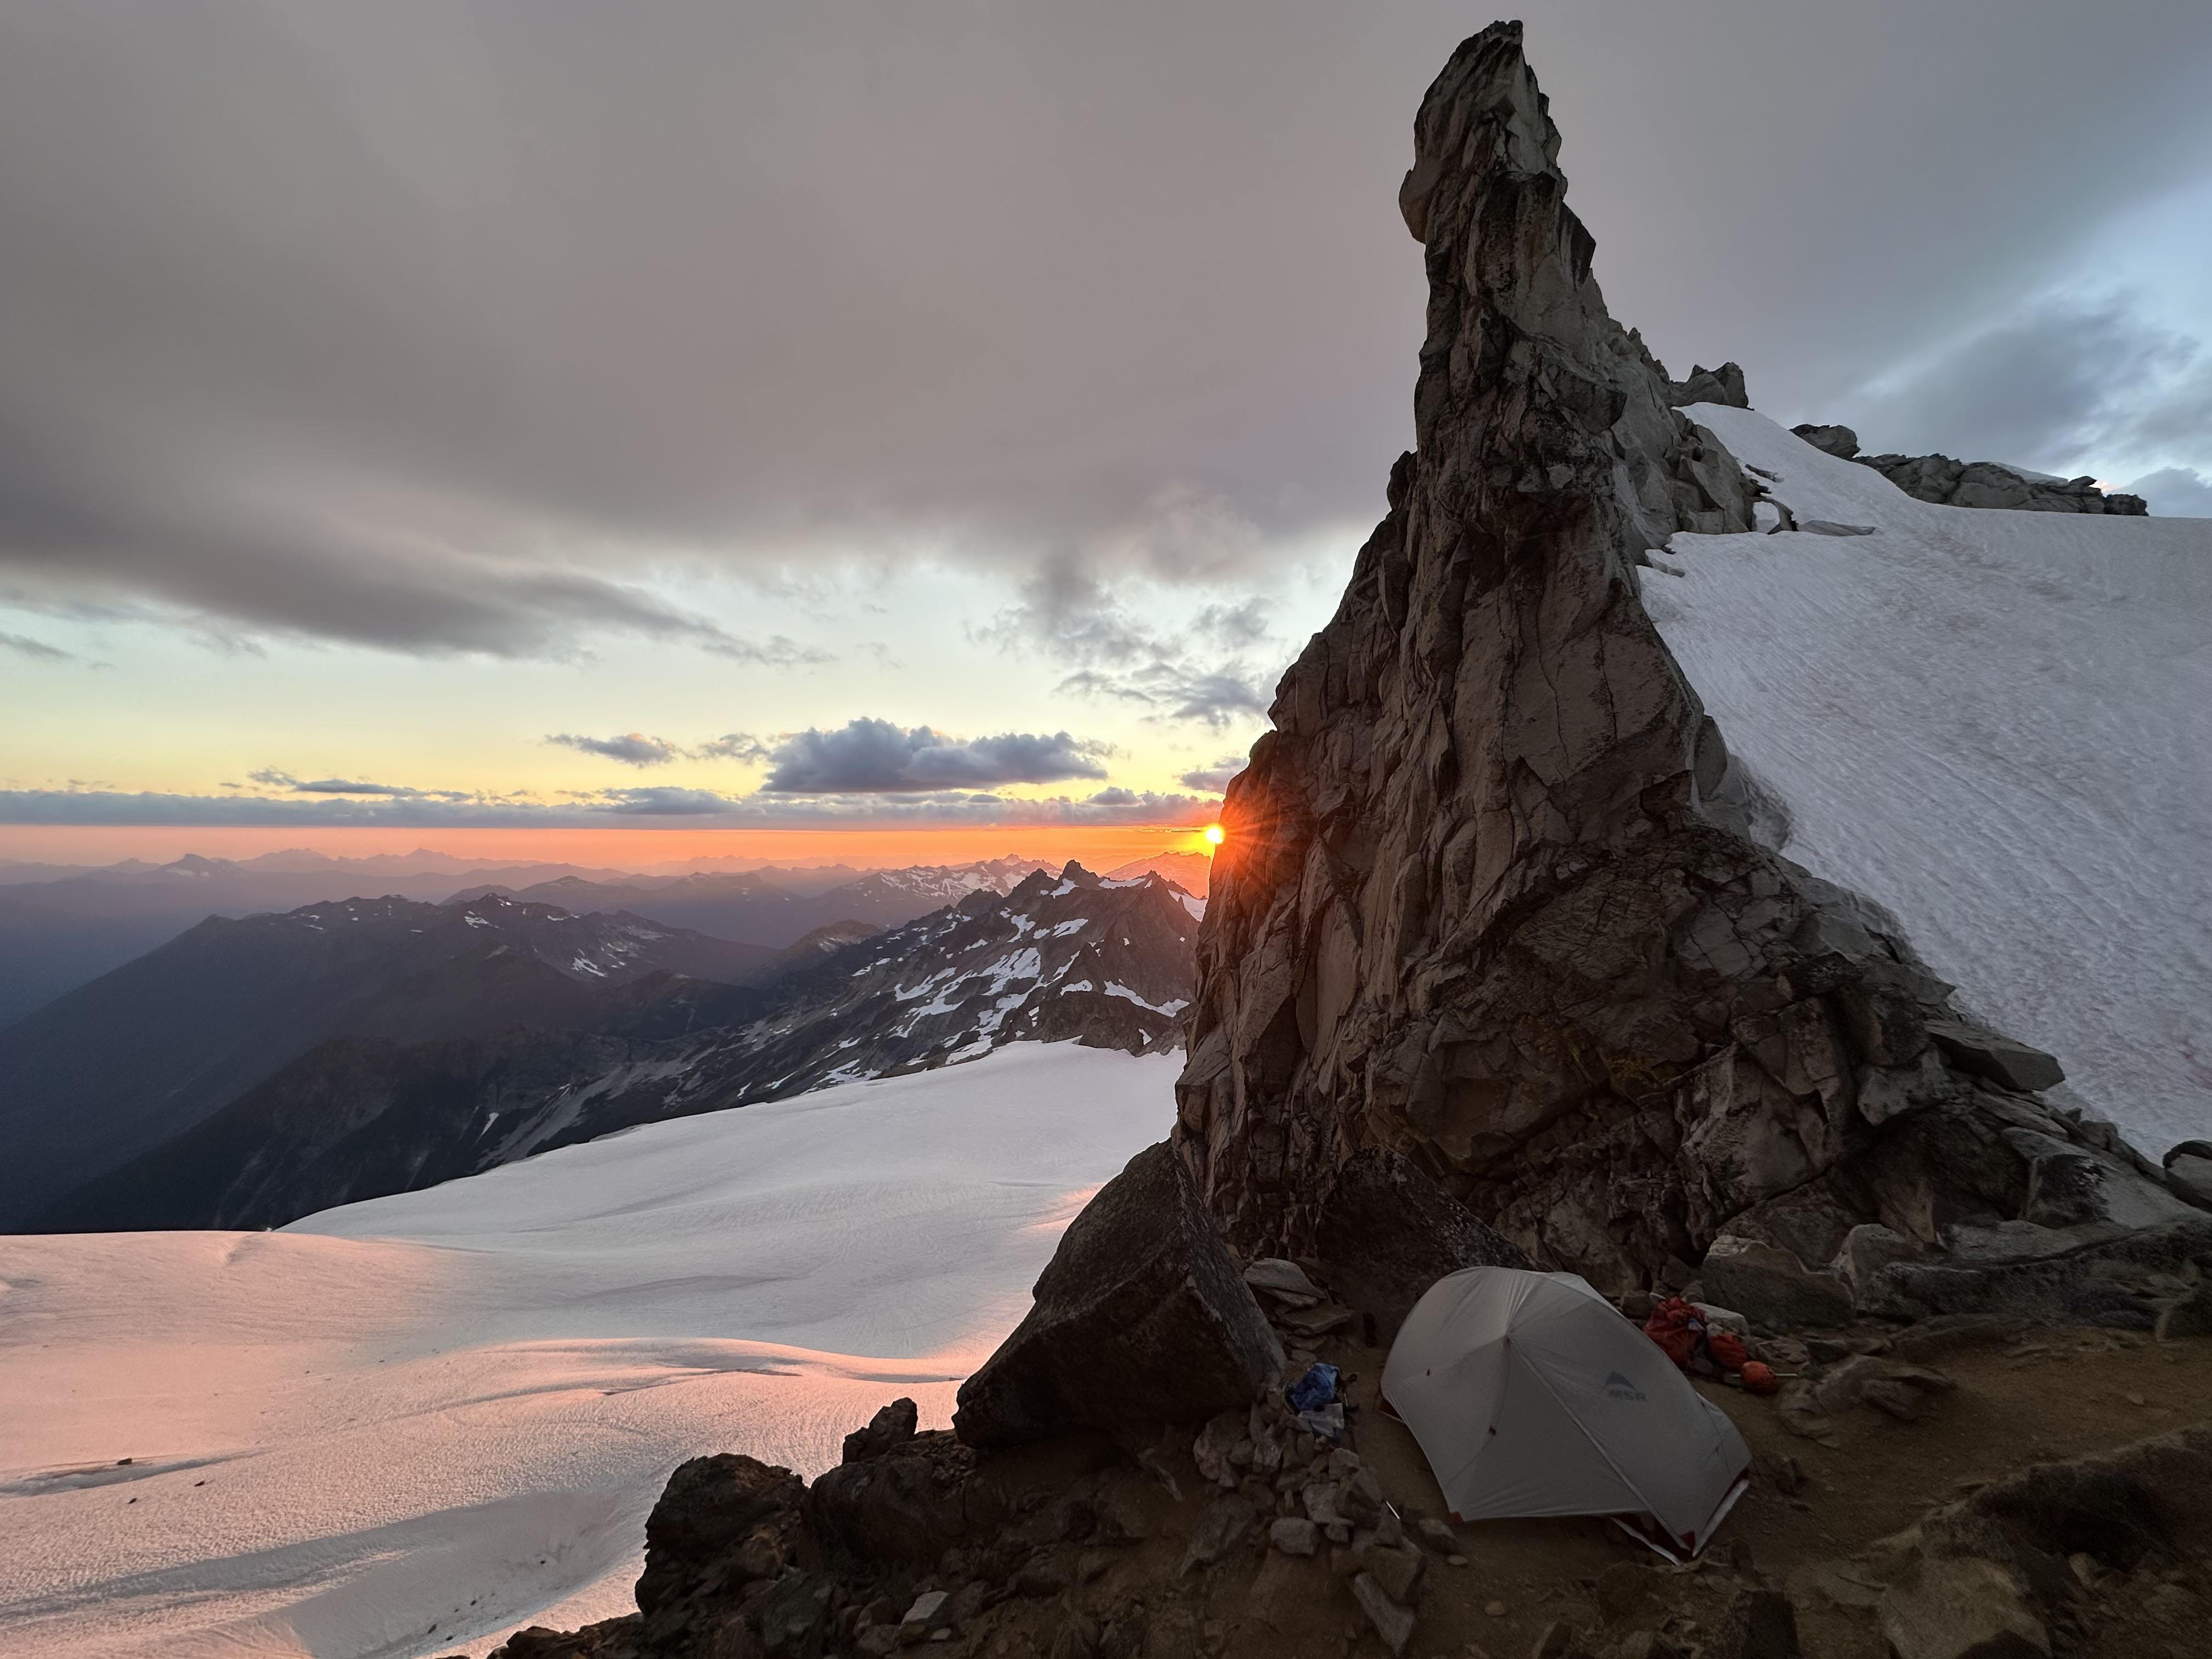
- the Dome Glacier / Chickamin Glacier col (pic 1, pic 2) –> at 8500′, this spartan alpine camp has a single rock ring just west of it’s ridgecrest, and a single large flat rock east of the ridgecrest just large enough for a second 2-person tent to sit on top (though you’d need some ~2′-5′ long cord extensions to appropriately anchor that tent.) A large scoop of flat snow to the east could accommodate many more tents if need be. No running water here; melting snow is definitely required. Great views. But this is a rough place to be if it’s windy.
- Itswoot Ridge camp –> at 6350′ on Itswoot Ridge, where the descent routes from either Spire Col or the Dome Glacier come back together, there is a glorious flat meadow campsite, with a raging stream nearby coming down from Spire Col. Comfortable camping and fantastic views. (From here to the exit at the Downey Creek TH, it’s about 14 miles, 6000′ of descent; about 8 hours of moving. Doable, but a bit long if you also plan to spend 6 hours retrieving the car shuttle & driving home.)
- Cub Lake camp –> at 5340′, Cub Lake feels like the border between alpine & sub-alpine. It’s a lovely alpine lake, still surrounded by heather meadows, but now also tall trees in heights you haven’t seen since Yang Yang Lakes. In a partial valley, it’s a decently wind-protected location, but that also means bugs increase in likelihood.
- a forest campsite along Bachelor Creek –> after cresting the ridge beyond Cub Lake and starting the descent down the Bachelor Creek valley, campsites exist here and there. The last & most established one is at 4460′, 48.3036, -121.1176. It’s a perfectly average forest camp, with the main creek nearby. If you go to that camp, afterward be sure to backtrack 1 minute back up the trail, as the new & better trail moves to the north side of Bachelor Creek just prior to this camp. Camping here nicely sizes the last day to have only 5 or 6 hours of travel remaining to reach the car.
- at the Bachelor Creek / Downey Creek intersection –> at 2440′, where the two creeks merge, there is a large established camping area in the forest. From here to the end, all that remains is the Downey Creek trail itself, ~6.5 miles and fairly flat-ish & relatively-well maintained, meaning about 2.5 hours remain to reach the car. (A smattering of other campsites exist along the Downey Creek trail too, but there’s little reason to use them once you’re under 2 hours away from the exit-car.)
Glaciers
The Ptarmigan Traverse crosses a lot of glaciers!! Five at the very minimum. On our 2025 trip to get Dome and Sinister, I’d argue we stepped on 8 separate glaciers during our 6-day trip.
Be aware that there is a spectrum of safety-options that you must choose from when travelling on any glacier. Here are four points on the spectrum, listed from least-safe (but least-delaying) to most-safe (but most-delaying) –>
- Simply walk on the glacier without donning any glacier travel safety gear at all. –> By far the least-safe, but also the least-delaying. If your path across a glacier is short enough that you’ll spend very little time on it, and you have very high confidence that the risk of unseen crevasses is vanishingly small, you could choose this, and just keep walking across it the same way you would any non-crevassed snow field, but be aware of the risks you are choosing here.
- Put on harnesses preemptively, but not actually rope up. –> This option is especially popular with skiers, since it allows independent freedom of movement & travel speeds, while still at least slightly hedging the risks. IF someone were to have a small unexpected crevasse fall, and someone else is carrying the rope, it’s a heck of a lot easier to throw them a rope and get the rope attached to them if they are already wearing their harness, versus if they are not. (Someone wedged awkwardly in constrained space between two ice-walls certainly will not have the mobility to put on a harness once a fall has happened, so getting a rope attached to that person would be very problematic indeed.) Even so, there remain some big risks here: if a crevasse-fall is large enough to break bones or kill someone, they will suffer those full consequences when there is no rope in use to catch them. Also concerning is the possibility of someone falling into a crevasse at a moment when no one is looking, sometimes leaving the group without a clue as to where to search for the missing group member, since the small hole they leave in the snow surface is often quite difficult to notice visually unless you were actively watching at the moment that it happened.
- Preemptively put on harnesses, and do rope-up, but skip pre-rigging prusiks. –> This provides most of the safety you’d expect from roping up. However, if someone does end up in a crevasse, it’s a heck of a lot more difficult (and possibly impossible) for them to put their personal prusiks on after they are down in that constrained environment, and/or as the result of some partial injury they may have sustained during the fall. Also, for rope-teams that are only two people total, pre-rigged prusiks are typically a crucial enabler for the now-solo rescuer to simultaneously keep holding self-arrest with one hand, while single-handedly placing a picket & transferring the load to it with only their other hand.
- Preemptively prepare everything: harnesses on, rope-up, and do preemptively pre-rig prusiks. –> By far the most-safe, but also the most-delaying to set-up & later pack-up.
For each glacier, you have to choose where you want to be on that safety-specturm. Of course, the safest advice to give here is “Rope up on all glaciers, as a precaution.” On the other end of the spectrum, some very experienced climbers-turned-trail-runners are indeed willing to risk crossing each of these glaciers unroped. There’s a lot of room for spectrum in the middle. So, let’s say “officially” my advice to you is “rope up on all glaciers, as a precaution”, but here’s how I might personally lean on whether to rope up or not on certain glaciers found along the Ptarmigan Traverse: (You are responsible for yourself. Make decisions based on what you’re seeing while out there, and bais towards safer options if ever in any doubt.)
- Cache glacier (up to Cache Col) –> Generally not showing much in the way of crevasses, and you’ve got pretty good visibility of the entire length that you are going to travel before you step onto it. This one I lean towards the okay-to-not-rope-up end of the spectrum.
- Middle Cascade Glacier –> It’s got a few serious crevasses. I lean towards do-rope-up on this one.
- Le Conte Glacier –> The Le Conte glacier has the potential to be the gnarliest glacier of the just-through-traverse. I lean strongly towards do-rope-up on this one. This is also the one I’d be looking for recent beta on, to get an idea of how broken up it is. If there’s an added-challenge of possibly bare-ice anywhere, which may or may not warrant bringing extra or different gear for (e.g. sharp steel crampons?), this is the one.
- South Cascade Glacier –> The Ptarmigan Traverse arrives at this glacier near the glacier’s head, fairly high up the valley it sits in, and the crevasses up at that upper portion of the glacier are often very thin cracks (i.e. you could drop a pencil down them, but a human wouldn’t fit, making it quite hard to “fall in” a crevasse.) Also, the route only goes across the glacier side to side, across its relatively-skinny dimension, so you’re not on it for all that long. These factors that keep the risk-level low already make me lean towards the okay-to-not-rope-up end of the spectrum.
- The western half of the Dana Glacier (the route up to Spire Col.) –> There’s not a lot of crevasses, but there are a few. I kind of land in the middle of the spectrum on this one. Though to be safe, might as well rope up. You’re already carrying the gear, so better safe than sorry.
- The eastern half of the Dana Glacier (the route up to the Dana-Dome Col.) –> This is similar to the western half, though you’re on it for at least twice as long. I lean towards do-rope-up on this one.
- The Dome Glacier –> Similar to the Dana Glacier. I lean towards do-rope-up on this one.
- The Chickamin Glacier –> You won’t need to travel on the Chickamin Glacier, unless you are specifically going beyond Dome Peak to the east, either to Sinister Peak, or Gunsight, etc. If you do travel on the Chickamin Glacier: it can be quite gnarly. Definitely rope-up. Maybe even add an extra picket or so to your gear list. The crevassing and the bergshrund on the Chickamin Glacier can get quite serious.
Gear
- boots –> Keep in mind that you’ll spend quite a bit of time on snow, and at times you’ll want something that can kick-steps securely on sections of steeper snow. But at the same time, you’ve got a lot of distance to cover. IMO, the ideal footwear here is either lighweight 3-season mountaineers boots, or some decently stiff & waterproof hiking boots that you’ve kicked a few snow-steps with at some point before. (Personally: I’ve worn Asolo 520 boots for the whole traverse one time, and Salewa Crow boots for the whole traverse another time. Both times I was perfectly happy. I had a pair of Crocs as camp-shoes. Alternatively: some other people bring some light trail runners as their camp shoes, which can also be worn for some of the trail miles on the first & last days, and that also works pretty well. Yes, there are people out there who do the entire traverse with only a pair of trail runners… but if it’s your first time on this traverse, then you should still wear snow-appropriate boots your first time through, and not commit to solely-trail-runners until after you’ve gained familiarity with the terrain.)
- basic glacier travel gear:
- helmet
- ice axe
- crampons (aluminum is generally fine)
- gaiters (small ones are fine)
- a light harness, with some tidbits for glacier travel, like:
- hero loops / small prusik loops
- texas prusiks set
- a light pulley
- a few locking carabiners
- one spare non-locking carabiner
- a sling or two
- something to serve as a light personal anchor
- (optional) a light cordelette (e.g. 5.5mm BlueWater Titan Cord.)
- (optional) a belay device (if you’re only doing the simple trough-traverse, there’s no need for for any rappels, it’s just glacier travel. If doing side-trips to summits, then the possibility of needing to belay and/or rappel goes up.)
- the shared technical gear: rope and pro
- glacier rope –> if just doing the through-traverse and no side summits, bring whatever length of glacier rope you’re comfortable with. If you are doing some side-summits, get beta on those, and see if any require any specific rope lengths. (e.g. is there a rappel? Or need to setup a fixed line? If either, how long?) FWIW: On Dome, a 60-meter handline would have been the most comforting, but it could be possible with a 30-meter handline either by scrambling the first 30 meters of the exposed traverse unroped and only using the handline for the last 30 meters. (Or by doing two “pitches.”) On Sinister: a 40-meter handline was very comfortable, though it looked like things would have also just reached with a 30-meter handline.
- pickets –> At most, 2 per rope team.
- ice screws –> From the beginning of July onward, I would encourage bringing and carrying perhaps two long (e.g. 21cm) lightweight ice screws. (Aluminum ones like the Blue Ice Aero Lite, or Petzl Laser Speed Light.) It can be just two for your entire party. In July, it’s fairly unlikely you’ll use them, but I do think they’re worth carrying, just in case. Sometimes, especially as summer goes on, some of those glaciers get down to bare ice. If you had to do crevasse rescue and found you were dealing with solid ice, this gives you at least some way to anchor. Or more likely: if there’s a section of bare ice on a glacier that’s kind of a medium slope-angle (i.e. not flat, but not steep enough to be real “ice climbing” either, more like “ice scrambling”,) then the ability to set pro to do a running-belay across that section may make the difference to that glacier being safely traversable. Of course, as summer gets later (later August and onward,) you may need to think about the possibility of bare ice even more, which may further change what you need to pack or plan for, beyond what I’ve suggested here.
- rock pro –> If you’re just doing the through-travese and no side summit, then there’s no need for any rock pro at all. If you are doing side-summits, then you might need some rock pro, it depends on the needs of the specific side-summits. For example: for doing Dome & Sinister, I was happy to have a small handful of rock pro, which included a set of 4 tricams, and a half-set of nuts (e.g. if you’ve got a set of 10 nuts, start by removing the largest one, then remove every-other size down from there, and you’ll end up with just 5 nuts that still fairly-effectively cover the whole size range, but weigh less than half what the full set did.) If you do bring some rock pro, don’t forget to also pack at least 1 nut tool, and also throw in a few more slings with it too (e.g. 3 or 4 more runners.) If you really want to go with the minimum number of carabiners, rather than 2 carabiners per runner, you can plan to girth-hitch (better yet, dress it to be a strop bend) a sling to a piece of pro to save a carabiner; but keep in mind this is fine for low-force uses like scrambling, and not so much appropriate for high-force uses like true rock climbing leader-falls.
- typical camping gear:
- tent
- sleeping bag (or IMHO, better yet, a sleeping quilt!)
- sleeping pad
- (optional) pillow stuff-sack
- sleep-kit stuff (eyemask, earplugs, melatonin or any preferred drugs, etc.)
- stove –> Think about your planned camps, and the likelihood of whether you’ll have to melt snow as a water source or not. (A very rough rule of thumb in this area: camps at or below 6500′ tend to find access to running water, and camps above 6500′ may required melting snow for water.) If you won’t have to melt snow, then any stove is fine. If you do have to melt snow, most stoves are still fine, but you’ll probably want one you’ve tested out at melting snow before. (FWIW: JetBoils are pretty good for most things. If I know I’m going to have to melt snow, then I sometimes prefer to bring an MSR Reactor, since it puts out more BTU’s, and the larger 1.7L pot is helpful for that too. But yeah, probably any stove is fine.)
- fuel –> As a very rough rule of thumb: If not melting snow, I generally find that one medium-sized canister (i.e. the one with a net weight of 8oz, but gross weight of 13.1oz) will make hot-dinners and hot-breakfasts for 2 humans for about 7 days. If there are any nights that you do expect to melt snow, I lean towards bringing a whole fuel canister (per 2 humans) just for that night. So, the rough formula is:
total # of medium canisters = ([# of people] ÷ 2} ✖️ ([1 for the week] + [# of camps definitely melting snow]) - water treatment –> It’s become common in my group of friends for almost everyone to have their own personal BeFree, as they are so convenient for collecting & treating water during the day while on the move. We also have one larger shared gravity-filter that comes out at camp, to make larger-volume water treatment at camp easier. Arguably this is more tools for water treatment than really necessary, but it’s not that big of a weight pentaly, and it sure is convenient. You do whatever works for you.
- food storage –> The best way to go here is to use an Ursack. In particular, the largest Ursack you can find. At the beginning of the trip, when everyone has some six days of food each, it’s likely that each group member may need their own Ursack. (In my experience, I find the Ursack website’s capacity-estimates to be over-optimistc: they say “15 liter of capacity fits approx. 7 days of food for 1 person”. On Night 1, I definitely would not have been able to get all of my food into bag that was only 15 liters in size. On Night 1 I’d estimate just my own food took up about 20L of space. Though to be fair, I didn’t do much to carefully repackage or tetris my food to make it as small as possible.) Anyway, Ursacks are the best way to store food on the Ptarmigan Traverse. Just to comment on other possible food storage strategies:
- hanging bear bags –> Hanging a regular nylon stuff sack so that it’s “out of reach” for a bear won’t really work at most camps along the Ptarmigan Traverse (with the notable exception of Yang Yang Lake, Cub Lake, and other lower-elevation camps.) At most camps, the trees just aren’t high enough to be beyond a bear’s reach.
- hard sided bear canisters –> I’m sure these would be great while at camp. But man do I hate having to carry a hard-sided bear canister. Plus you’d need a pretty darn large one. I vote for Ursacks just because they’re so much easier to pack & carry.
- If you only had an “Ursack Minor”, that yellow only-small-critter-resistant version of the Ursack –> Well, it’s better than nothing. If you can actually fit all your food inside of that, and always keep it close to your person (i.e. at night lean it against the tent wall by you,) then it’ll at least stop rodents from gnawing on your stuff, and likely bears won’t approach because they smell human and they do generally want to avoid us. It’s a bit of a gamble though.
- rolling-the-dice with non-bear-proof food storage –> I certainly don’t recommend this… I know quiet a few people who have done this and said it worked out fine, but those are anecdotes, it doesn’t mean it’ll always work out fine. I also have heard plenty of reports of people seeing bears walking around near the Ptarmigan Traverse, and even one report where someone found bear-prints in the dust on their truck (that had some food stashed in it) at the Downey Creek trailhead. You really don’t want to be “that guy” that ends up food-habituating a bear: that could lead to that bear getting euthanized, and/or leading to an area-closure and/or permit system for the Ptarmigan Traverse in the future, and all of it would be your fault. So don’t be “that guy.”
- some personal items
- toilet kit (see section on bathroom etiqette above), and Kula cloth, if one is right for you.
- a battery pack, and all the charging cables, for any electronic devices you’re brining along
- (optional) a tiny washcloth / camp towel (It’s nice to wash your face at camp)
- (optional) a mosquito headnet. Most camps are high enough that bugs aren’t too bad. I carried a head-net, never actually used it, but came close a few times. It’s so light, I’d rather bring it than not-bring it.
Food
Generally, for backcountry trips four days and longer, I find that I have to spreadsheet-out the food that I intend to bring so that I successfully both bring enough calories, without bringing too much weight. To help with that, you may want to make a copy of my template spreadsheet here: https://docs.google.com/spreadsheets/d/1cd_a71tnEHWv086VBWJwnMCX5Qy9r5cf4TQZLAFM2q8/edit?usp=sharing
To use the spreadsheet linked above:
- Make your own copy — Pull down the “File” menu to “Make a copy”
- Get your goals — Edit the numbers in Row 1 (green background), to set whatever you intend for the number of days, calories per day, and pounds-of-food per day. (If you’re unsure, I recommend aiming for 3000 calories per day, and 1.5 pounds per day.)
- Note where to see the status of your plan — Rows 4 & 5 are calculated for you, and tell you how close your documented-food-plan comes to matching the goals you’ve set. The “Results” in Row 5 will initially show zeros, but keep coming back to check those numbers as you enter food items later.
- Start drafting a food plan — In Row 12 and below, add names of food items you may bring, and fill in some relevant numbers in the four columns C, D, E, & F. You could either delete the example food-items I’ve got in there and enter your own; and/or grab any row with an example food-item in it, and set the “Quantity” (Column C) to anything greater than zero to include it in a draft plan. I like to drag things above or below the bar to organize what I intend to pack or not, but be aware the position of the row makes no difference to the calculation of weight- and calorie-totals, only the number sent in the “Quantity” (Column C) affects that, so be sure to zero-out anything that you change your mind about and decide not to pack. Drafting your food plan can be an ongoing process with continual revisions, where you add and remove things from the spreadsheet until the “Results” numbers in Row 5 are dialed to a point that is close enough for you to be happy about.
- Double-check your numbers — Be sure to check & revise the specific numbers for any example food-item later, since manufactured/packaged sizes for food items may have changed over time since I came up with those examples. Also be sure that “Quantity” is indeed set to zero for any item you don’t plan on packing. If you don’t double-check your numbers, the most concerning risk is that you end up having actually packed fewer calories than you thought you had because of an error in the spreadsheet, and you’ll be really sad if you don’t realize that until you’re out in the field.
- When it’s time to physically pack — You can use the spreadsheet as a checklist to make sure you don’t forget any food-items you were planning on bringing. Put an X in the “packed” column (Column B) after you’ve actually physically packed it. You can skim this column to notice what doesn’t yet have an X, and thus still needs to be packed.
Le Conte – 7762′
Le Conte is one of the easier side-peaks to tag, requiring only Class 3 scrambling, and it’s overall barely a 2-hour detour round-trip. It’s so centrally-located in the Ptarmigan Traverse that it provides astoundingly panaoramic views, both looking back on much of where you’ve come from, and getting clear slightlines to many incredible things ahead. While doing the through-traverse, you can drop your ropes & big packs at 7000′ where the route of the traverse passes quite close to the summit. Wear helmets to the top (a lot of loose rock on the scramble), and bring ice axes as far as you see snow. Kick steps up the central very large snowfield up into the snowfield’s hammerhead-shape, then go climber’s left off the left-side hammer onto the rock. Ascend what feels easiest through the quite-loose Class 2-ish/3-ish rock for a couple hundred feet, until as if by magic, an easy Class 2 ledge appears to the right, allowing you to traverse quite far right. An exposed step ends the ledge, then make your way up indistinct Class 2/3 terrain where any way goes, as long as you’re aiming & funnelling up towards a prominent deep notch in the skyline of the rock. From the notch, a second magical Class 2 ledge appears to the right again, allowing another long easy rightward traverse. It may be easiest to go a hair further right beyond the summit itself, then hook up and back to the summit on the crest of the ridgeline.

Sentinel – 8257′
We made an attempt on Sentinel, but it did not work out. I’ve read that there is a scramble route on the southwest face of Sentinel, likely loose 3rd class. Starting from near those rock-ring campsites that overlook the head of the South Cascade Glacier, the southwest face initially feels like an unintuitive location; some part of me had expected a scramble route to Sentinel’s summit to be closer to the head of the Le Conte glacier. Also, it’s hard to get a picture of the of the SW face that looks good, as you’re a little too close to it to begin with, and get quite the flattening / foreshortening effect from trying to look up at it.
On the southwest side, we dropped our big packs, and kicked steps up the snow towards a “snow donut.” (Seen middle-right in the picture below.) I think if we could have accessed the rock there, a long rock ledge diagonals far up to the left from there. However, at the top of the main snowfield, we encountered a moat that was ~15 to ~25 feet deep between the snow & rock. We hadn’t really left time to deal with this moat problem, nor had we brought any equipment that might help (ropes & pickets were down with our big packs, stashed 600′ below.) It didn’t help that the main snowfield gets notably steep just before the moat-problem too. So with a little reluctance, we threw in the towel on this summit attempt.

Dome Peak – 8926′
Going for the summit of Dome Peak as part of the Ptarmigan Traverse typically means coming at it from White Rock Lakes. The most direct route from White Rock Lakes to Dome’s summit is:
- From White Rock Lakes, at first the route is the same as for the just-through-traverse: make a slight dip into the head of the West Fork Agnes Creek valley, and scramble up into the area of the Dana Glacier’s western half.
- While the normal just-through-traverse would go up to Spire Col here, instead traverse low (~6500′) below One Eyed Bull to get onto the Dana Glacier’s eastern half, then ascend the gently-angled glacier to the Dome / Dana Glaciers Col at 7470′.
- Once you’ve passed through the Dome / Dana Glaciers Col, turn left (east), and cross the Dome Glacier, aiming for the Dome / Chickamin Glaciers Col at 8500′. The last ~200′ of gain to reach this col involves a dirty scramble (Class 2 to 3) up some junk rock.
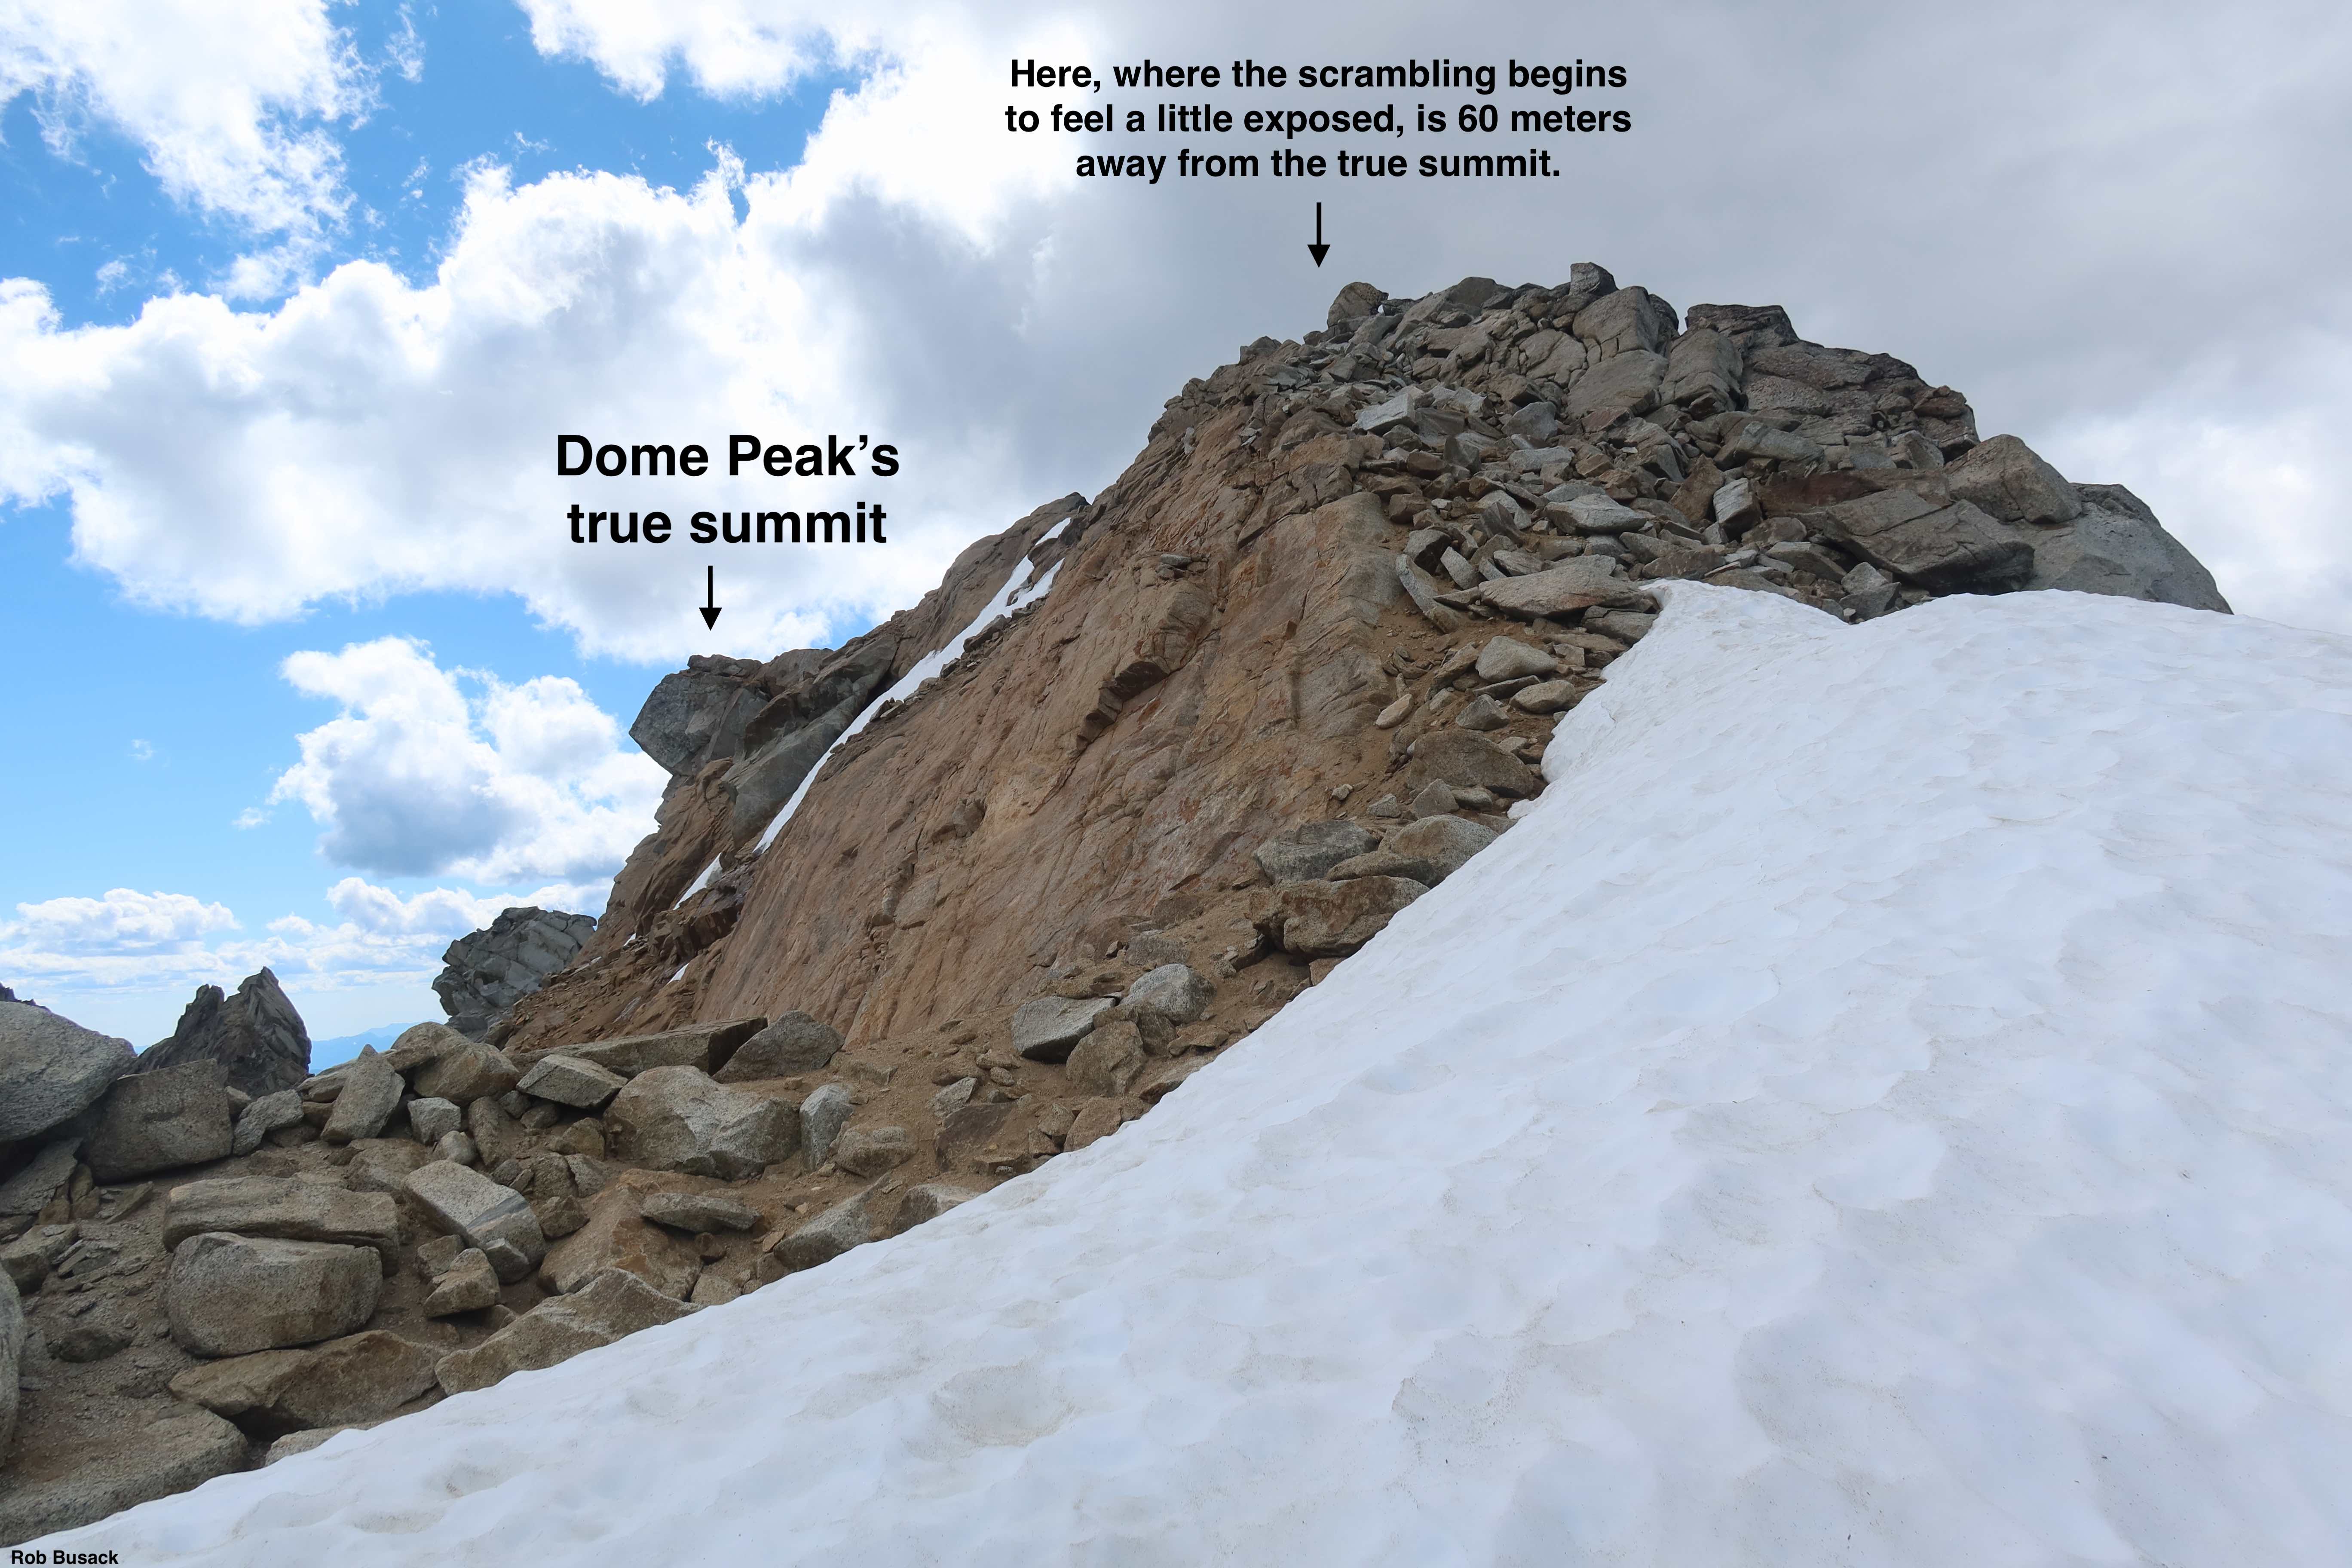
- From the Dome / Chickamin Glacier Col, turn right (south), and ascend a little more steep snow to reach the final rocky scramble to Dome’s true summit.


For the final couple of hundred feet of travel to Dome’s summit:
- After leaving the snow, there’s a short ramp of loose rock to get up to the solid-rock ridgetop, that part is easy enough. When you first get to the solid-rock ridgetop, where the scrambling first begins to feel exposed, you’re almost exactly 60 meters from the summit.
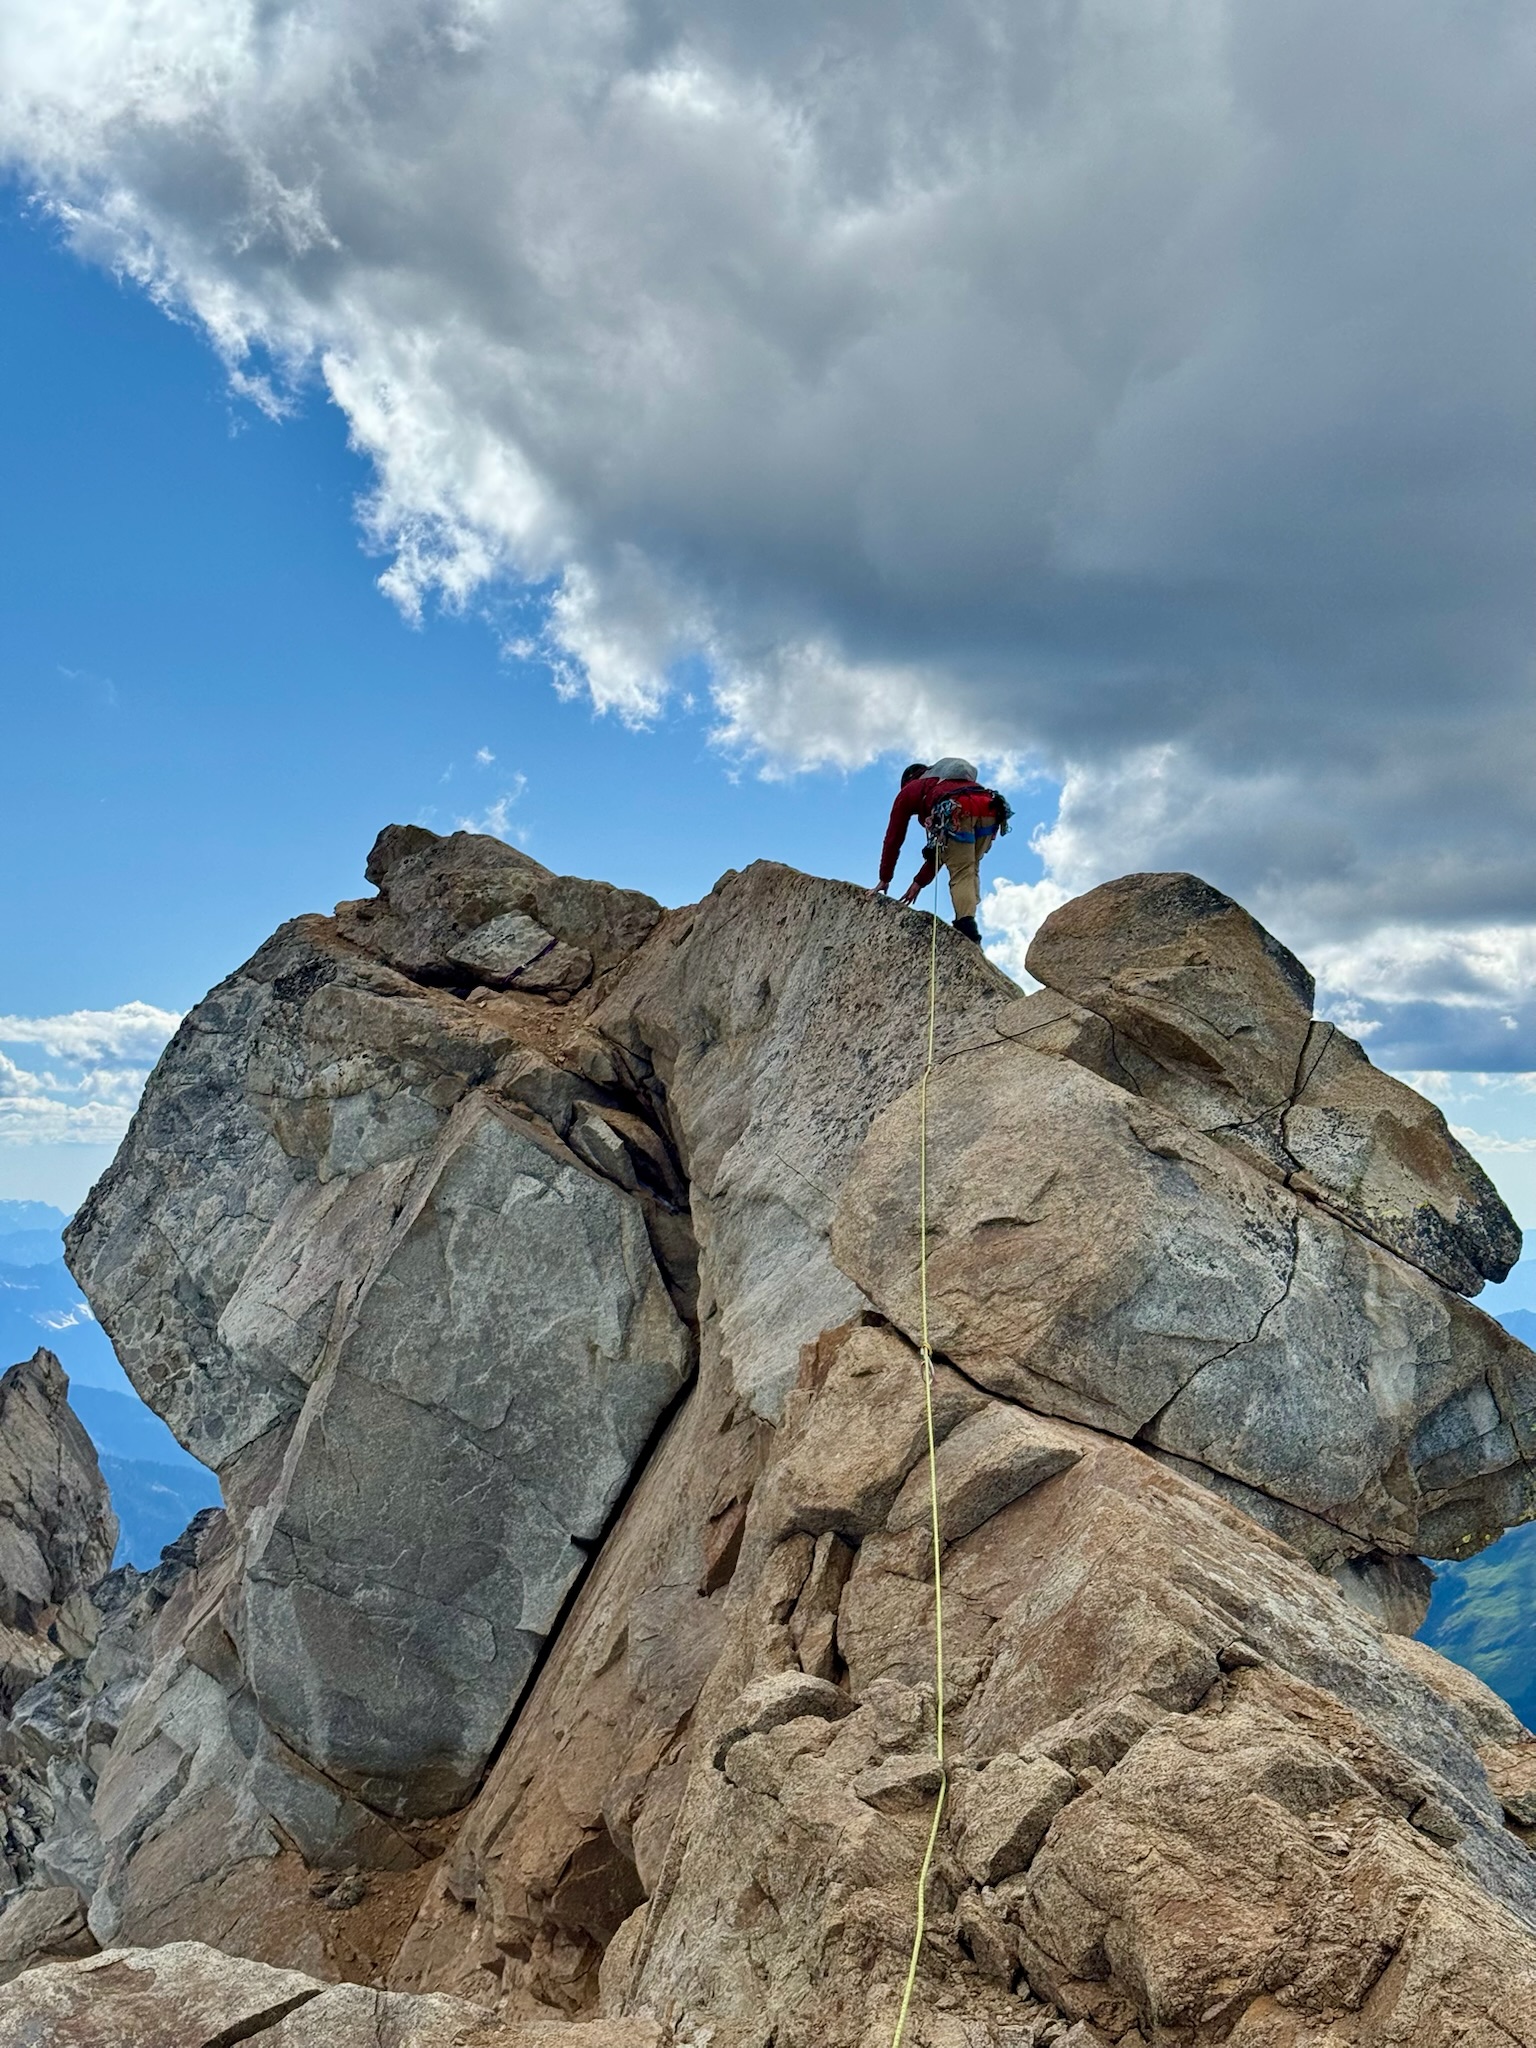
- If you happen to have a 60 meter rope (or two ropes that add to 60 meters,) you could set up a fixed line for the entirety of the variously-exposed rocky ridgetop to the summit. (Start with a beginning anchor. One person leads out, builds an anchor at the end, and fixes the rope. Once the rope is fixed at both ends, then everyone else can self-belay themselves with a prusik. Later, reverse the process to take it all down.) If you’re using two separate ropes to add up to 60 meters, you can probably find some cracks to build an anchor mid-way. (This what we did: we had one 30m rope and one 40m rope, but only used 30 meters of the 40m rope.)
- If you only have a 30 meter rope and nothing else, you’ll need to scramble the ridgetop unroped for at least half of its distance to the summit. Fortunately, while the exposure is noticeable for the first half, the scrambling is still pretty easy & secure (e.g. mostly Class 2 with exposure,) where it’s reasonable to feel comfortable without a rope. For the second half (the final ~25 meters to the summit), the exposure ticks up, and the scrambling-moves feel less secure. There’s two ways you could go for the second half. Either:
- …stay on top of the ridge, high & right, like in the photo below. It’s scrambling / highly-exposed-walking both going out & on the return this way. With the protection of a rope, this is a great way to go. (I know of some people who do this part unroped, but to me that would be quite scary & risky.) Or…
- …dip down left to arrive at that nice left-facing-corner and hand-crack, and jam it to make the final few moves to the summit. To reverse this Option #2, there is a rappel anchor, but it’s a bunch of slings around what appears to be a large loose block just sitting there. Personally, I think Option #1 is way better.
Sinister – 8444′
TODO: add notes & a picture
