
On Saturday, June 14th, 2025, Kelly Ryan and I climbed a rock buttress in the Washington Pass area that had no previously-documented ascents. It has 1000′ of mostly moderate and enjoyable granite climbing, with trees available for almost every belay station. The route is solidly Grade III in size. We swung leads for eight long pitches, where I led the odds and Kelly led the evens. We estimate that maybe one pitch was 5.9, and a number of others were 5.7 / 5.8, but we look forward to second-opinions, as there were factors that could have led us to over-estimating difficulties at the time. The buttress overall has a fairly consistent slope-angle of just over 60°. There is a walk-off from the top, which returns to the route’s base. The route is minorly committing, in that completing it and walking off would be the preferred way off; though if a mid-route retreat were really necessary, many trees are available that a party could leave slings on, and a series of many <30-meter rappels would return you to the beginning.

- This rock buttress: Where is it? What’s its name? What’s our specific route’s name?
- Was this a First Ascent?
- Further efforts to determine ‘First Ascent’ history…
- Gear Recommendations
- The Climbing Route – in Written Descriptions
- The Climbing Route – in Photos
- The Walk-Off
This rock buttress: Where is it? What’s its name? What’s our specific route’s name?
For orientation: near Washington Pass, there is the well-known and popular route Spontaneity Arete, which is on a fin of rock whose summit is “Le Petit Cheval.” Directly on the backside of the larger ridgeline that Le Petit Cheval is part of, another point gets the name “Black Horse Rock.” At least, that’s the label given on Caltopo’s “MapBuilder Topo” basemap, and on Peakbagger. In the Beckey guide, volume III (the pink one), the only reference I could find is on one map, which labels it as “White Horse Rock”, on page 302 (my copy of the Beckey guide is the 3rd edition, printed in 2008.) I believe “Black Horse Rock” is the (relatively) more widely-used name (although I found very few references to it either way,) so I’ll stick with that. It’s not exactly a standalone summit, since it is a substructure of the larger ridgeline here, so “Black Horse Rock” appears to be a name for this one specific buttress, which juts out to the northeast, towards Willow Creek, as sort of the geological mirror-image to the buttress which Spontaneity Arete is on. I think its somewhat “backside” location has kept it hidden from most people’s notice (it’s mostly obscured from eyesight from the highway,) which is maybe why it hasn’t received more attention yet. Since Le Petit Cheval means “the little horse”, and this is on its backside, I am tempted to call the specific line that Kelly and I climbed here “La Croupe du Poney”, aka “the pony’s rump” 🙂
Was this a First Ascent?
Were we the first party to climb this route in its entirety? Maybe… but we do have a couple of reasons to doubt that we truly got the ‘First Ascent’ here:
- First: What are the odds this route has truly gone unclimbed before now?? Washington Pass is a very popular climbing destination. It’s hard to imagine a 1000′-long potentially moderate rock buttress being entirely not-noticed and not-pursued until now. Though it is in a visually less noticeable location, so, maybe…? I searched thoroughly on the internet, and while I found a few records of other semi-obscure first ascents nearby that made passing mention of “Black Horse Rock” as a nearby landmark, none of them described routes actually on Black Horse Rock itself. If our route has ever been climbed before, there is nothing on the internet saying so. While planning our June 14th attempt, the plausibility that maybe we would have a chance at a first ascent here was decently high!
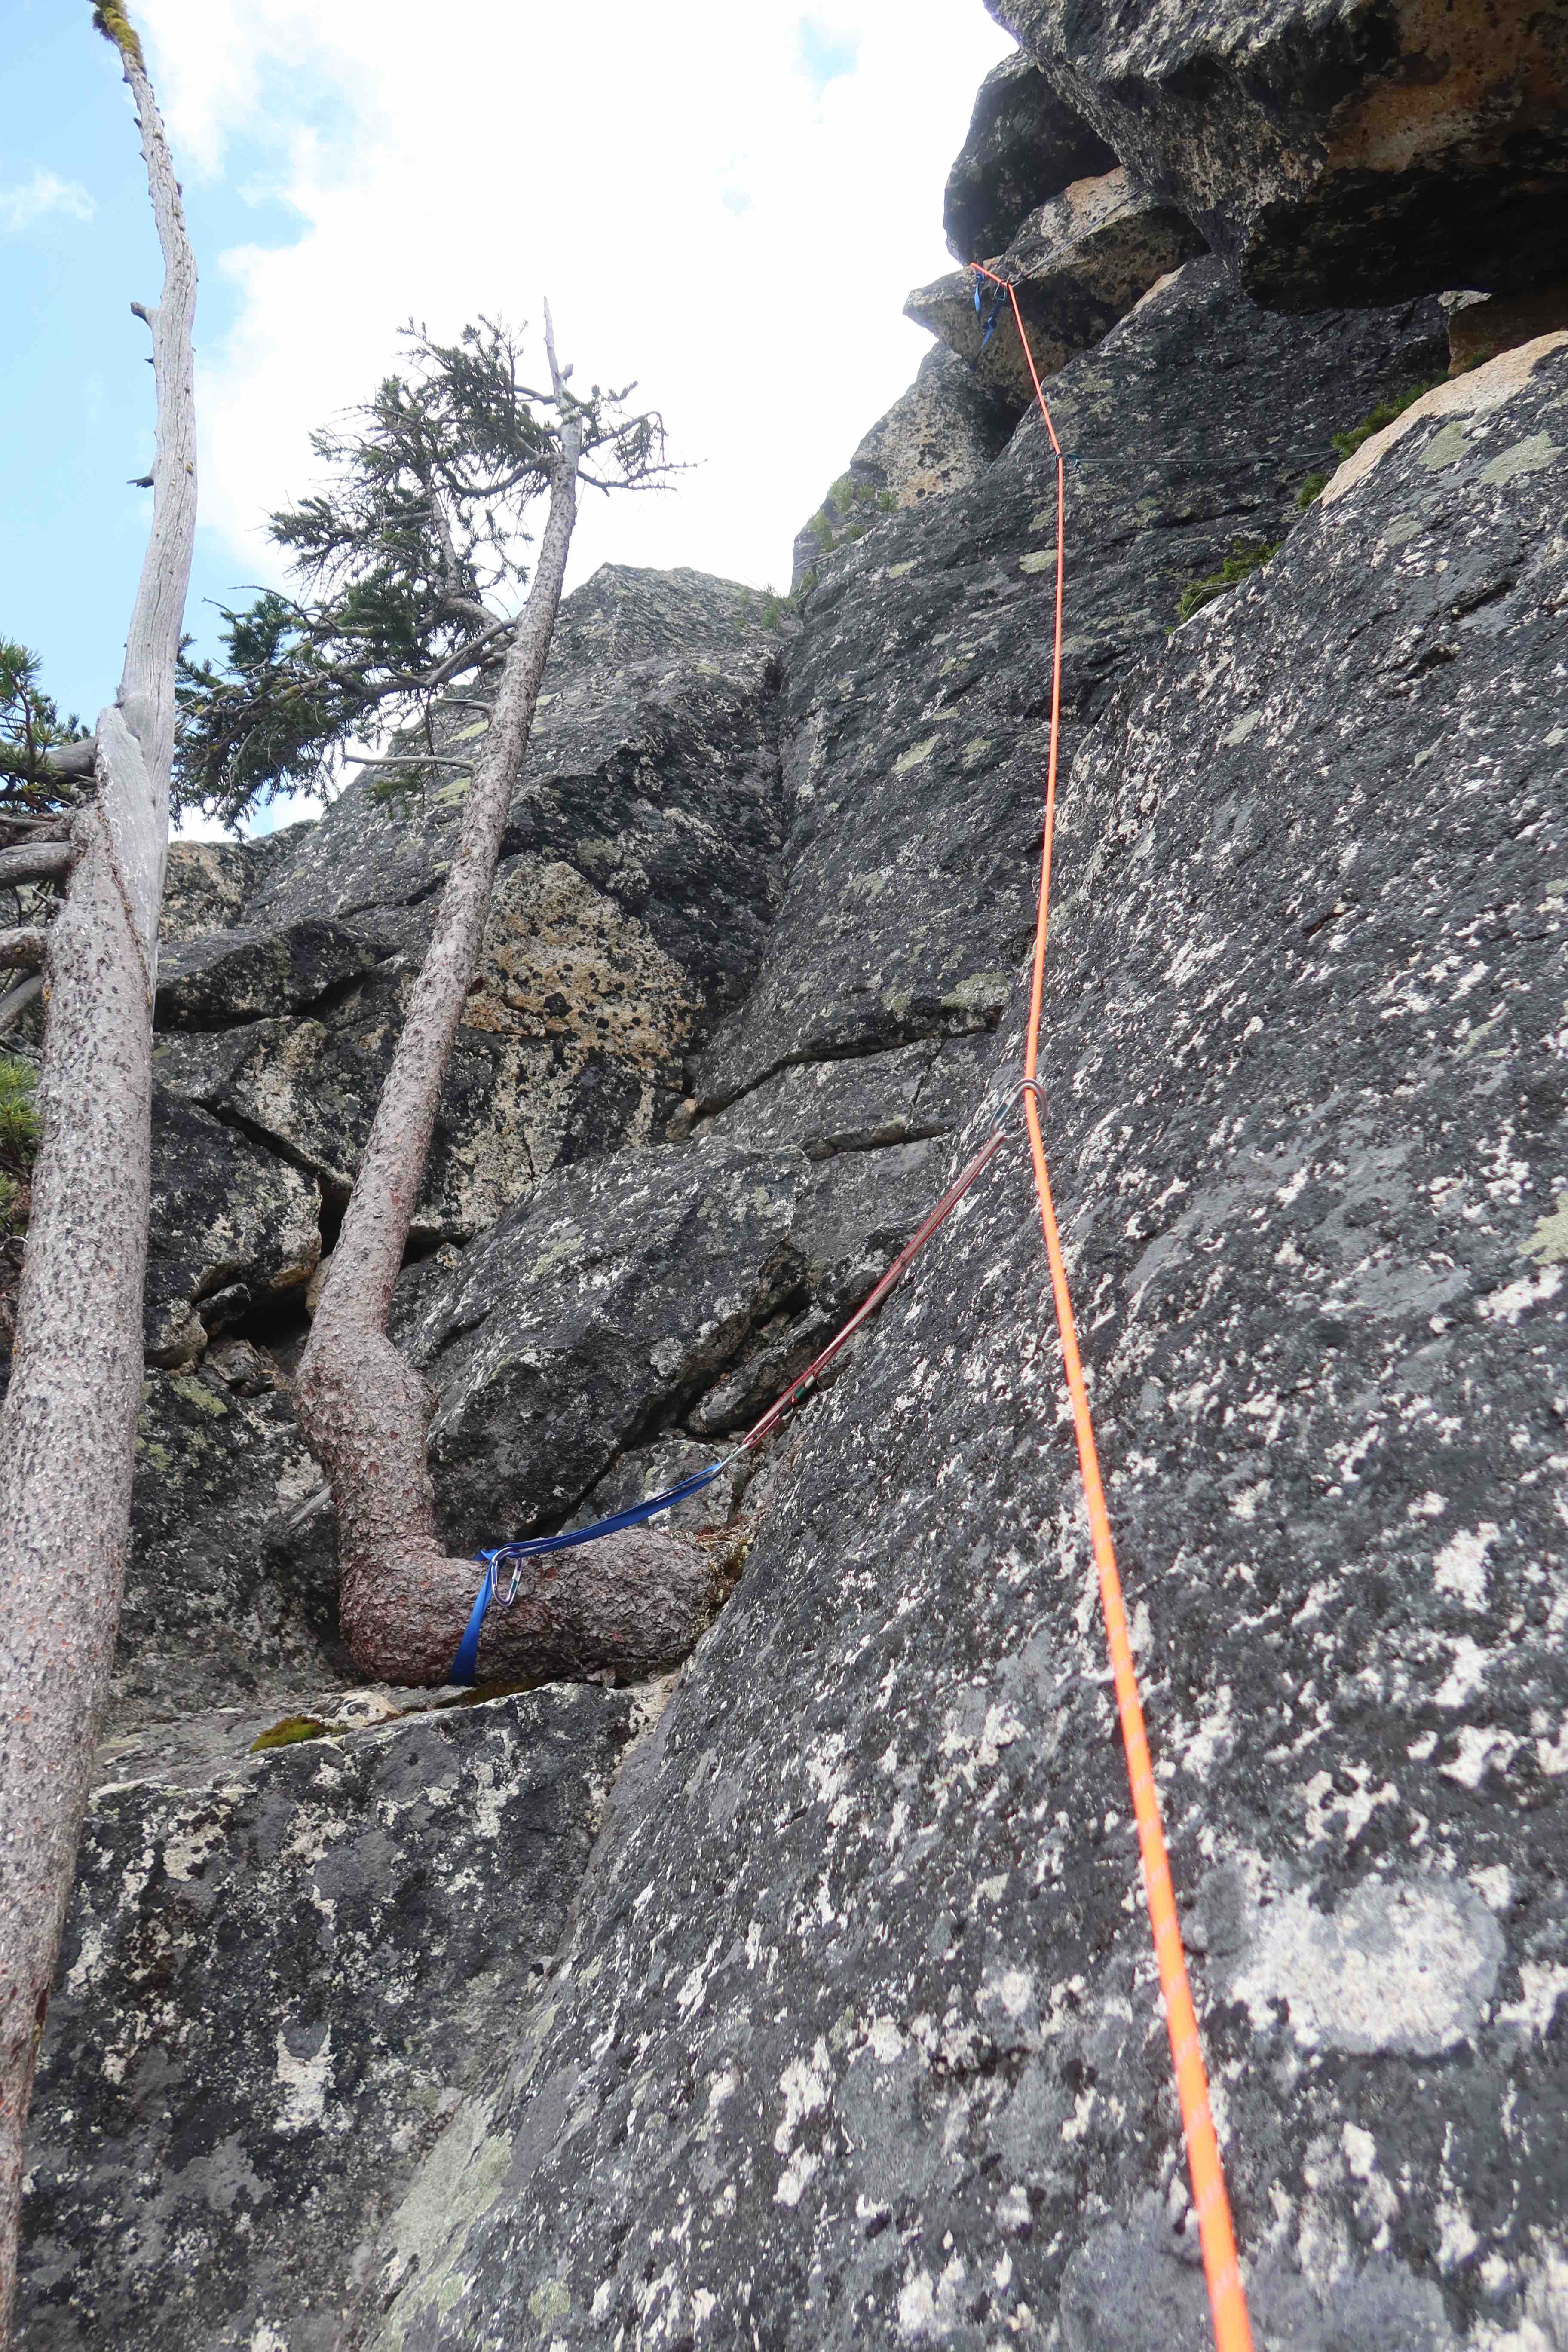
- Second, the biggest evidence against came as I was leading our first exploratory pitch of this thing: I picked a tree that I aimed to end the pitch at, and when I arrived at that tree, I found an old badly-core-shot cord already slung around the base of the trunk: clearly someone else’s rappel anchor from some time ago. Welp, I certainly was not the first human to have climbed that pitch after all, despite the lichen & occasional loose rock giving the feel that I had been. As we continued up from there, we found a series of old rap anchors, always just a single piece of material without a ring, more like emergency-bail anchors, definitely not frequently-used rappel stations. The last of these that we found was just before the end of our 3rd pitch. So, it’s also interesting that we climbed five more pitches beyond that (our route being 8 pitches total) without seeing any other rappel anchors up there, including passing through some terrain that would have funnelled any climbing parties to the same location at points, so we would have noticed if any other bail-anchors had been left higher. Whatever previous party left these bail anchors definitely must have turned around near the top of our 3rd pitch on the day that they bailed. So maybe Kelly and I are still the first to complete the entirety of the route? However, I know if I had been the one to bail part-way up a route, it would then feel like “unfinished business” to me, and I’d be even more emotionally invested in going back and eventually completing it. It’s very plausible to imagine that whatever party had bailed here before may have come back another time, and successfully climbed the entire line that Kelly & I climbed here. Hypothetically, if they topped-out successfully on a second attempt, that wouldn’t necessarily leave any physical evidence, since there is a walk-off available from the top. However, I am entirely speculating, and if they had topped out, I’d also imagine they’d at least make some mention of it somewhere, like on a forum like CascadeClimbers.com, so given the lack of Internet-evidence or printed book evidence, maybe they didn’t after all?
- Third: After Kelly & I topped out, coiled our rope, and started our walk-off, about 100′ into the walk-off we did find a cairn: three rocks on top of each other that must have been stacked by human hands. So we are definitely not the first humans to be on top of Black Horse Rock. That’s unsurprising to me, though, despite it having absolutely zero ascents listed on Peakbagger at the time that I write this, nor is summitting it mentioned in anything else I could find. There are definitely other routes to get to the top of this formation, which would be much easier than the route we took up, including the walk-off we used ourselves, or even just someone traversing over from Le Petit Cheval to here, since this is indeed a very scenic point with great views of Silver Star & others across the valley. So maybe the cairn was built by someone who did climb our same line before us?? Or maybe it was built by someone who scrambled to this same location by another route? The second seems relatively-more-likely to me, but we don’t know either way for sure.
So we’re still left with the open question: Did we actually do the first ascent here?? It’s hard to know. If someone else has information about previous climb(s) of this route, please reach out to me, I’d love to hear any stories, and get the history right here. Especially if you’ve got some proof, like where I should look on the Internet or in print for an older trip report I may have missed, or a photograph that indicates you were on route, etc. Even if we did not do the ‘First Ascent’ of this route, so far I can definitely say we did do the ‘”First-Documented-Ascent” here!
Further efforts to determine ‘First Ascent’ history…
During a few weeks after Kelly & I climbed this, I’ve taken a few other avenues to figure out if there has been a prior first-ascent on this route, or if we perhaps are the ‘First Ascent’ here!
- I emailed Michael Levy at the American Alpine Club to ask if the American Alpine Club / American Alpine Journal could share the records it had of other first ascents on “Black Horse Rock”, so that I could see if they were overlapping or unique from the particular line we climbed here. I had already attempted to search their public-facing database myself, and I at least found a mention of “Black Horse Rock” in a different first ascent article: https://publications.americanalpineclub.org/articles/13201215341 but it’s a passing mention for orientation, since their (very impressive!) route is about 2/3rd of a mile away, and clearly a different route. So far, I haven’t gotten any reply. It would appear that this particular route of inquiry is a dead end.
- Really scouring the Internet yielded a few vague, brief, and inconsistently-named references to this buttress, “Black Horse Rock” vs “White Horse Rock” vs “Black Horse Point” vs “Blackhorse” with no space. Here are three different old CascadeClimbers posts that very-briefly mention the buttress: post 1, post 2, post 3.
- Those old CascadeClimbers posts linked above imply that there is a Bryan Burdo book out there that says something about Black Horse Rock, but I’m not sure what. I’d really like to get a look at that book. Local guidebooks are a thing I collect and deeply treasure! I am pretty sure my personal collection is a complete set of everything printed about roped climbing routes in Washington within the past 20 years. It looks like this Bryan Burdo book predates even that, though. I believe the book in question is this: https://www.amazon.com/North-Cascades-Rock-climbing-Washington/dp/B0006RHCHG/ “North Cascades Rock”, a black & white spiral-bound thing printed in 1997. I don’t have a copy, but now that I know about it, I’d very much like to get a copy, or at least look at one and get a chance to photograph the pages. I figured my best chance to at least see a copy would be the Mountaineers Library. I’m at the Mountaineers Program Center in Seattle fairly often, and the Summit Room there contains a lot of bookshelves, where it seems likely a copy of this old book might be found. However: the bookshelves are behind locked glass. A totally reasonable precaution. But: I went and asked Mountaineers staff in person, and no one knew what key unlocked that glass, or where that key was likely to be stored. They couldn’t unlock their own glass bookcases! So, it would appear that this particular route of inquiry is also a dead end. (Though if anyone out there reading this does have a personal copy of Bryan Burdo’s spiral-bound “North Cascades Rock” from 1997, please let me know!! Could I come visit, see it, and photograph it??)
- Those old CascadeClimbers posts also gave me another name to search for: “Archer”. Apparently the more well-known of the two Bryan Burdo routes on Black Horse Rock is named “Archer.” (It seems like the second route didn’t warrant being mentioned by name at all in anyone’s old CascadeClimbers posts.) Okay, so, this “Archer” route… how much does that overlap the line that Kelly & I climbed, or is it entirely distinct from it?? After even more Internet-digging, I eventually found this old 2001 trip report, with description and photographs of the route “Archer”. Ah ha! “Archer” is completely different than what we climbed!! The routes are totally unique from each other!
So where does all of the above get me? It’s been a whole lot of searching, with dead ends encountered that do leave me with open questions. And although a lack-of-answers is not proof-of-absence of any prior matching ascent, how much searching do you have to do? It doesn’t seem like there’s any way to truly prove that any “first ascent” is really the first ascent, all any first-ascentionist is doing is claiming that there’s a lack of prior recorded ascents. And in all of the places where I did find answers, so far those have all indicated prior ascents of separate and distinct routes, different than the line that Kelly & I climbed. I’m getting increasingly tempted to actually say “Hey, we did do the first ascent here!”
Gear Recommendations
Based on our one experience on this route so far (i.e., take this with a grain of salt), the gear I’d recommend bringing would be:
- 60 meter rope
- rack:
- doubles of BD cam sizes #0.4 (little silver) to #3 (blue) (maybe fewer could work, but I’m not sure what to cut. On more than one pitch, we did place both #3’s, so I wouldn’t recommend cutting back there)
- singles of smaller BD cams #0.3 (little blue) & #0.2 (little yellow) (Or: blue & black Totems, since they are virtually equivalent sizes to BD #0.3 and #0.2)
- set of nuts
- ~8-10 single-runners, and 6 double-runners. (Amongst the double-runners: having some or all be tied webbing would help if you had to rappel.)
maybe one #4 or a #5? We had both for our first ascent, wanting to be ready for anything, and since we had them, we placed them at times. But were they necessary? I don’t think so, I think other smaller placements could have sufficed. Perhaps to play it safe: I do recommend bringing one #4 for now, and once I eventually get feedback from others who climb the route, maybe I’ll update the recommendation here accordingly.I went and climbed the route a second time, and tried out bringing nothing larger than the two BD #3 cams, and was perfectly happy.
- For the approach: I was happy wearing boots (waterproof hiking boots, or light 3-season mountaineering boots,) so that my feet stayed dry during some of the streams you have to step through. A larger pack to carry everything, with gear tucked inside as much as possible, helps reduce moments of getting caught on grabby trees. It’s easy enough to stash boots, the larger pack, and anything else you don’t want to climb with at the base of the route and get it back after the walk-off.
- Small summit-pack to climb with. It’s a long enough route you’ll definitely want some food & water with you on route. Always a good idea to have one spare layer, and a headlamp too, just in case things go really sideways.
- Radios are nice to have. Not mandatory, nothing’s very loud out here, you probably could shout short climbing commands successfully. However, almost every belay station is out-of-sight of the previous one, so radios are indeed pretty nice to have.
- Footwear for the walk-off. If you wore boots for the approach, you could either clip your boots to the back of your harness or climbing pack and climb with them. Or, you could bring some very light approach-shoes for the walk-off, but bringing light-approach shoes requires some other compromise: either you do the initial approach wearing those too, in which case you’ll probably get wet at a stream crossing. Or, you carry the light-approach shoes as an additional thing in your pack, while doing the approach in boots, which is a little extra weight (but personally, my preferred option.)
And about gear you (probably) don’t need to bring:
- A note on snow: As of mid-June, we didn’t have to touch any snow to get to this route’s base (at 5600′), nor was there snow to deal with anywhere on the walk-off. So in general, no need for ice axe or crampons here. However, I also know snow melted away rather early this year (2025.) If you go early-season in other years, maybe check Sentinel Weekly Satellite images to verify that things (like the walk-off) are snow-free.
- About rappelling: If all goes well, you won’t have to do a single rappel. But if you have to bail, you could end up doing a lot of rappels. And since there’s no reason to have established rappel stations along this route, you’ll likely have to leave a lot of slings & cord in order to build the stations you need. Just something to keep in mind while assembling your rack. If I were to make some guesses: if you have to bail from the top of pitch 5, you’ll probably have to build ≤10 rappel anchors to get back to the ground. (Mostly on trees, fortunately there are a lot of trees.) If you’re at the top of pitch 6 or higher, I’m not sure you should rappel, I think by then you should “bail upward”, pull on pieces and aid your way up those last two pitches if that’s what you need to do. Anyway: I don’t think you should bring any significant amount of extra gear for rappelling. Don’t bring a second rope, it would be a lot of dead-weight, and you might end up doing shorter rappels anyway. Keep things light: an ATC & an autoblock don’t weigh much so of course you should have those. As for anchor-building material: avoid weighing yourself down by bringing too much of a separate supply of tat. Instead, plan for things that’ll actually be used in your climbing rack, which could do double-duty as sacrificial rappel anchors if need be. If you and your partner both have tied cordelettes, that’s two 20′ pieces of cord. Both could be cut in half, giving you four 10′ pieces, that’s likely to provide four separate bail anchors, tying each around a tree. If you’ve got six double-runners in your rack too, that’s another six bail anchors. That should be enough to get you down. Don’t go planning to rappel. Go planning to walk off; but just think about what’s in your rack so that you could rappel if you had to.
Approach
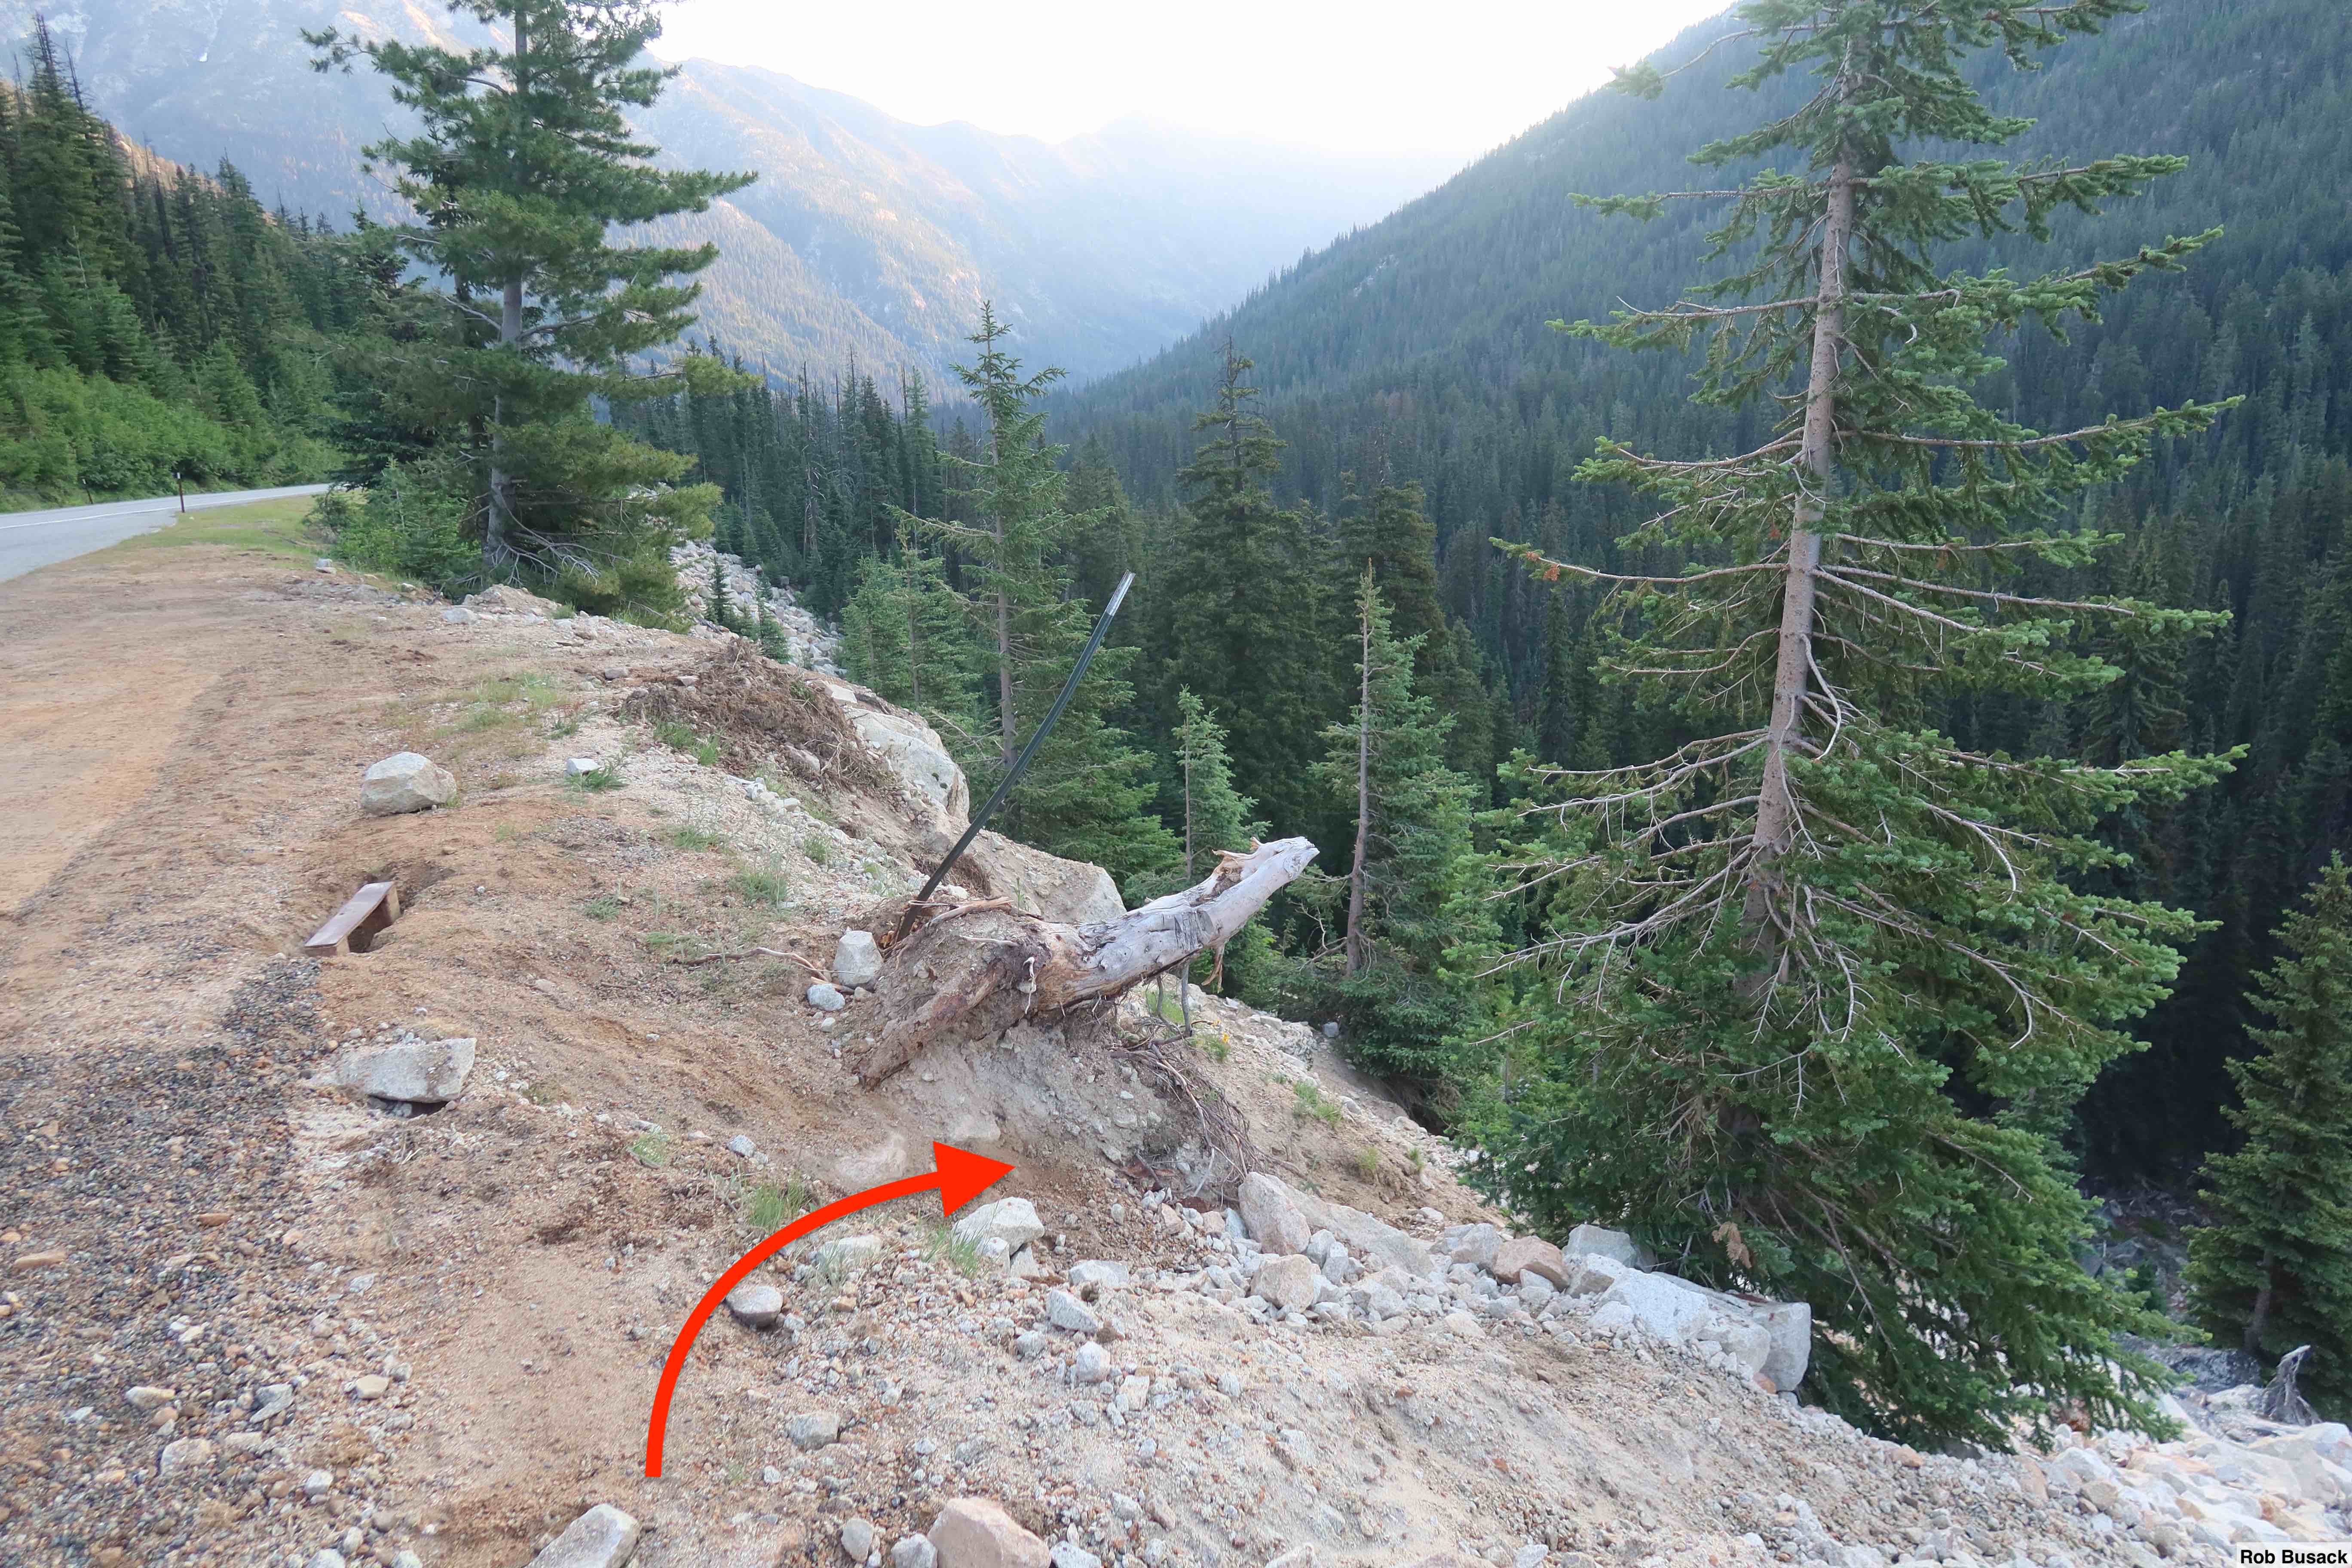
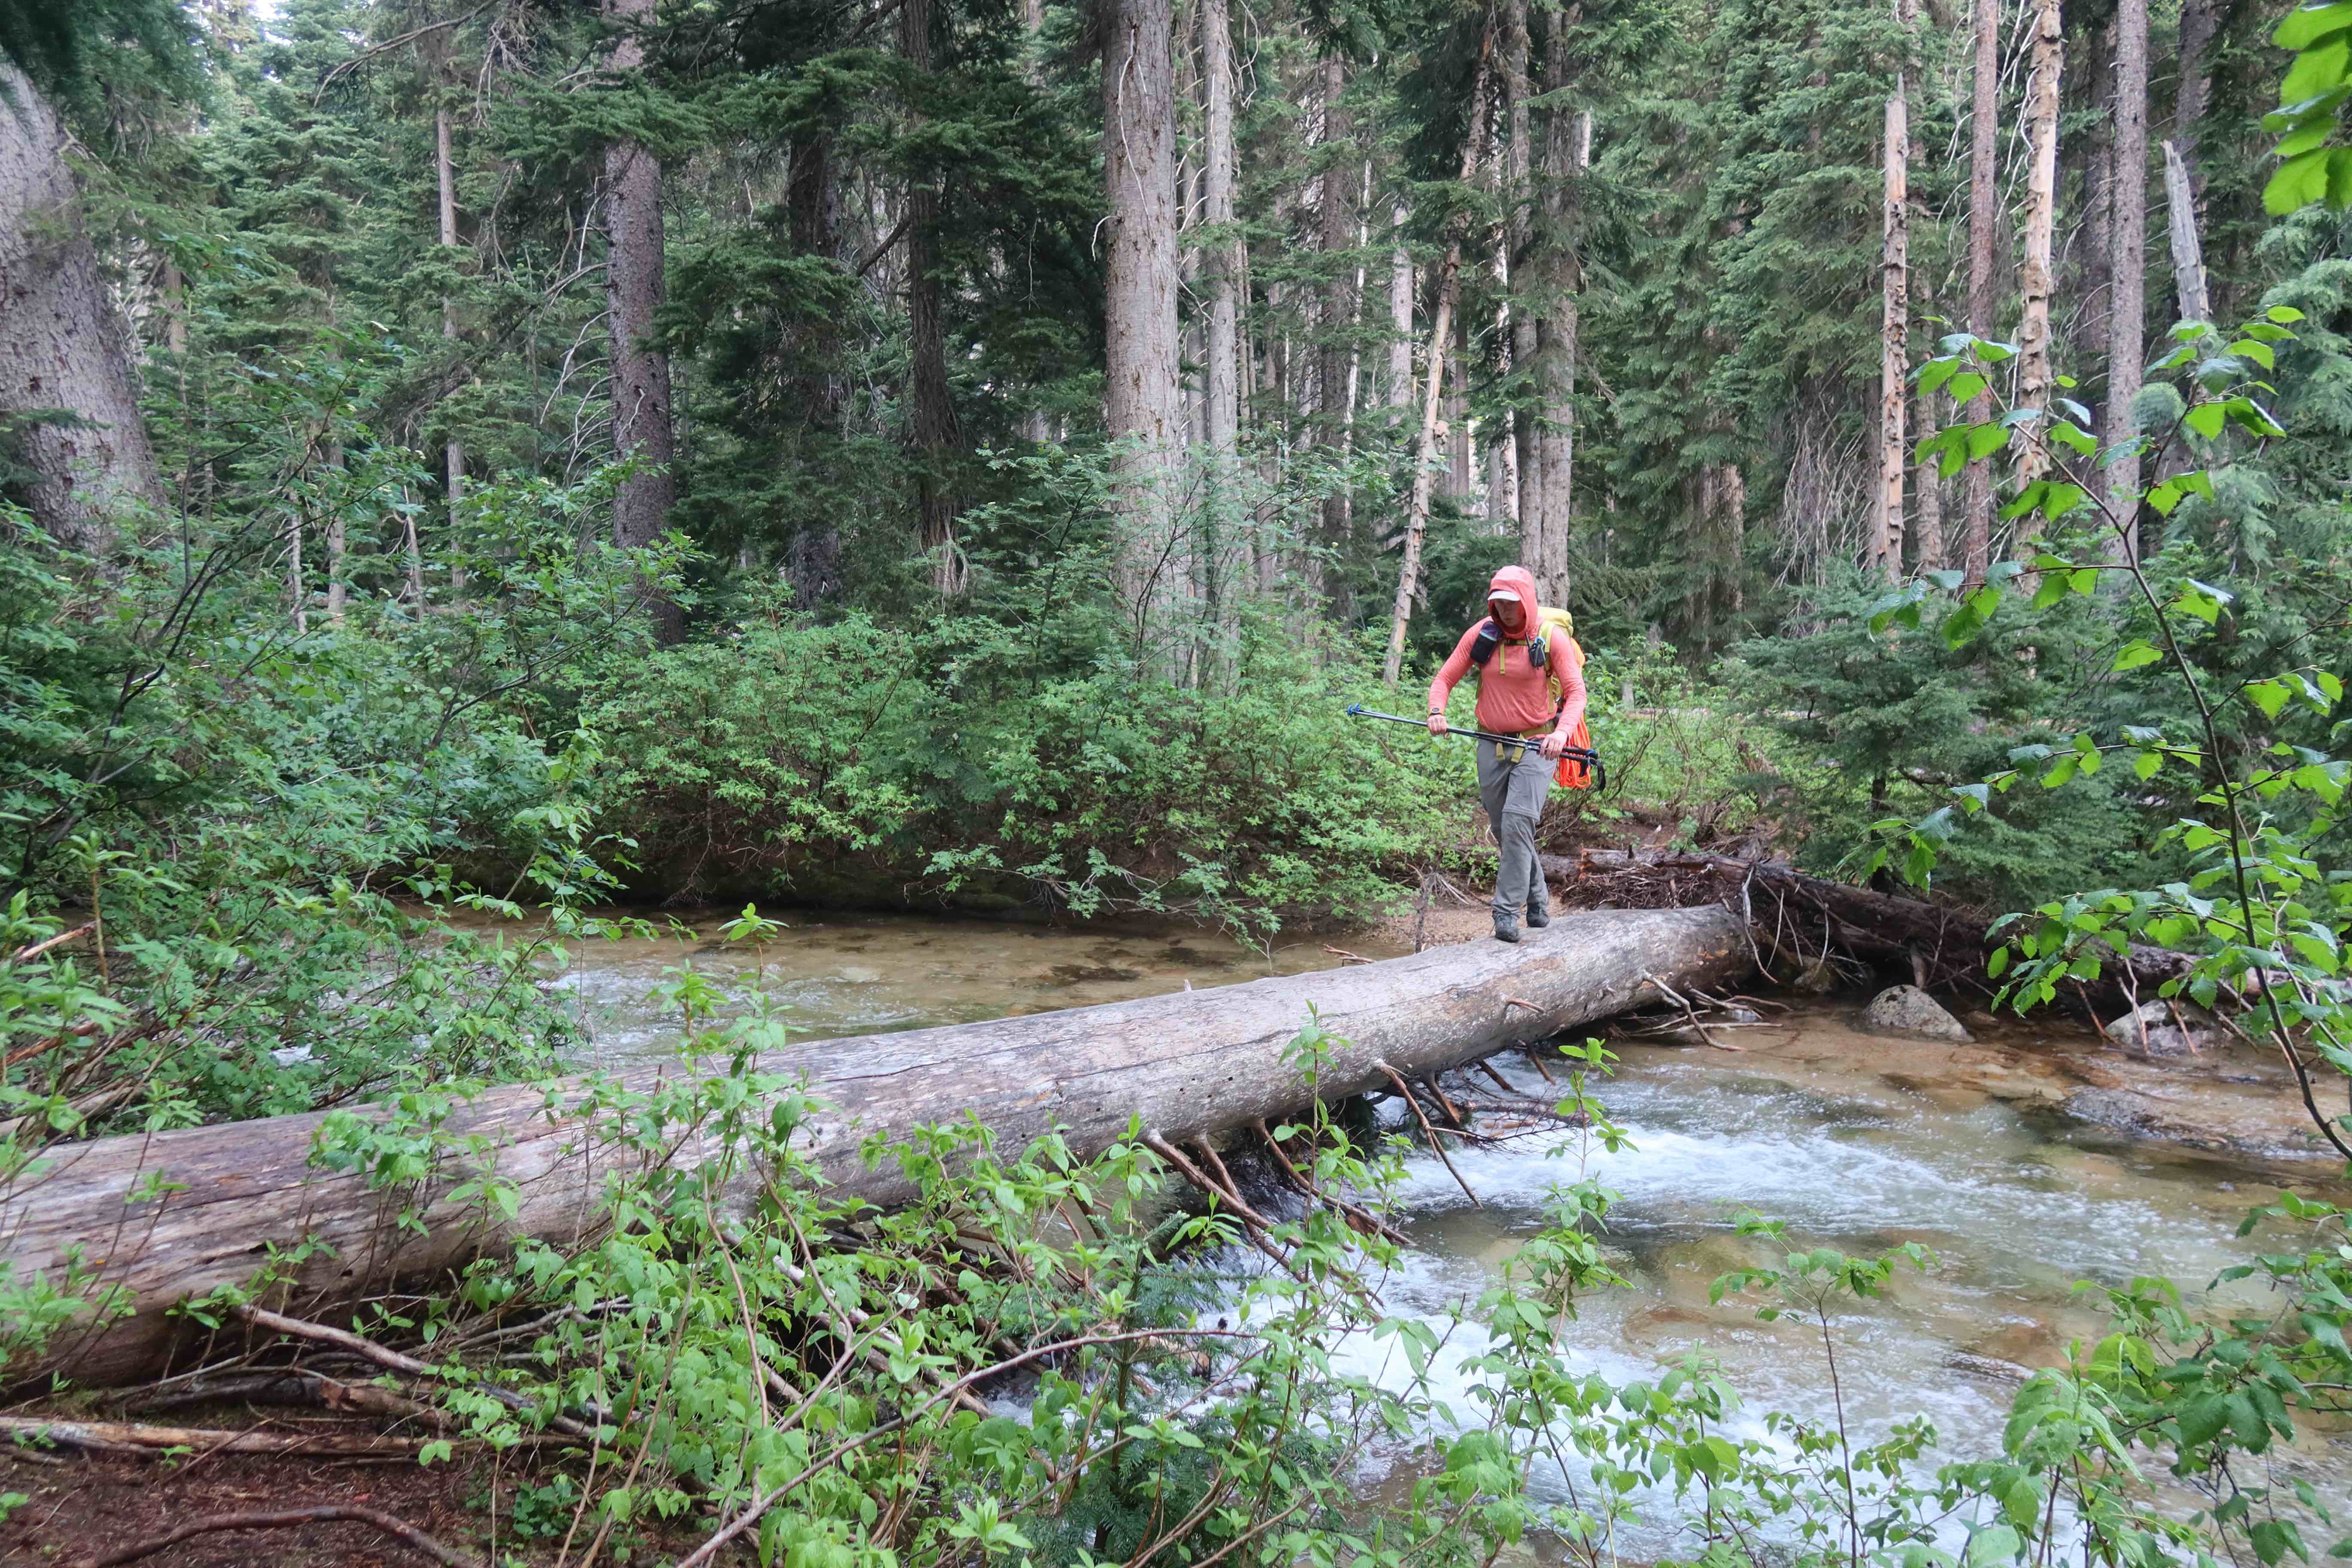
The approach begins from a large pull-off on the side of Hwy 20, the same pull-off you would use to access Silver Star via Burgundy Col (i.e. 48.5513, -120.6310) From the car to the base of our route covers 1.8 miles, gaining 1700′, is mostly off-trail, with light bushwhacking through mostly open forest with a few minor creek crossings. It should take 2 to 2.5 hours.
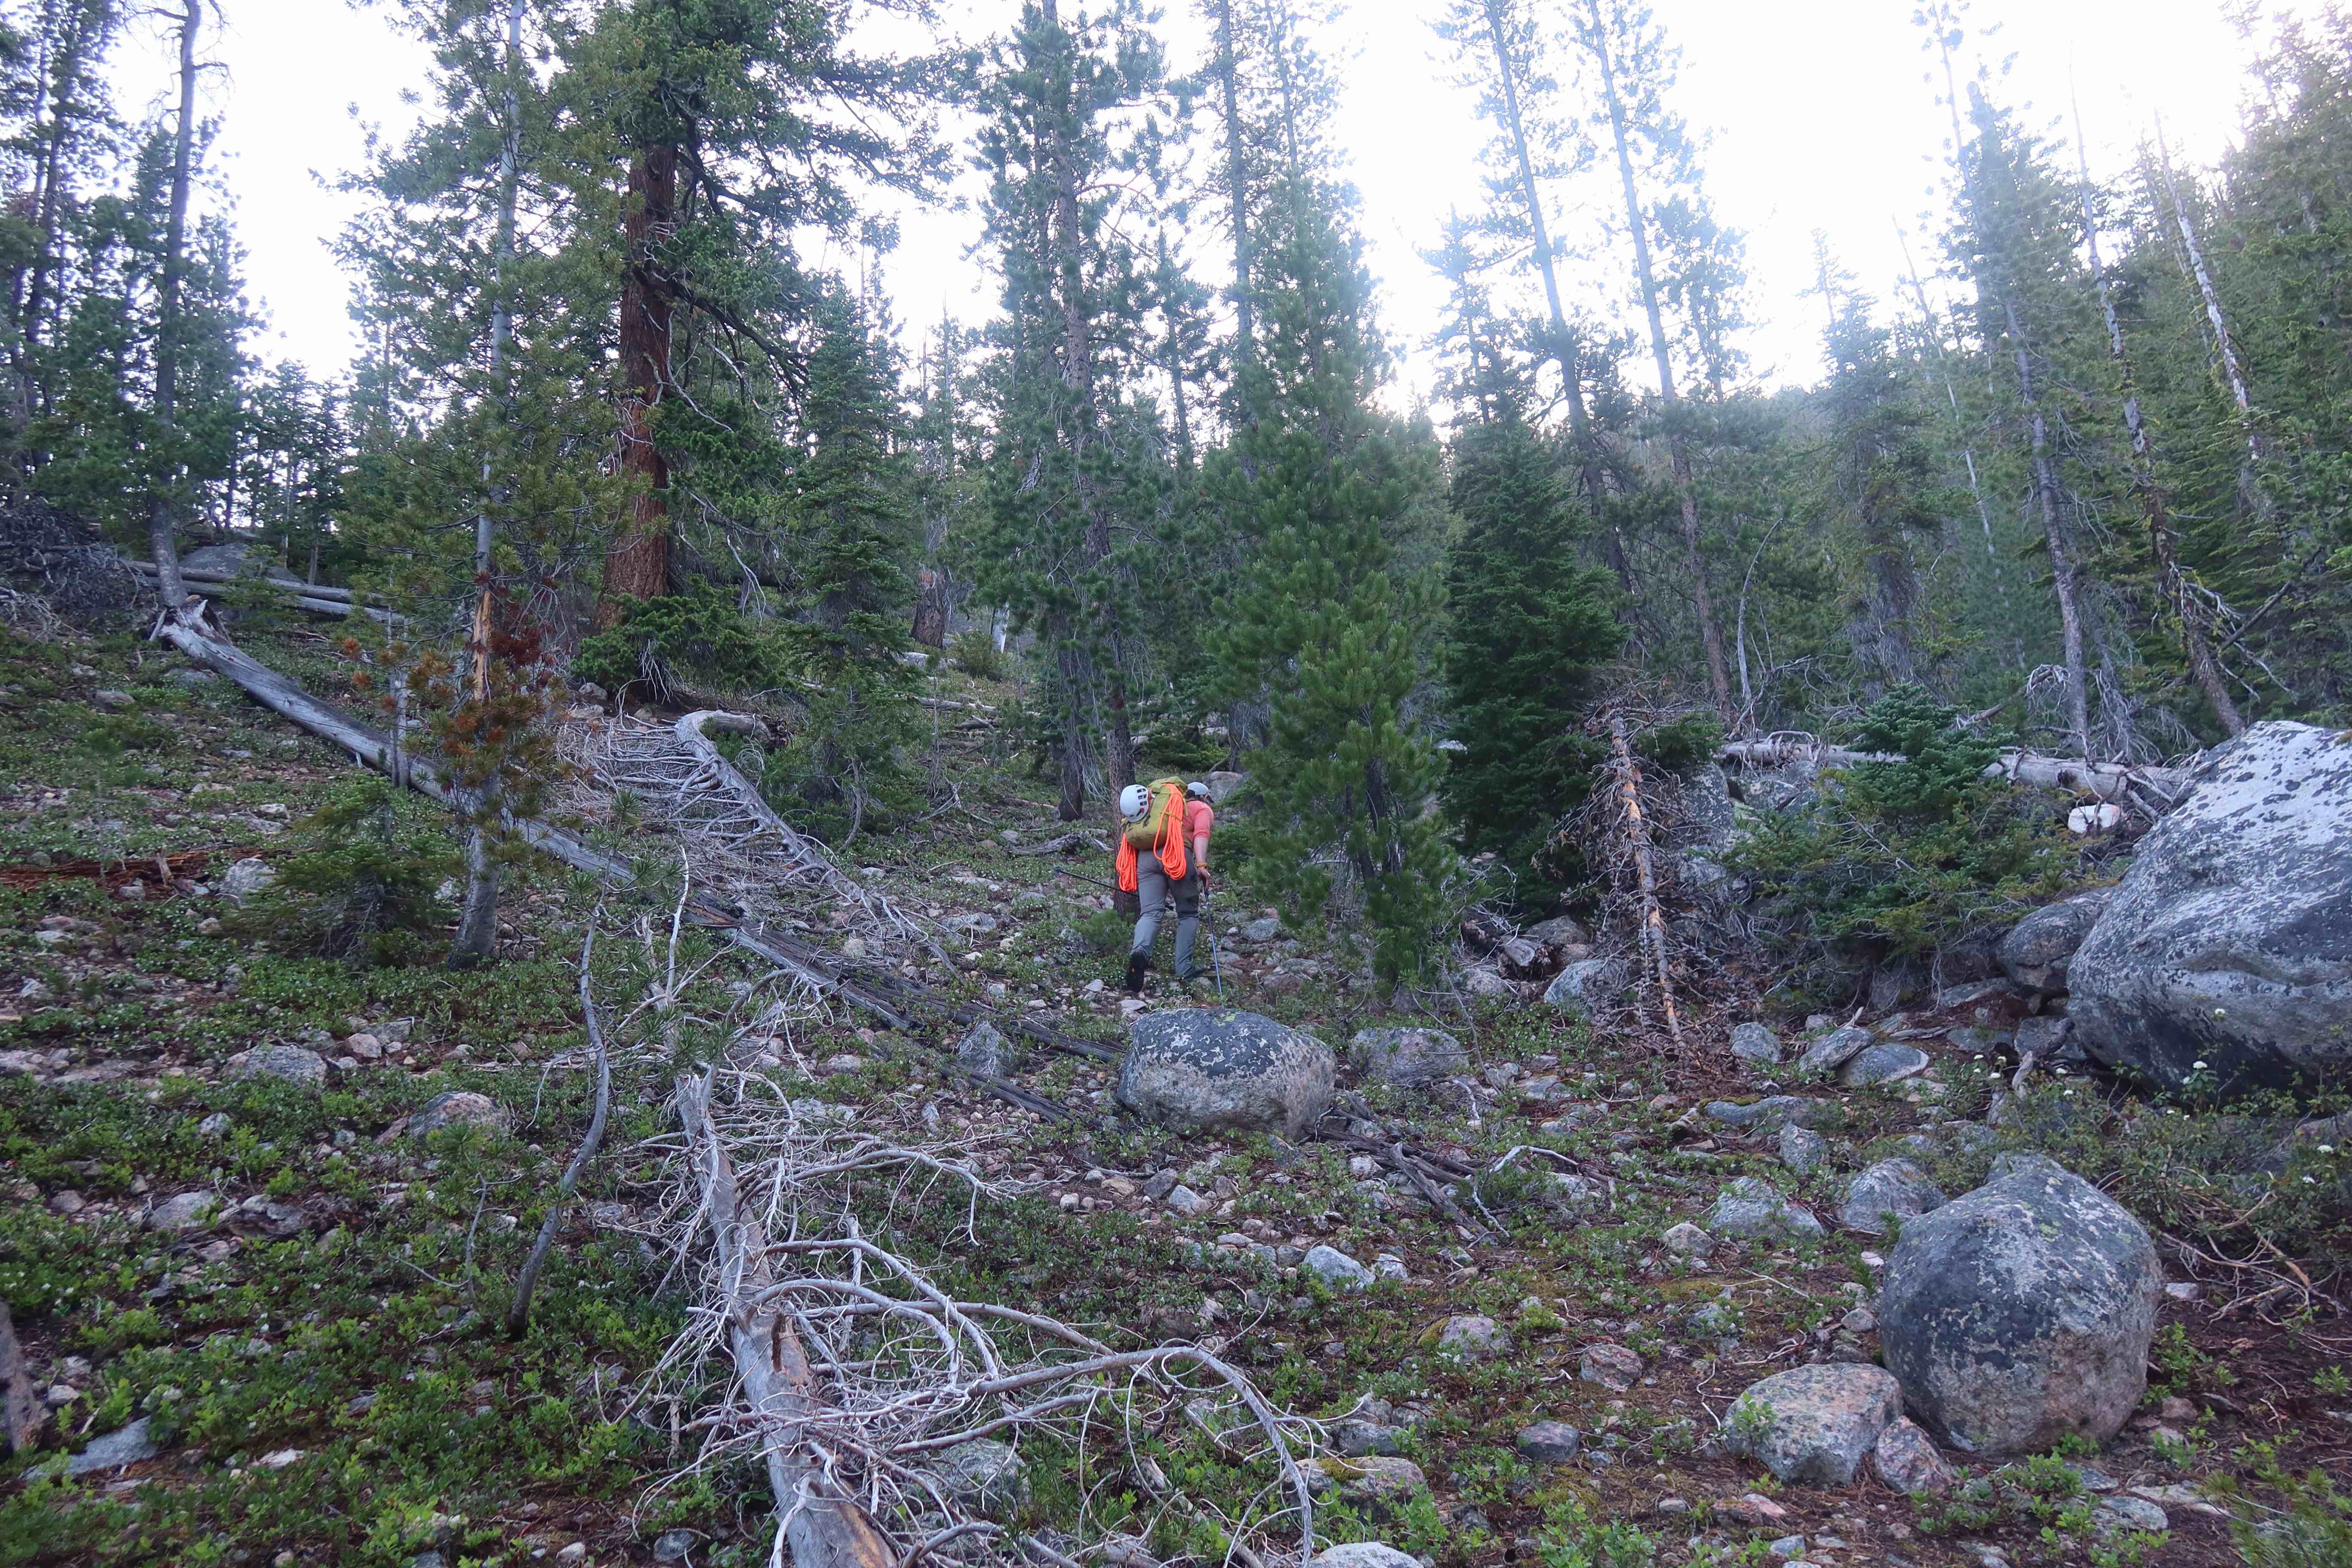
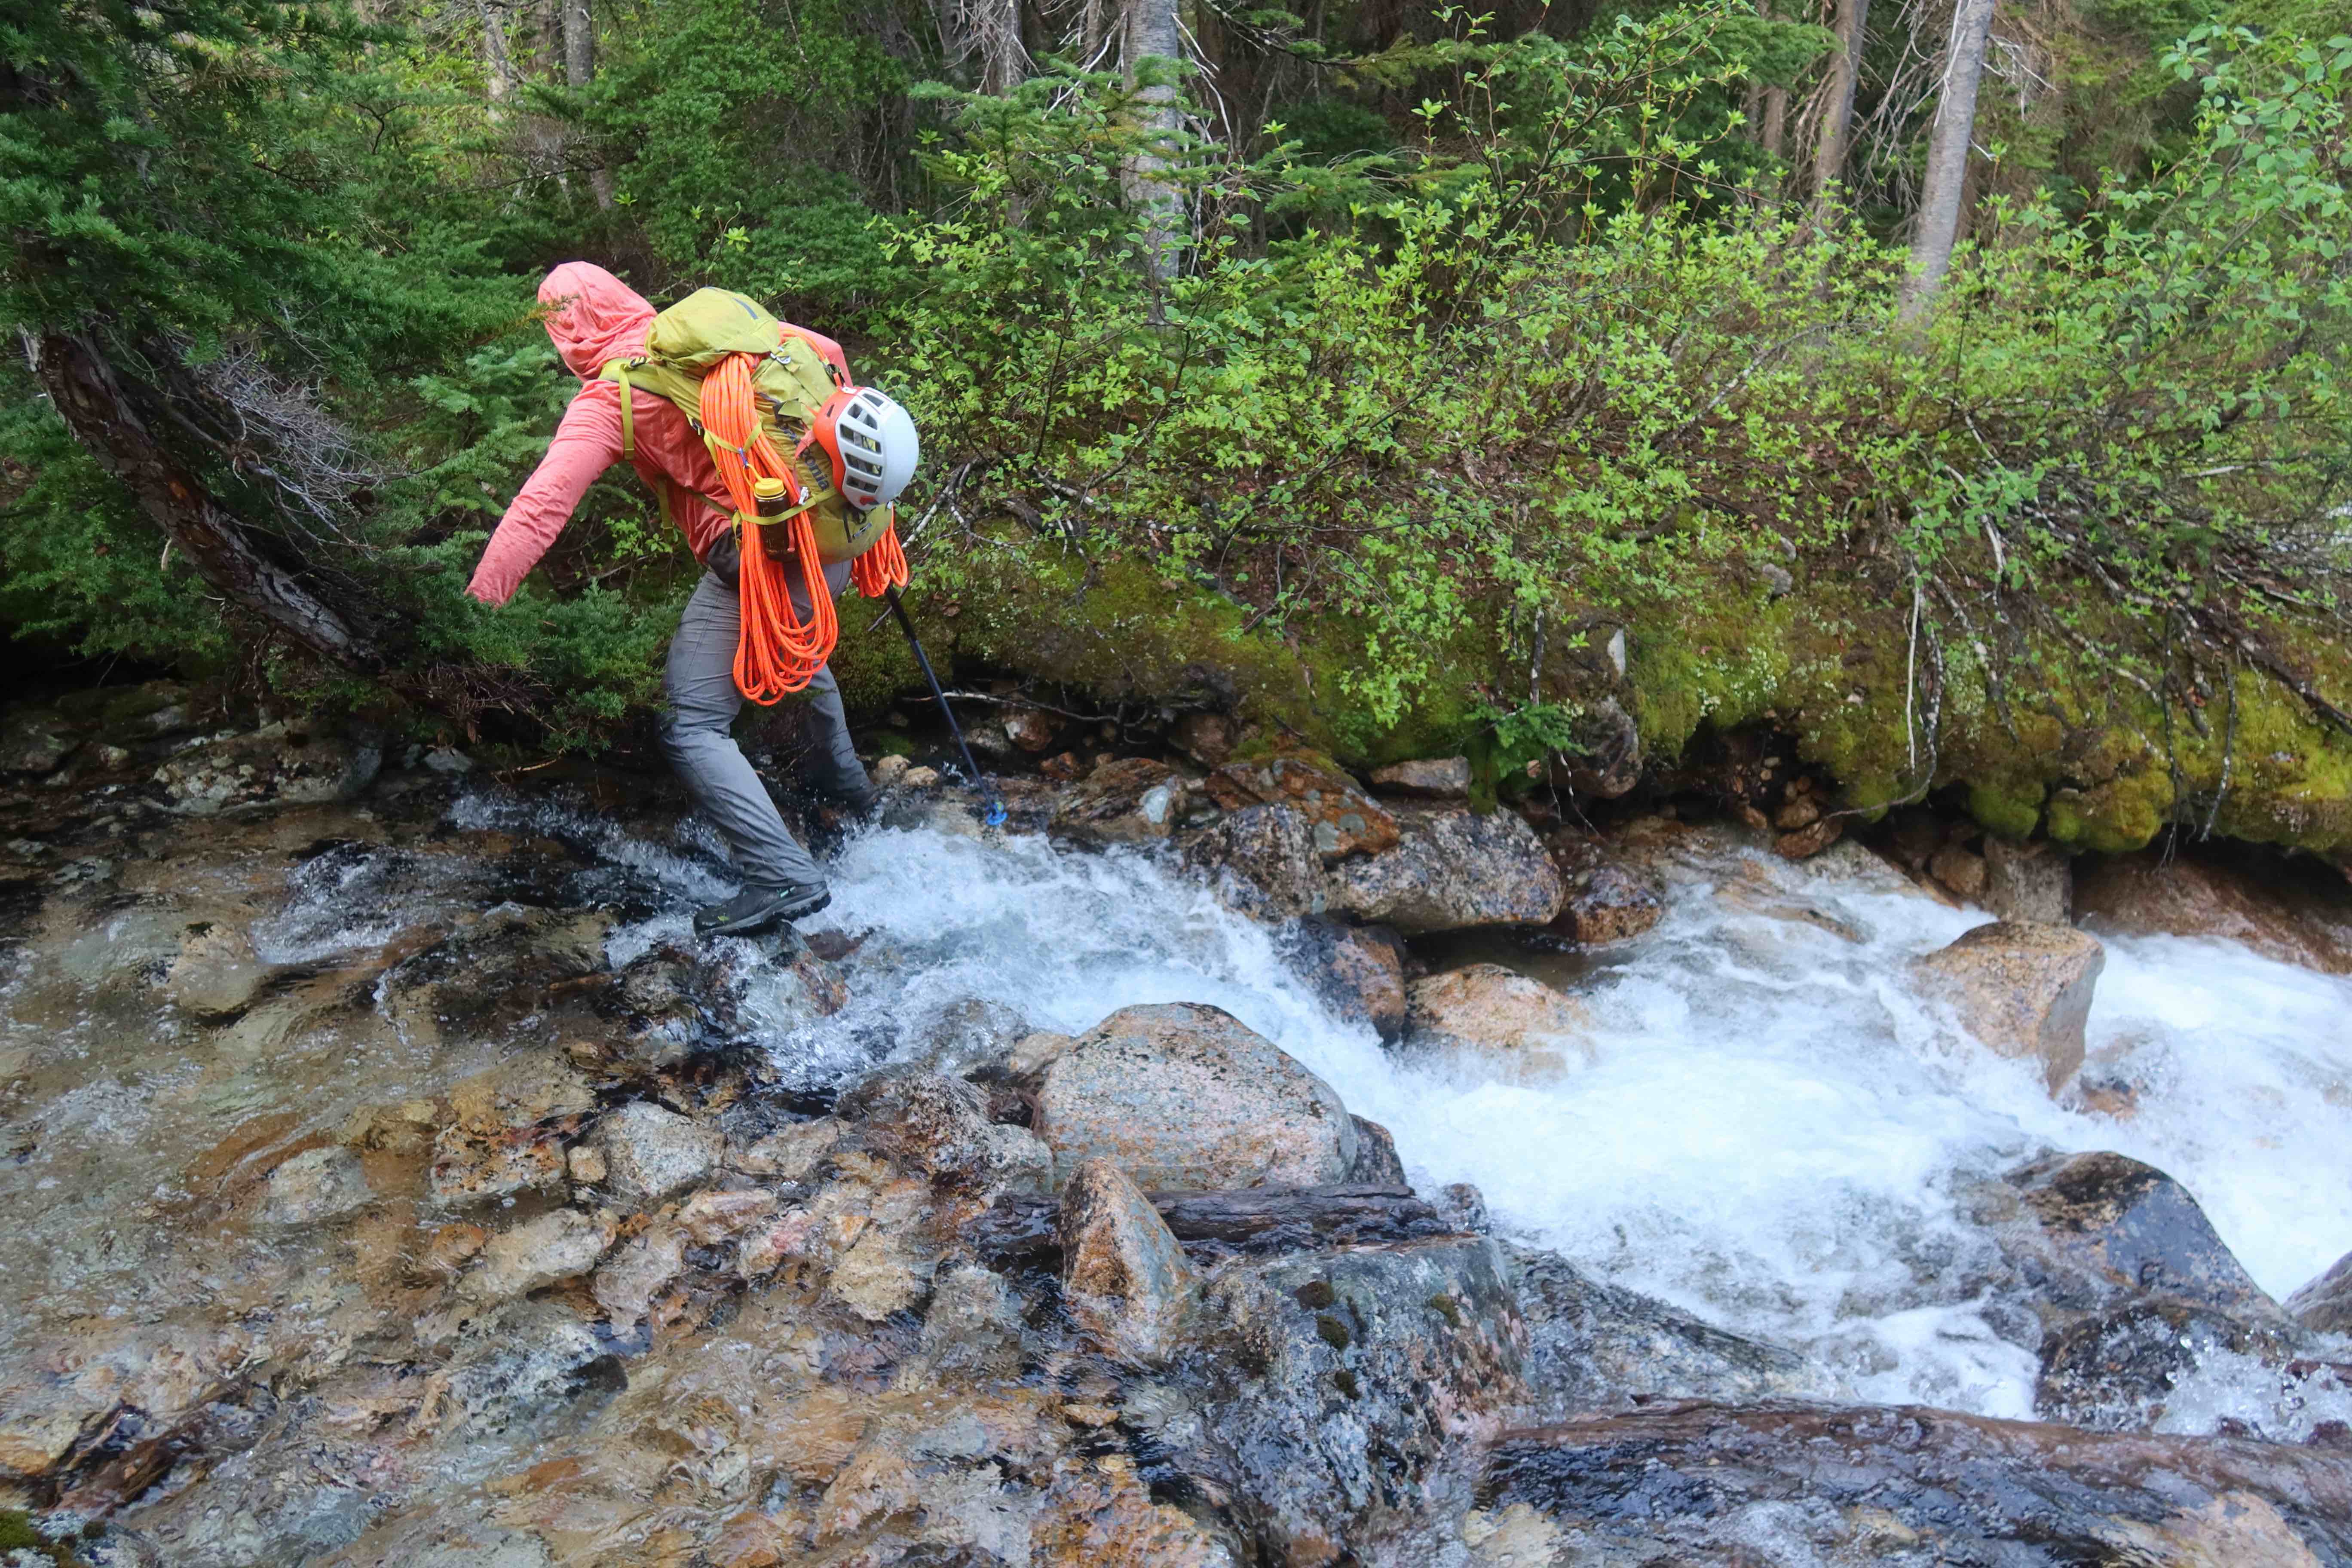
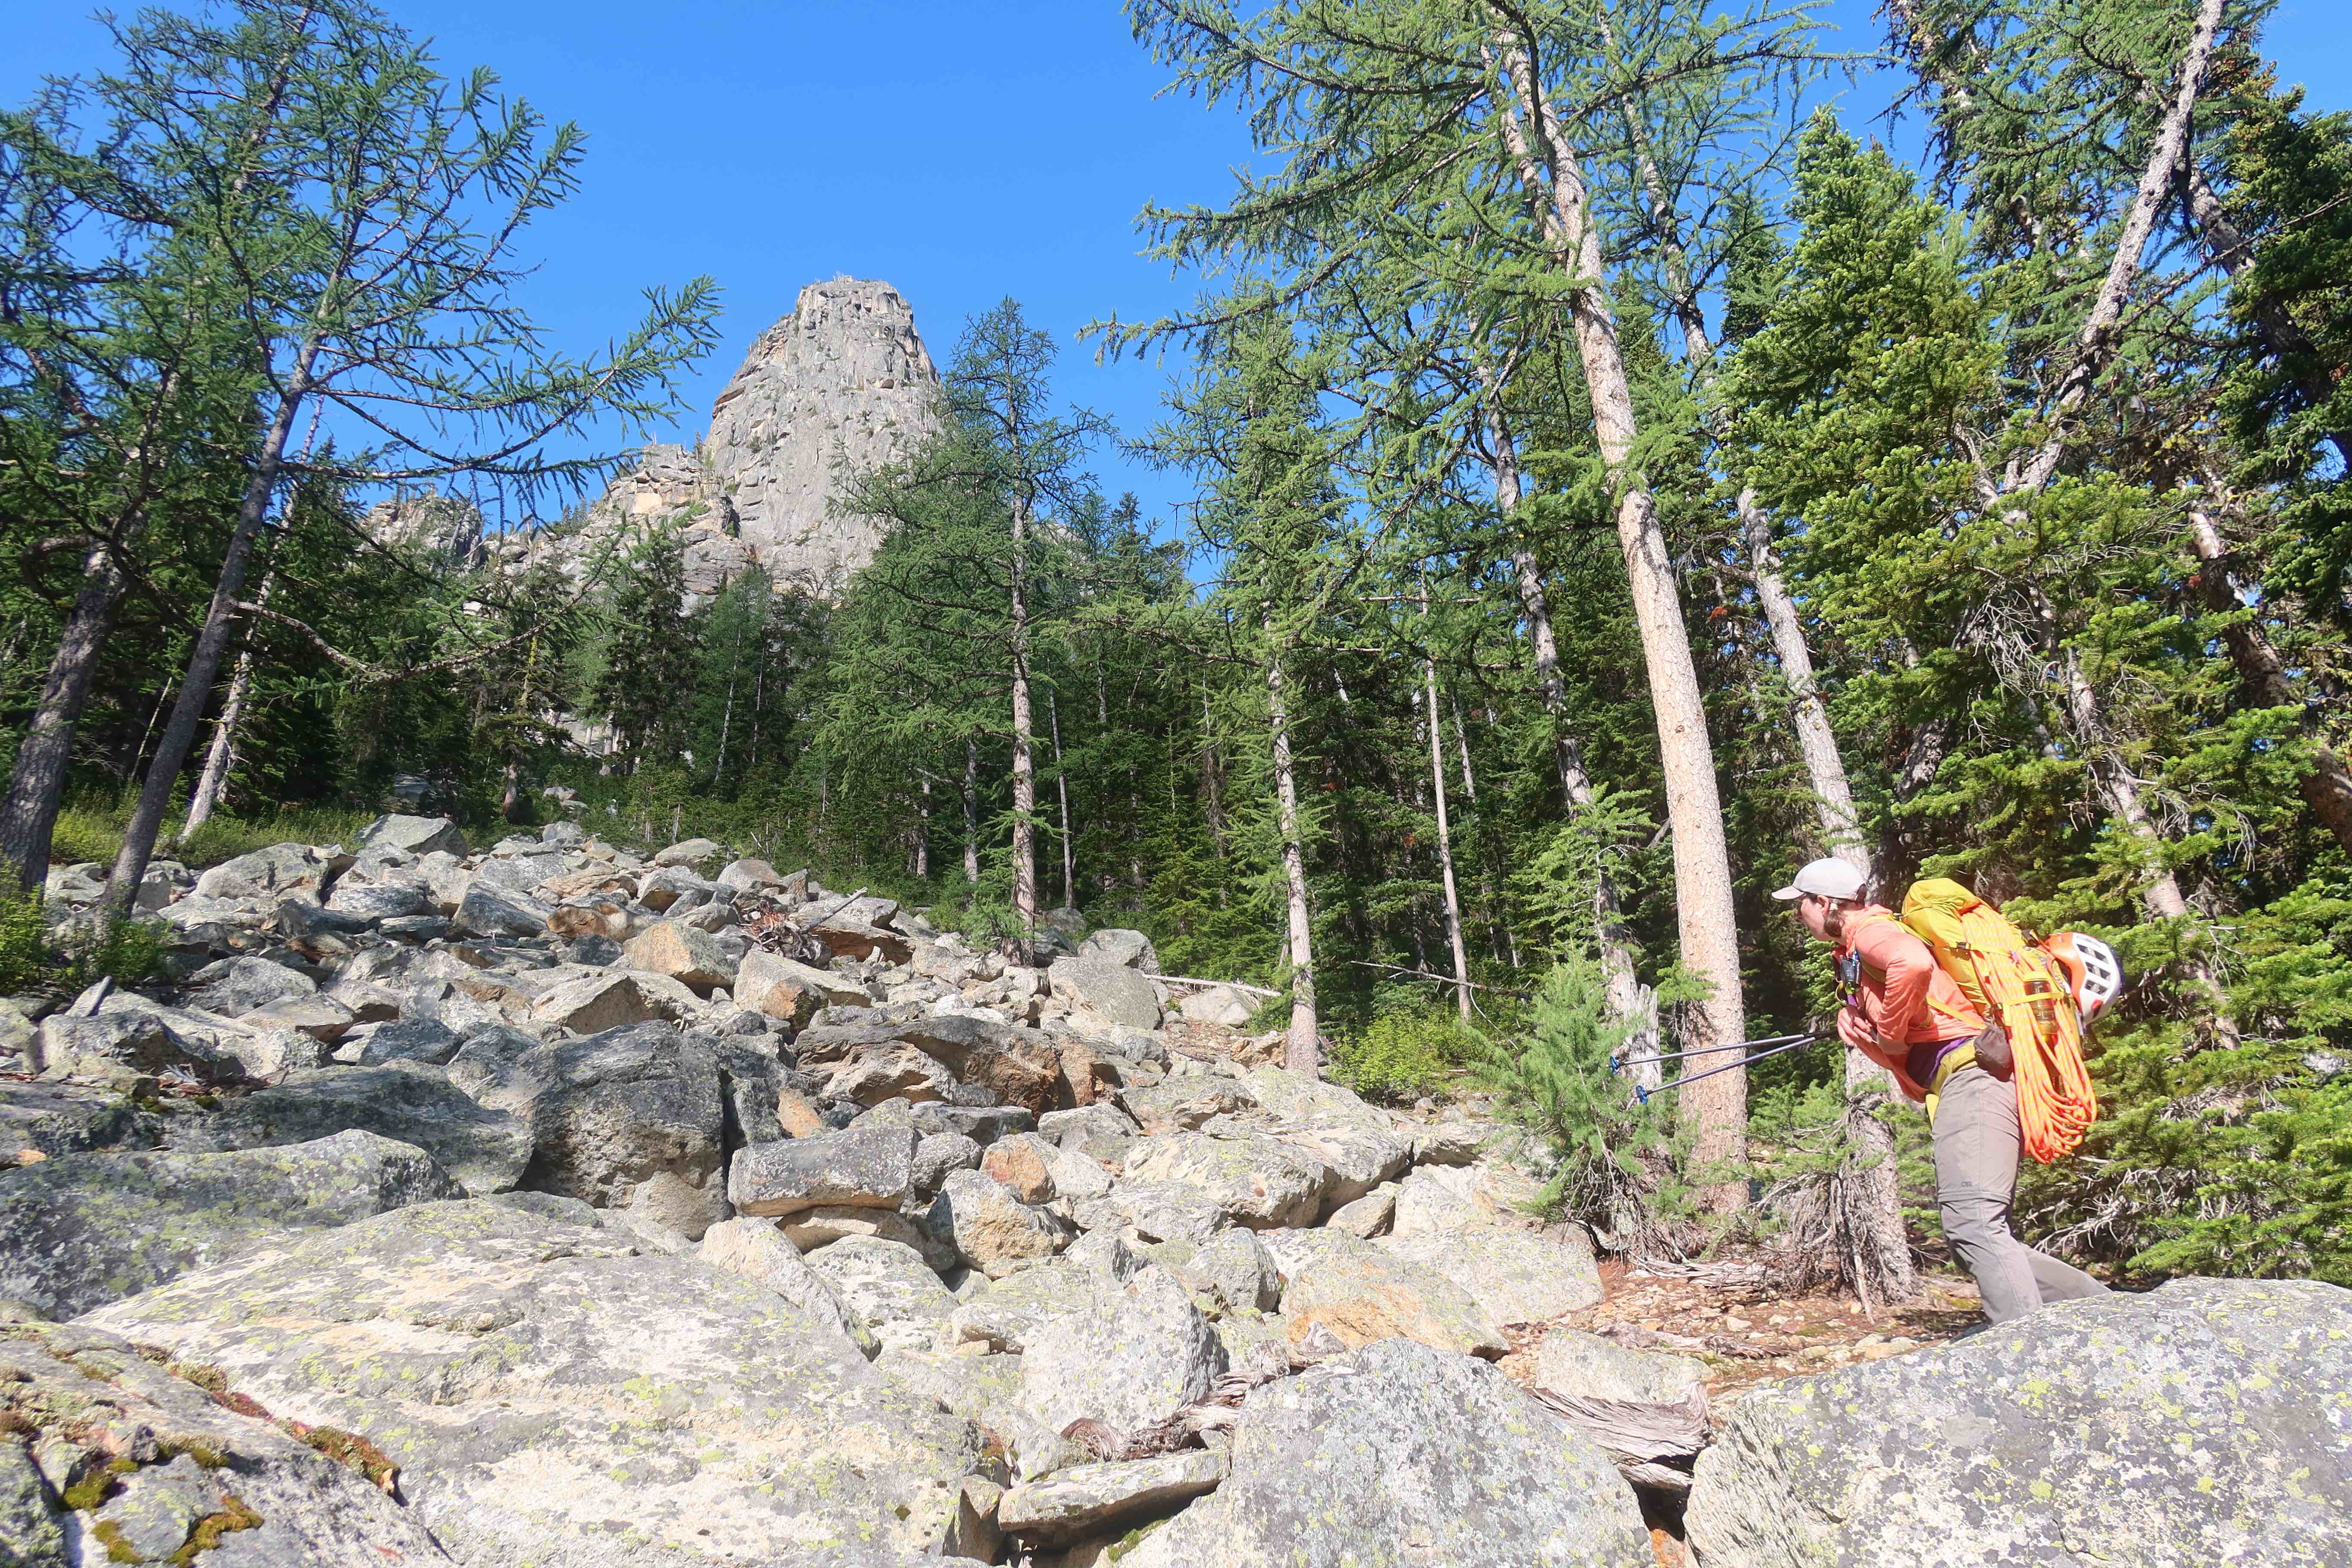
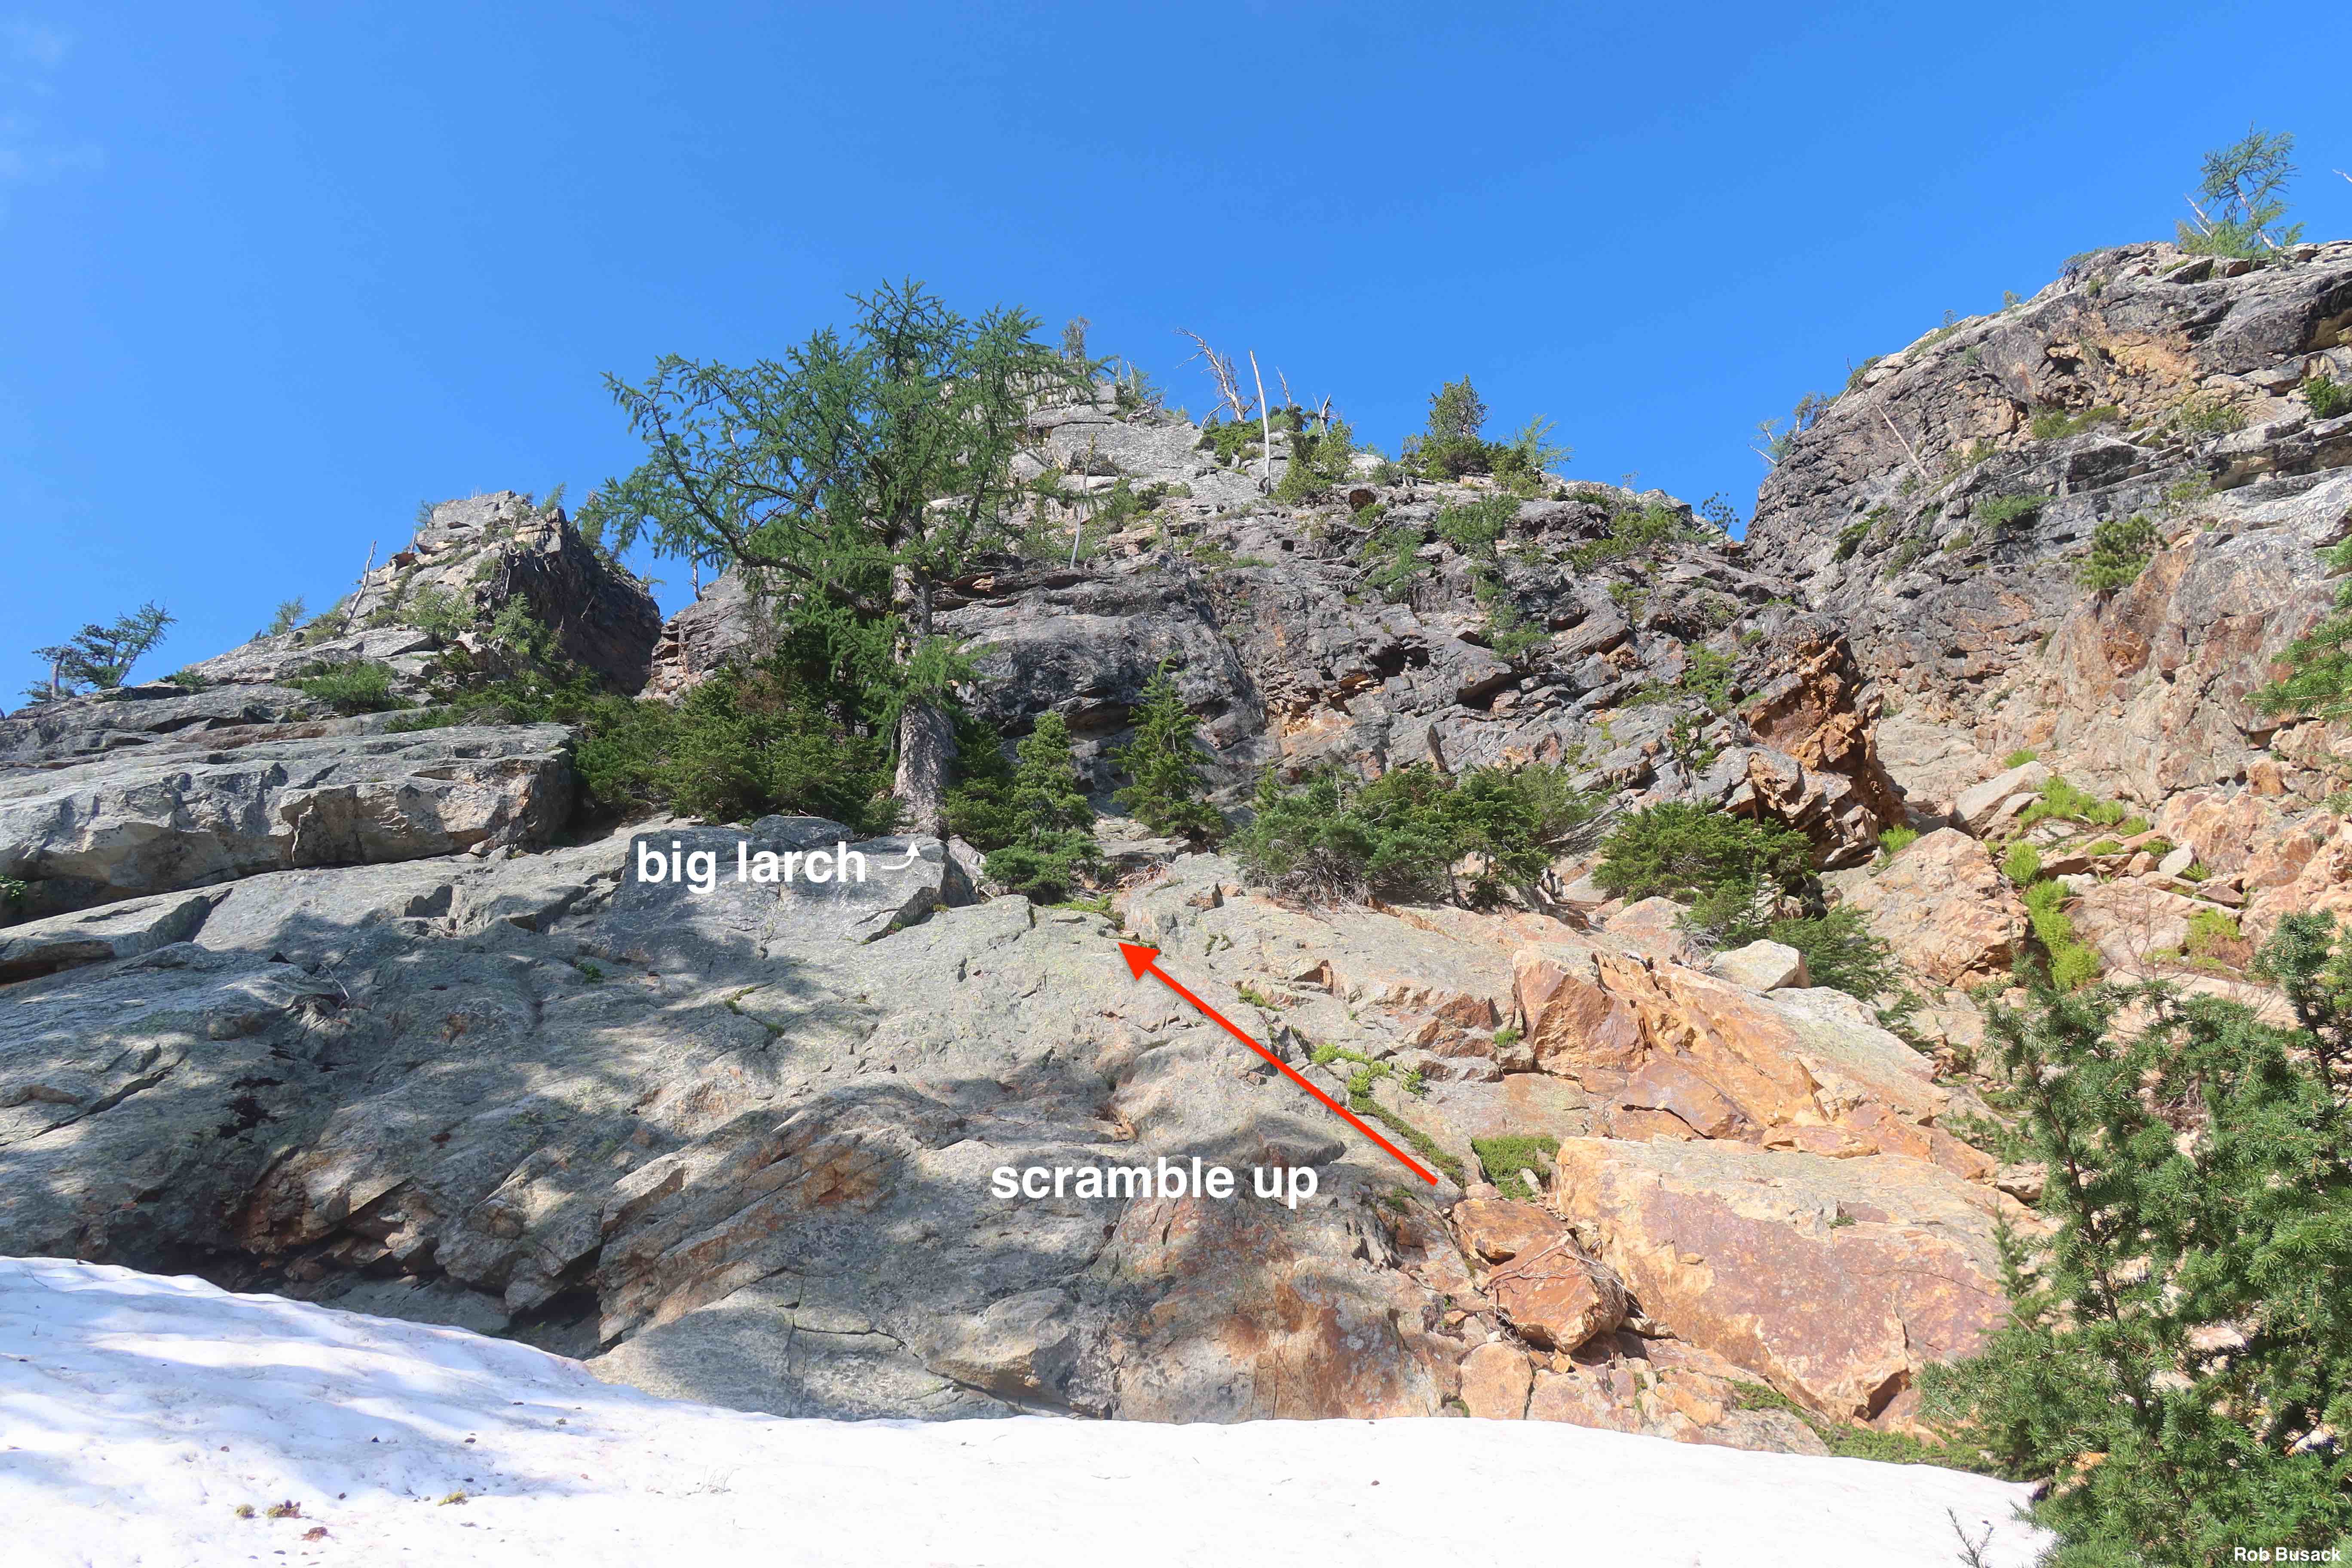
It’s possible to make use of an established trail for the first 0.8 miles (and virtually none of the elevation gain.) From the highway pull-off, closer to the north end (downhill end) of the pull-off, find the somewhat hard-to-see established trail to descend about 270′ through the talus field and into the forest below. About 10 minutes from the car, this trail crosses Early Winters Creek via a low foot-log. Early season, when water is running high, it may be necessary to divert slightly right (upstream,) where we found a higher & drier log in 2025 at 48.5525, -120.6279. It’s worth re-finding the Silver Star approach-trail once on the east bank. Continue following the Silver Star approach trail very briefly, watching for the right-hand trail intersection (a tenth of a mile after the creek,) with the old Early Winters Creek trail. Amazingly, it looks like someone has been doing recent maintenance on this old Early Winters Creek trail: many blowdowns have been cut, and there is flagging-tape in spots, though it is still more on the “faint climbers trail” end of the spectrum. Go south (up-stream, but fairly flat) on the Early Winters Creek trail without turning left or uphill for at least another 0.4 miles from this intersection (0.8 miles total since the car.) Then pick an arbitrary departure from the trail, turn left, and let the bushwhacking begin. From here on out, navigate by GPS or gut-feel through mostly open forest vaguely uphill at first, and sidehilling rightward higher up, stepping over or through some minor shallow side-streams at times, until you reach 5200′. At 5200′, slightly descend to Willow Creek (brush thickens considerably near the creek,) and find a crossing. We were able to step across on rocks that had only an inch or two of water running over them, so waterproof hiking boots were enough to keep our feet dry. Once across, very soon an open talus field and/or strip of forest allows for going straight uphill, gaining the remaining 400′ of vert to the obvious toe of the buttress. Once you arrive at the toe of the buttress, before doing any scrambling up onto it, choose a place to stash any gear that you would like to leave here and pick up after walking off. After gearing up, a short scramble up the right-hand side of the buttress’s toe gets to a large larch, which we slung, then began our first pitch.

The Climbing Route – in Written Descriptions
Note: these climbing difficulty-ratings are subjective rough-estimates from us climbing the route one time. Same goes even moreso for my description of pitch-lengths here: we didn’t carefully measure anything, we just guessed lengths based on how much rope it “looked like” got used. A number of factors may have led us to over-estimate movement-difficulty ratings: Most significantly, I carried too much weight in the spirit of being “ready for anything”, but in reality a lot of it turned out to be completely unnecessary and just made the actual-climbing harder on myself: I carried tons of dedicated extra rappel tat (ready to build about 12 redundant anchors, each with a ring,) odd-ball trad gear that was never needed (tricams, offset nuts, ball nuts, etc.), a #4 and #5 “just in case”, a chalk bag I never needed, etc. Also, after the weather forecast in the week leading up to our attempt had done a lot of waffling between maybe-rain and no-rain, it seemed the actual weather of the day still tried to make both be true at the same time anyway: an few passing waves of a few drops of rain did indeed fall of on us from time to time while we were on route, but never enough to really wet the rock or convince us to turn around. Even at one point it, started lightly hailing on us! Those weather conditions were light, they weren’t quite bad enough warrant a turn-around, but they could easily have nudged us mentally towards thinking the climbing was harder than maybe it actually was. Finally, the experience of pushing forward into a thing so unknown, climbing a route that we didn’t know for sure would go, or be otherwise safe to climb, let alone what climbng-difficulties to expect, set our minds on edge a little bit all day, possibly elevating how difficult individual moves subjectively felt. I’d be stoked if eventually a consensus from other climbers downgrades some of these difficulties over time, since part of my original hope for this route was to discover a long multipitch with easier climbing moves, thus more accessible to a larger number of climbers.
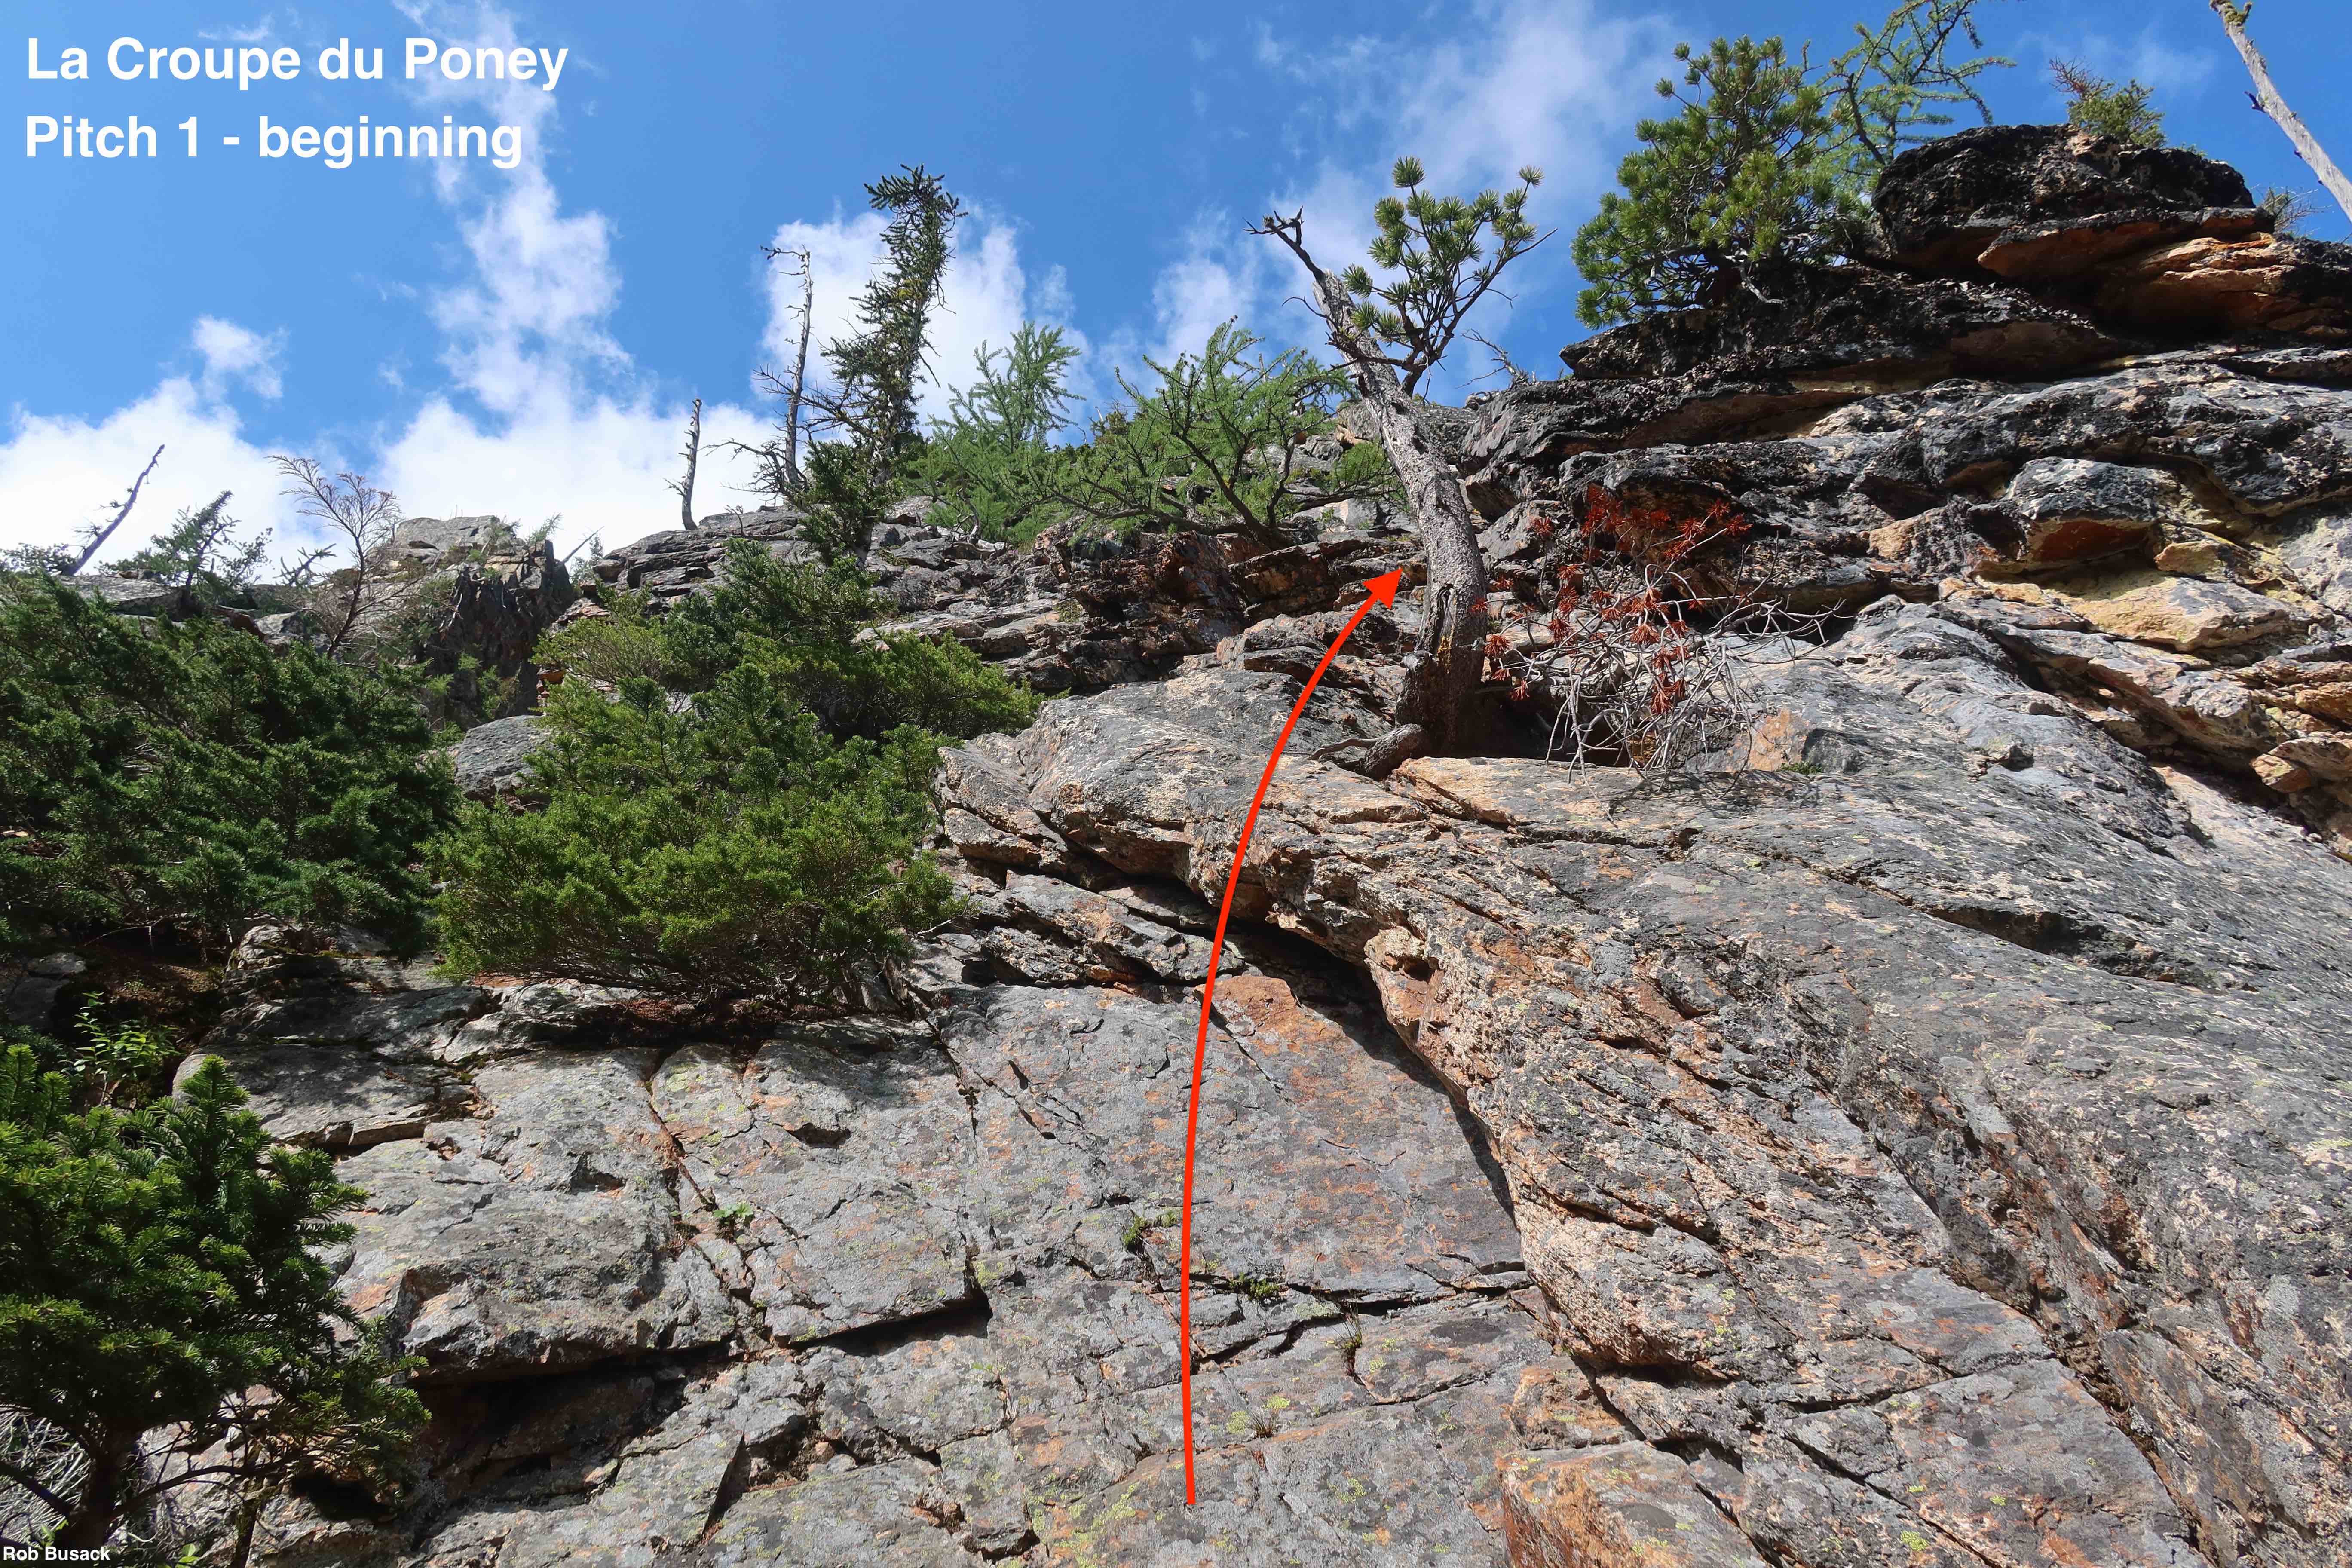
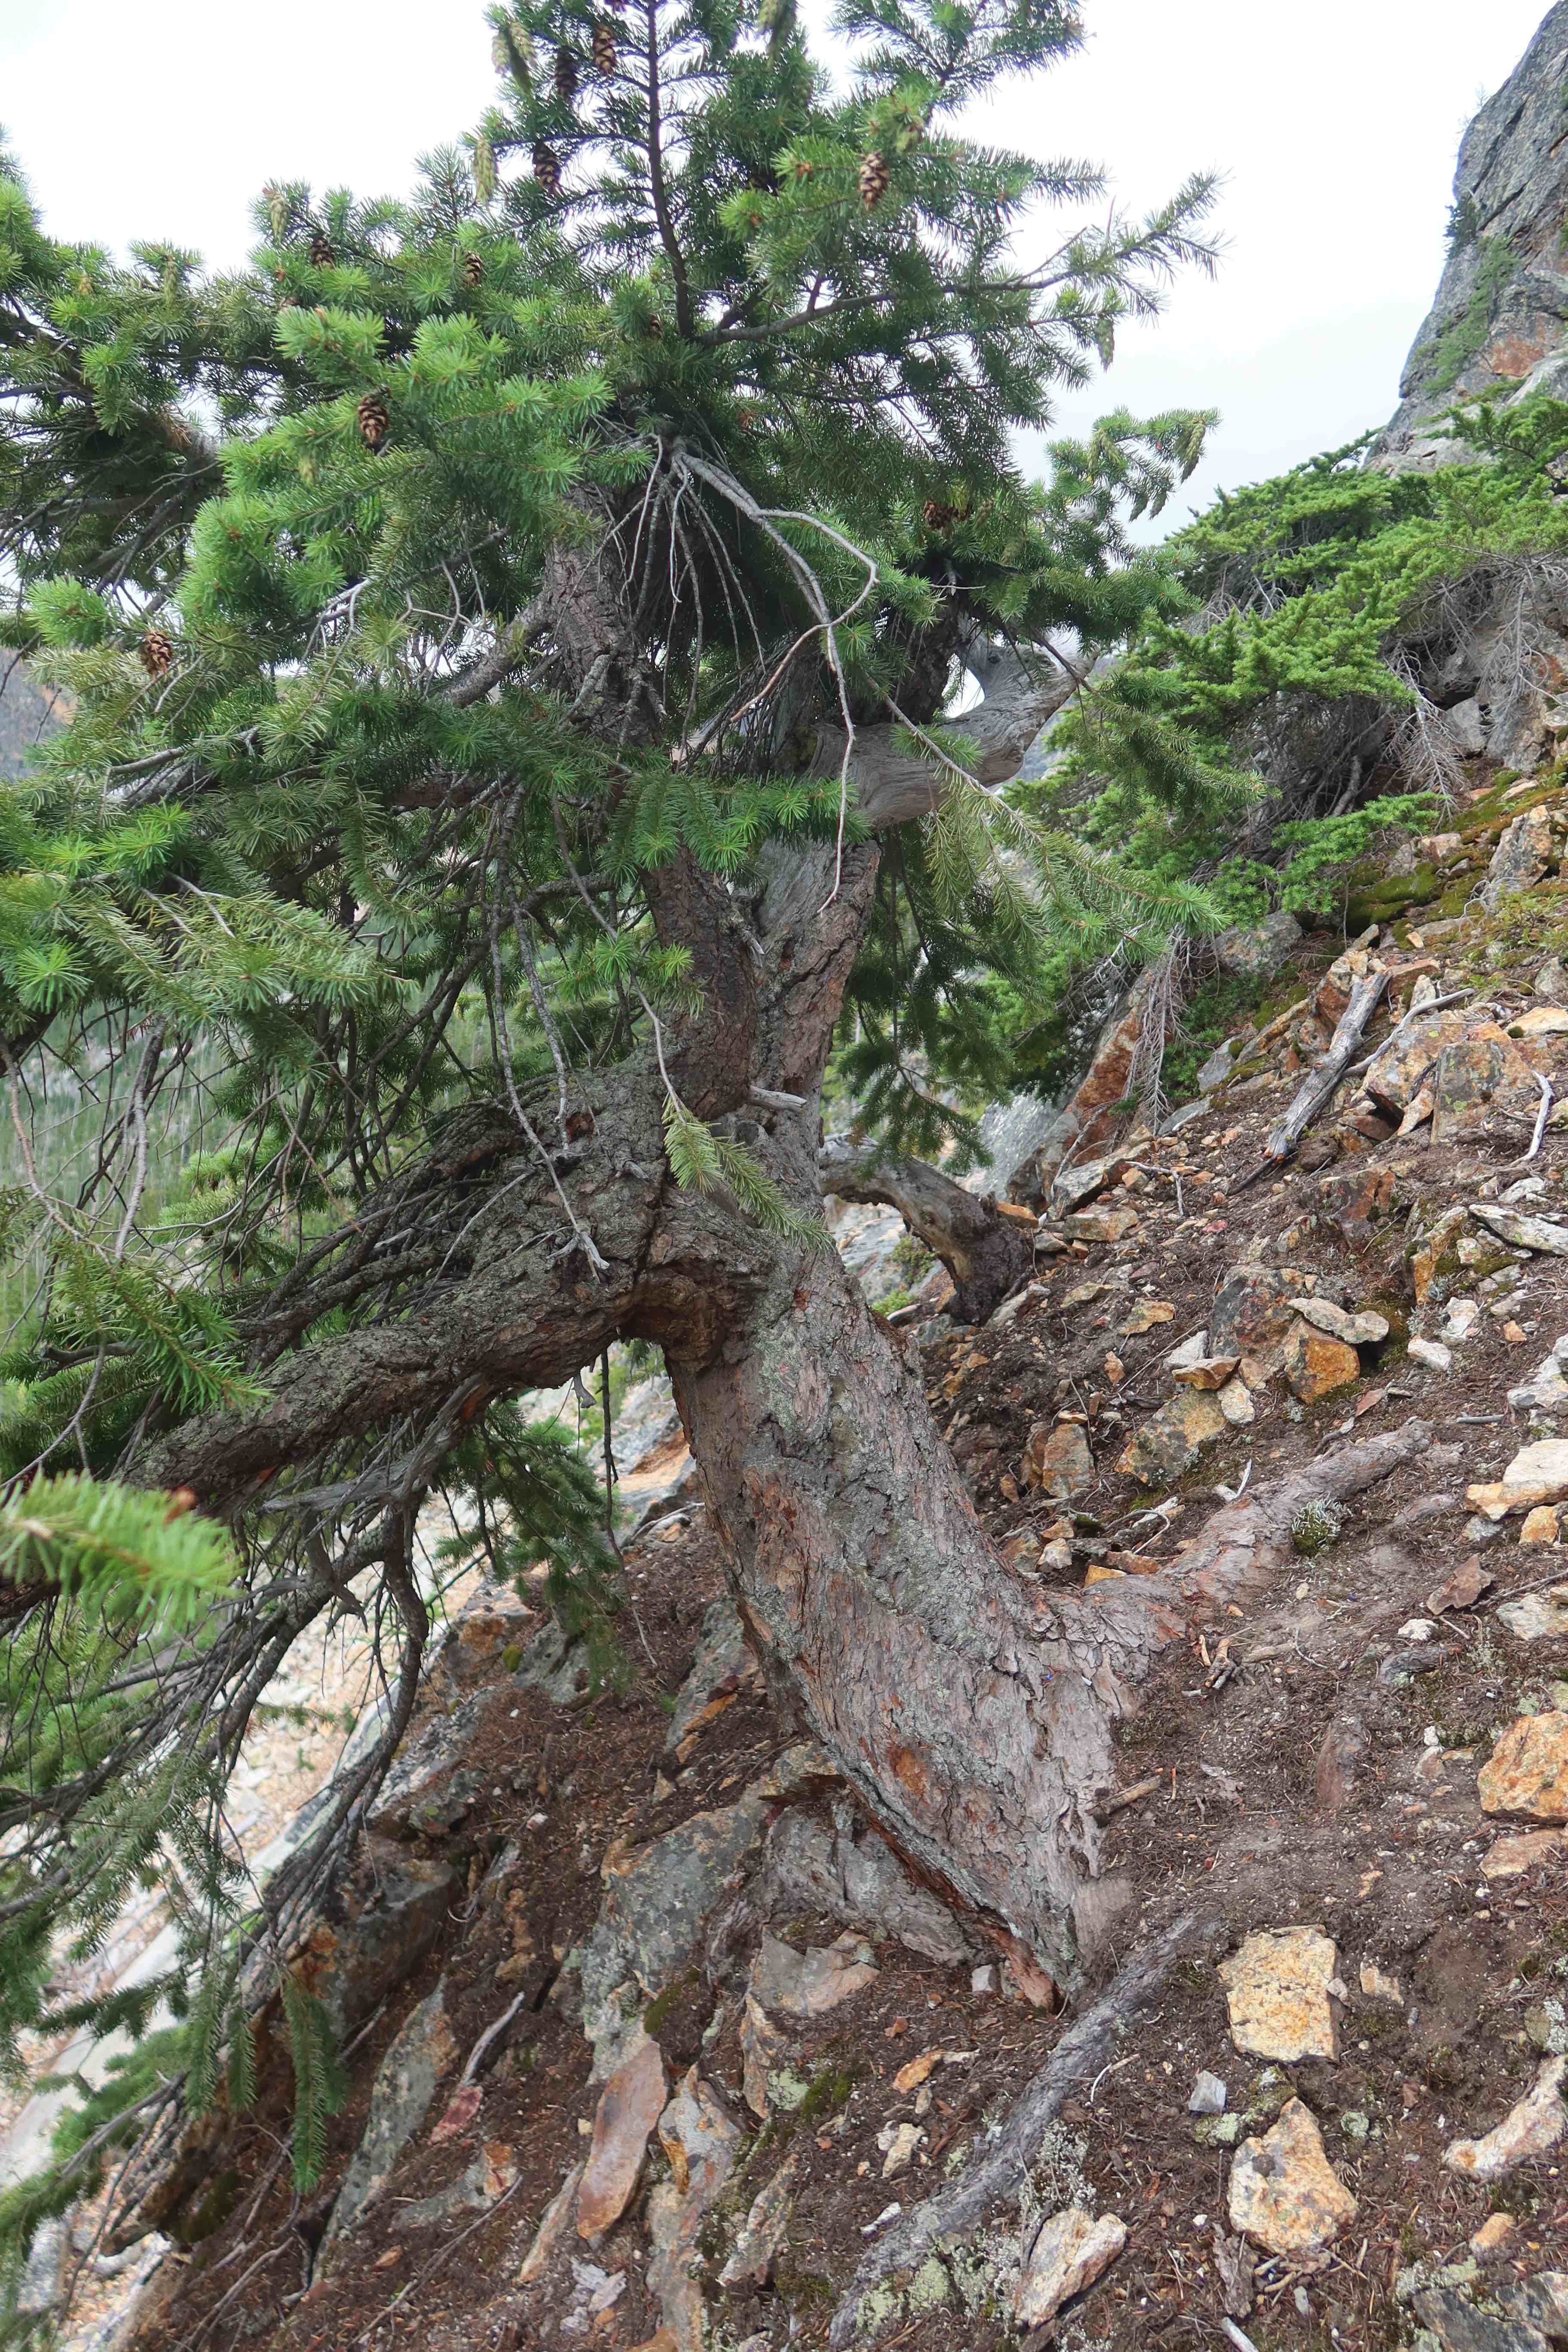
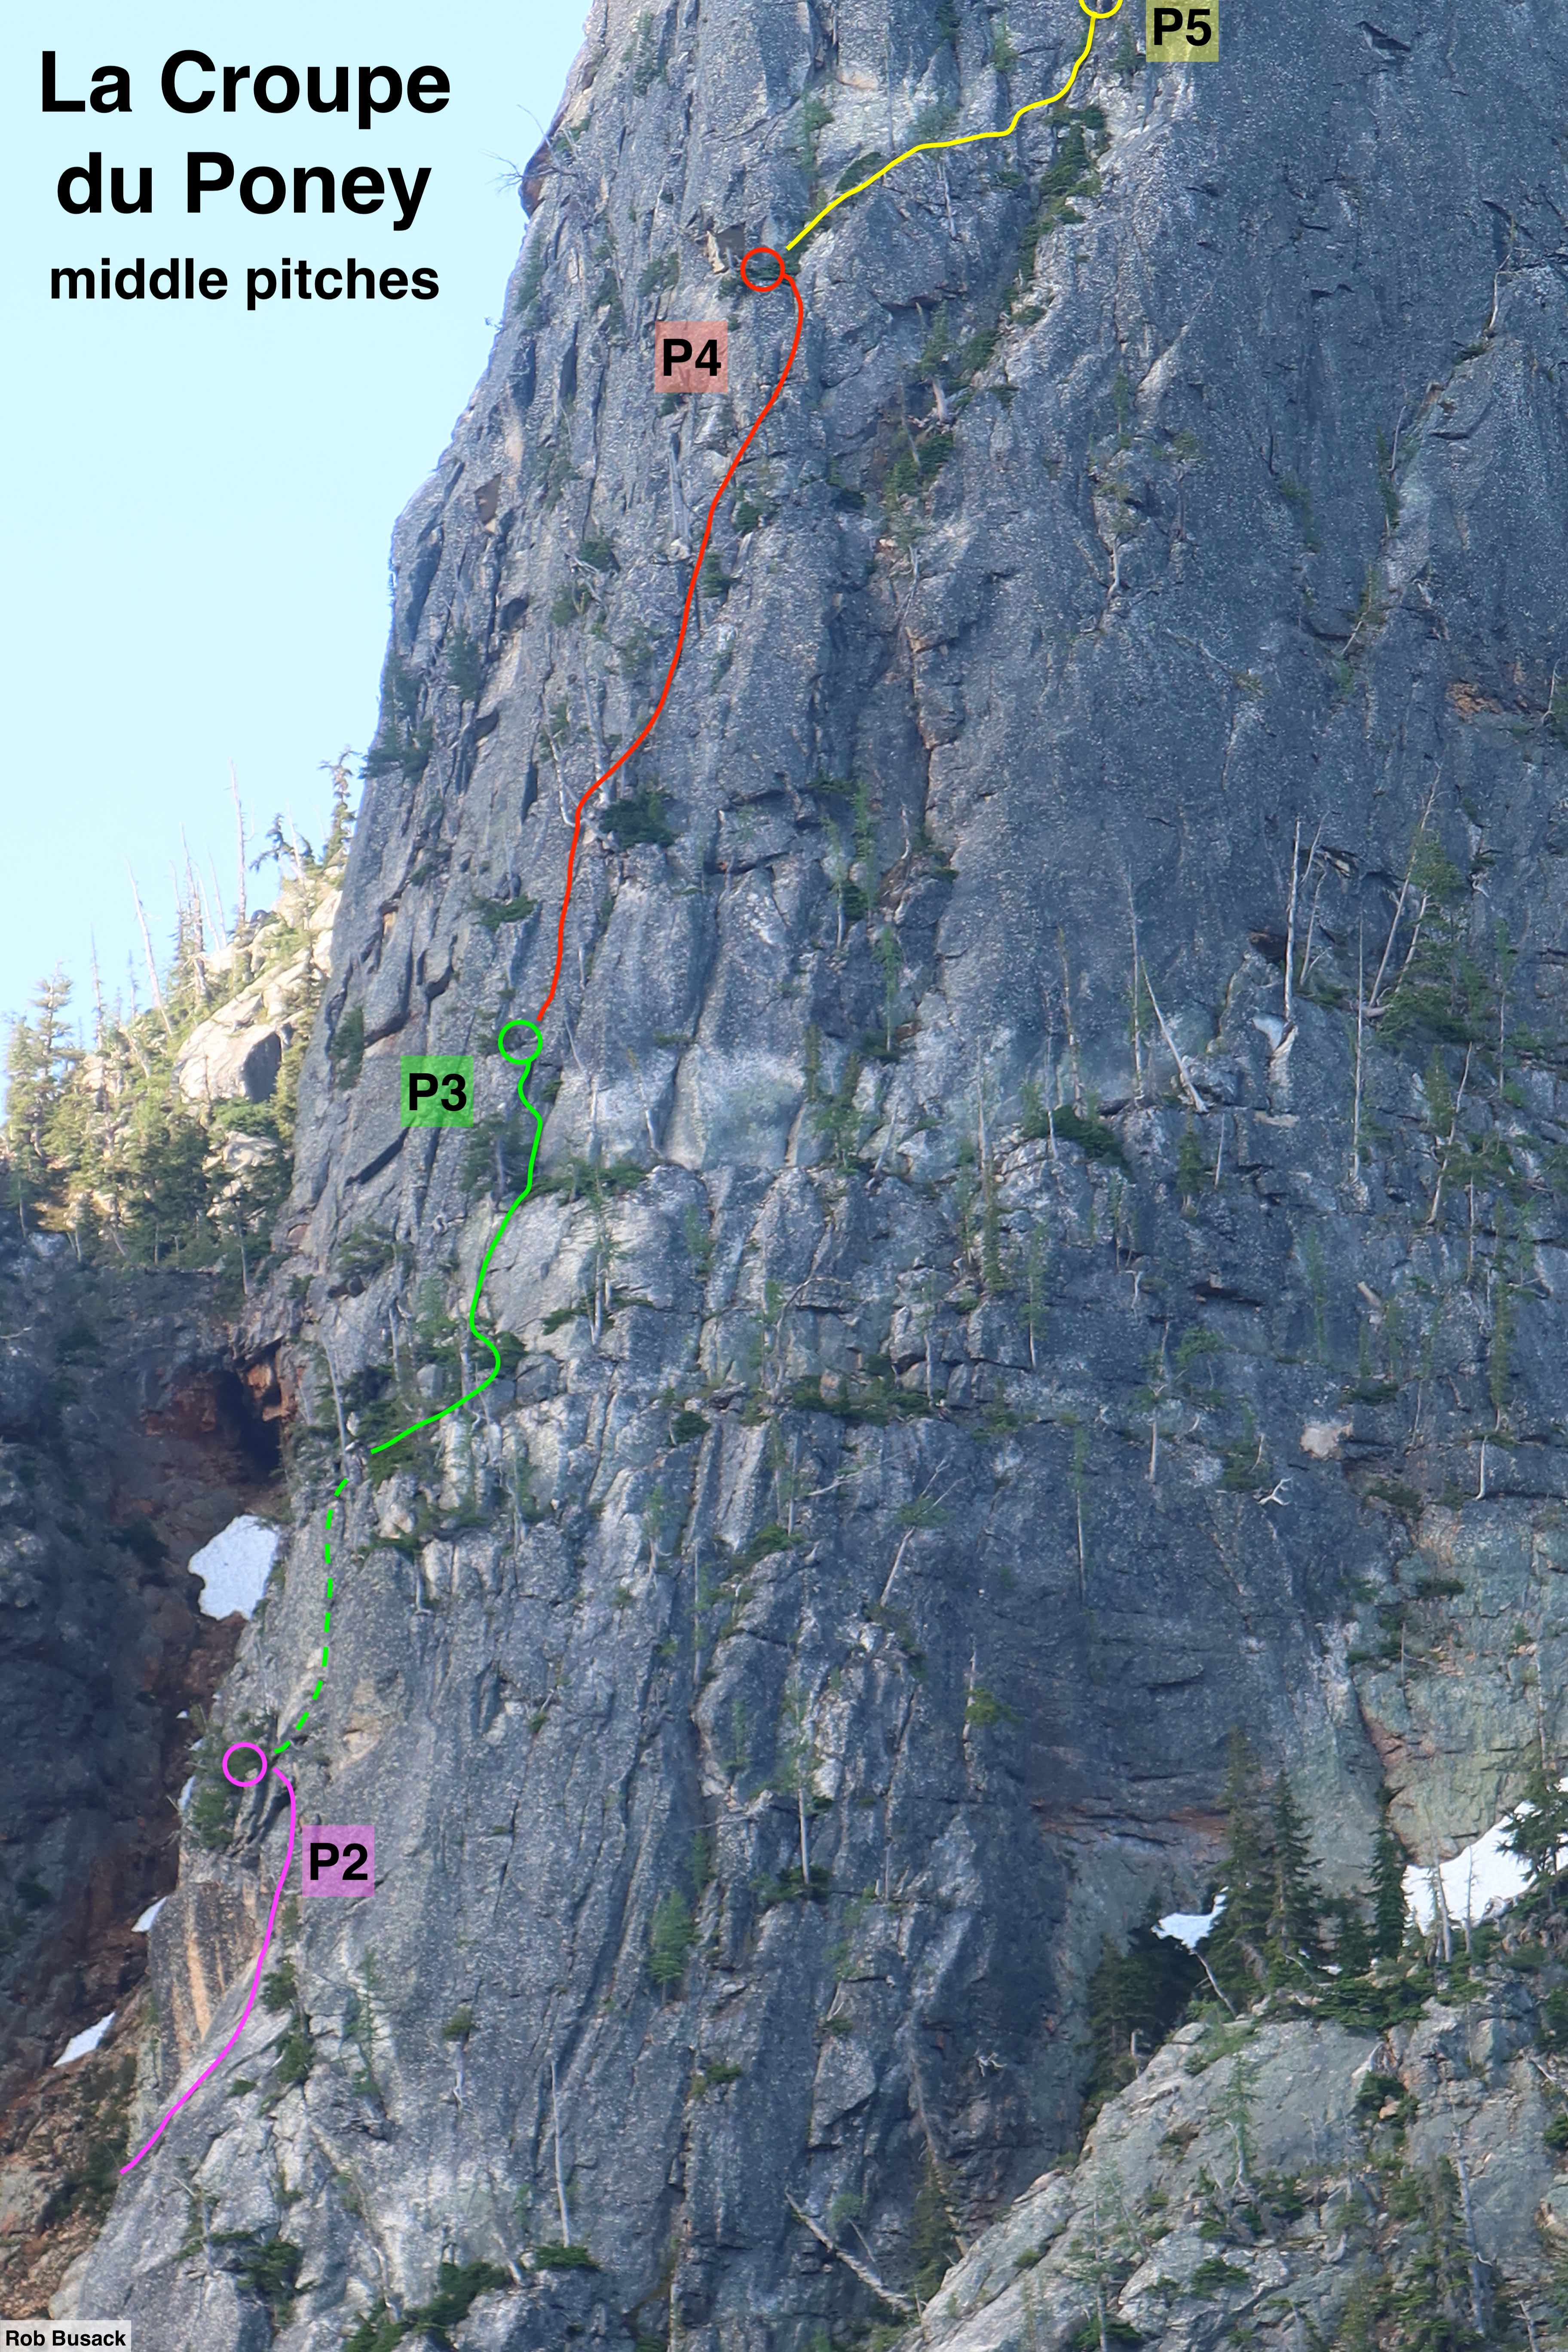
- Pitch 1: 5.5/5.6?, ~140′, tree anchor – Mostly 5.0, with occasional single moves of 5.5/5.6. Blocky & indistinct, with a bit more loose rock than any of the other pitches. Ends at a tree that is to the left of a noticable leftward-arching-roof landmark.
- Pitch 2: 5.7/5.7+?, ~190′, tree anchor – Sustained 5.7 for a lot of the pitch. Left-facing-corner after left-facing-corner keeps coming, until just after passing a distinctive yellow & black vertically striped wall that’s off on your left. As soon as you’ve climbed higher than that vertically striped wall, it’s easy to hook left and use the tree just above that vertical-striped-wall as a belay anchor.
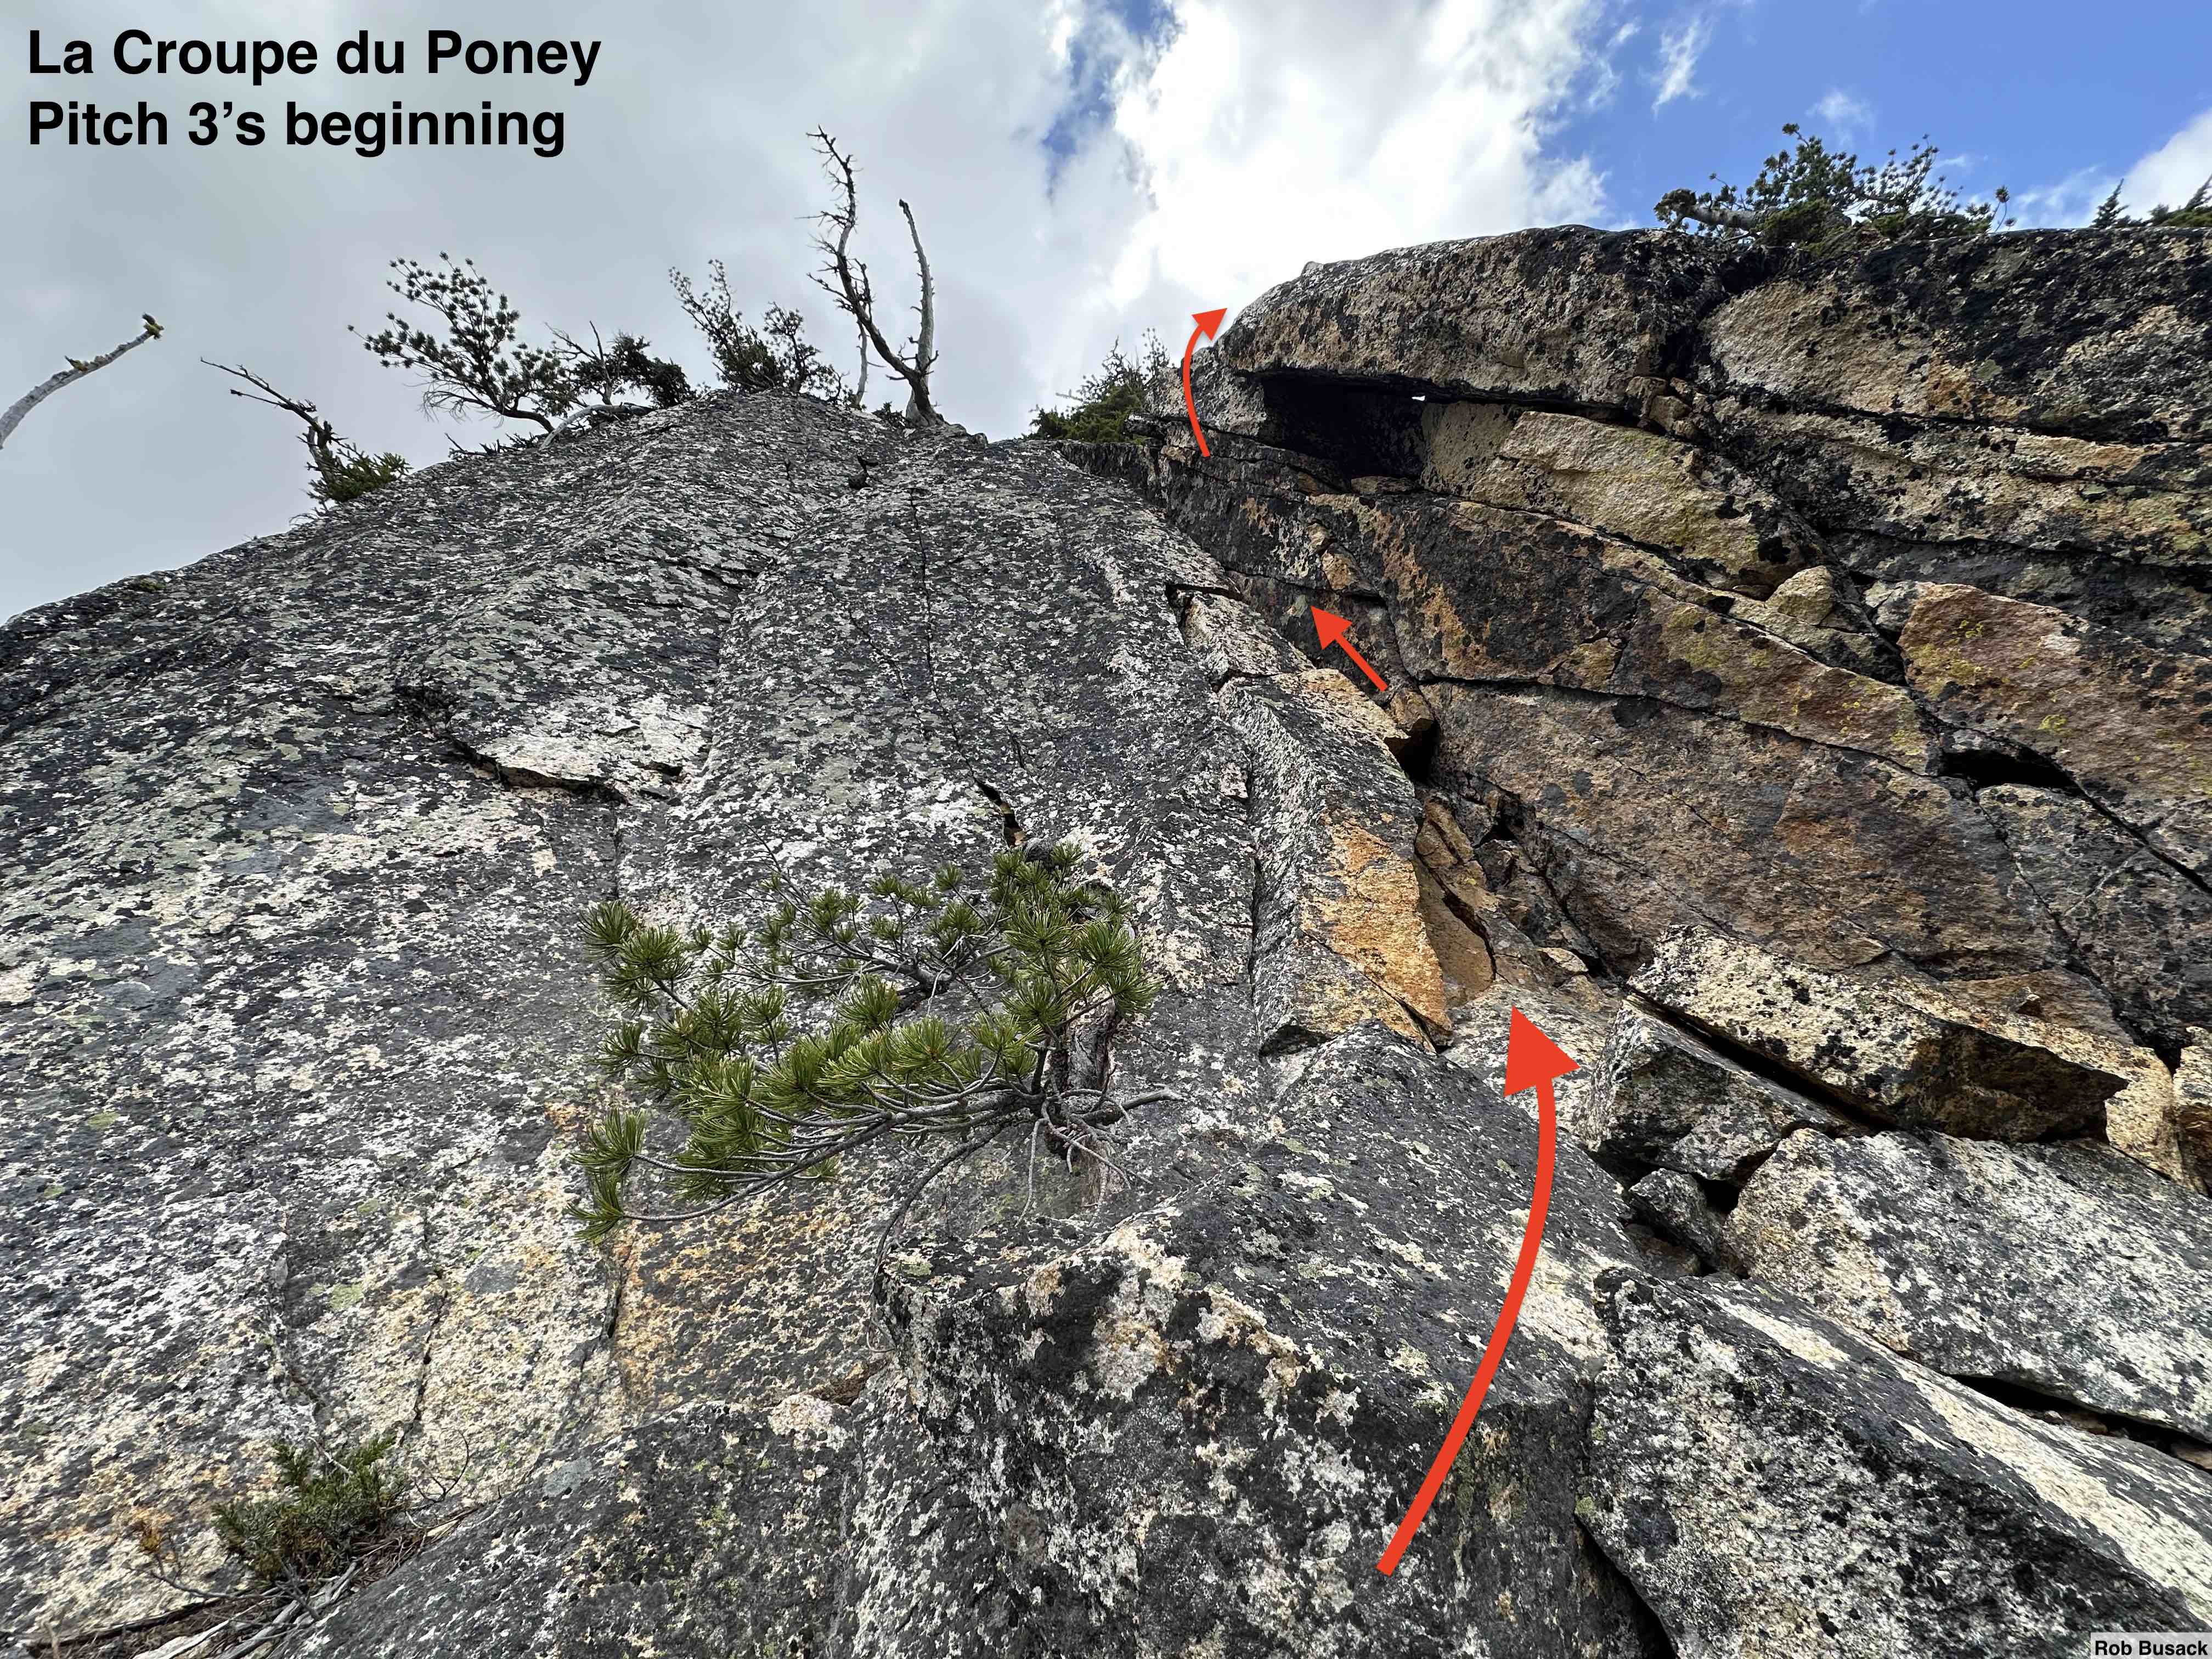
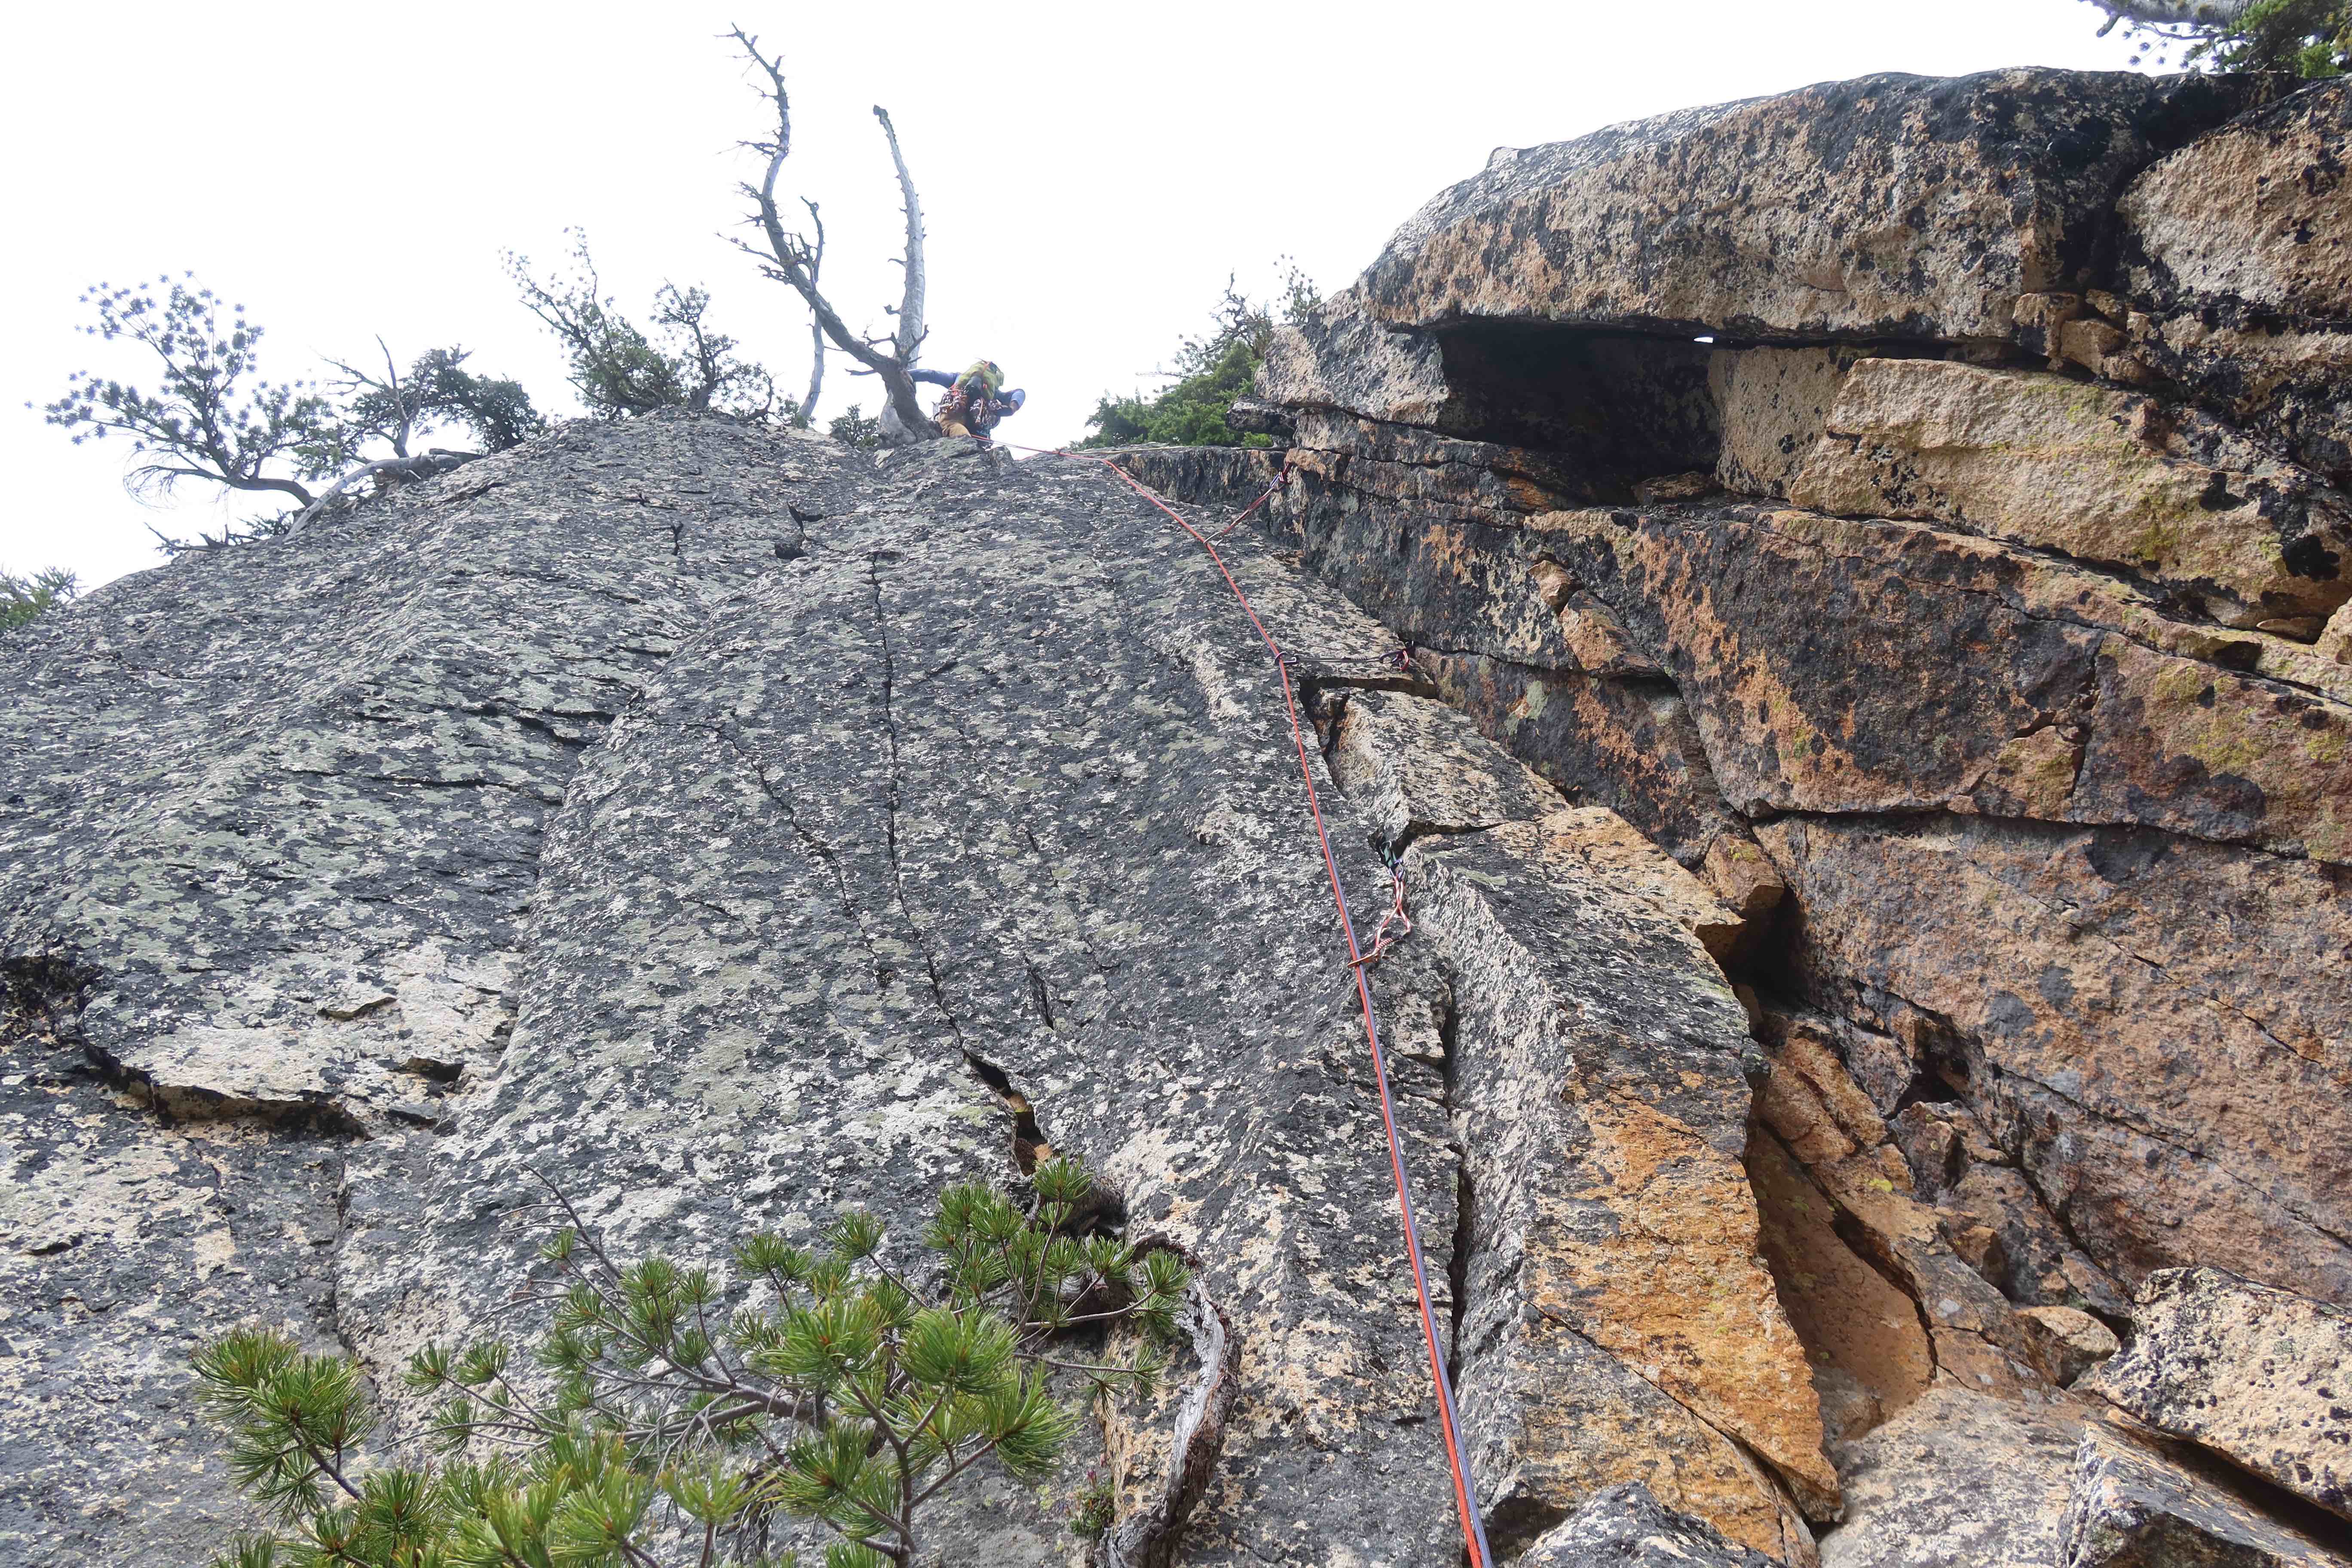
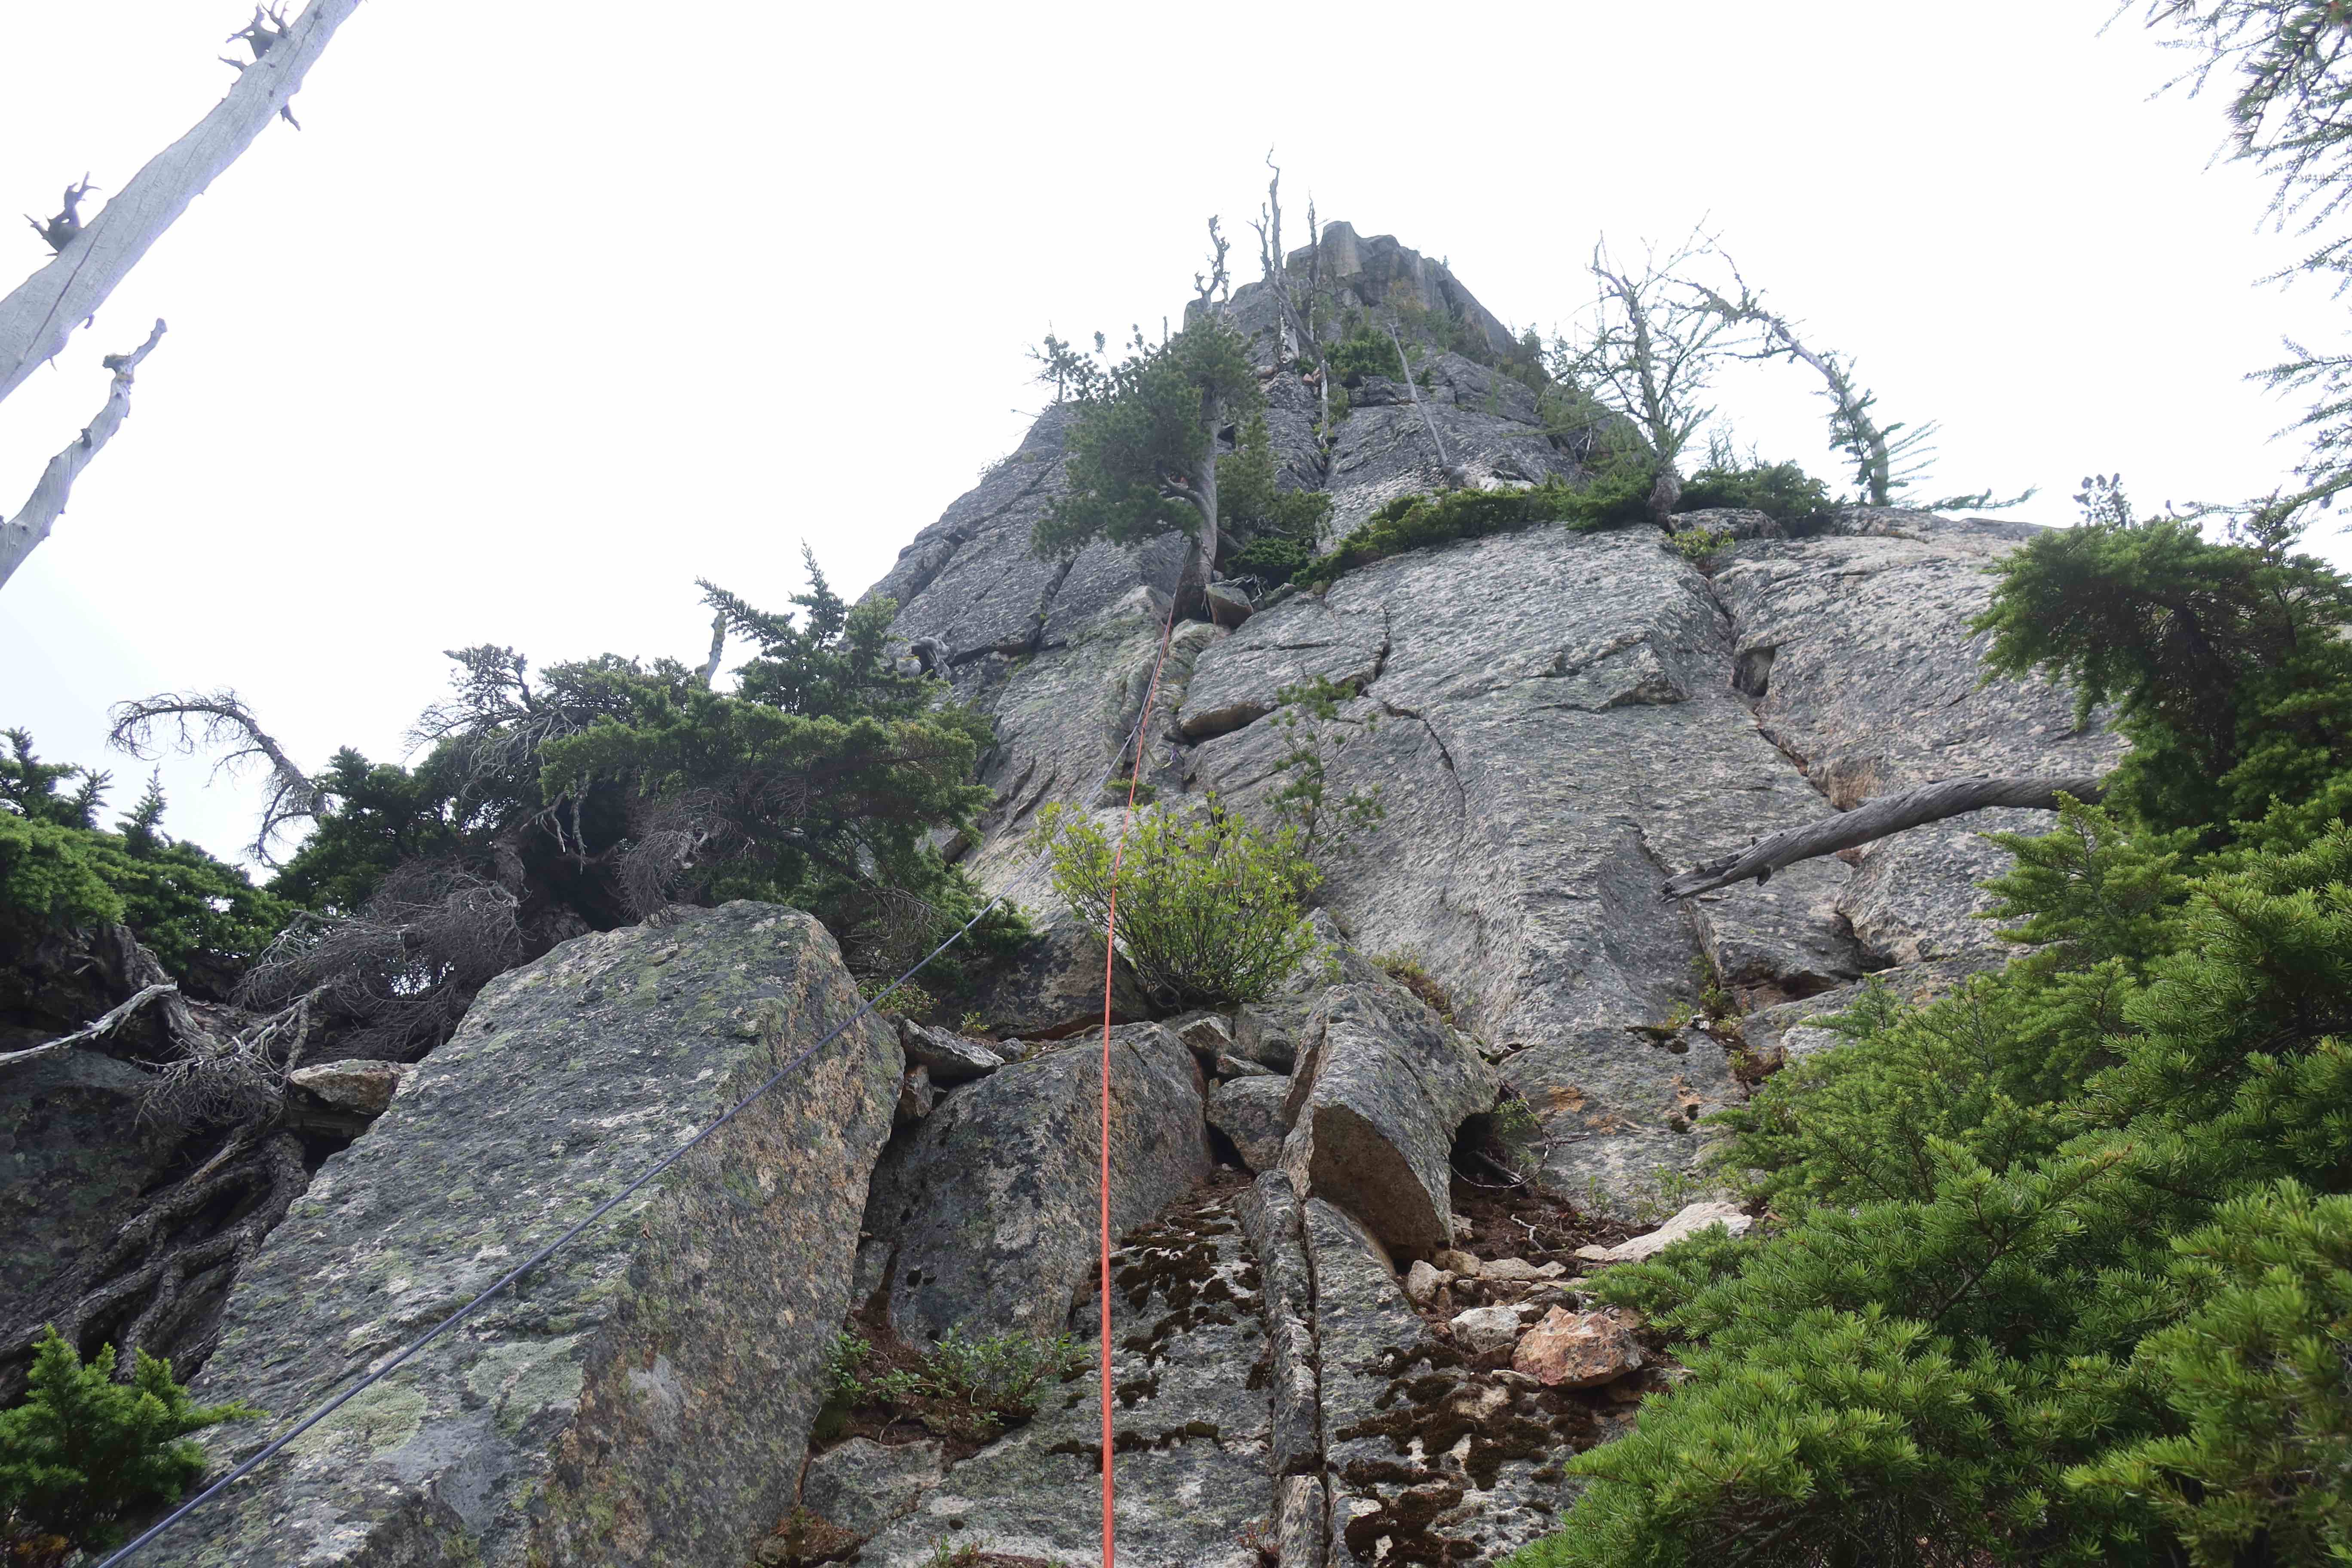
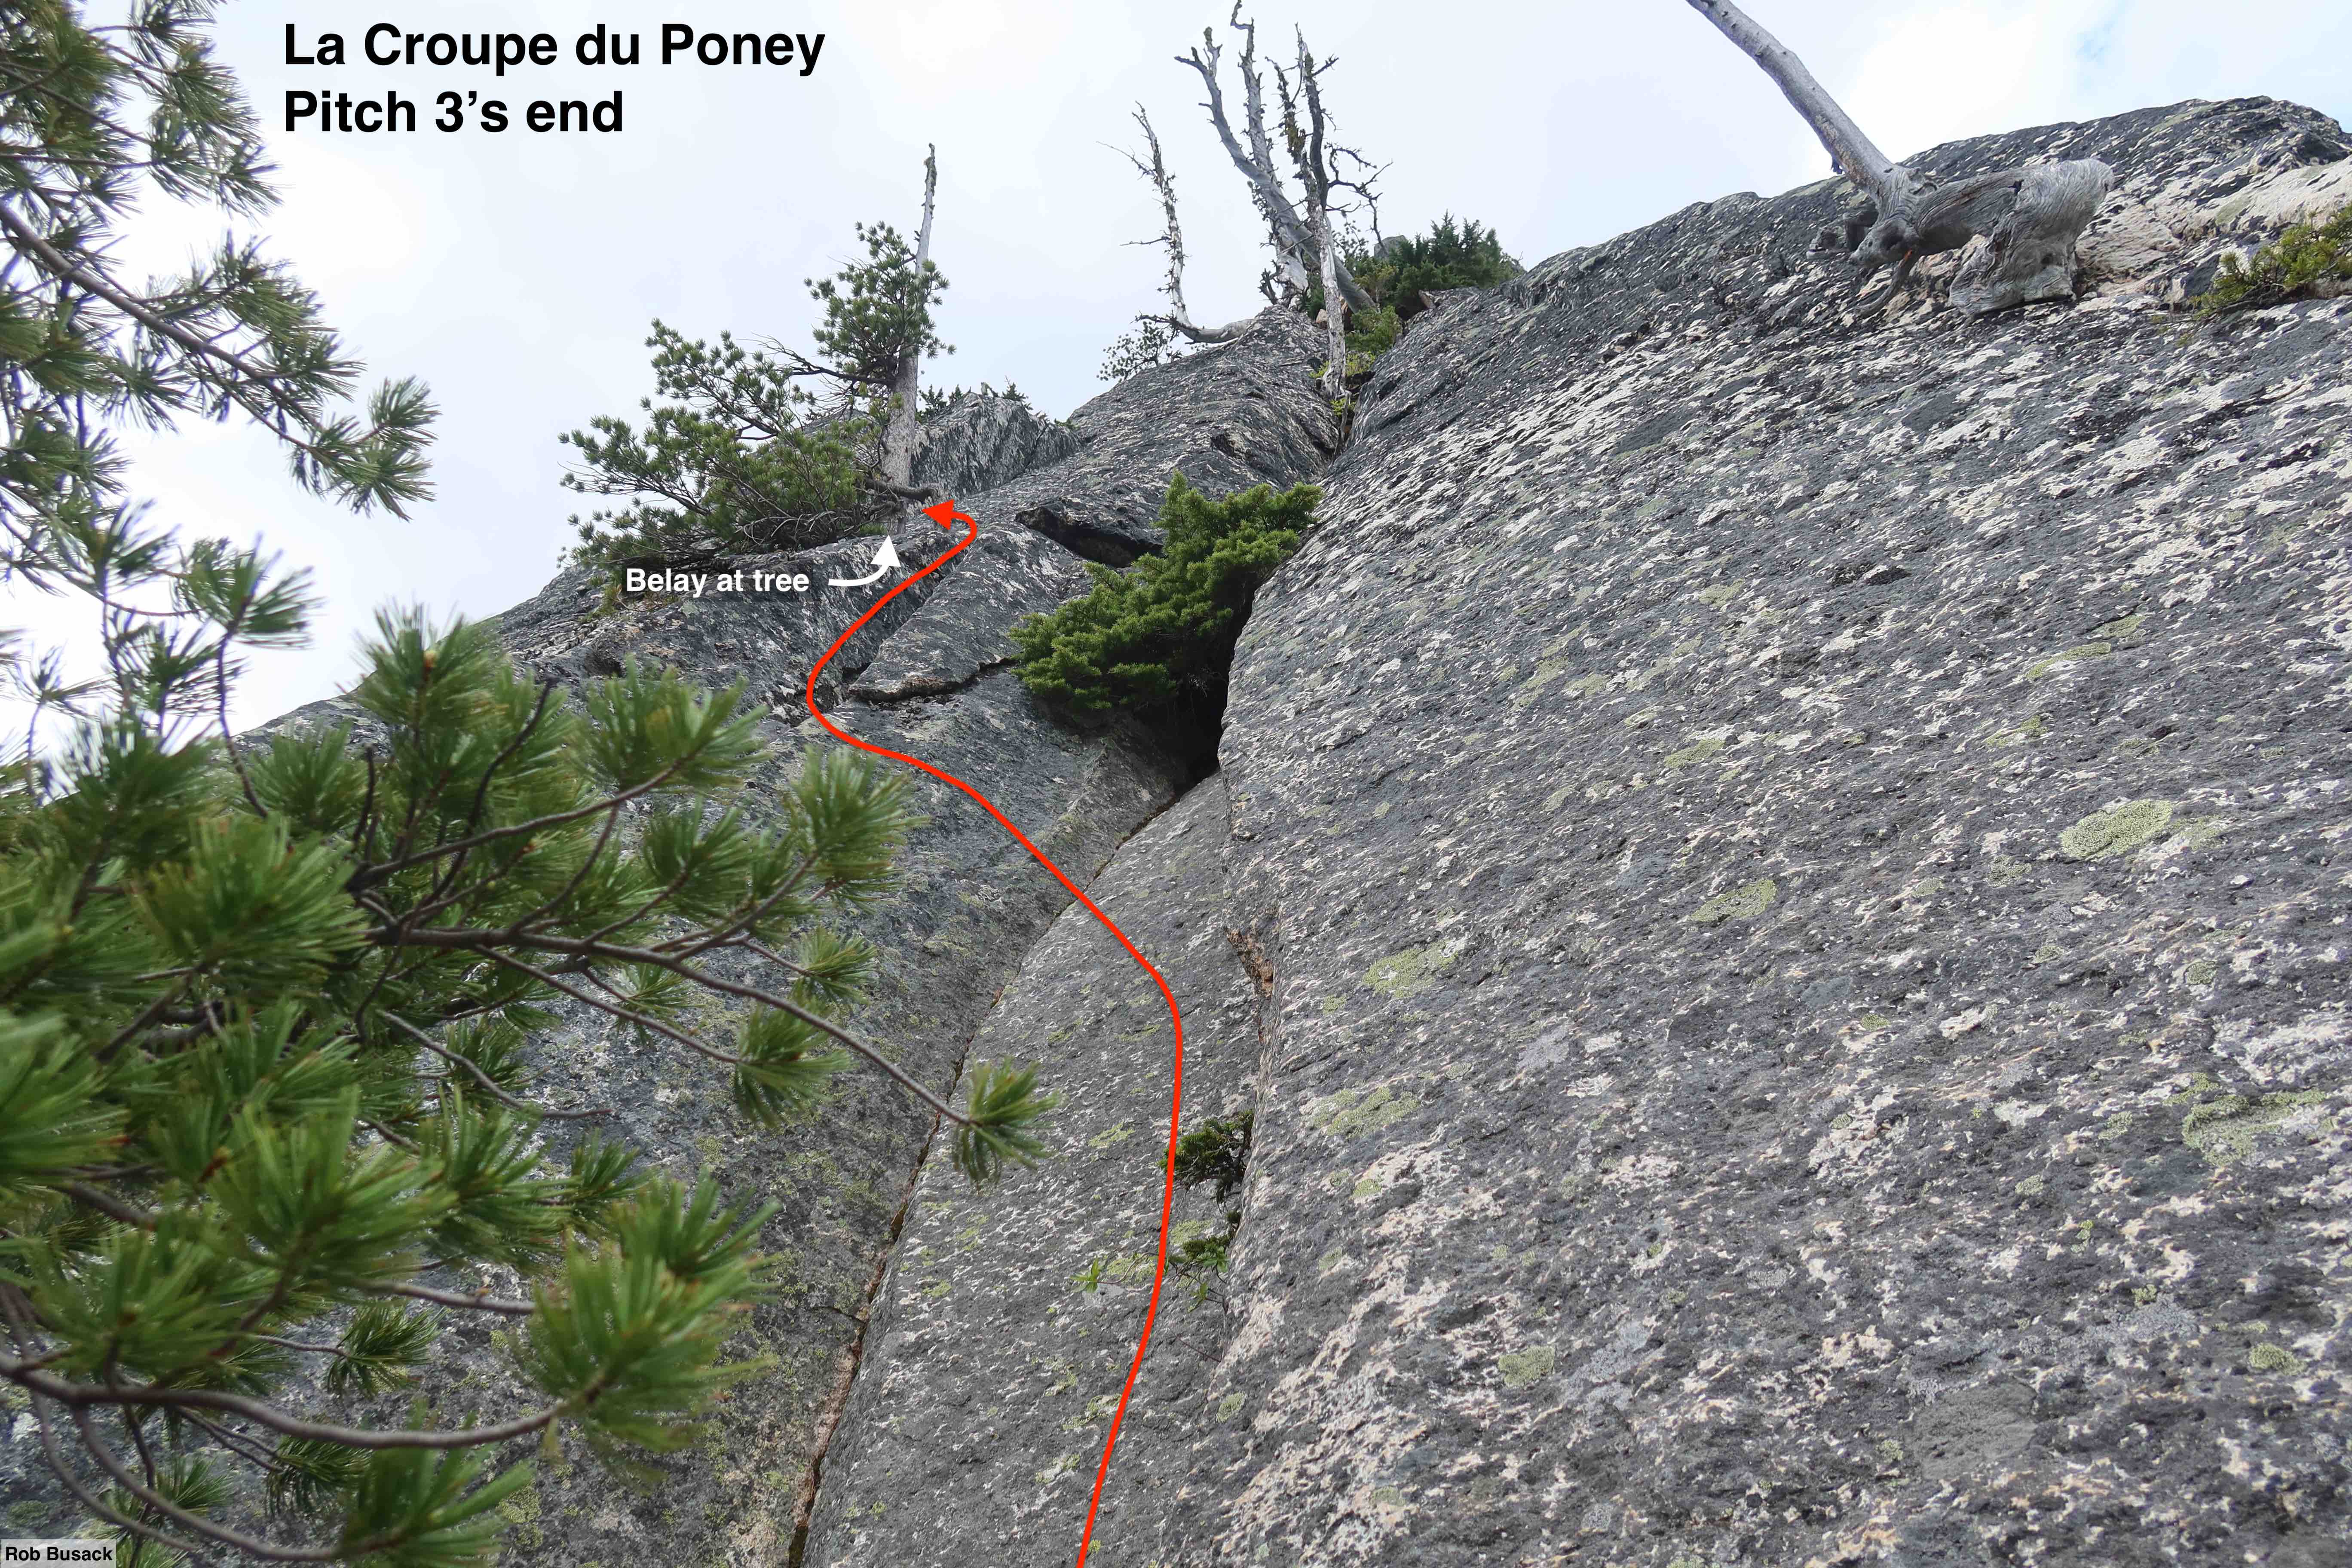
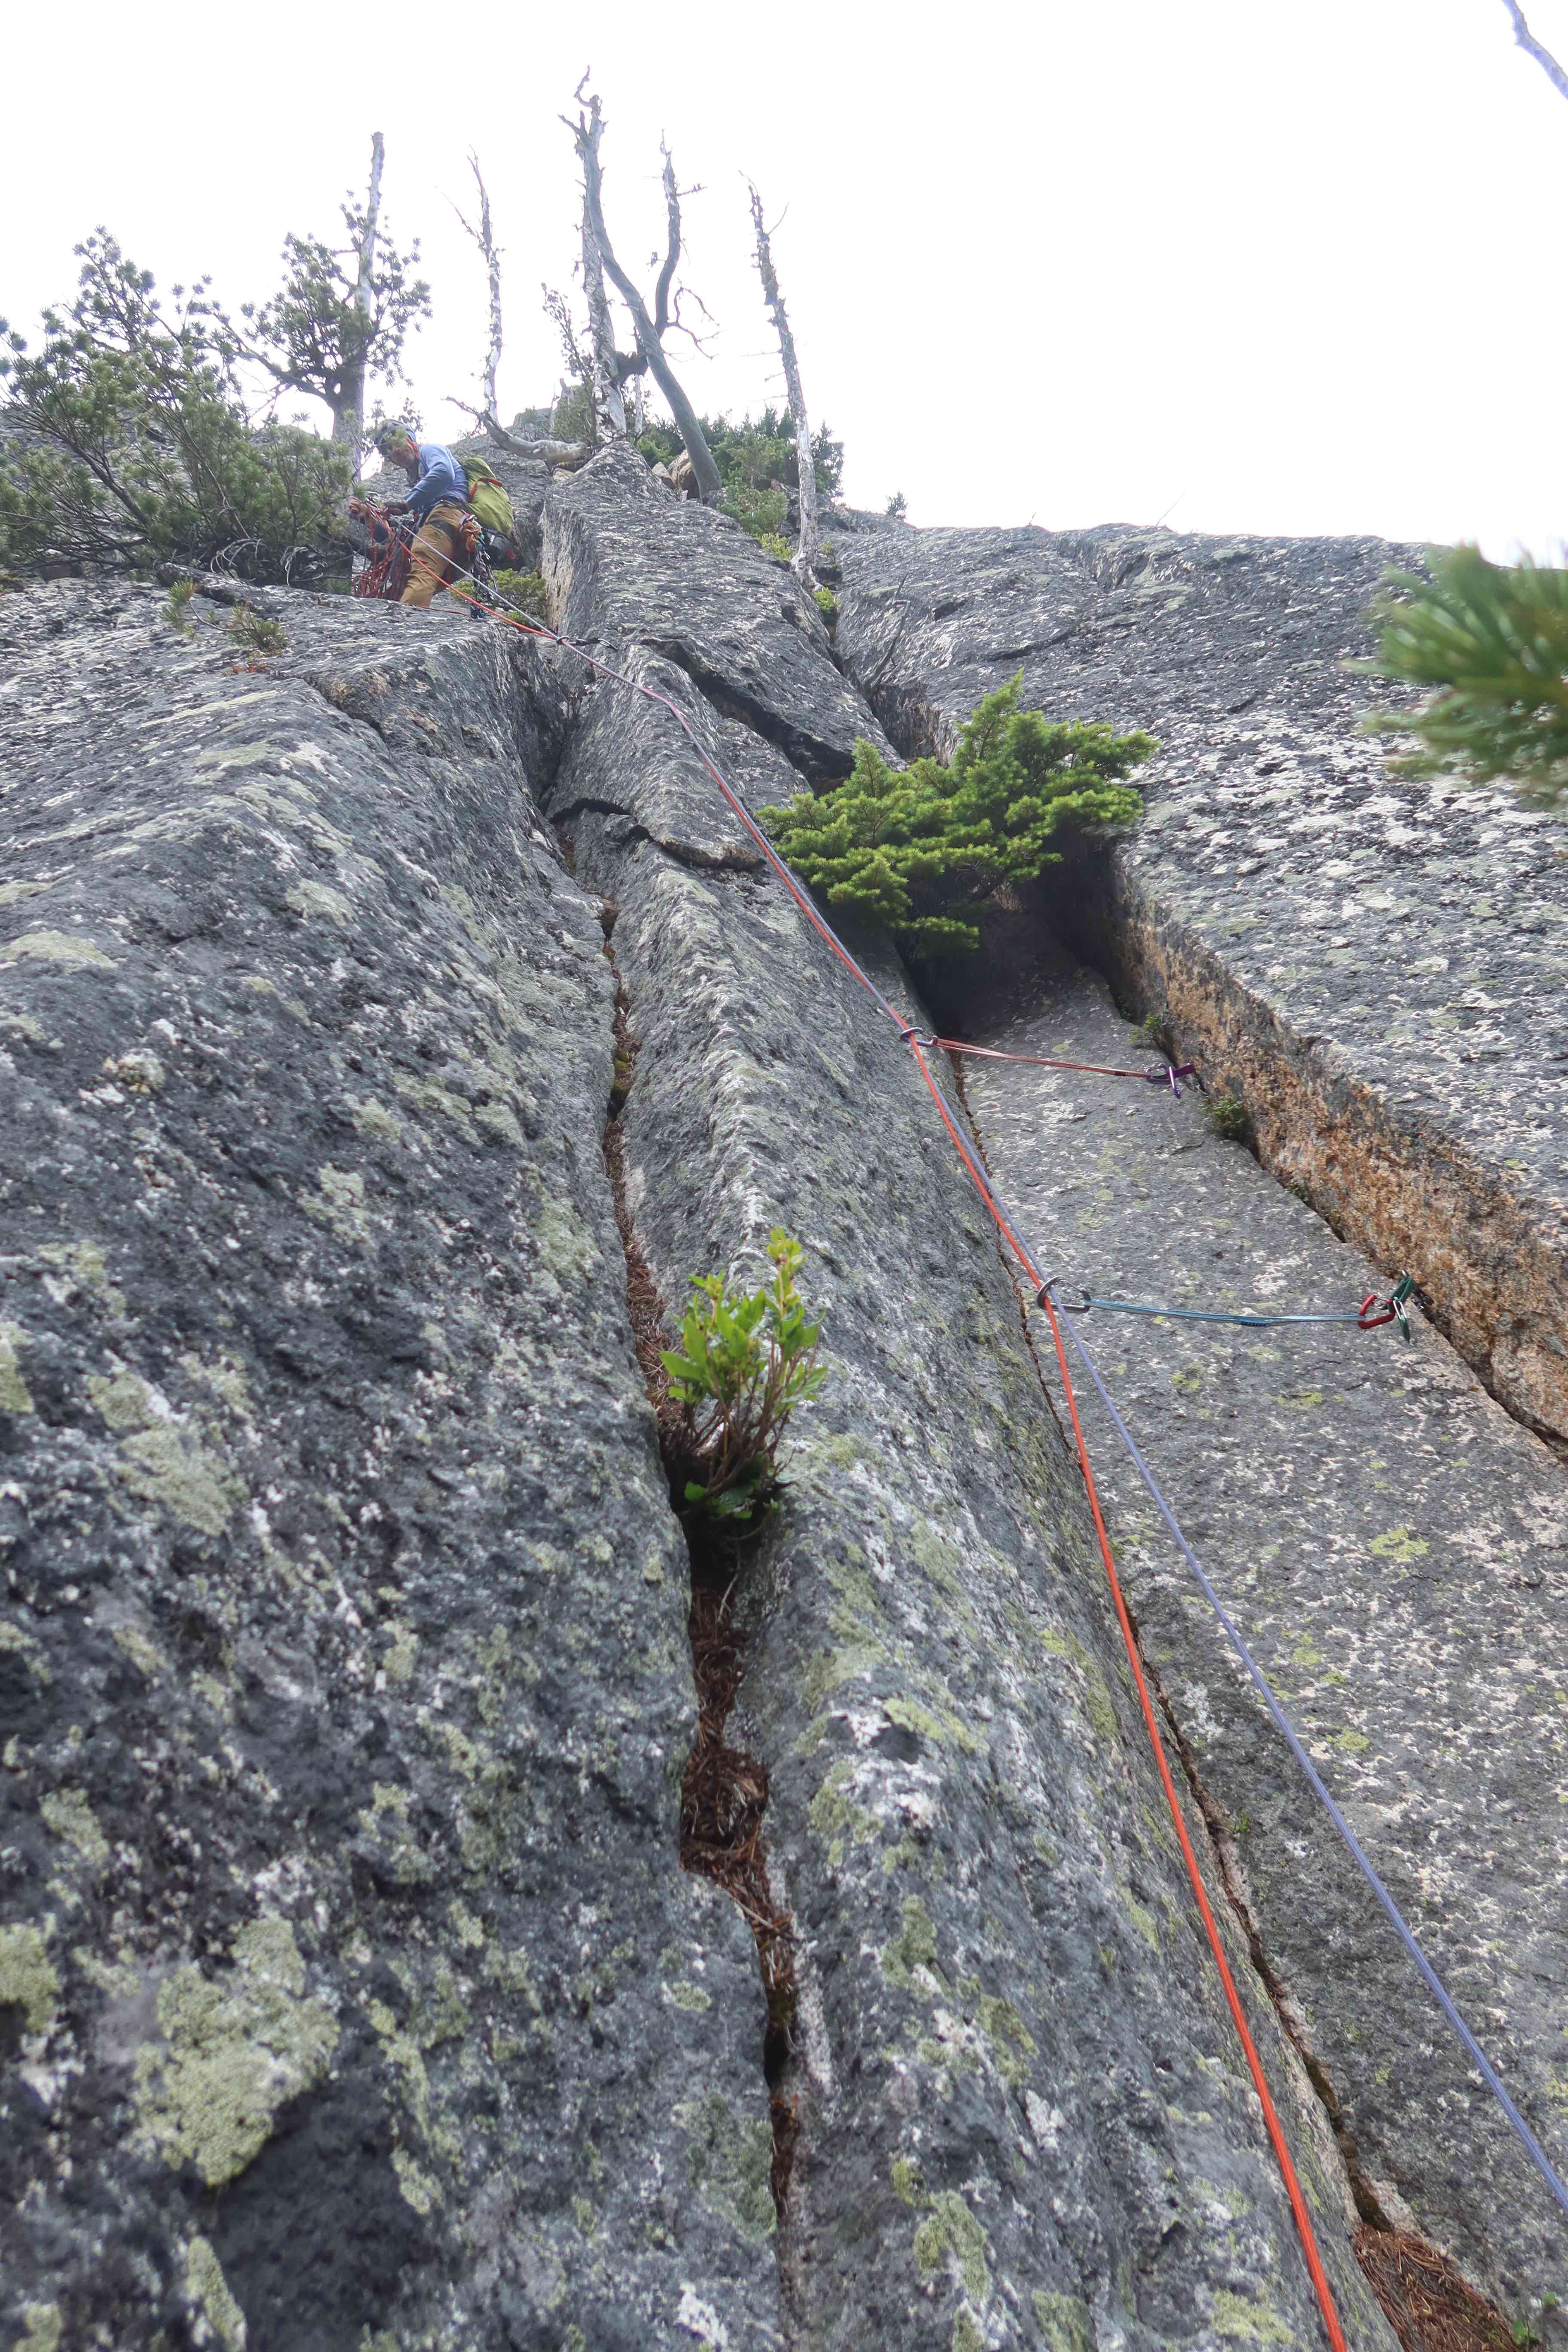
- Pitch 3: 5.8, ~170′, tree anchor – Return to the line on your right, the last left-facing-corner, which is briefly stiffer climbing (5.8). In about ~50′ that left-facing-corner tops out on a friendly ledge to the right with many trees. 5.0 scrambling for a bit, keep aiming straight up as soon as you can, then a flume of 5.6 friction & stemming side-pressure to reach a live tree to use as an anchor a little before running out of rope. A distinctive U-shaped snag is the next visible tree straight above the live-tree where we ended this pitch.
- Pitch 4: 5.4, ~195′. Moderate and rambly climbing straight up past many trees takes you as far as the rope will let you go. If you had a third-person perspective, you’d see that this pitch ends just right of a landmark big roof, but positioning while on the pitch prevents you from seeing that roof at all, so just end as you run out of rope, and/or when can see shish-kabob-tree in the distance, which will be the end of the next pitch to come. There’s a thin-flake which is surprisingly-solid that we slung for an anchor, it seemed good to us.
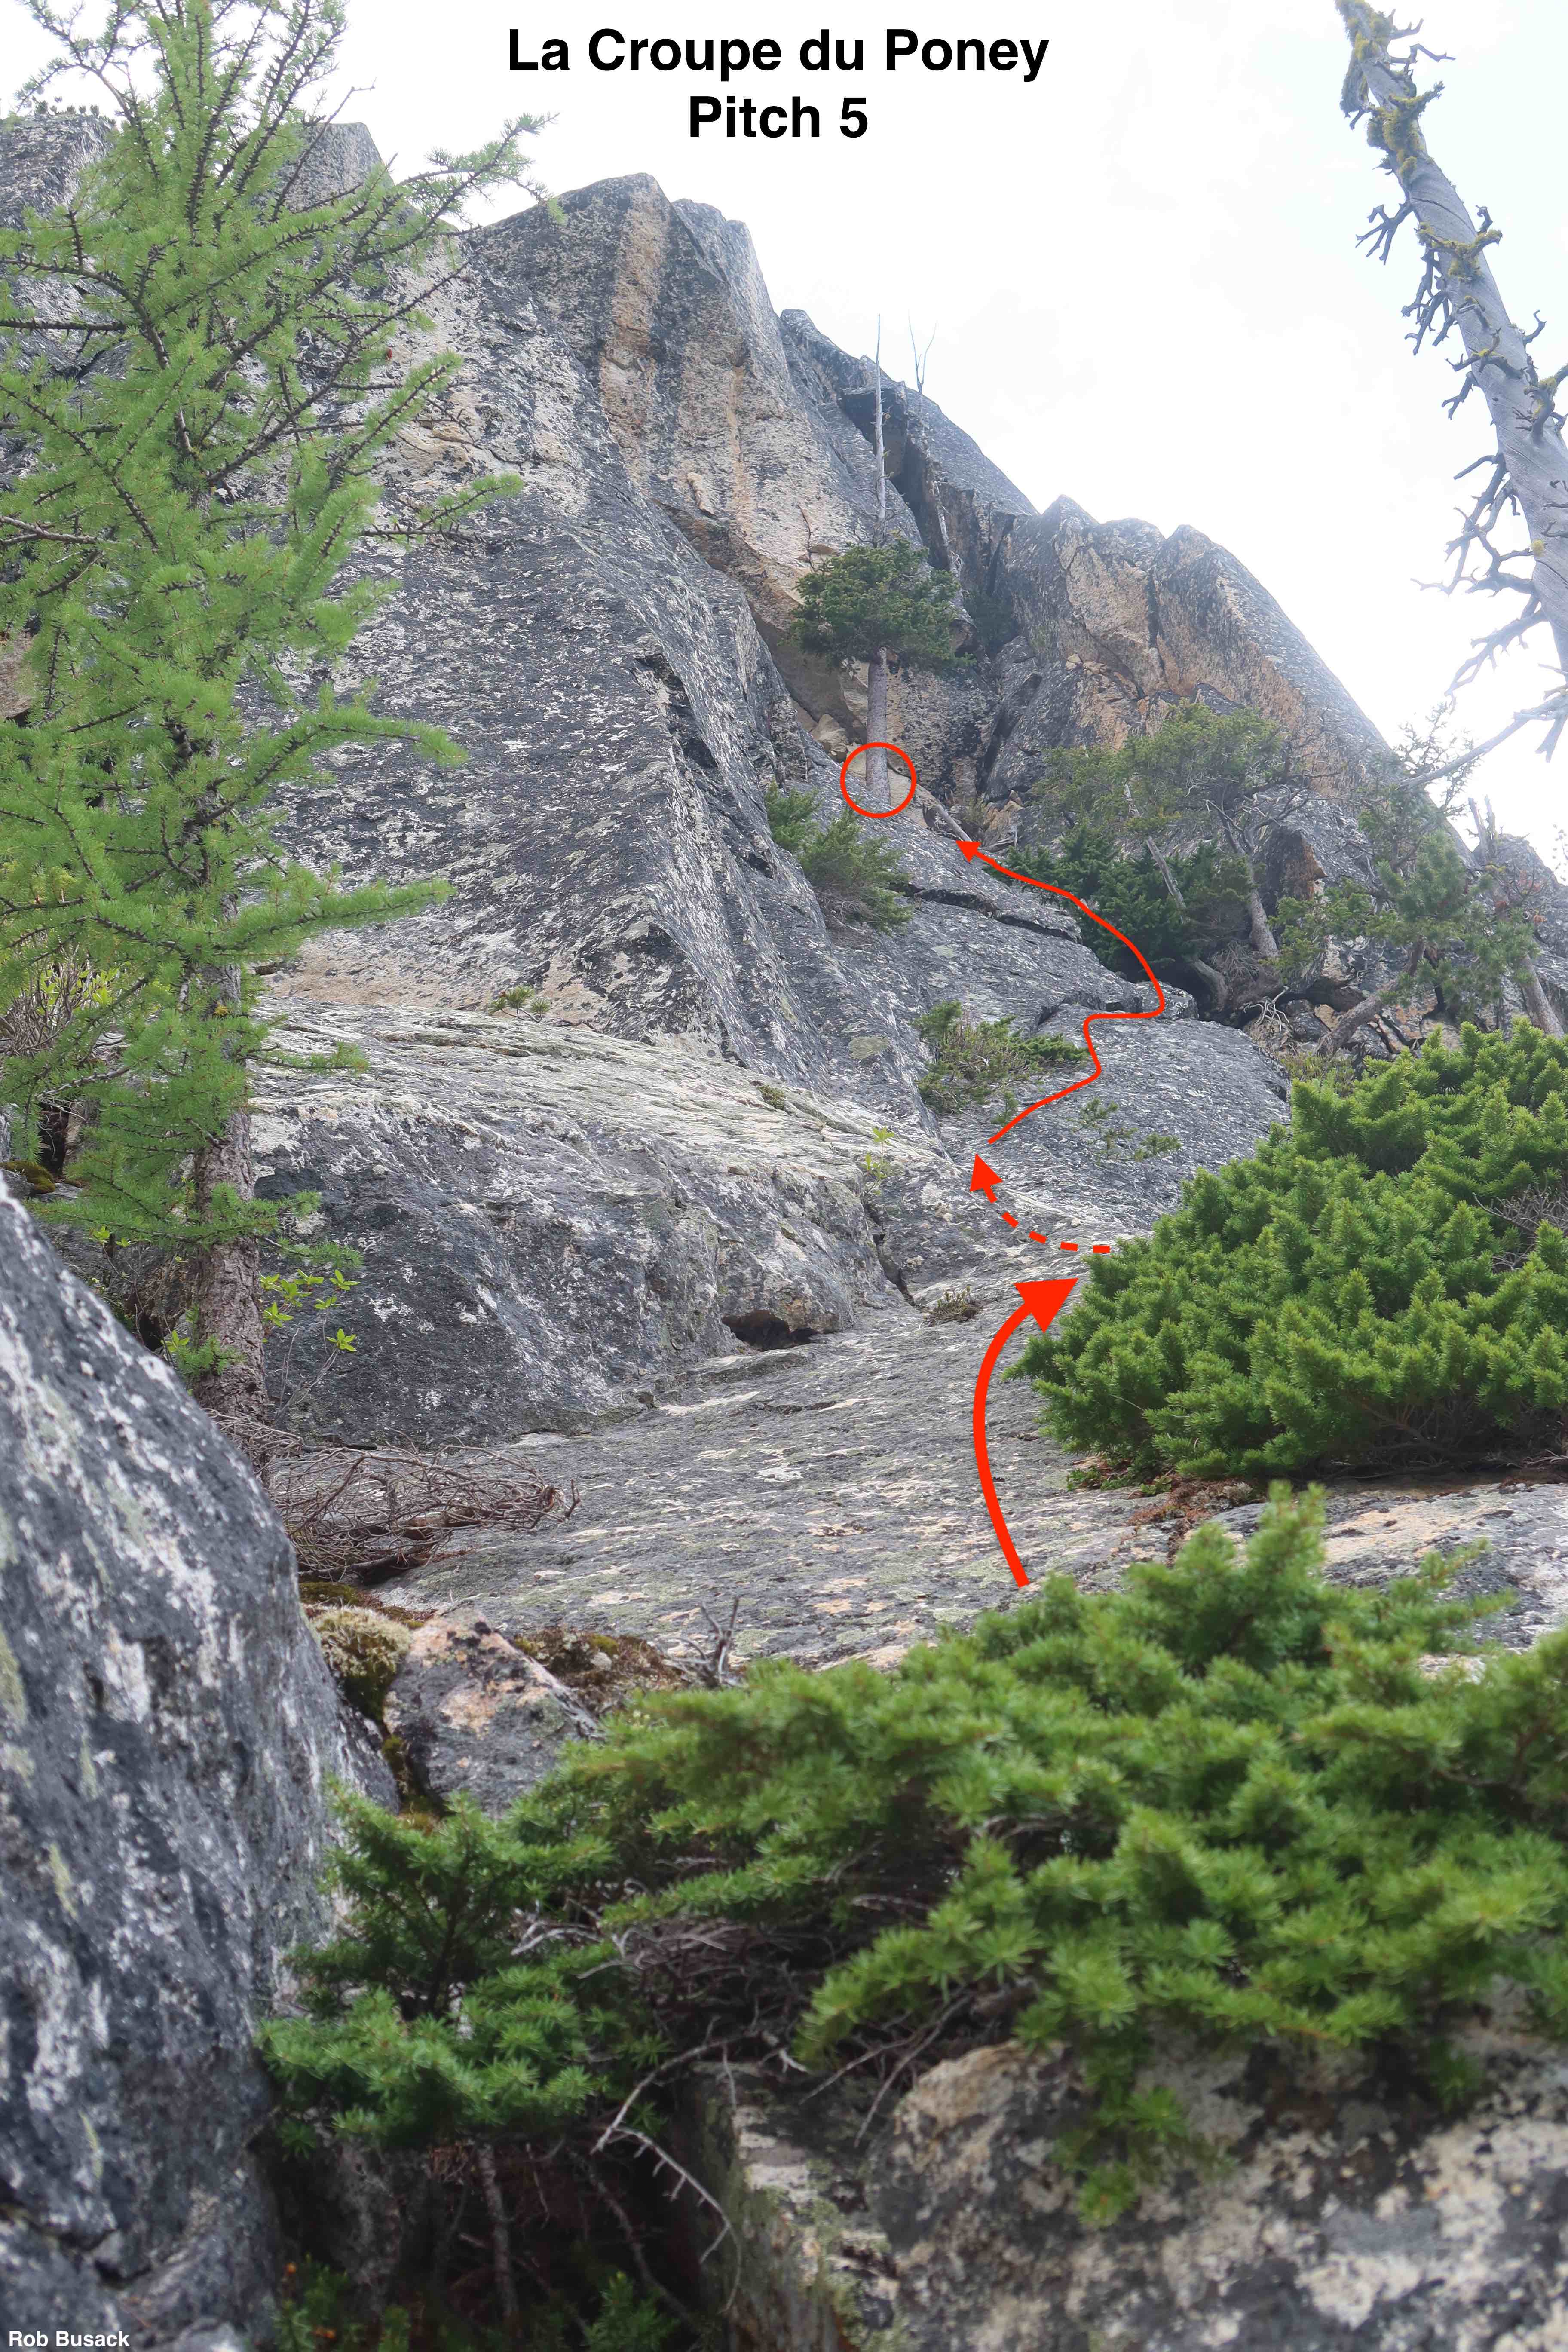
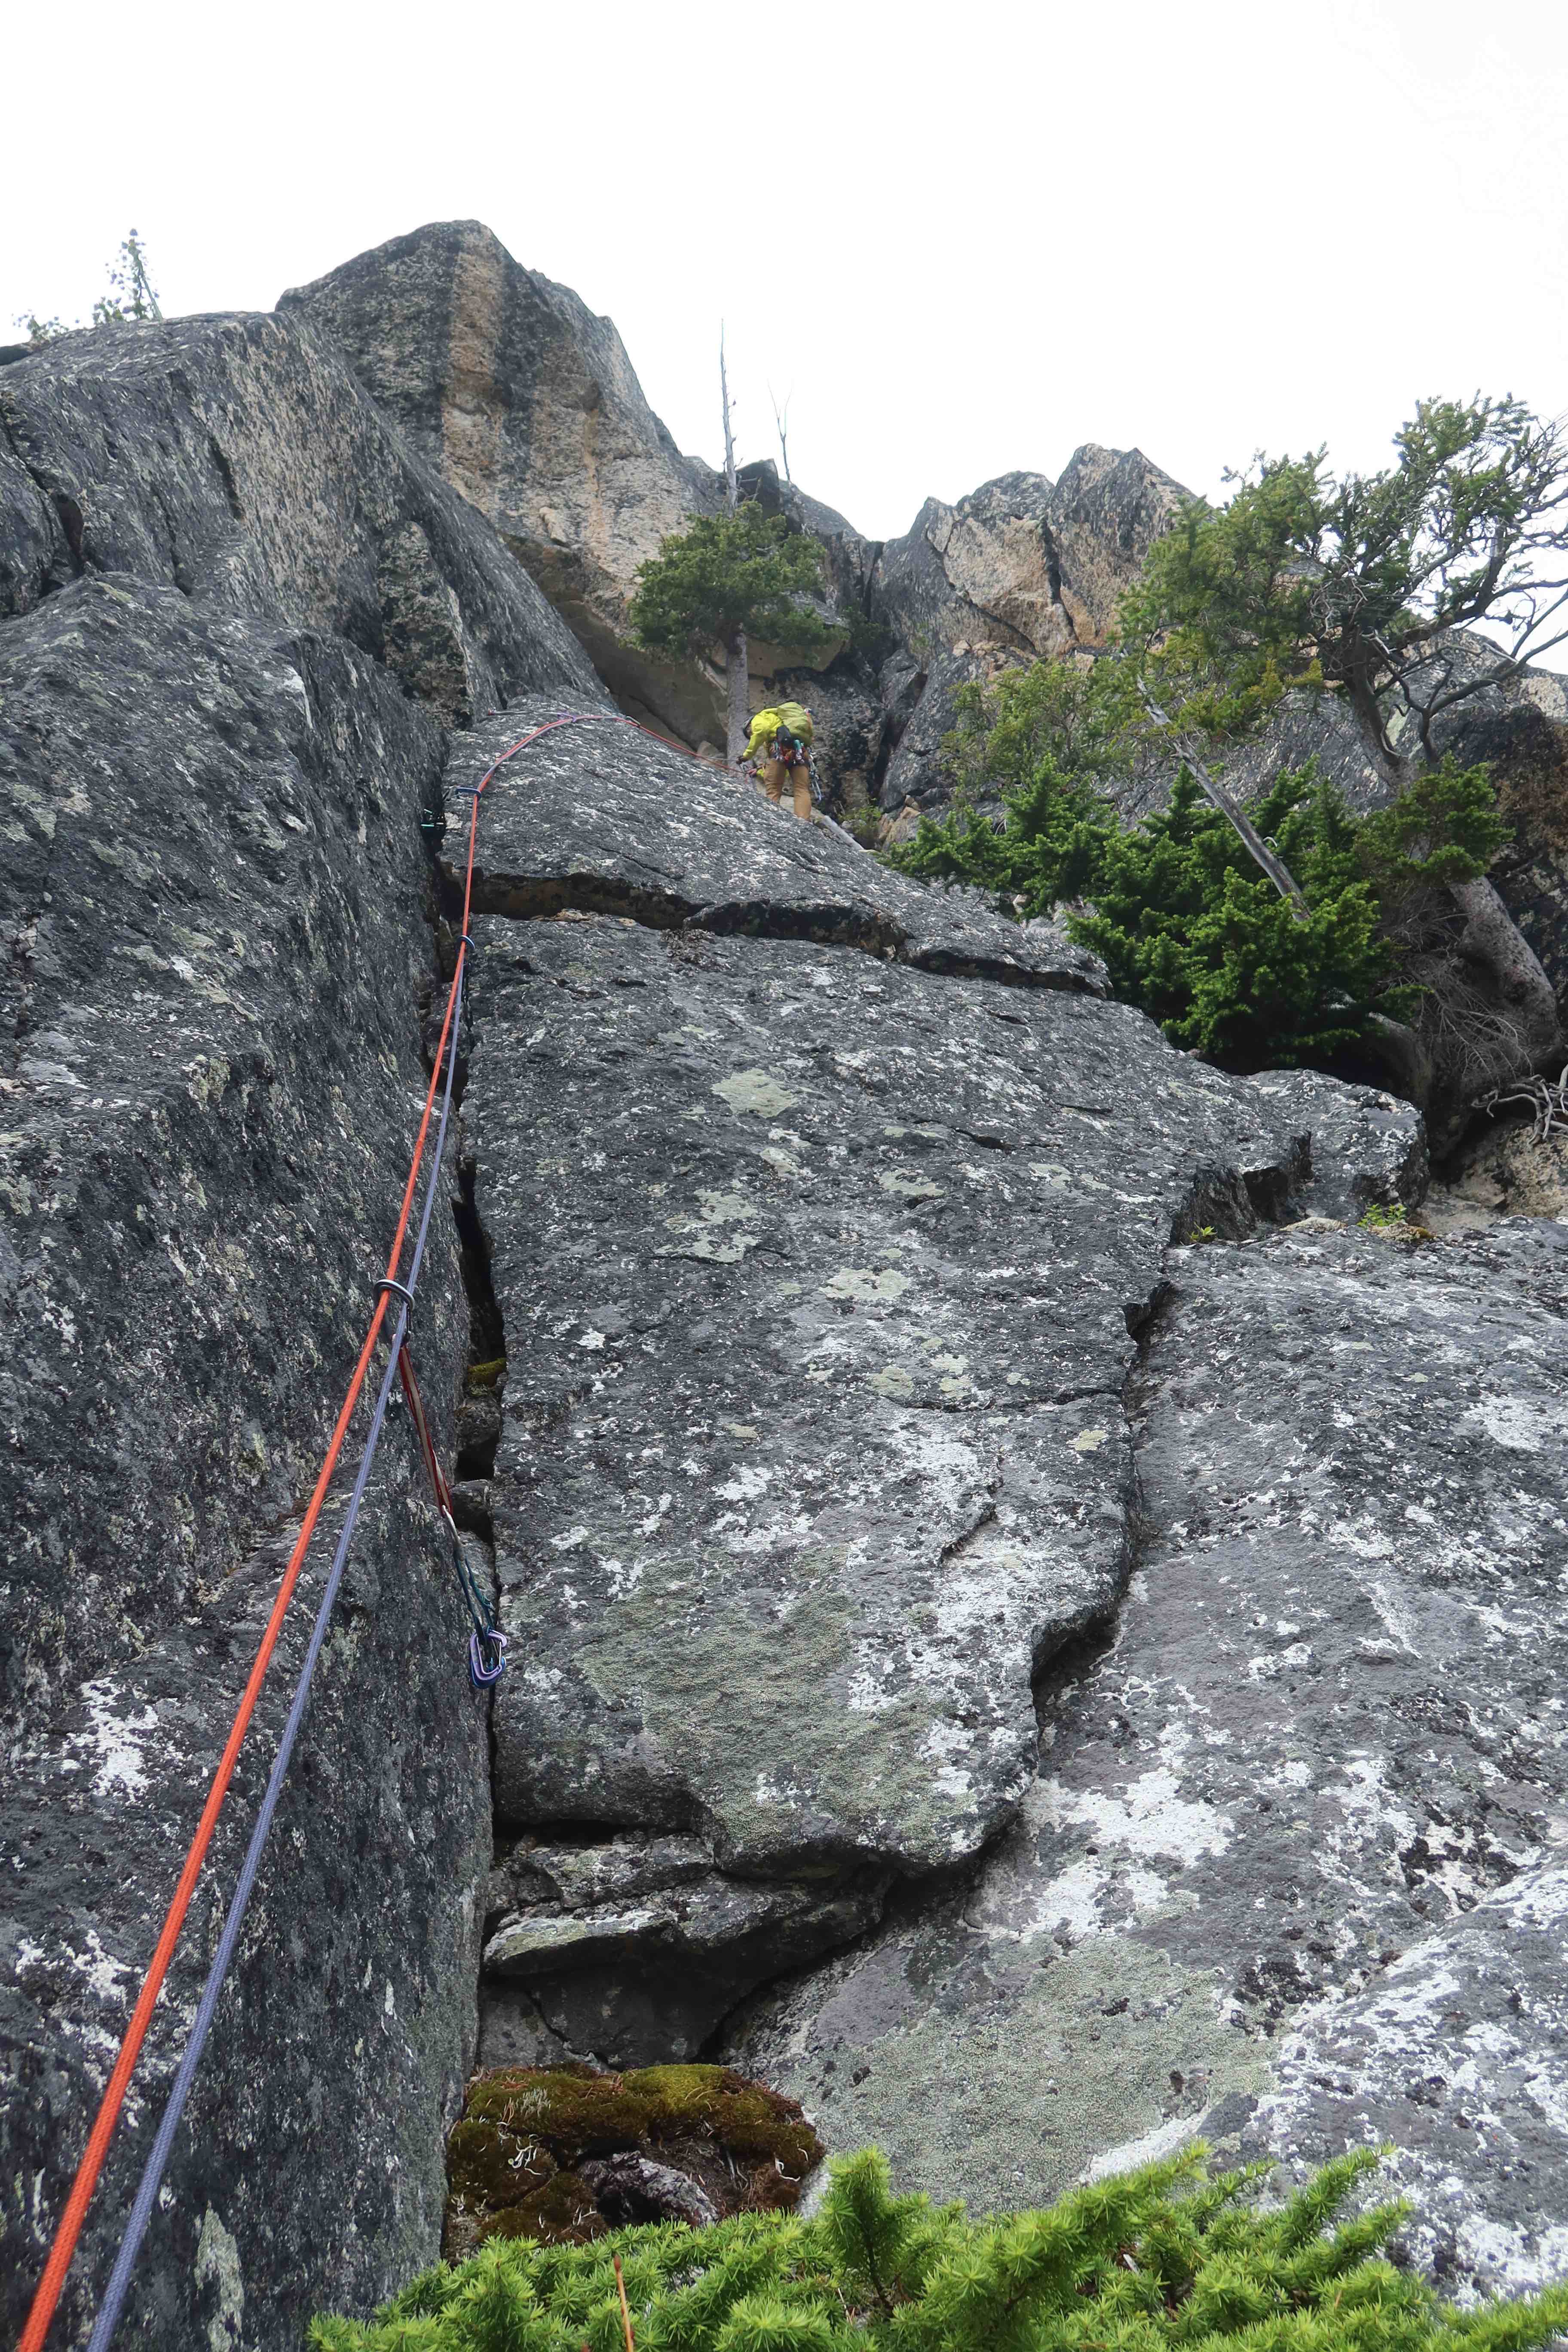
- Pitch 5, “Shish Kabob Tree”: 5.7/5.8?, ~150′, tree anchor – From the Pitch 4 belay anchor, look up and right for a distinctive tree whose trunk is a straight skewer, but whose green branches seem to only be in a ball half-way up the skewer. We called it “shish-kabob tree”, though it also bears a resemblance to the Fernsehturm tower in Berlin. This is perhaps the only pitch on the route where the beginning belay-station and the ending belay-station can see each other, so that it’s actually possible for the belayer & climber to see each other for the entirety of the pitch. Moving up and rightward, aiming for shish-kabob tree, will take you through some small cracks in little right-facing-corners, a moment of tricky friction moving between some cracks, and then pushing past some smaller grabby trees until you reach that shish-kabob tree to end this pitch. (Alternatively, the Sullivan variation, 5.9: near the end, instead of following the curved horizontal crack rightward to the grabby trees, it’s also possible to stay in the last right-facing-corner and climb it more directly and aesthetically straight to shish-kabob tree.)
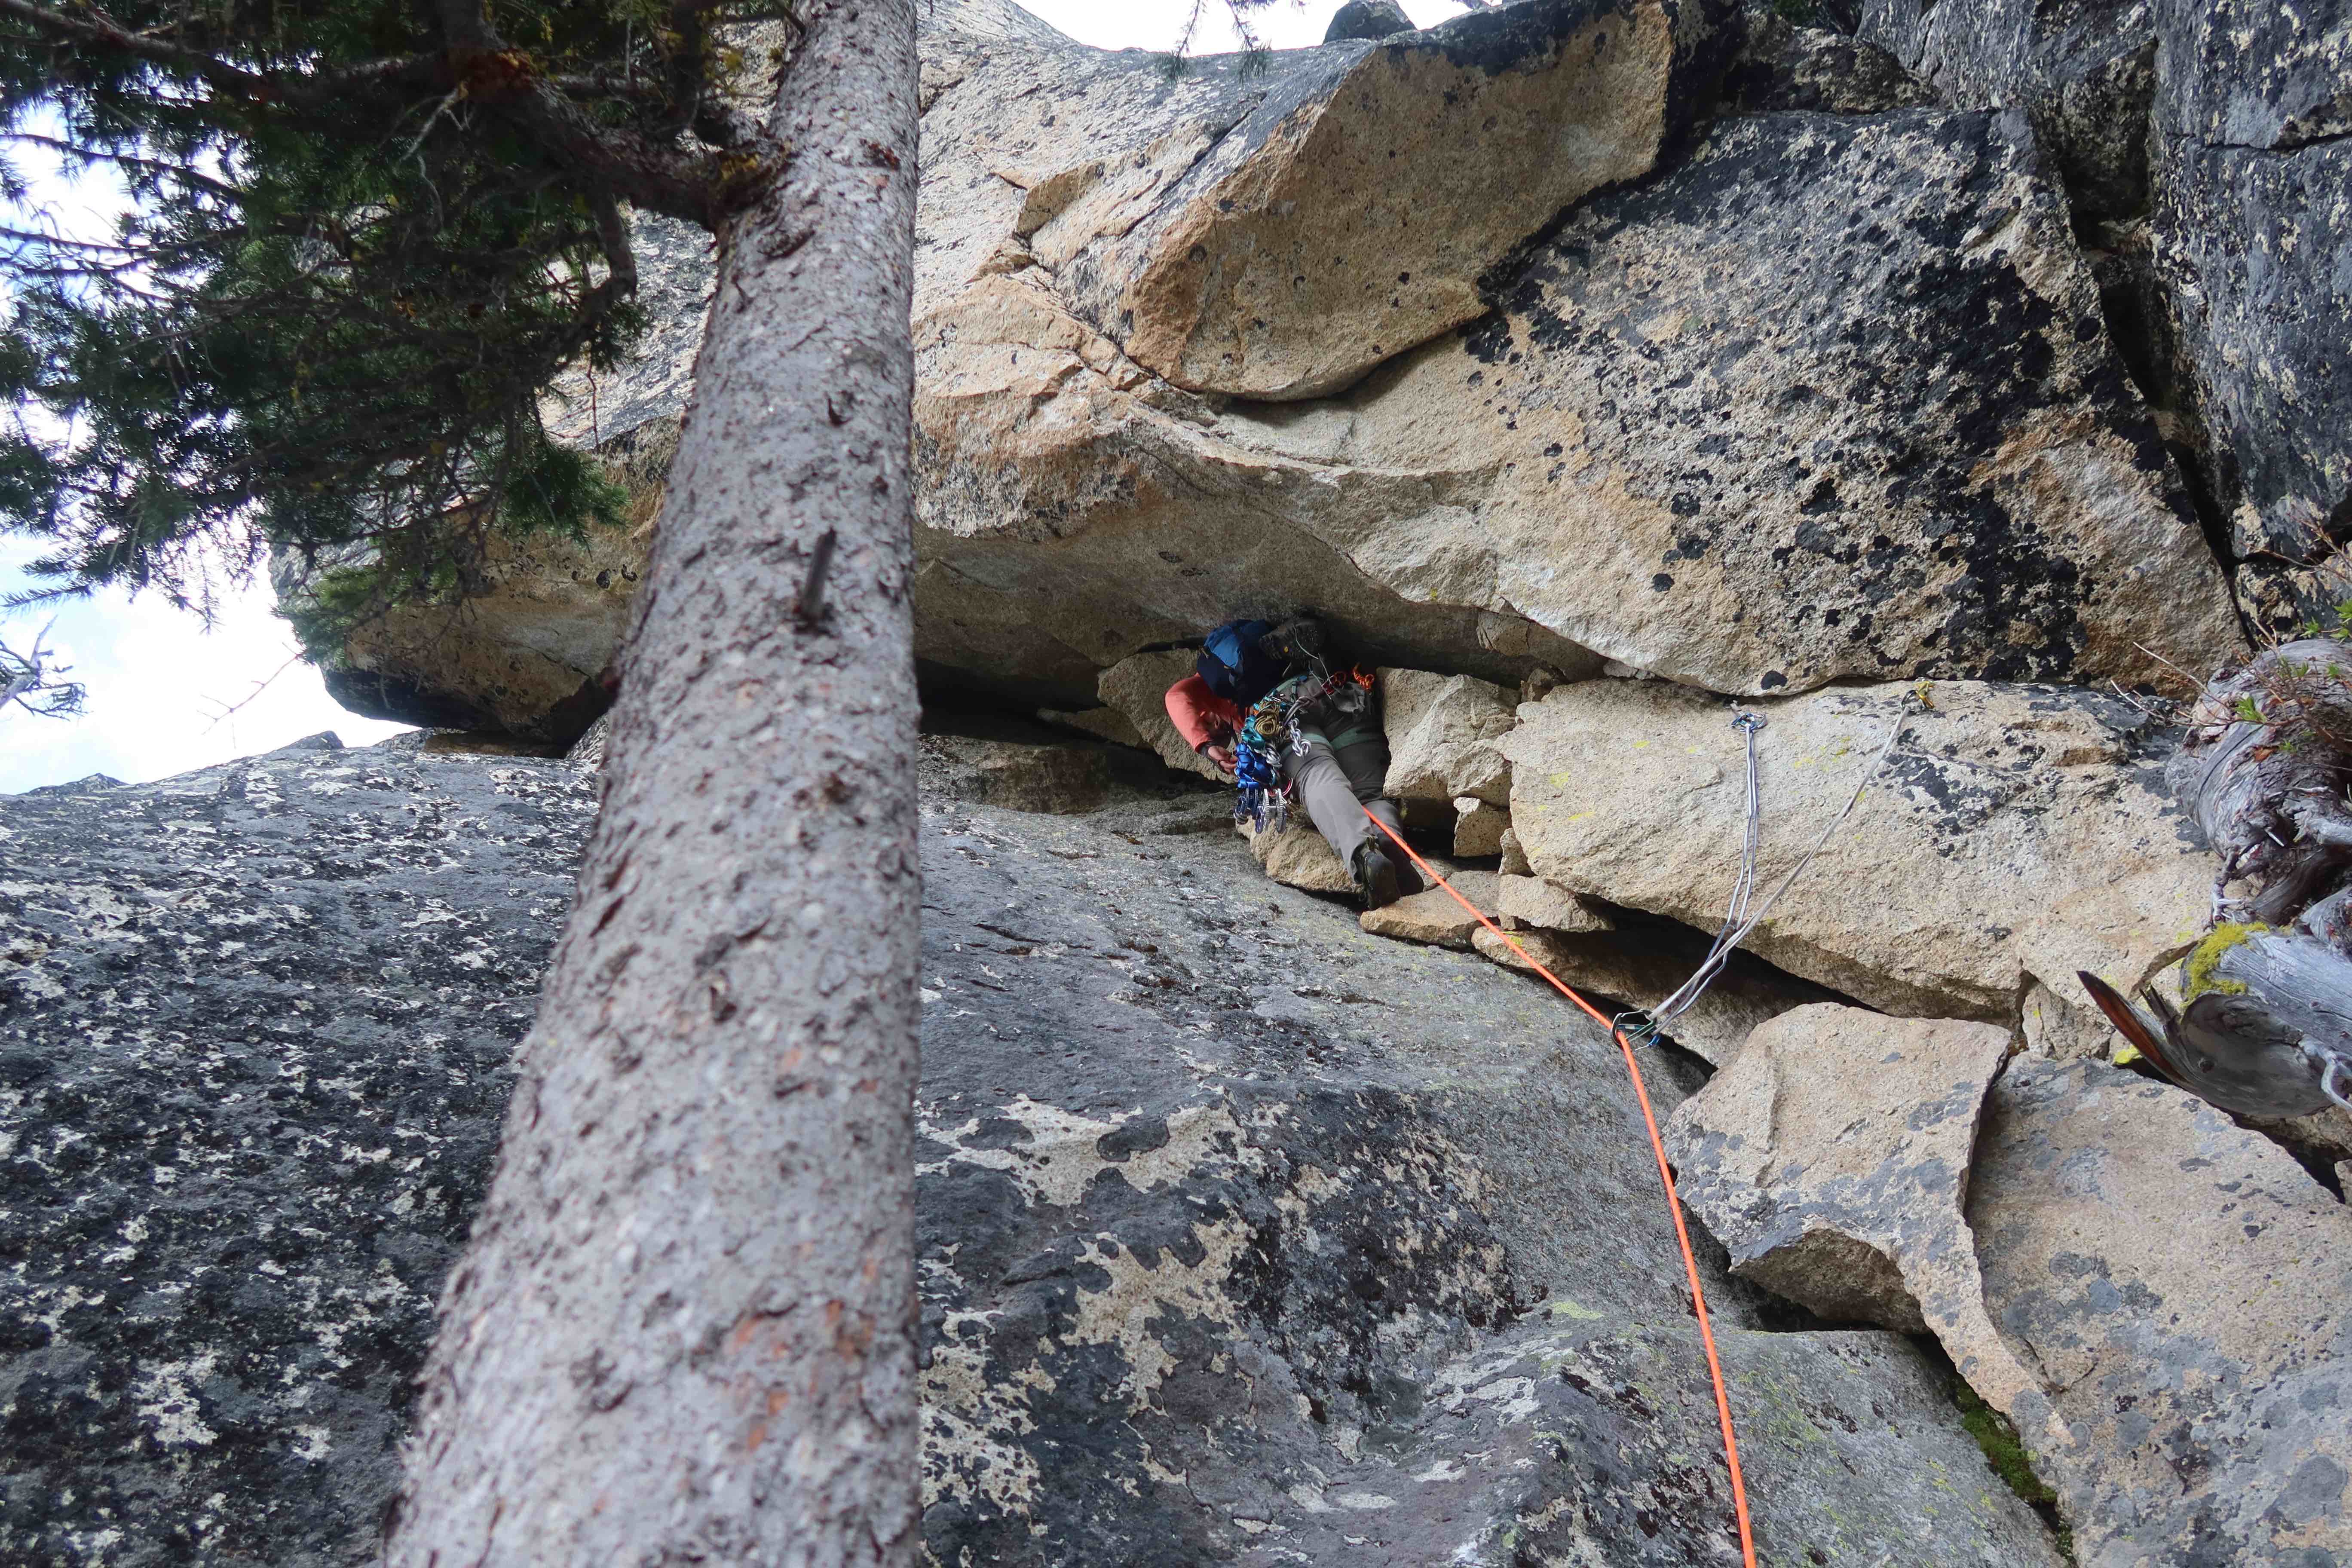
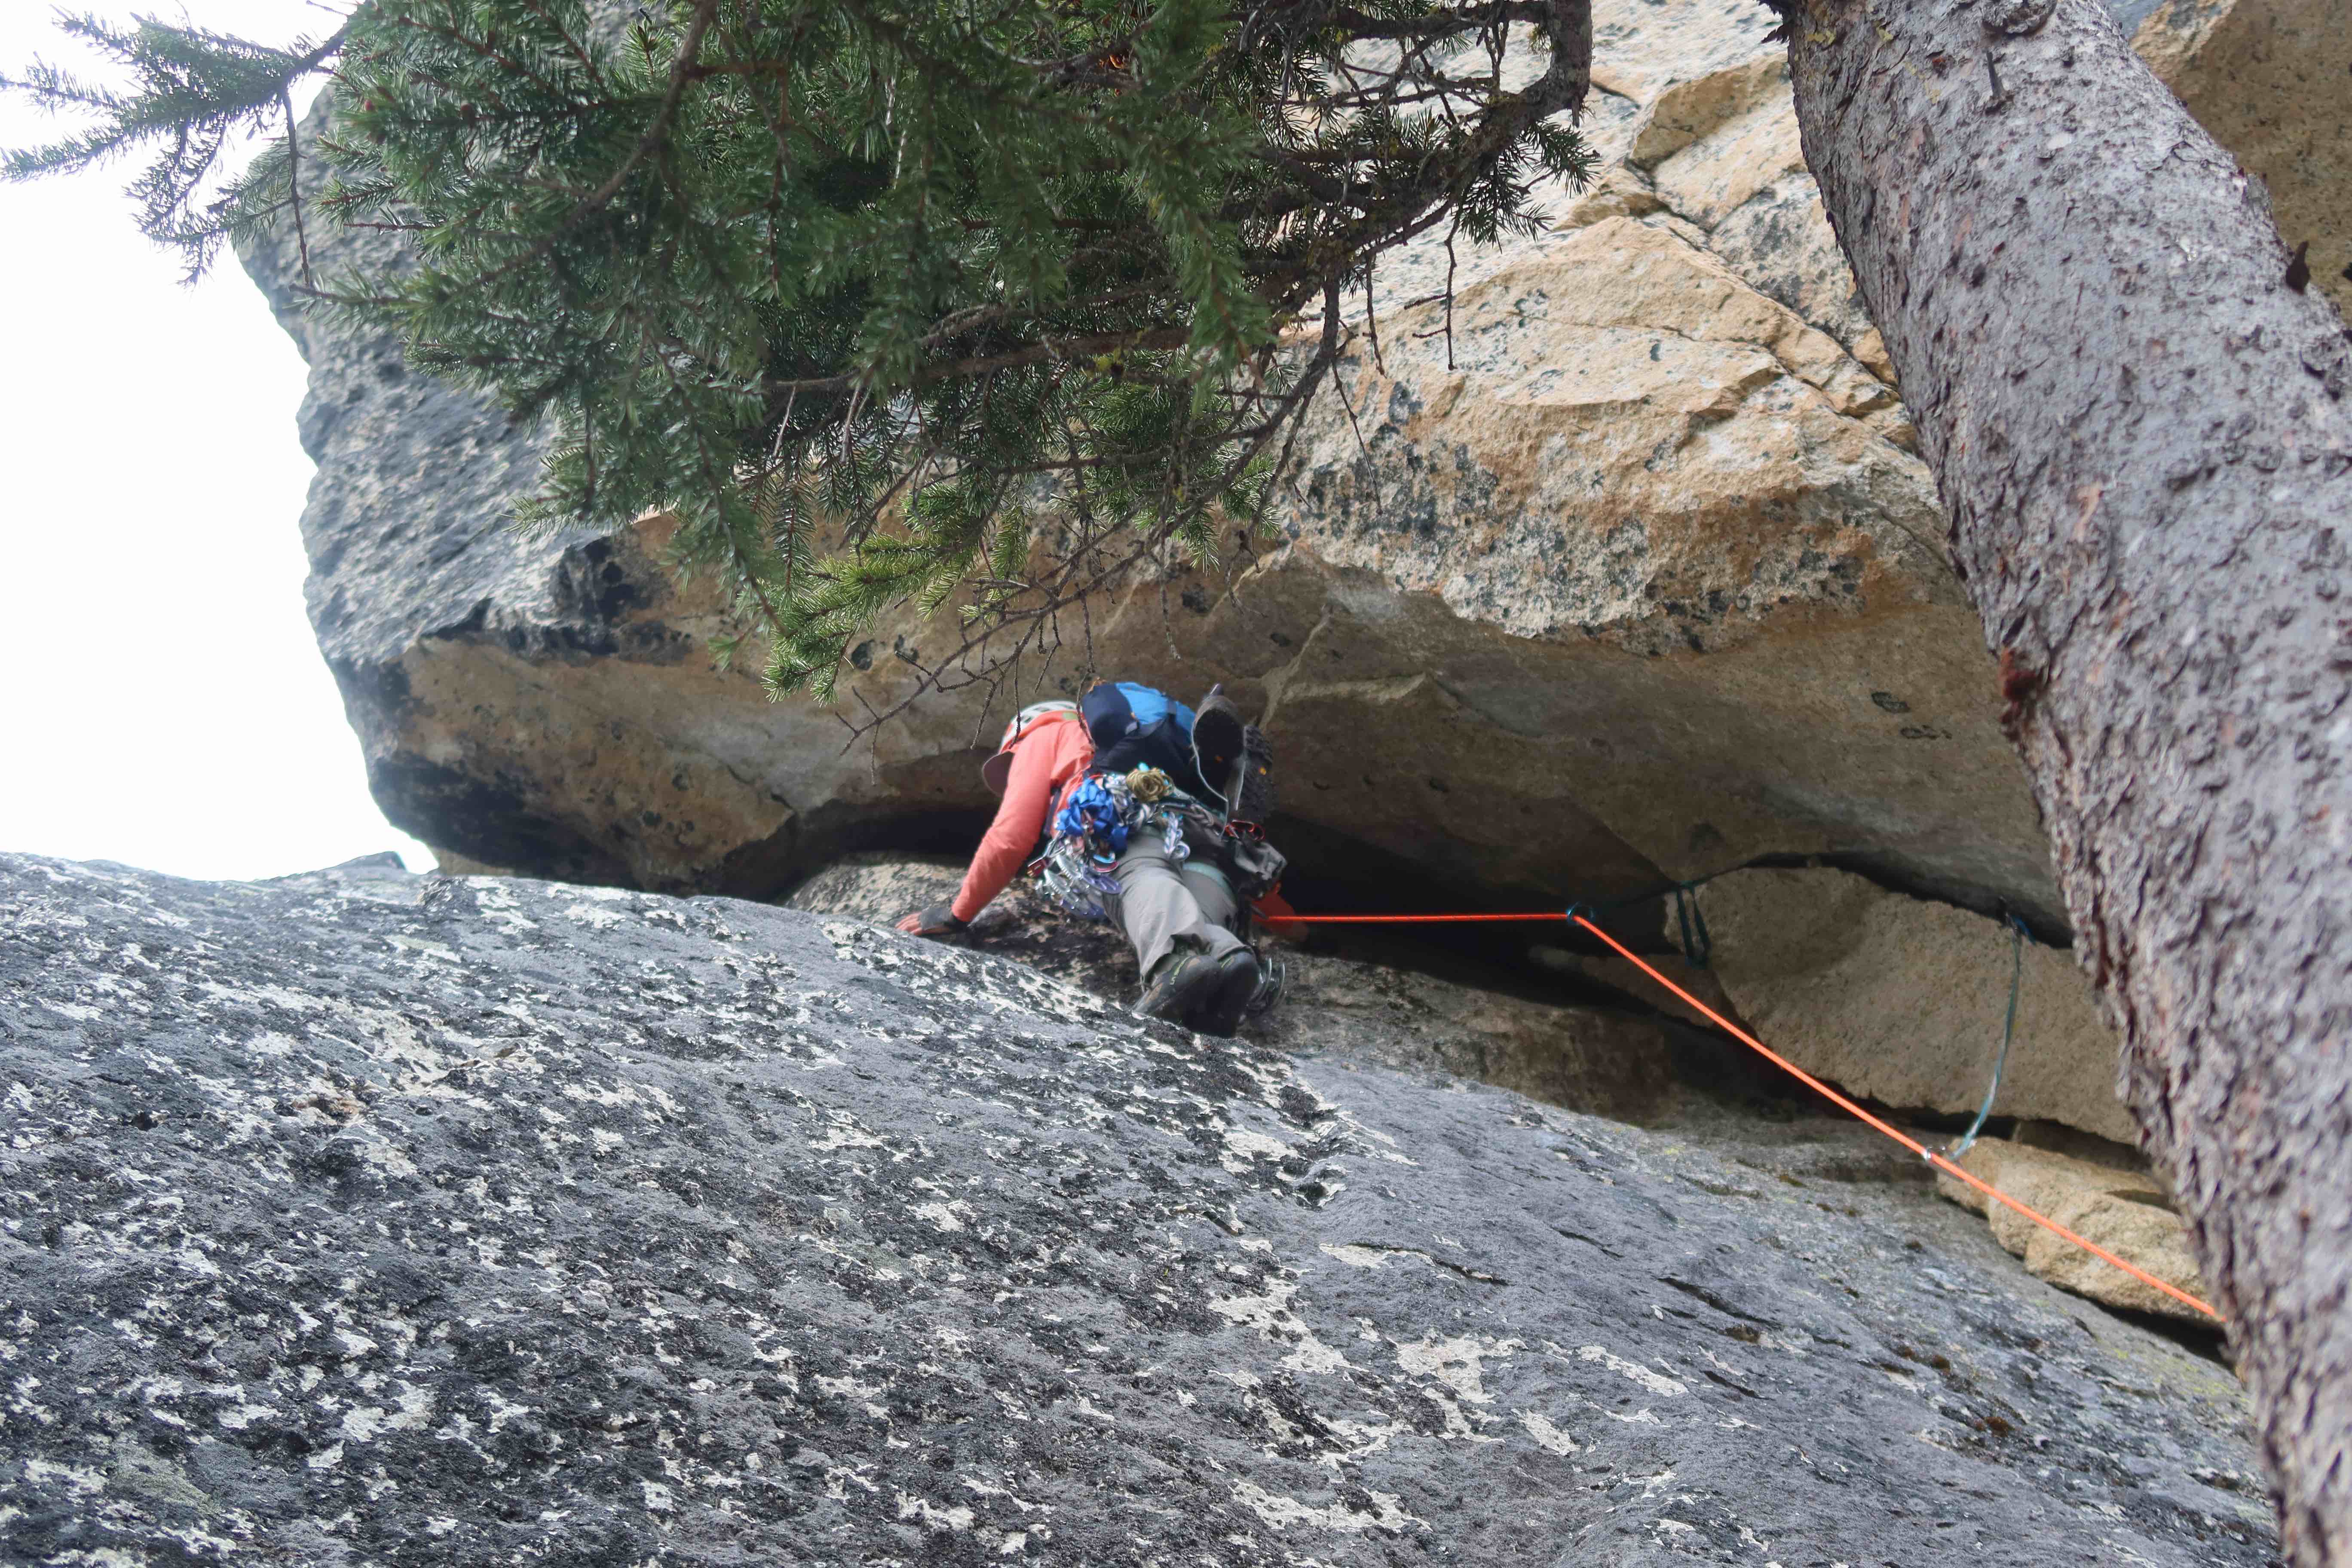
- Pitch 6, “The Clamshell”: 5.9, ~100′, gear anchor – This is the crux pitch, and also the most interesting! Below an intimidating large headwall, a clamshell-like giant crack curves left. Get pro in the area of white blocks up in there (check that they’re solid first, not all are.) Friction for feet and counter-pressure on the roof above you makes for some memorable moves going up and left. Place something very reliable at the last white block (like slinging the top constriction), and extend it quite a bit, it’ll be your last pro for a while. (If I get a chance, I’m tempted to go back and add a bolt high-on-the-slab around here, perhaps also one in place of relying on the white block. I’d prefer to place the bolt myself.) A small foot ledge down & left allows an insecure step downward, then traverse left (friction) until reaching the salvation of the trees on the left. Do not sling the lower tree, instead wait to place pro at-or-above the higher of the two trees, and double-extend it (both for the sake of rope-drag, and for the sake of the direction your follower will get pulled.) Going up from those trees, easier moves go up and right, then seem to dead-end, but an excellent horizontal crack provides really good hands for a big step left (a moment of 5.7), after which you can go straight up on to a lower-angle area of rock with many cracks, where you should build a solid gear anchor and end the pitch. (Check carefully what you’re using for an anchor at the top. We slung a huge block as an anchor, but in hindsight, we wonder if better options may exist in terms of cracks for a gear-anchor.)
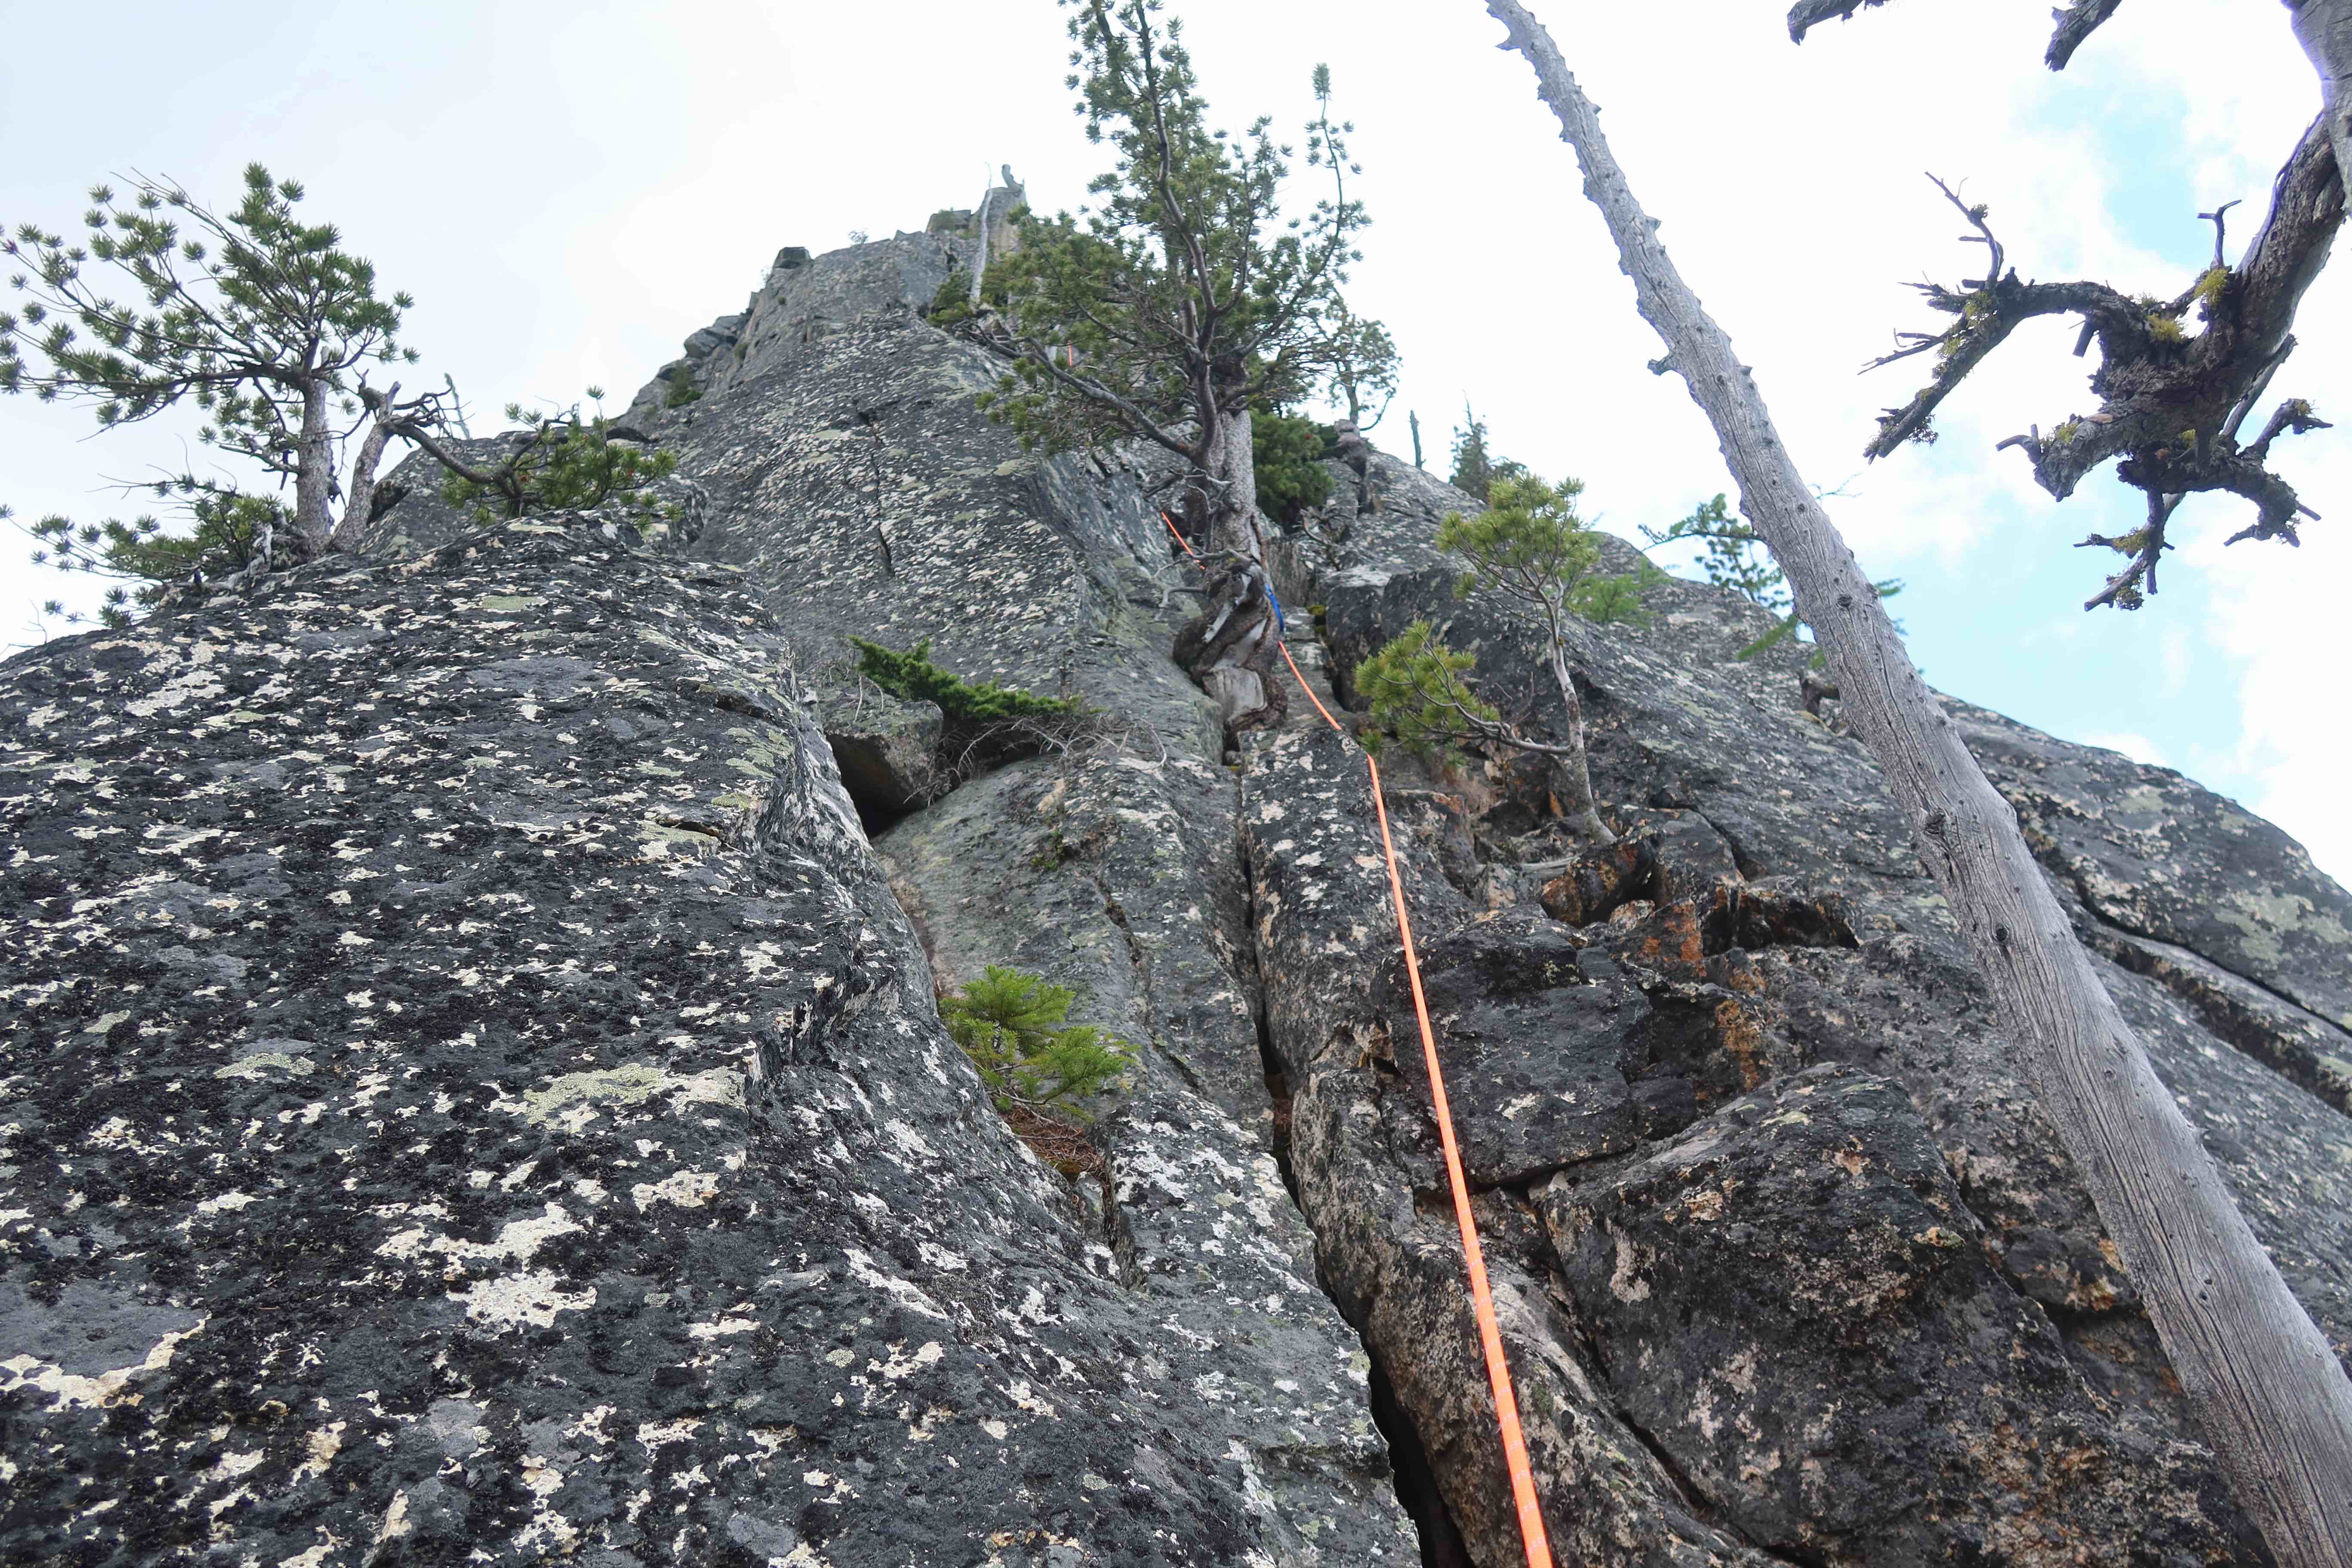
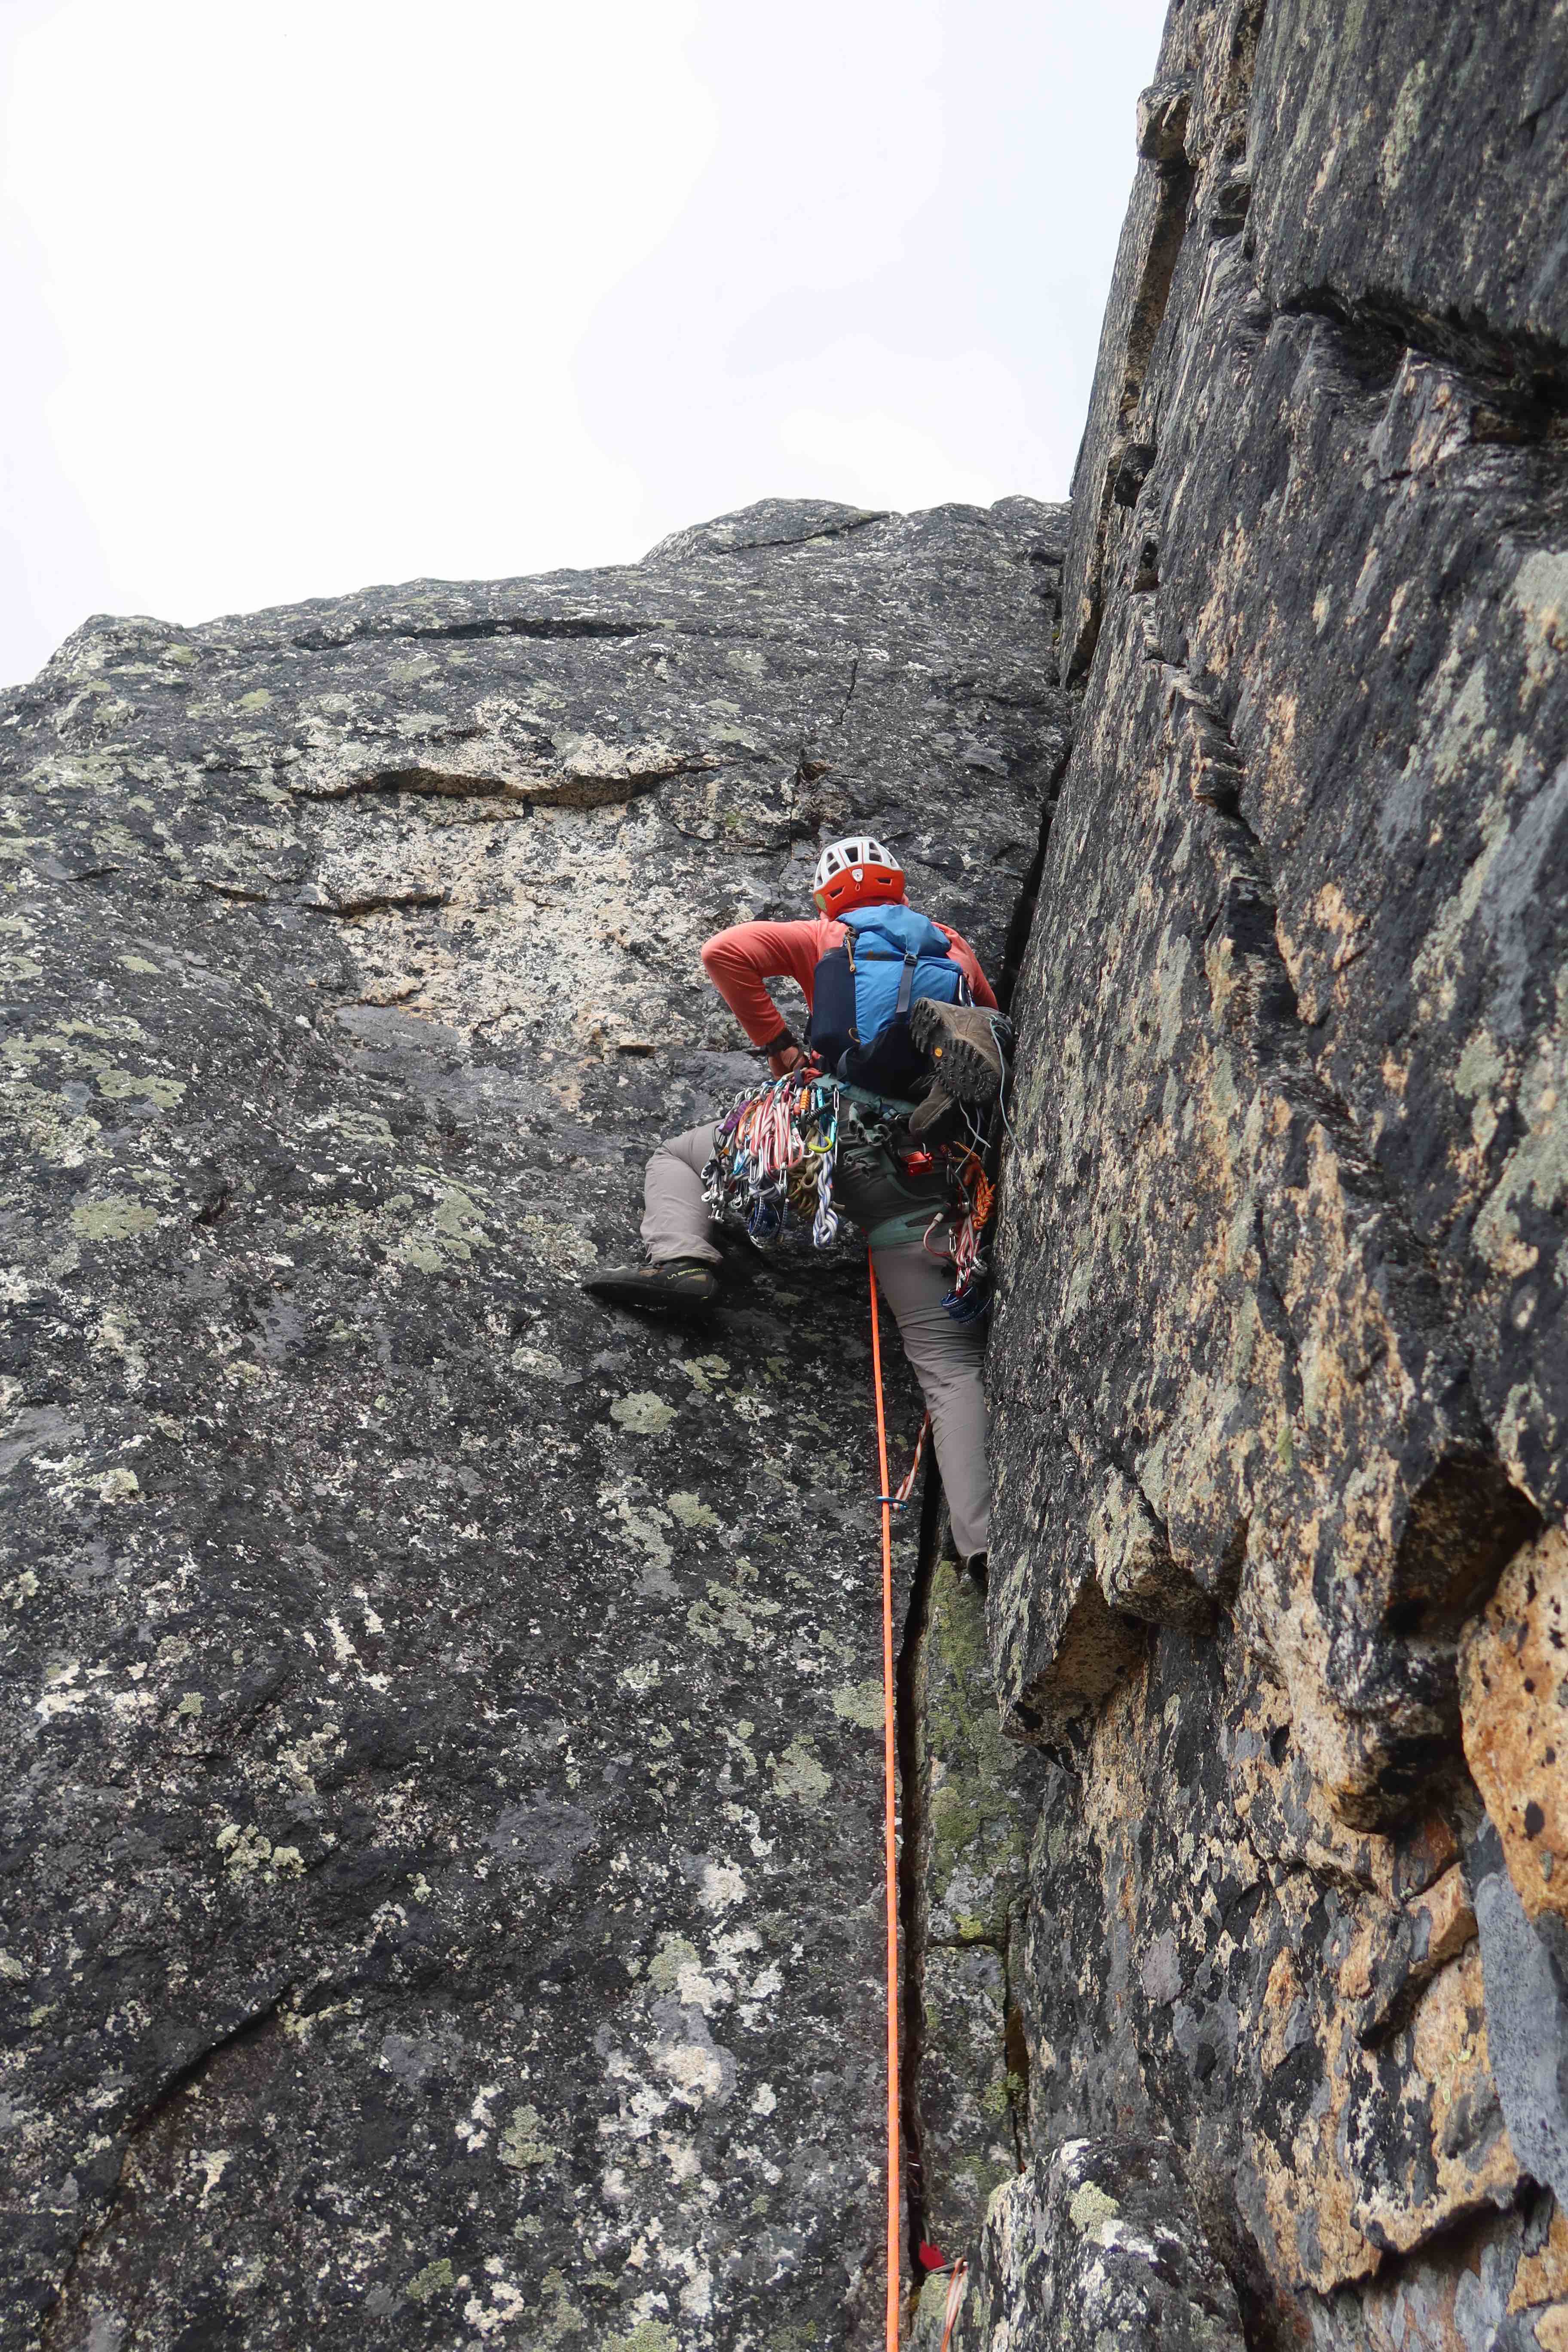
- Pitch 7: 5.7, ~110′, tree or gear anchor – Start by moving rightward, which is made easy by a low horizontal crack, in order to reach the obvious vertical crack that will take you up to the right around the otherwise-imposing blank headwall above you. The beginning move getting into that vertical crack at its bottom is tricky, it turns out to be two cracks with a fin in the middle, and both cracks start as off-width sizes at the bottom there. After the initial stiff move, soon the cracks shrink to more secure jamming sizes, and continue straight until you arrive up in a room-sized alcove with a big roof over it. Around right of the big roof, you can see the rather-perfect right-facing-corner that makes for the next & final pitch. Pick a way to belay near that right-facing-corner without blocking it. (Note that a 60-meter rope would not be long enough to link pitches 7 & 8, not that you’d probably want to anyway, considering rope drag, amount of pro, etc.)
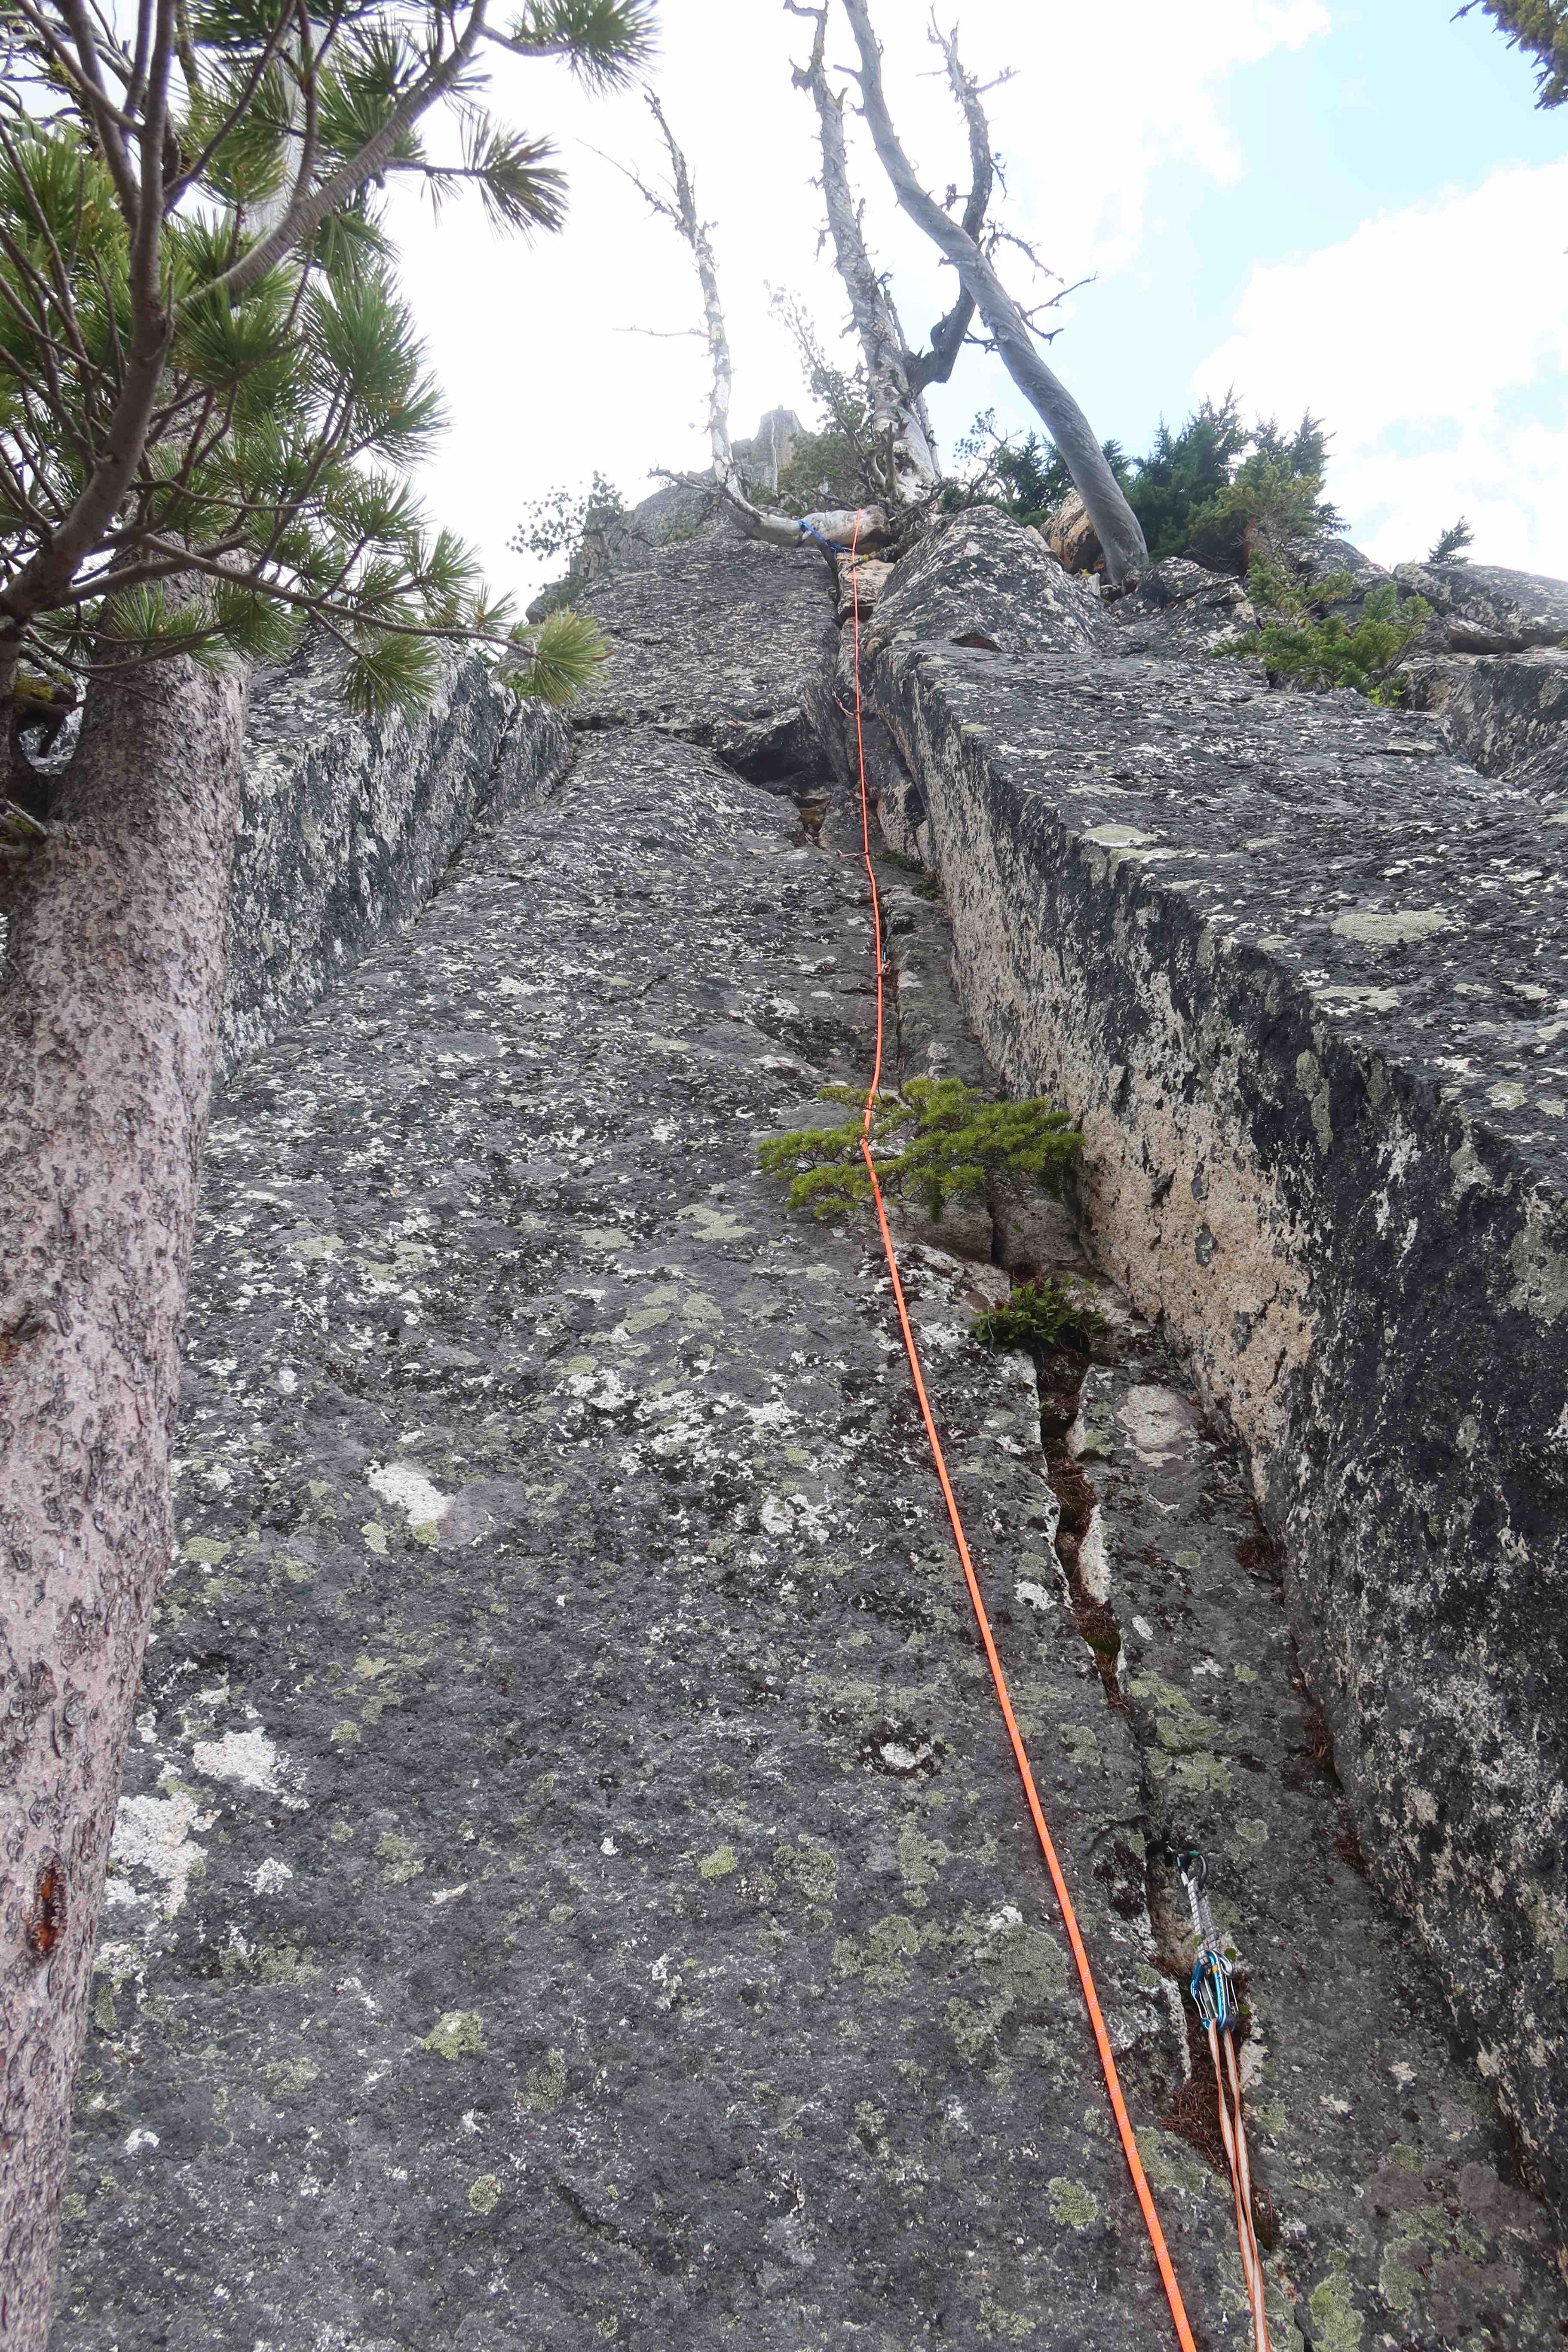
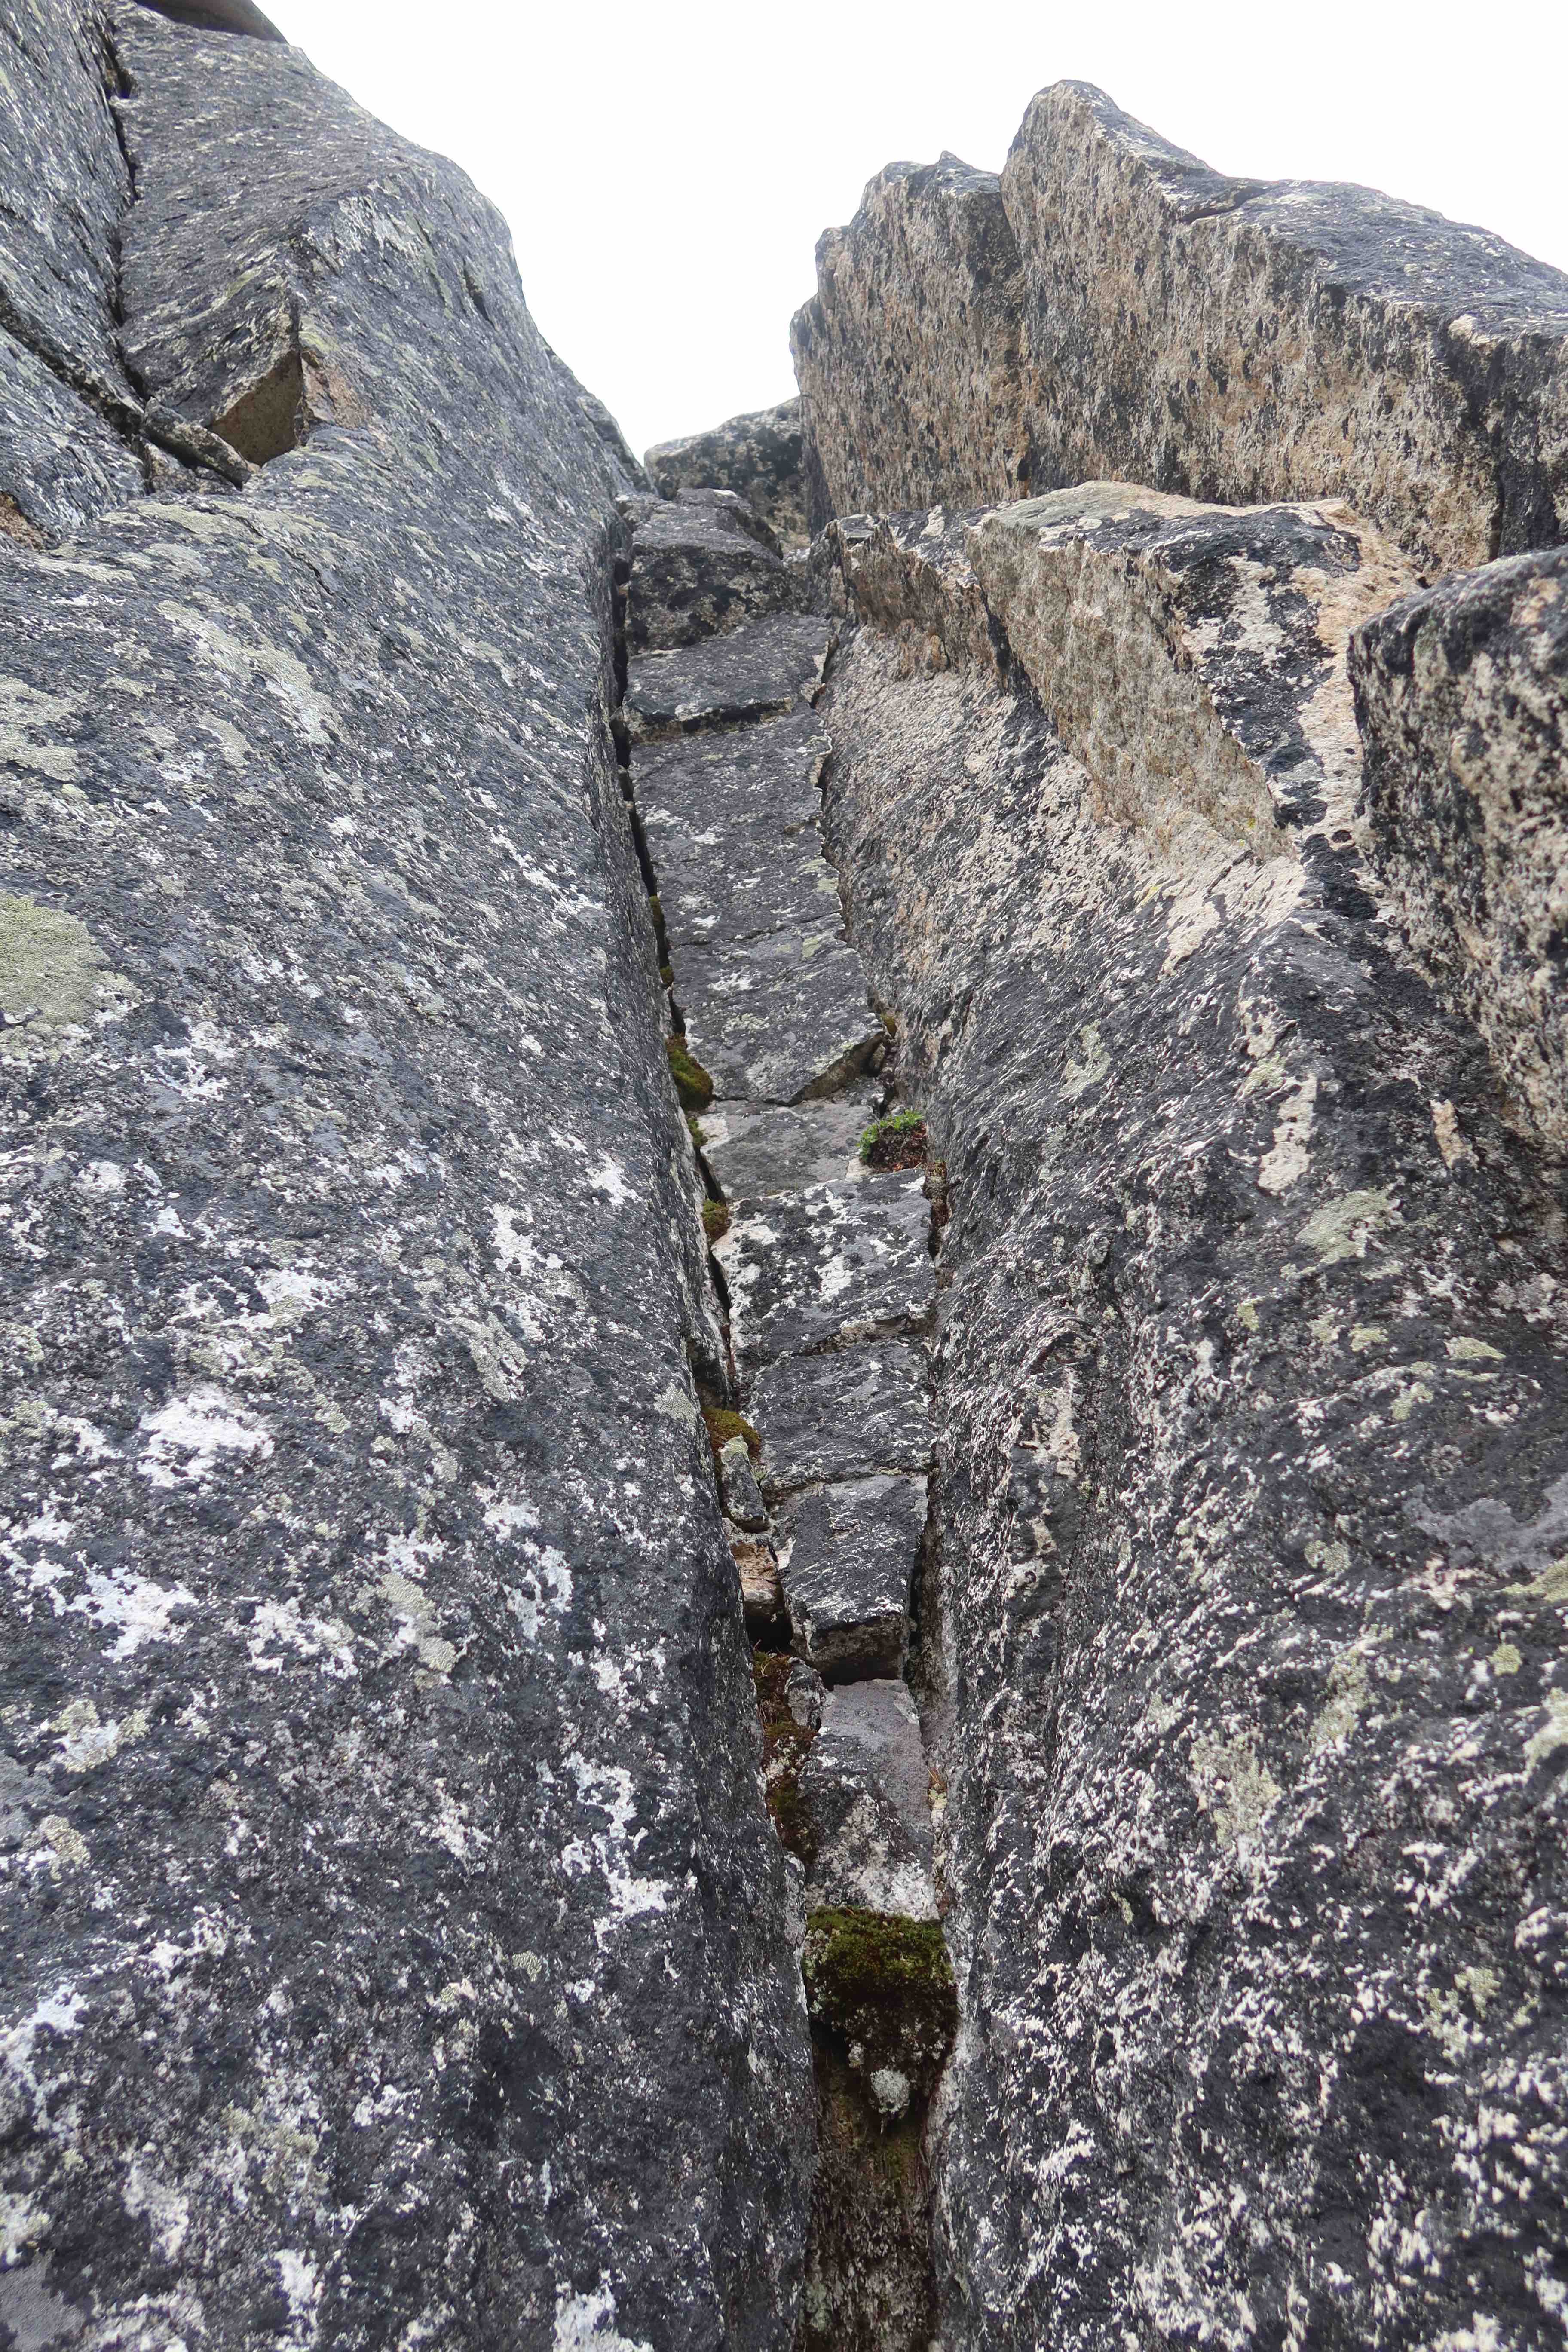
- Pitch 8: 5.8, “The Incredible Dihedral”: ~120′, tree or gear anchor – A stunning right-facing-corner, with a hand-jam-sized crack at its heart, and a few hidden but helpful little foot ledges out to the sides at times, makes the perfect cherry-on-top pitch to finish this route. End by topping out into scramble terrain, far enough that you’d be comfortable unroping there once your follower comes up, and pick something to build your last belay anchor on (there are plenty of options). Once you’re both up, you can change shoes, coil the rope, and start the walk-off.
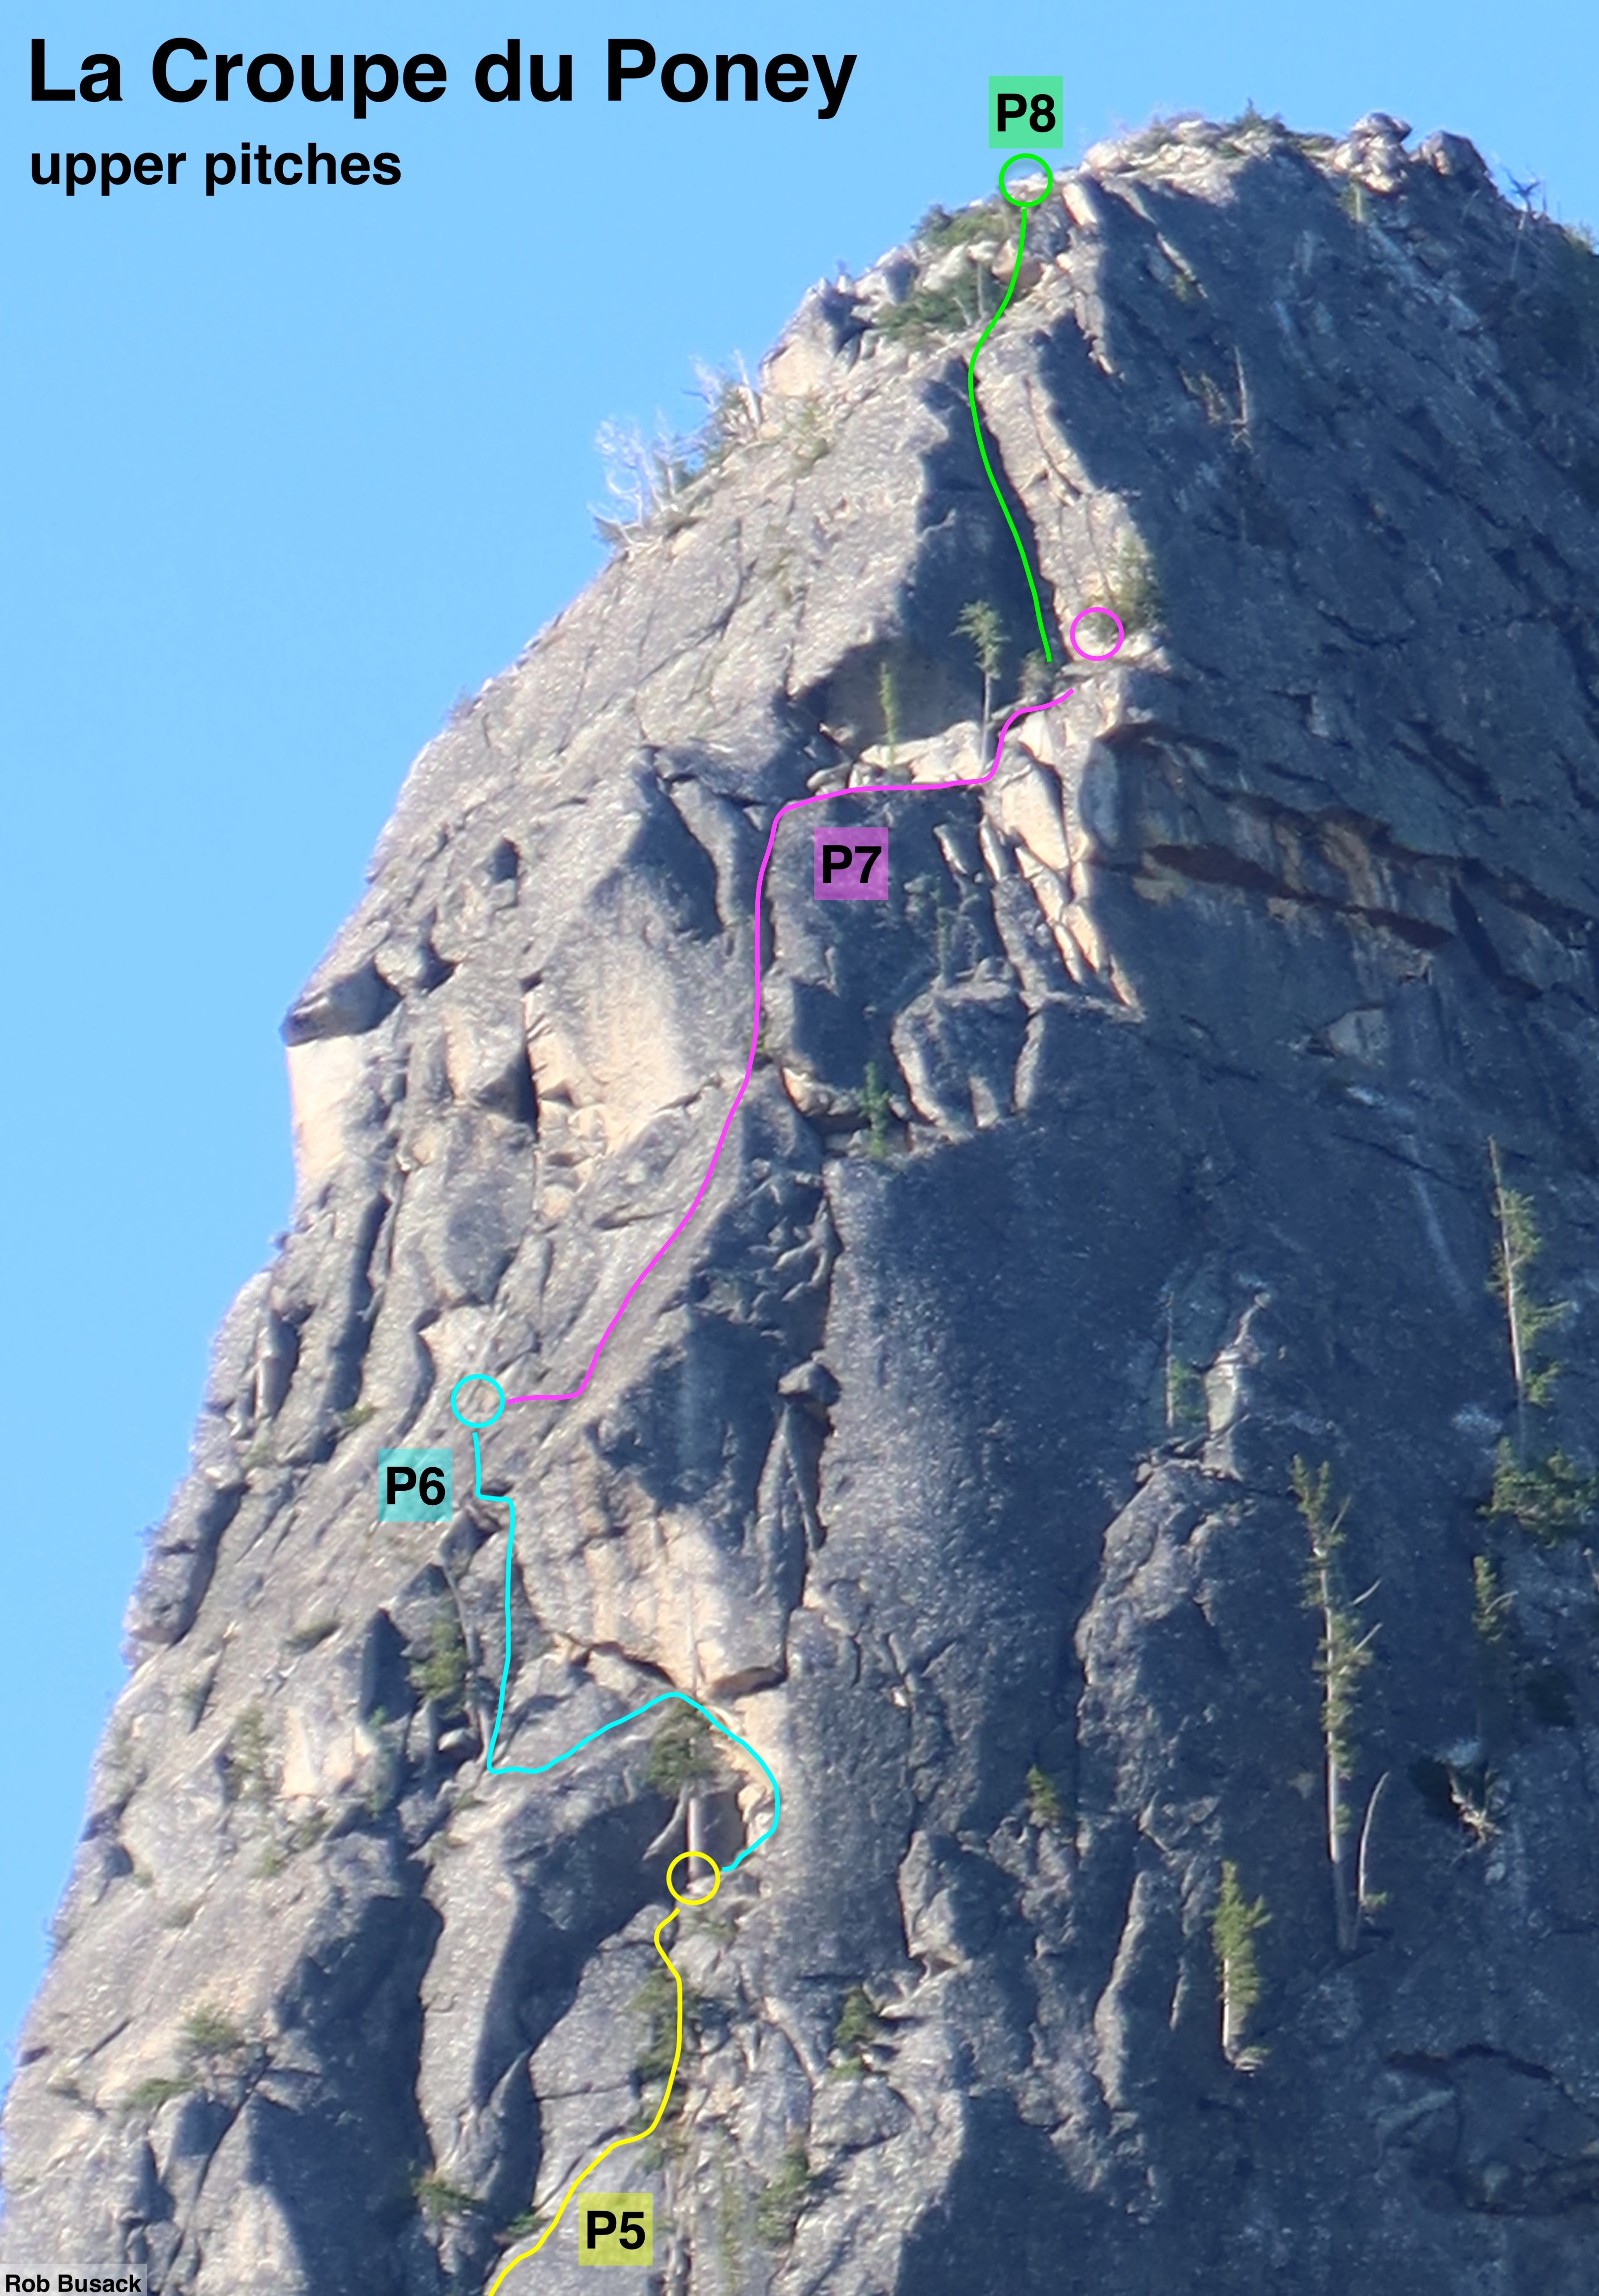
The Climbing Route – in Photos
Pitch 1:

Pitch 2:
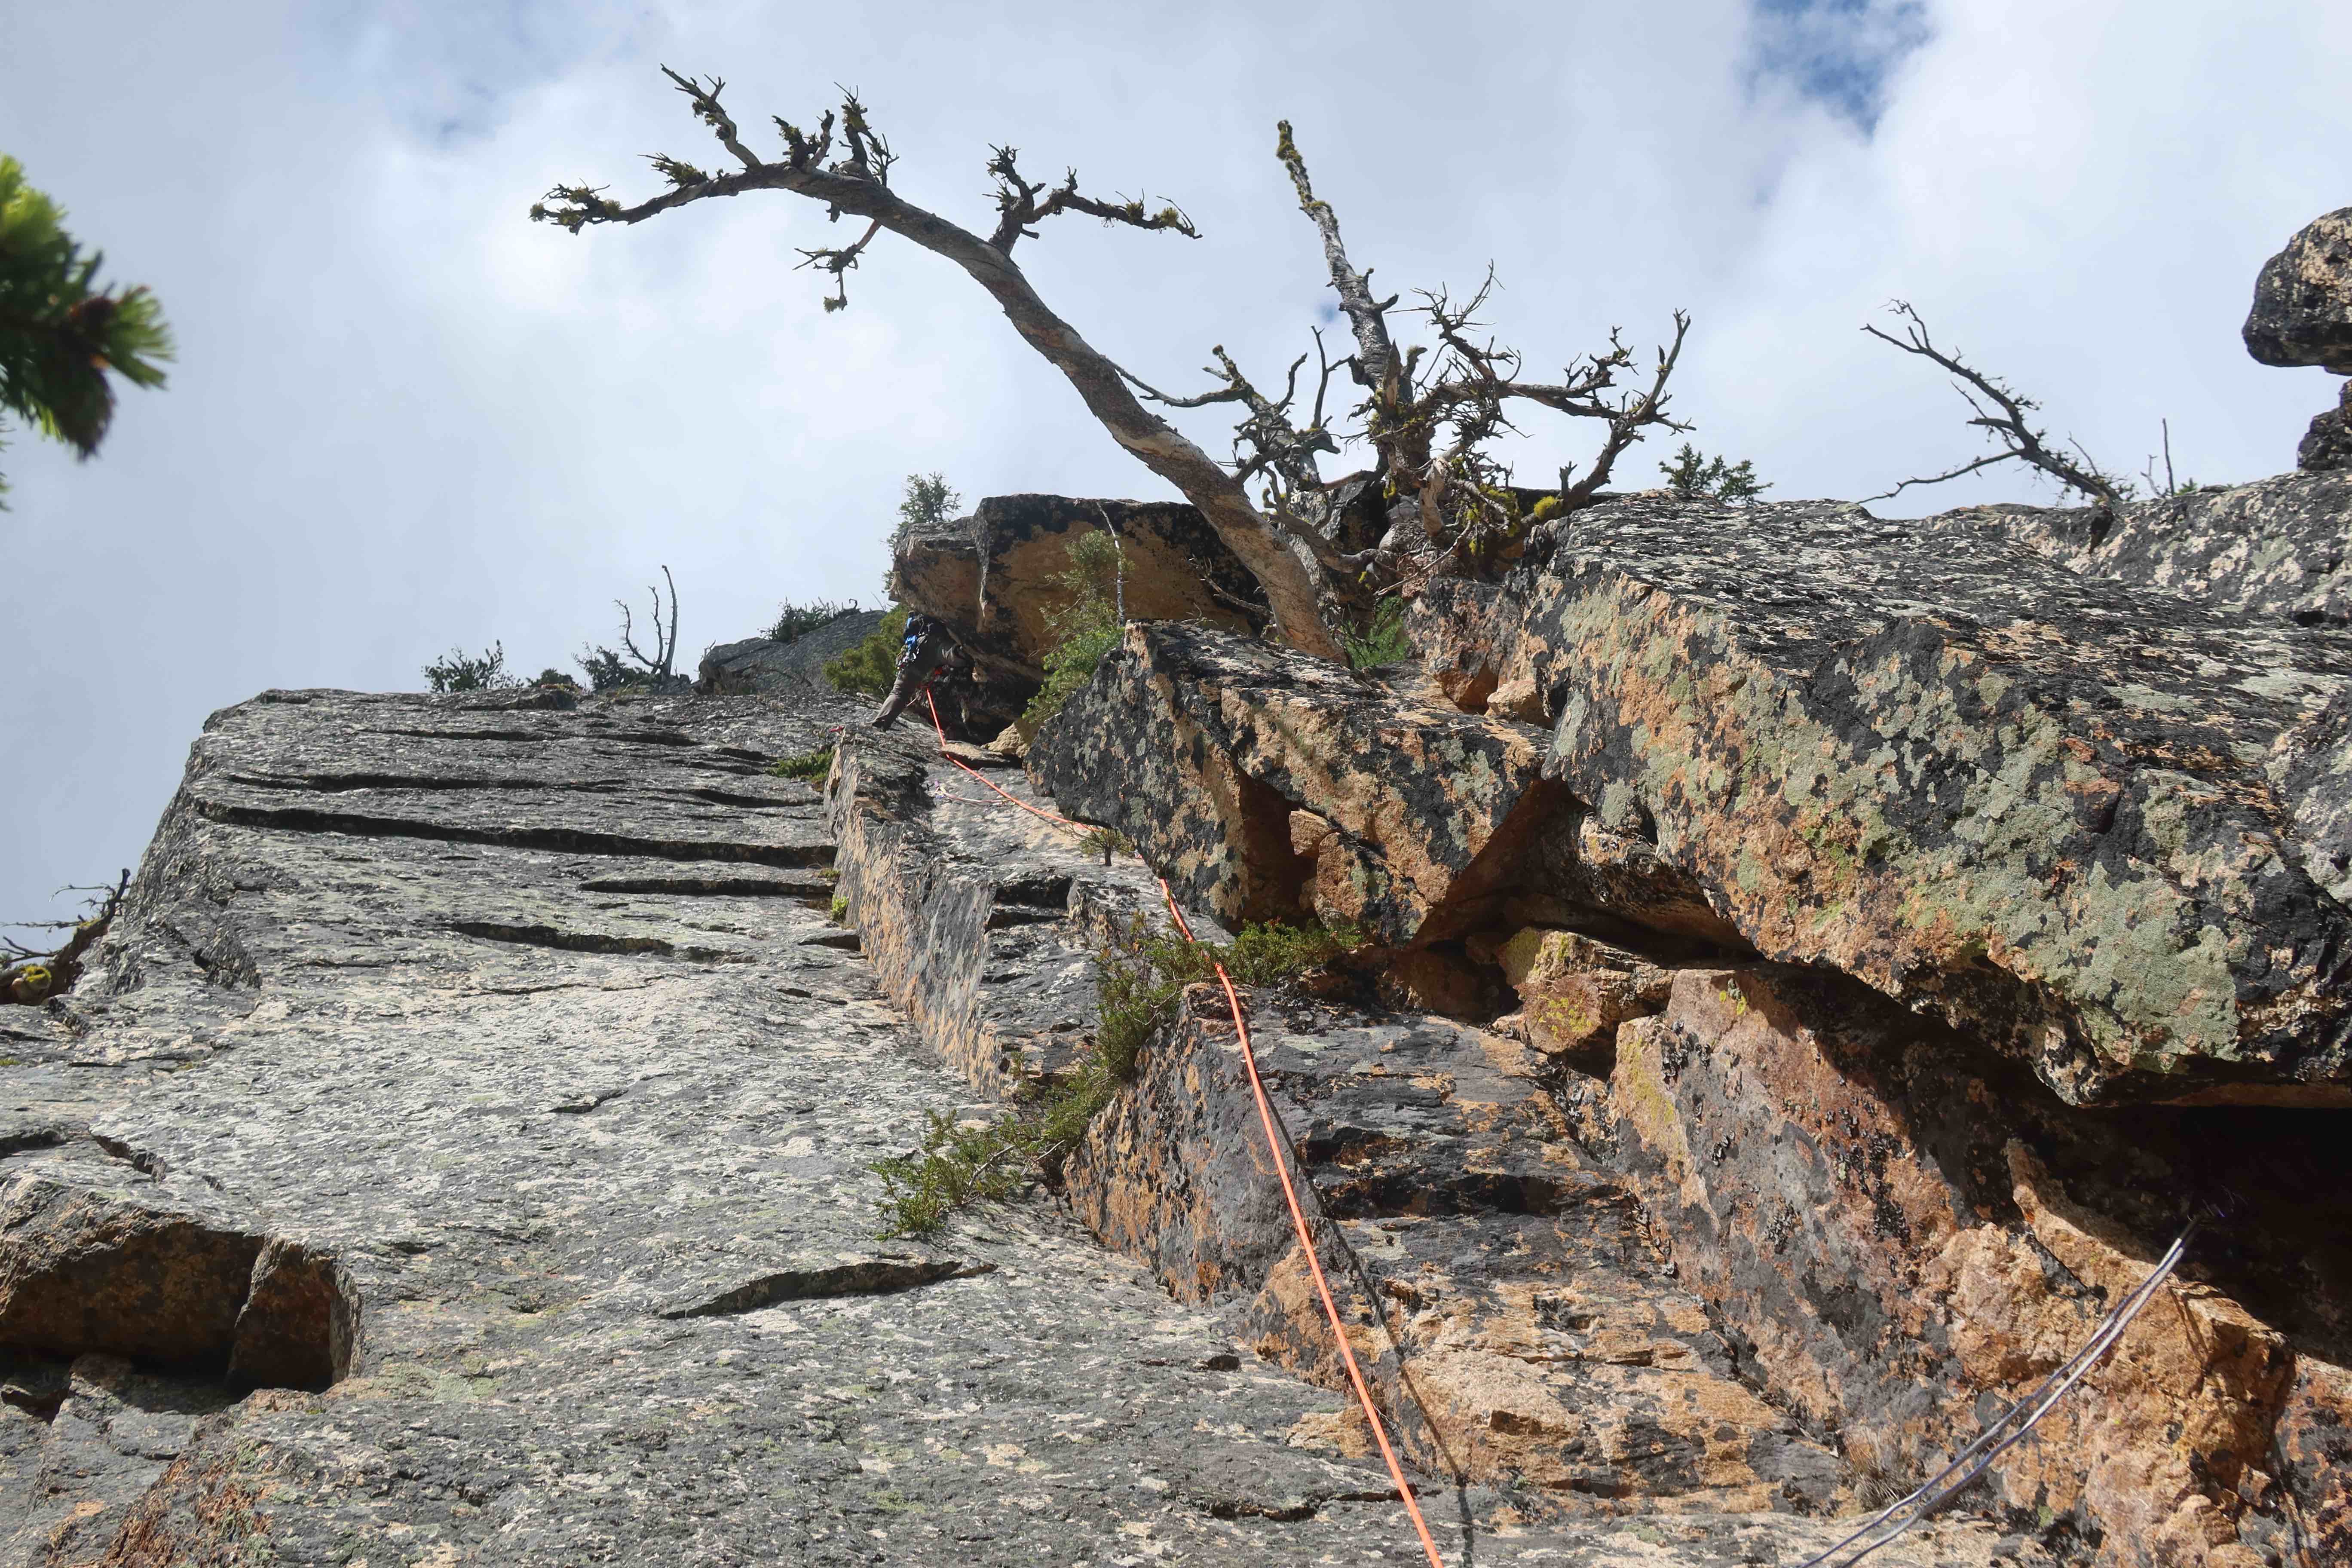
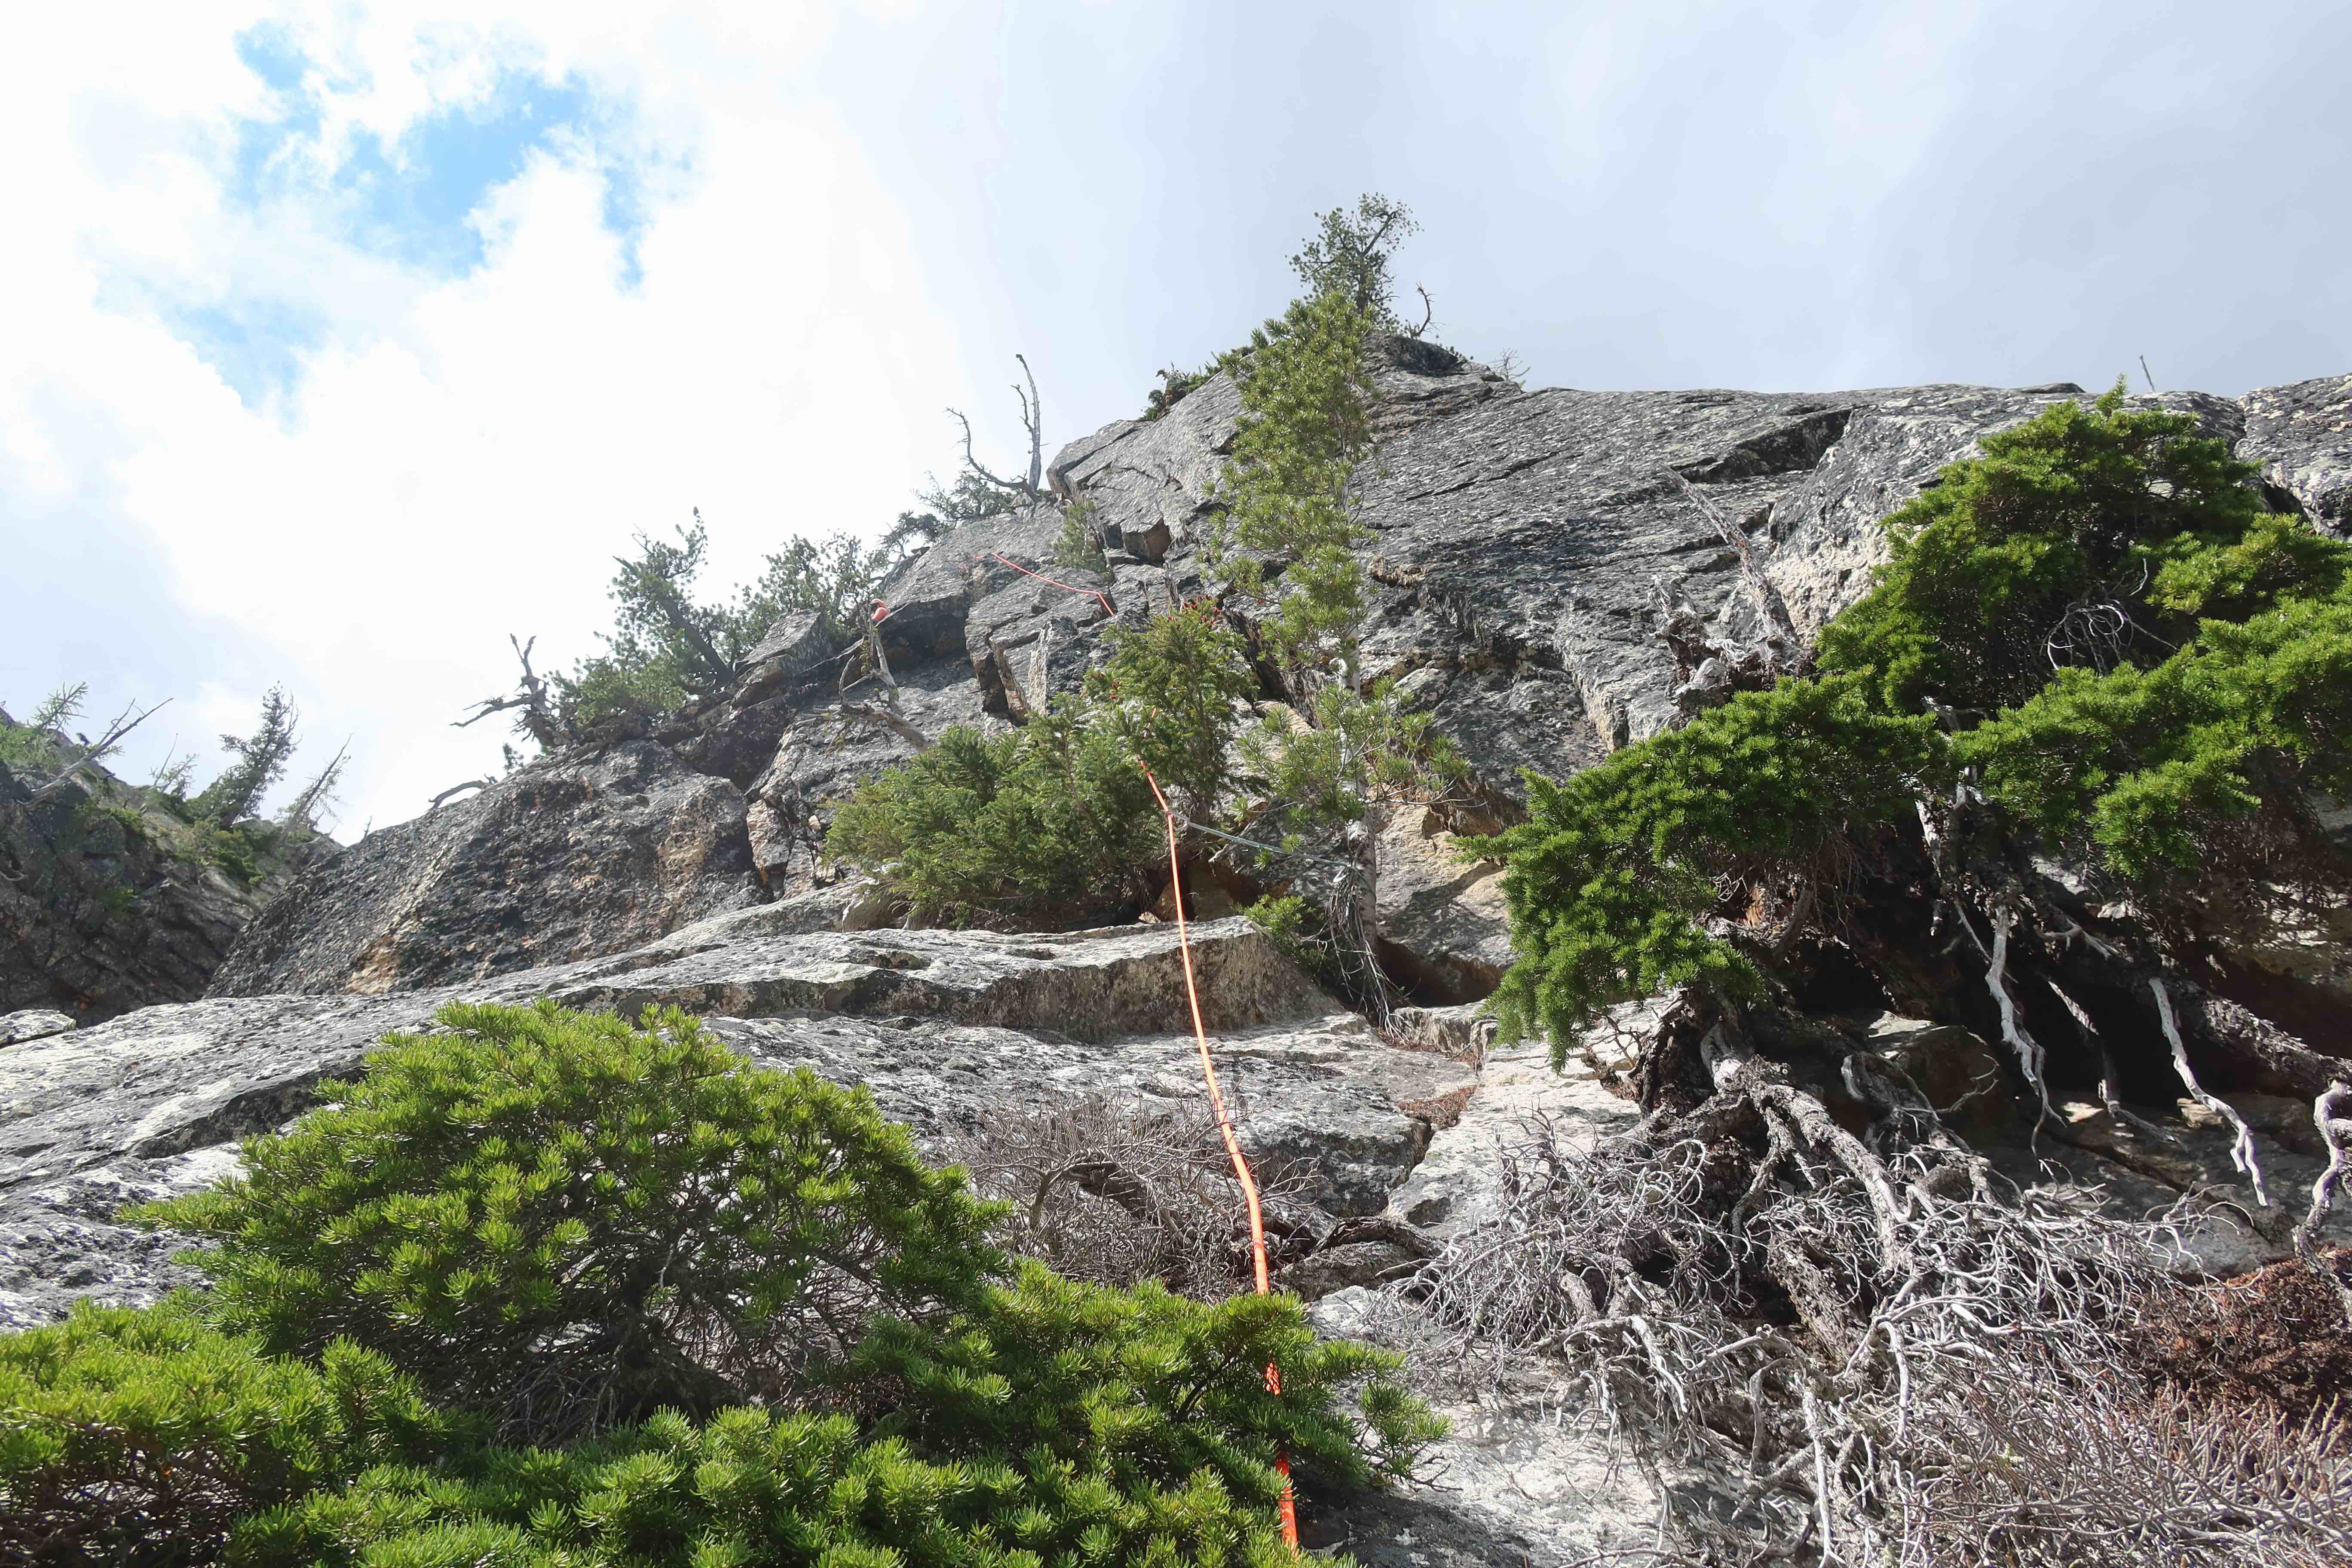
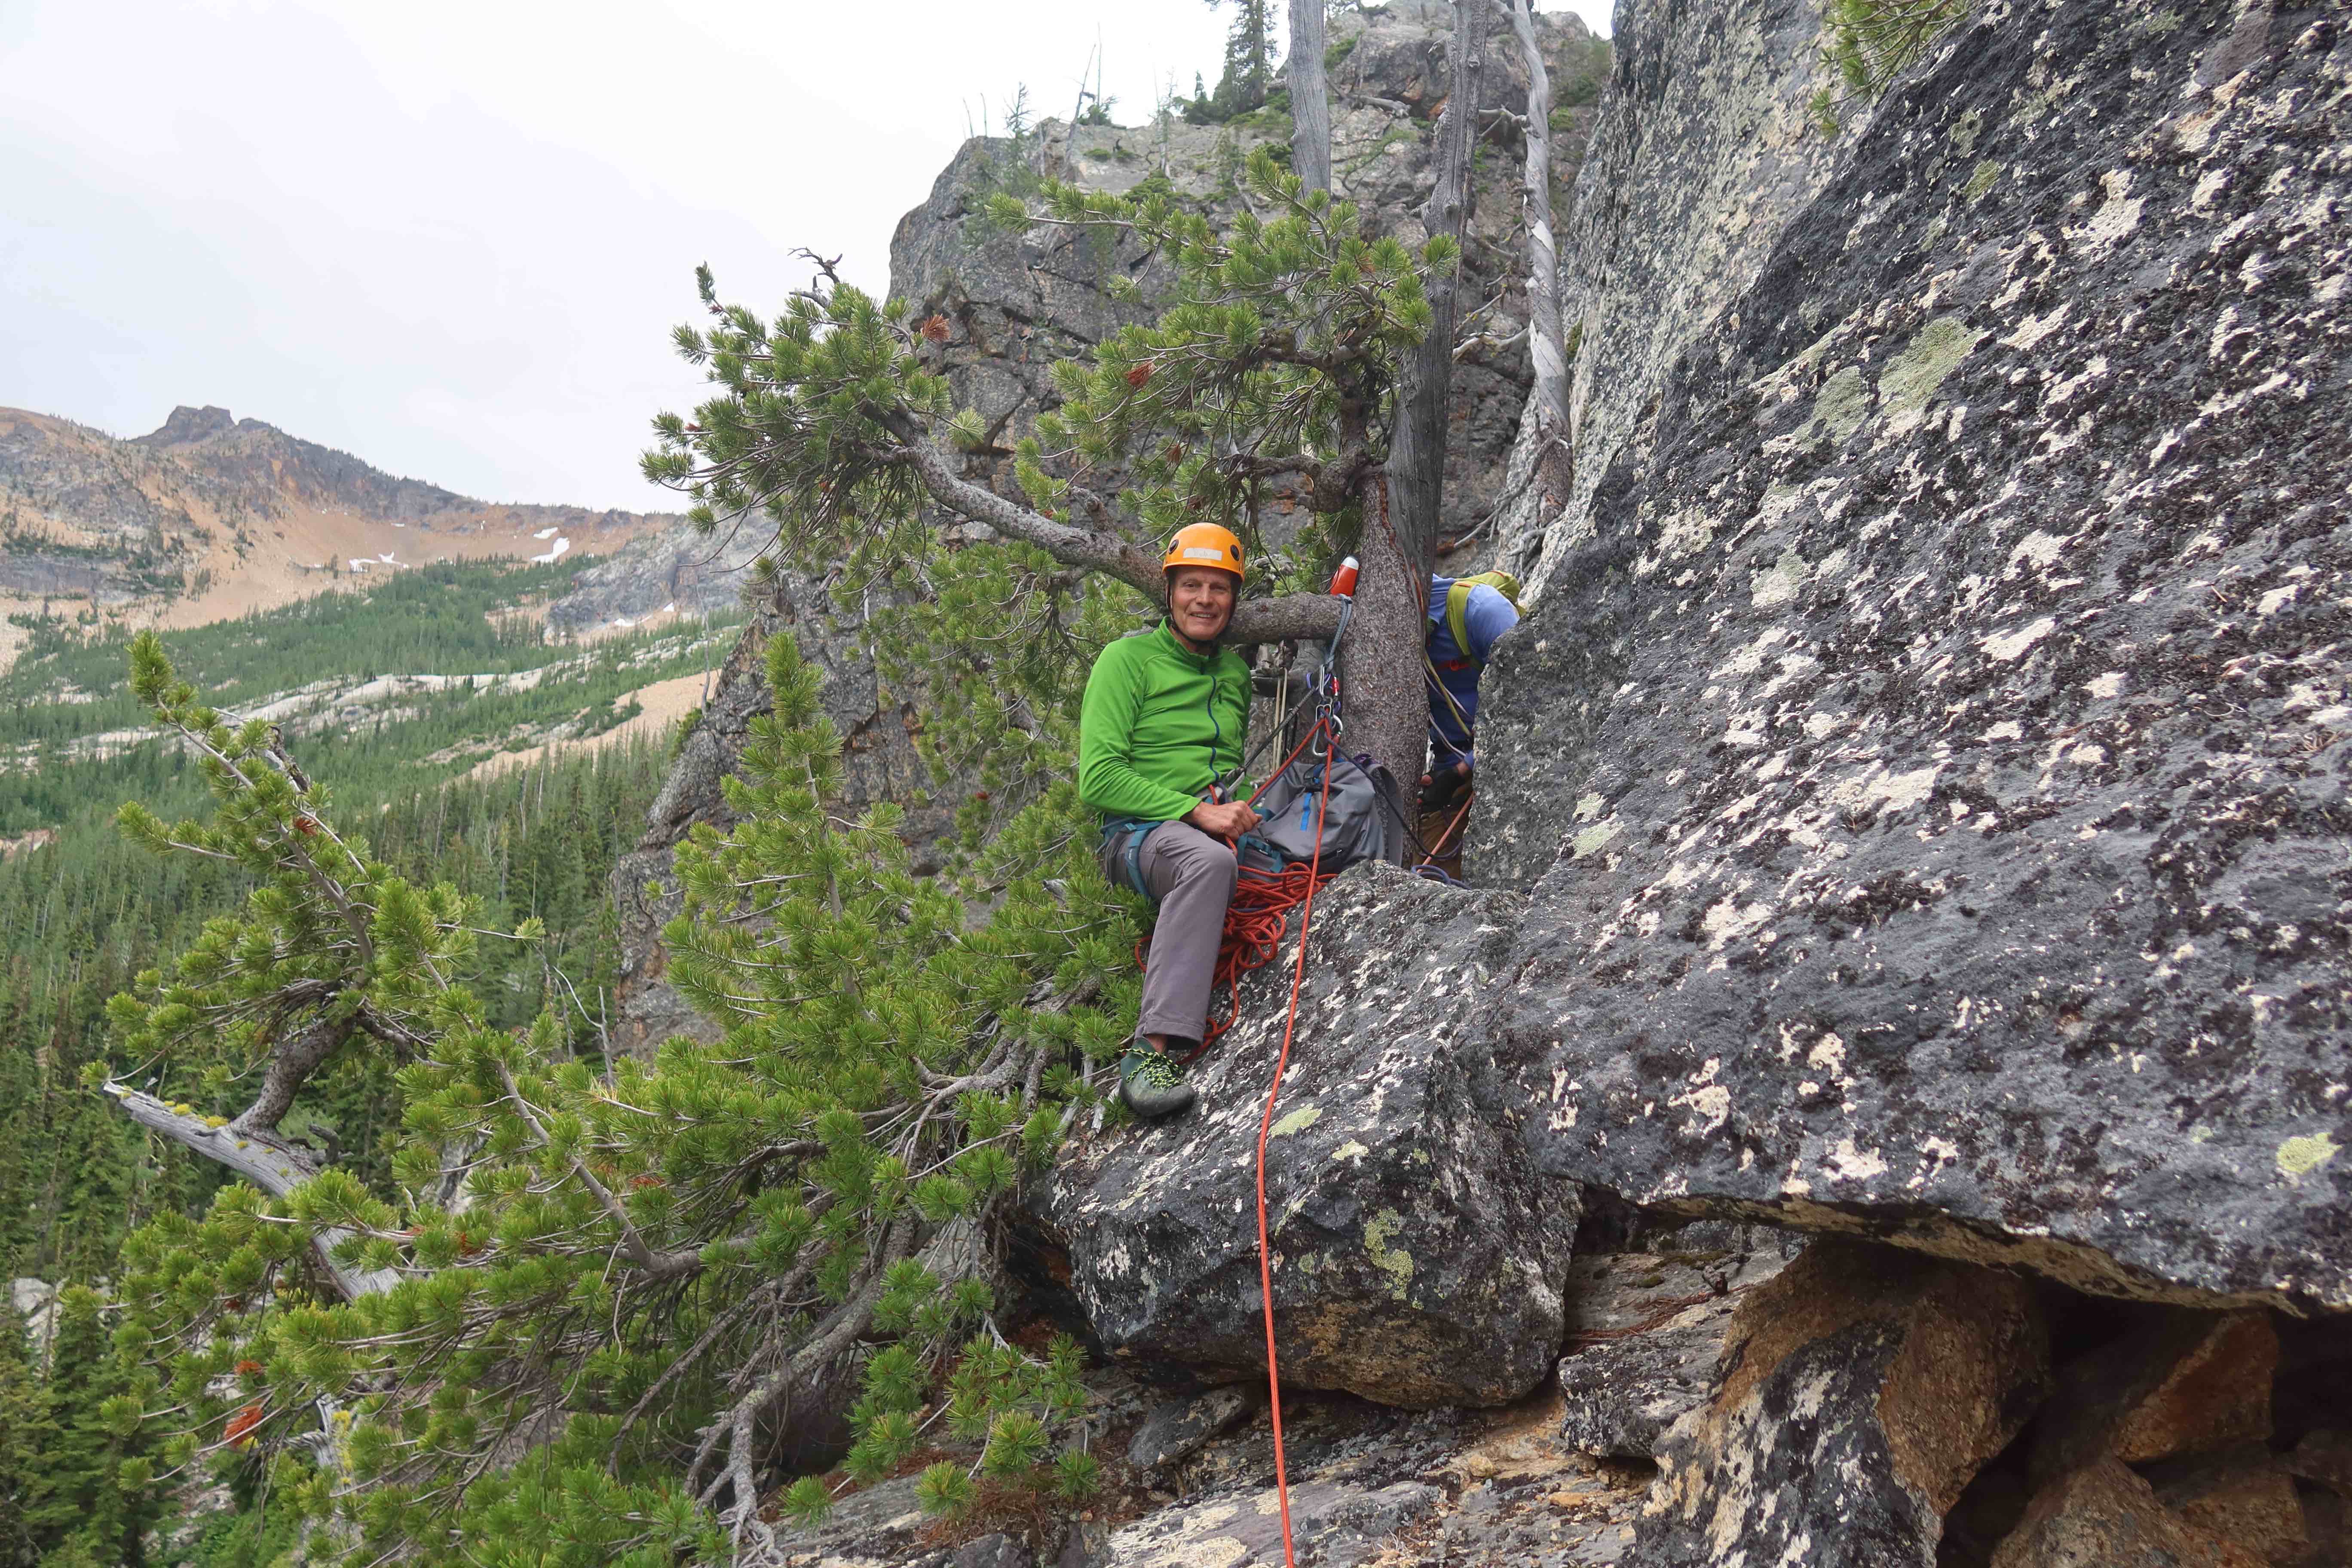
Pitch 3:
Pitch 4:
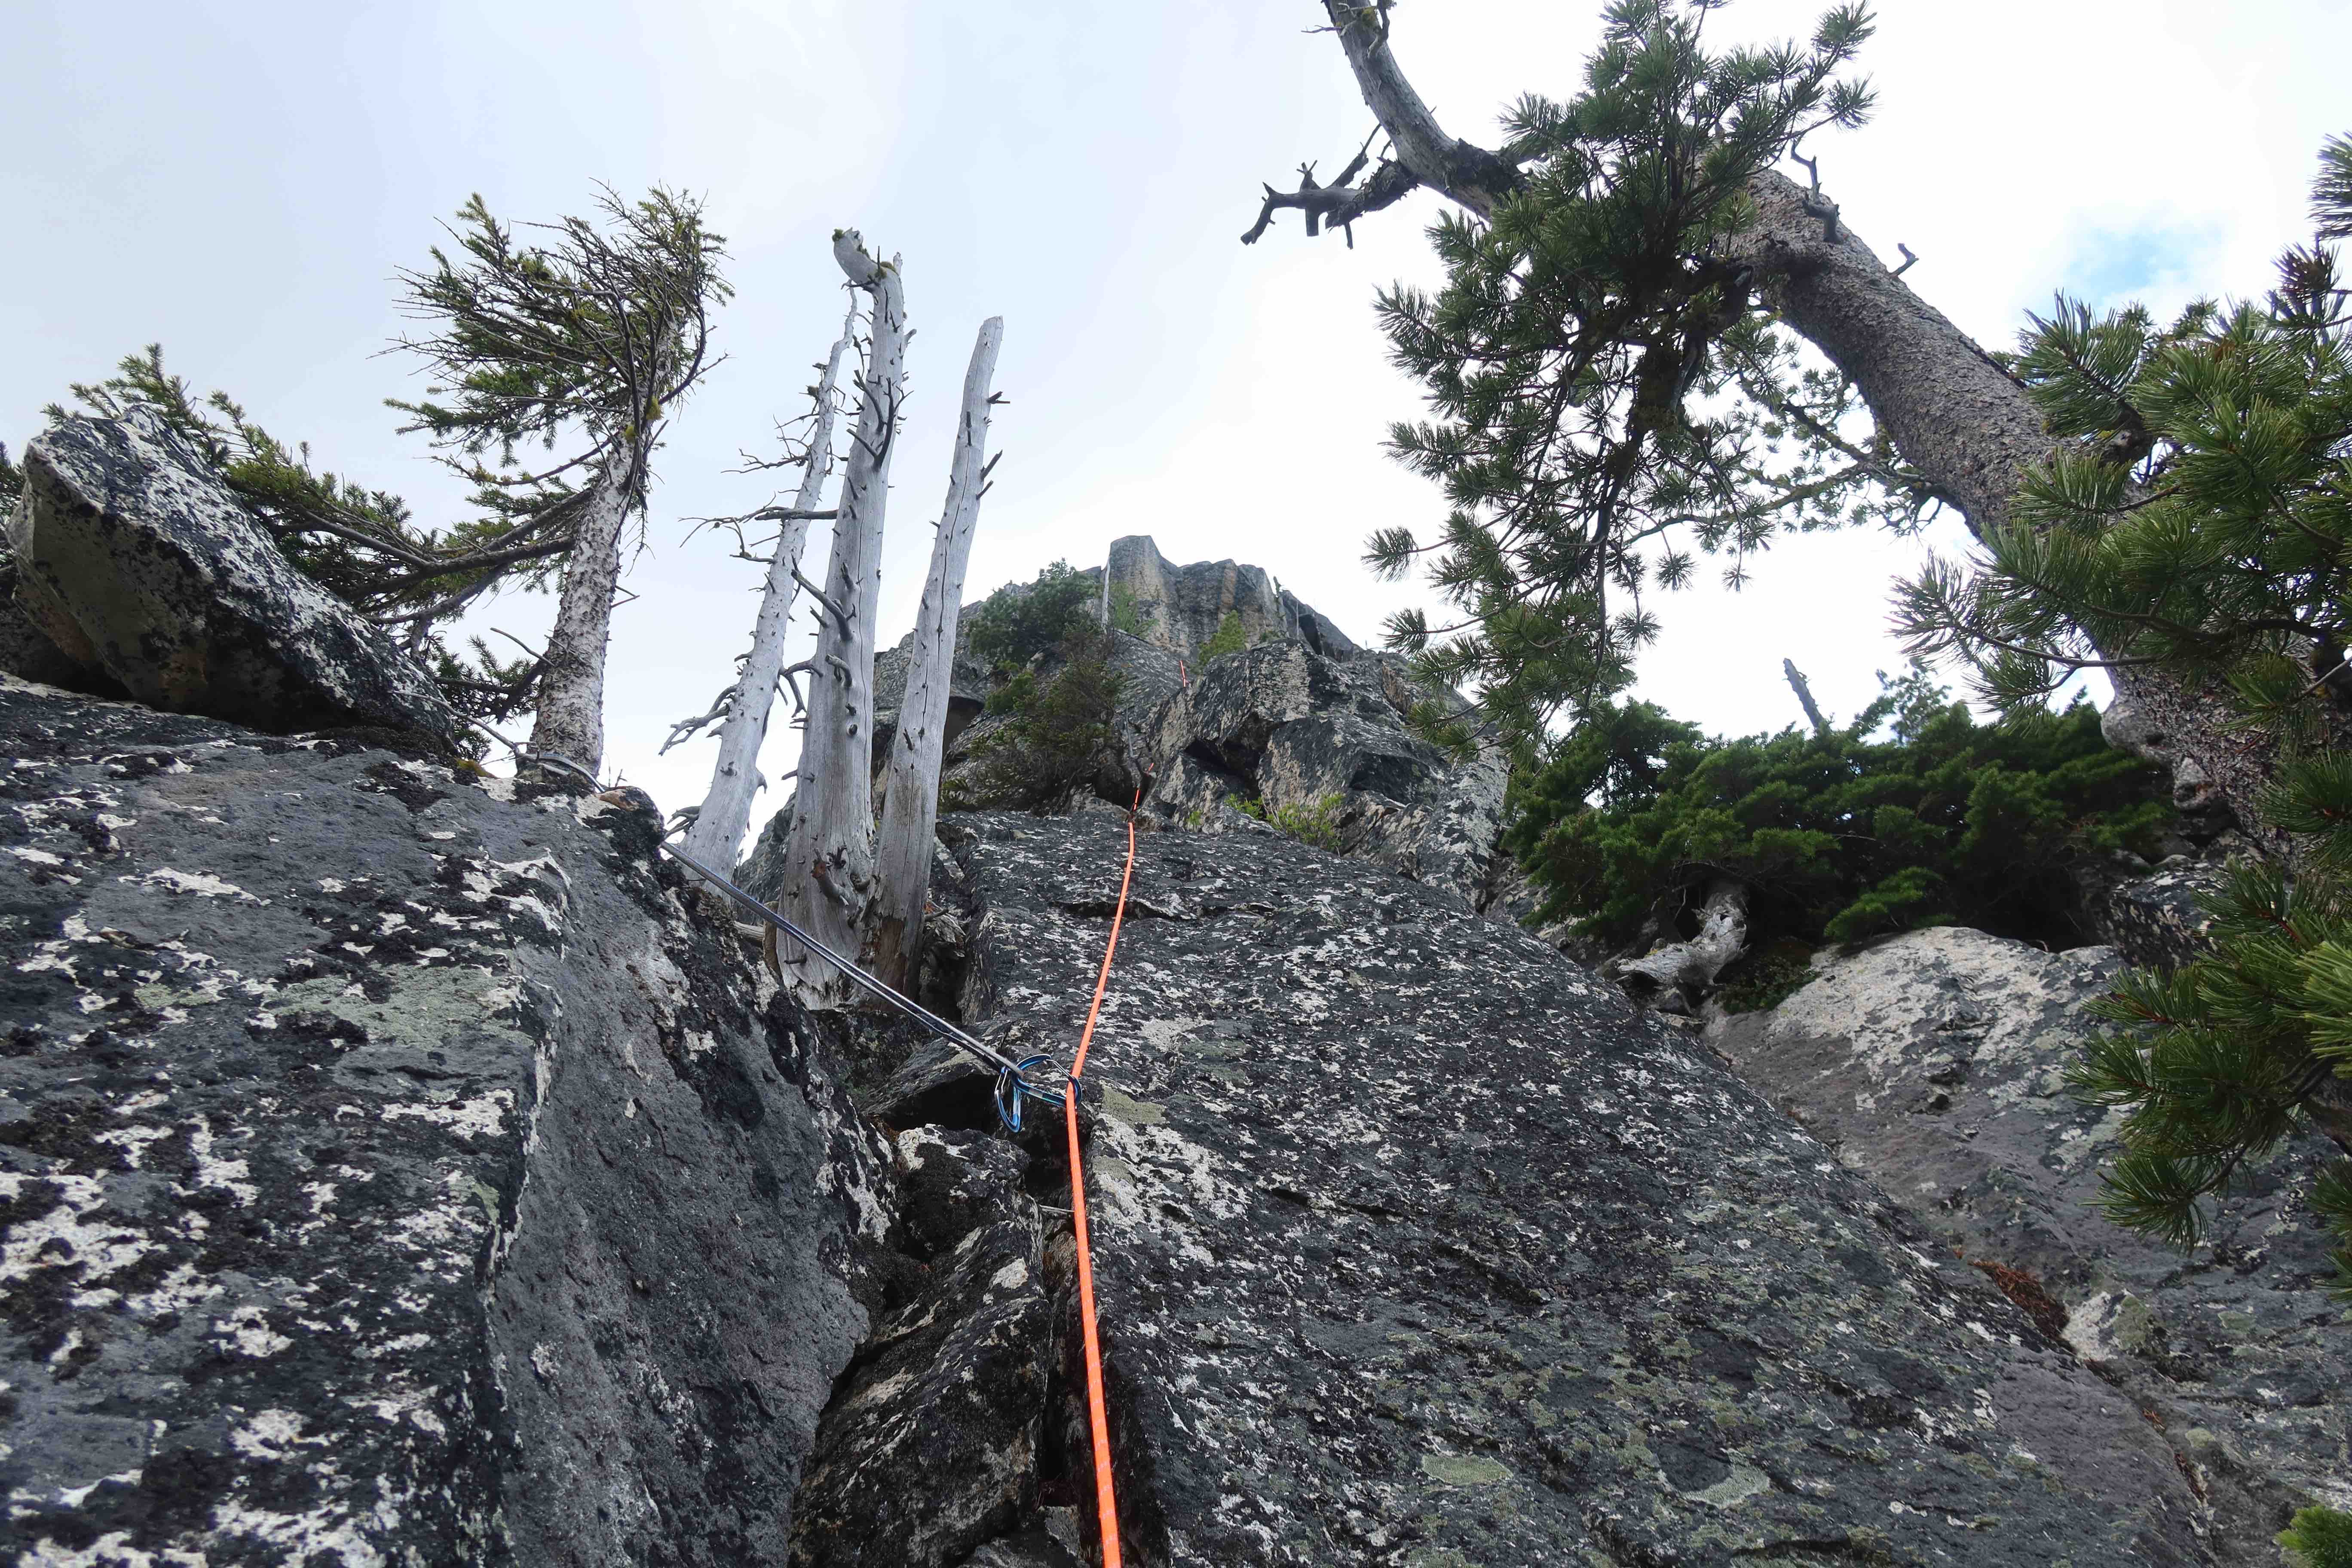
Pitch 5, “Shish Kabob Tree”:
Pitch 6, “The Clamshell”

Pitch 7:

Pitch 8, “The Incredible Dihedral”:

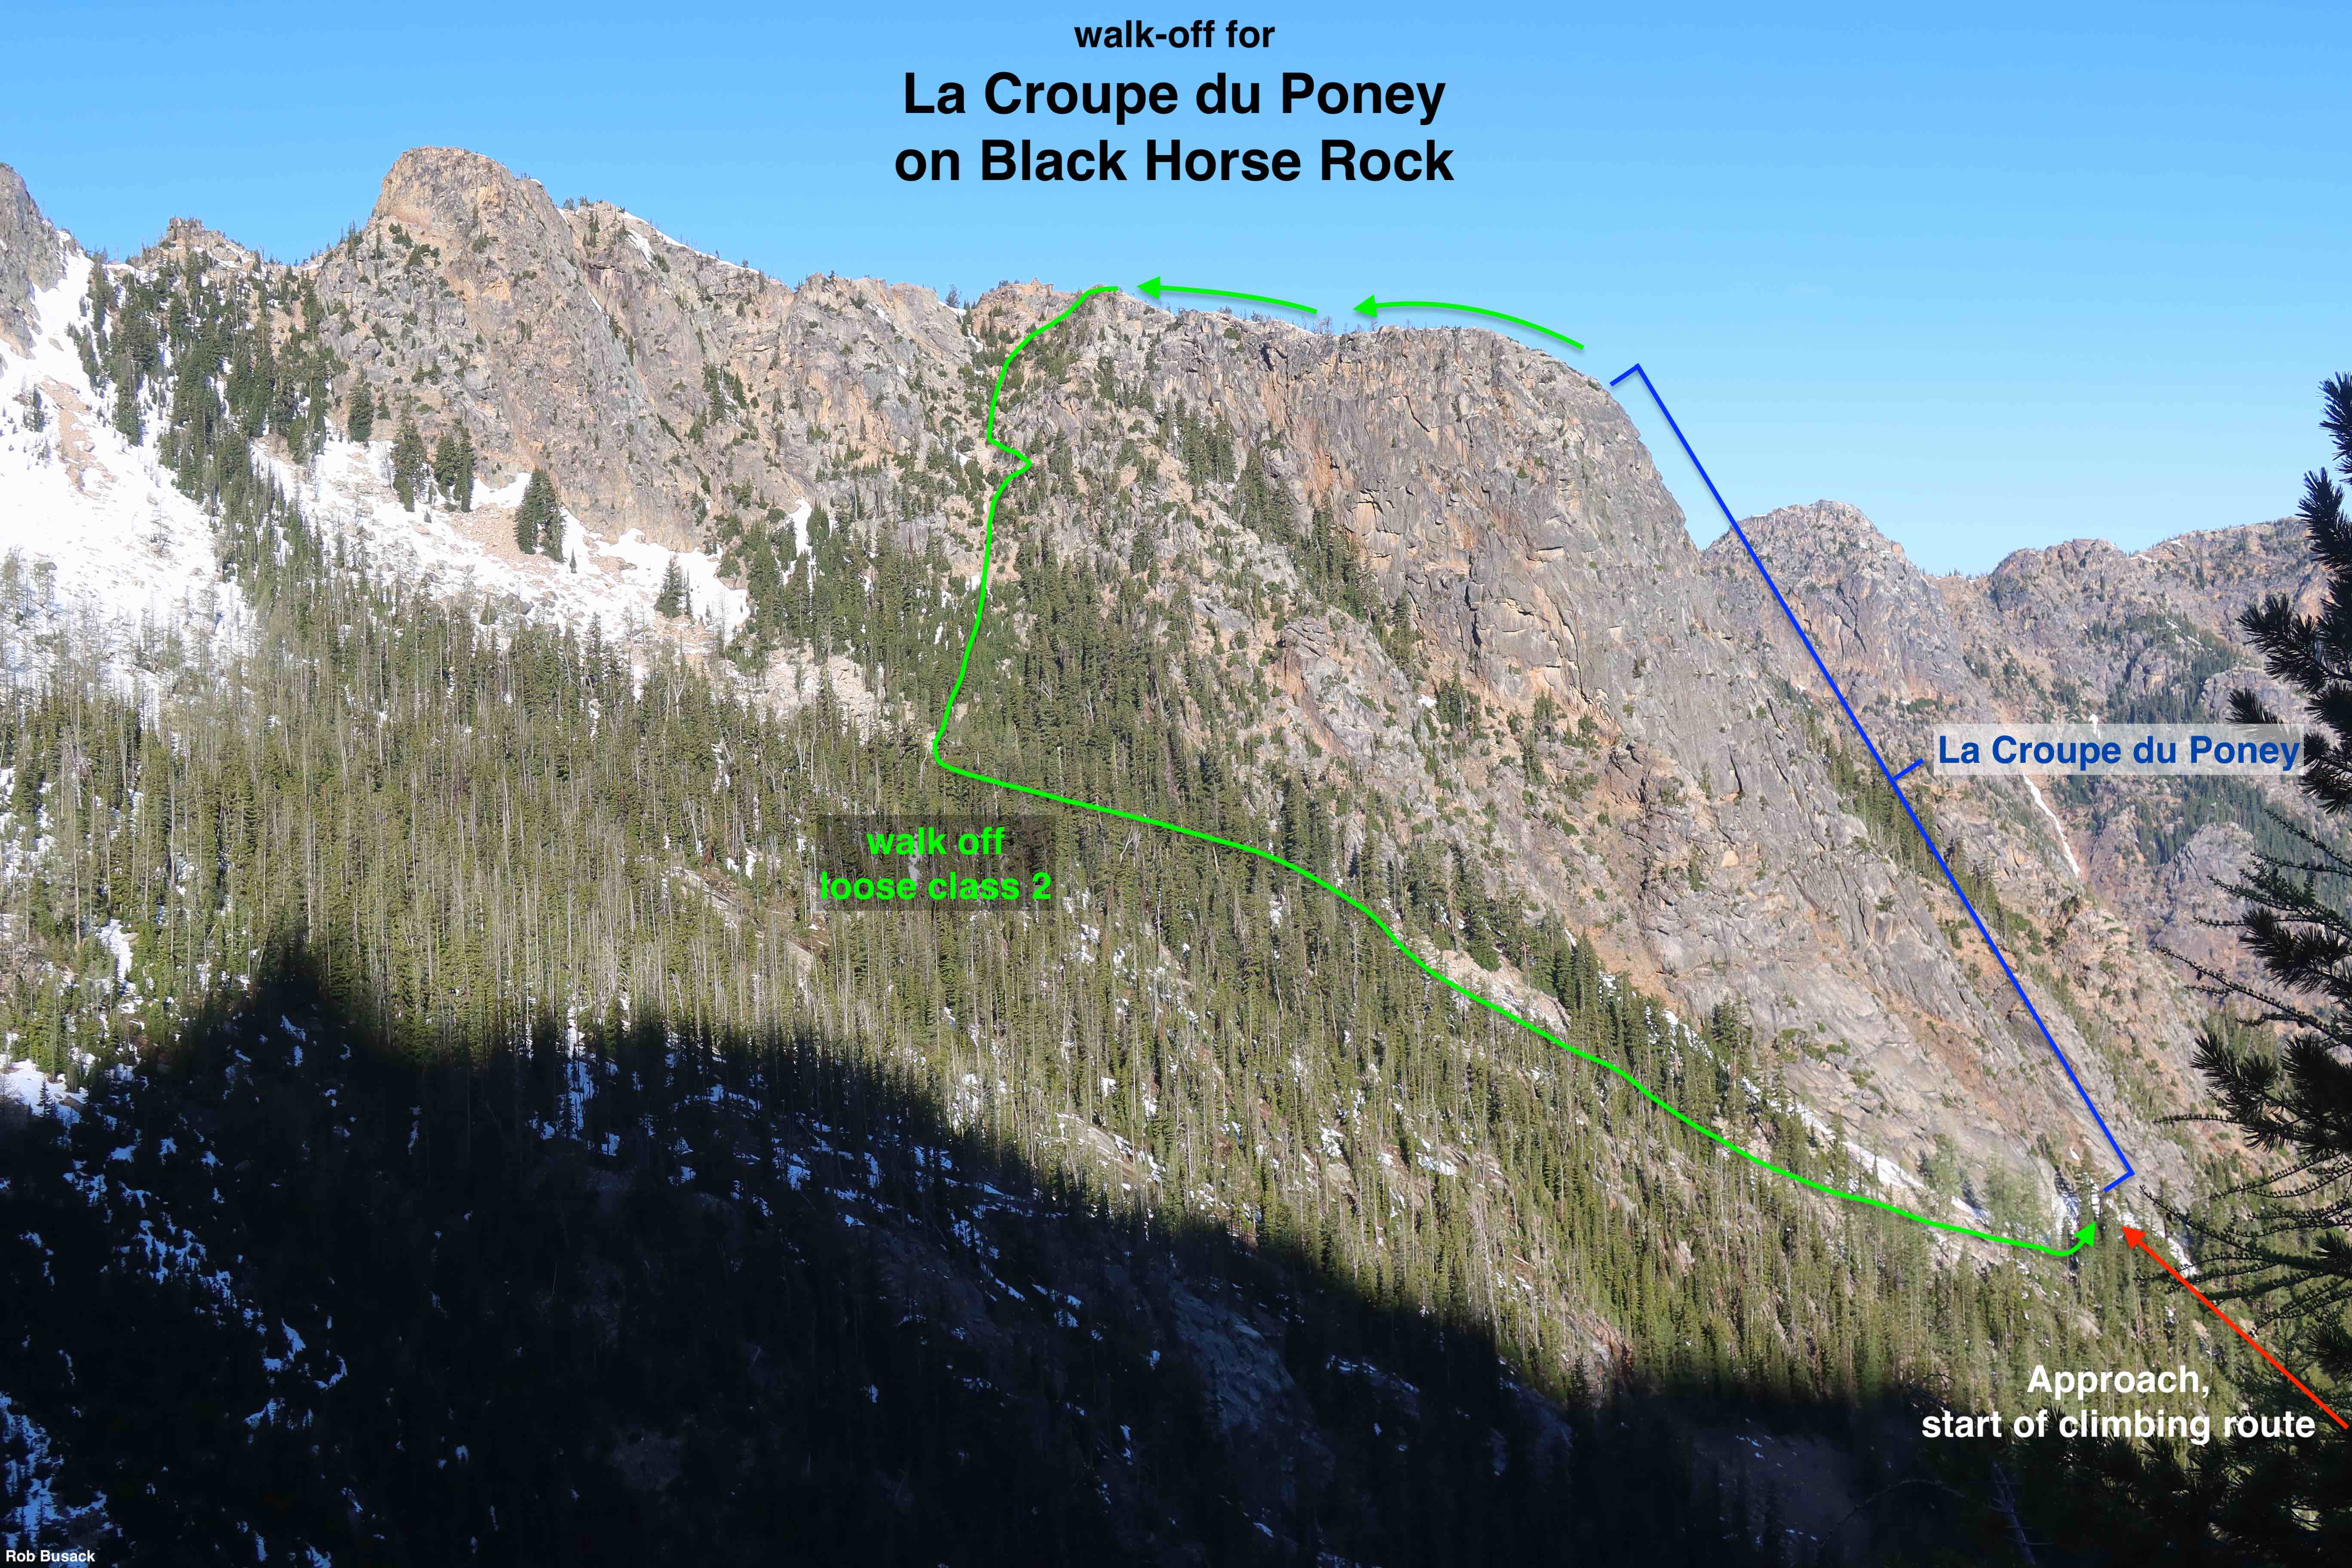
The Walk-Off
After topping-out, the ridge top is surprisingly flat. The walk-off is merely just over a half-mile in distance travelled, but it descends 1000′, and involves a fair bit of loose class 2 descending once you leave the ridge-top, which can make it take a while. It took us 1h45m to descend and return to where we stashed gear at the base of the route. It’s hard to say how much of that was first-time-route-finding delays, plus us just being rather mentally-tired at that point. It’s definitely plausible that later parties will do it faster. After retrieving stashed gear, it takes about 2 hours to reverse the approach and get back to the car.

Hey I do have the guide book. You’re route looks left of archer. You are more than welcome to look at the guidebook. I live down in carbonado. Good job!