
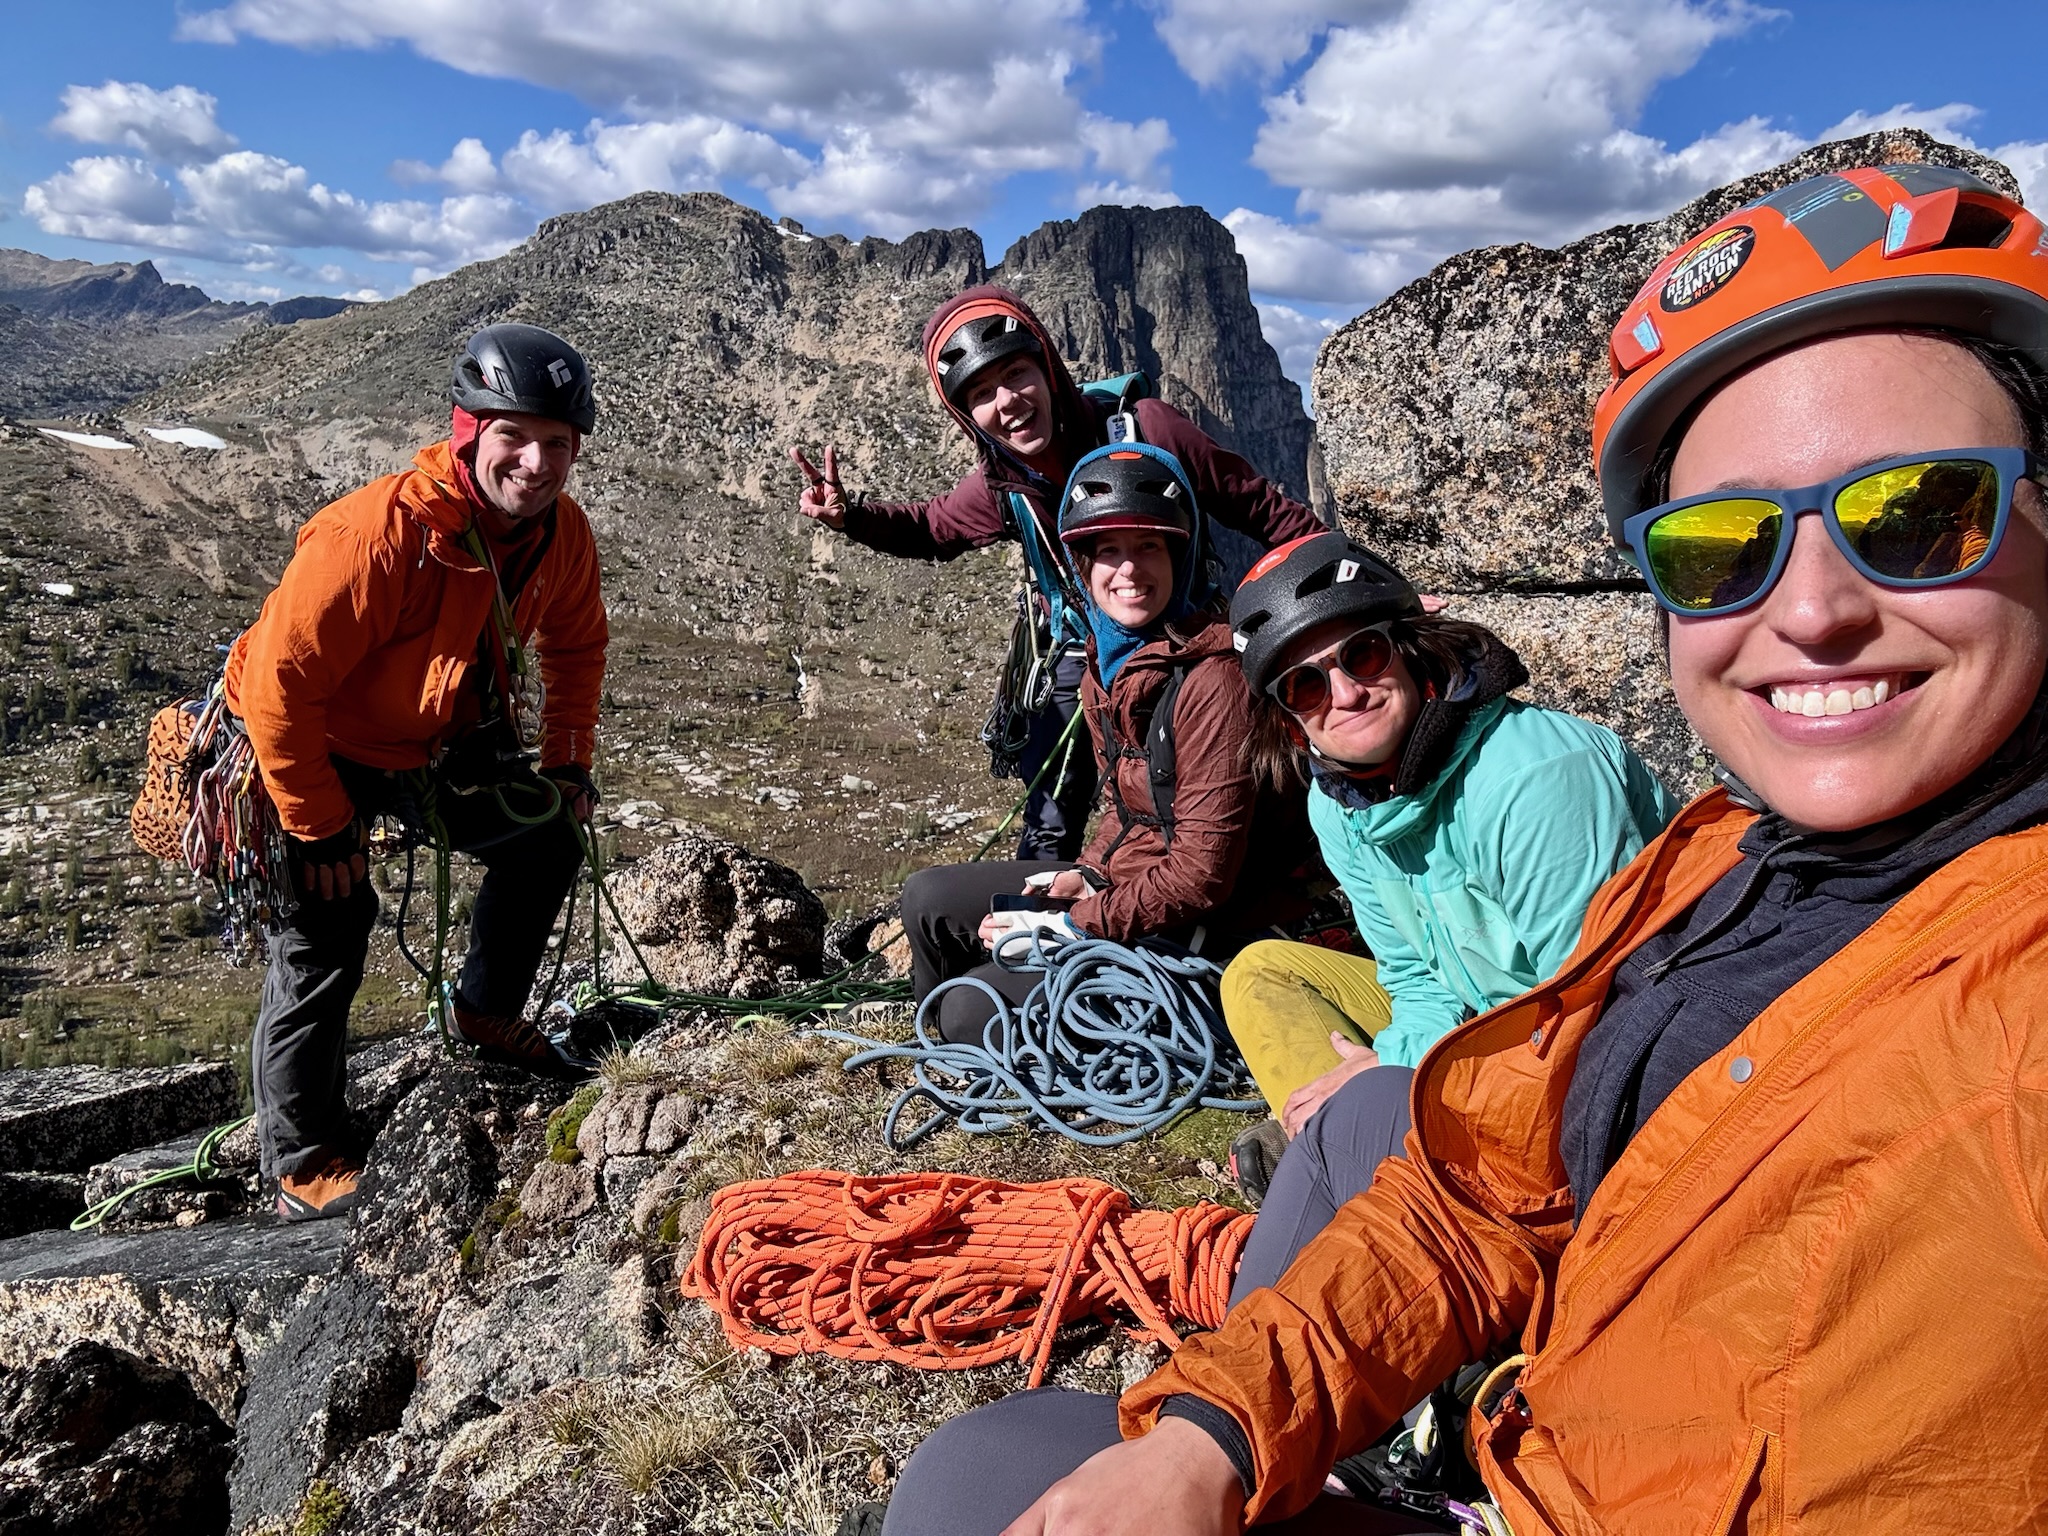
We had a delightful opportunity to make a 6-day trip into the Pasayten. The highly praised granite multipitch trad routes in the vicinity of Upper Cathedral Lake were the main draw for me, and I’m very stoked and grateful that we got to climb the two that we did: Pilgrimage to Mecca (4 pitches), and Cathedral’s SE Buttress (10 pitches.) While both were rated 5.9 in the beta we had going in, I found them both to be burly and surprisingly sustained for an alpine climb, and I think a 5.10a rating would better set expectations about the climbing there.
What we did
- Day 0 – 5 hour drive from Seattle, dinner in Winthrop, slept in our cars at the trailhead
- Day 1 – Thirtymile Trailhead to Four Point Lake (14 miles, 3800′ gain)
- Day 2, part 1 – Summit Remmel with light packs (4 miles r.t., 1800′ gain, class 1 scramble)
- Day 2, part 2 – move camp from Four Point Lake to Upper Cathedral Lake (10 miles, 2200 gain)
- Day 3 – climb “Pilgrimage to Mecca” (5.9+, 4 pitches) and summit Amphitheater
- Day 4 – climb Cathedral via the SE Buttress (5.10a, 10 pitches)
- Day 5 – side trip to summit Apex (2 miles r.t., 1000′ gain, class 1) while moving camp from Cathedral Lake down to junction camp (12 miles, 1000′ gain; so total 14 miles, 2000′ gain)
- Day 6 – Finish the remaining miles to exit (8 miles), lunch in Winthrop, 5 hour drive back to Seattle
I’m not saying that’s the optimal plan, it’s just what we chose to do. It worked pretty well for us. There’s a lot of potential different plans that could be made, adding or removing days.
Map of the Area
👆 I’ve put this caltopo map together after the fact, including the GPS tracks I recorded during each of our days, plus some additional route-possibilities we considered but didn’t end up travelling on this trip. I saved waypoints at quite a few trailside campsites & water sources that noticed while out there, and I’ve marked each of those on that map as well. There are definitely more established campsites & water sources out and about out there than the ones I managed to mark, these are just the ones I managed to note.

- What we did
- Map of the Area
- Some Big-Picture-Schedule Alterations to Consider
- Season
- Trailhead Options
- Elevations quick-reference
- Trail Milestones
- Gear
- Remmel
- Amphitheater – Pilgrimage to Mecca
- Cathedral – Southeast Buttress
- Apex
- Tungsten Mine
Some Big-Picture-Schedule Alterations to Consider
- 3 Day Blitz – Some people may opt to squeeze this into a 3-day trip, specifically targeting one climbing route. You certainly could do that, though it’s going to be a rather harrowing schedule: Day 1 hike in 20 miles, 5000’+ gain, with a ~40lb pack. Day 2 climb a pretty demanding route (SE Buttress may take ~11 hours camp-to-camp.) Then Day 3 hike out 20 miles. You could do it, but from my point of view, I wouldn’t recommend it, it sounds like a little too much in terms of very-full-days back-to-back. You’re going to be tired at the end of Day 1, and have a hard time getting up early enough & fresh enough to go for the SE Buttress on Day 2. Also, be aware: natural 3-day weekends from public holidays have a focusing effect, many other people will see a holiday weekend as their only opportunity and try to squeeze this into 3 days too, meaning the day you’re on the climbing route might actually be crowded, even though overall these routes get relatively little traffic and you likely would have had the route to yourself if you went any other day of the summer. Overall, I’m glad we opted to make this a full week vacation, rather than cram it into some 3-day weekend, which I was tempted to do when I first heard about this area.
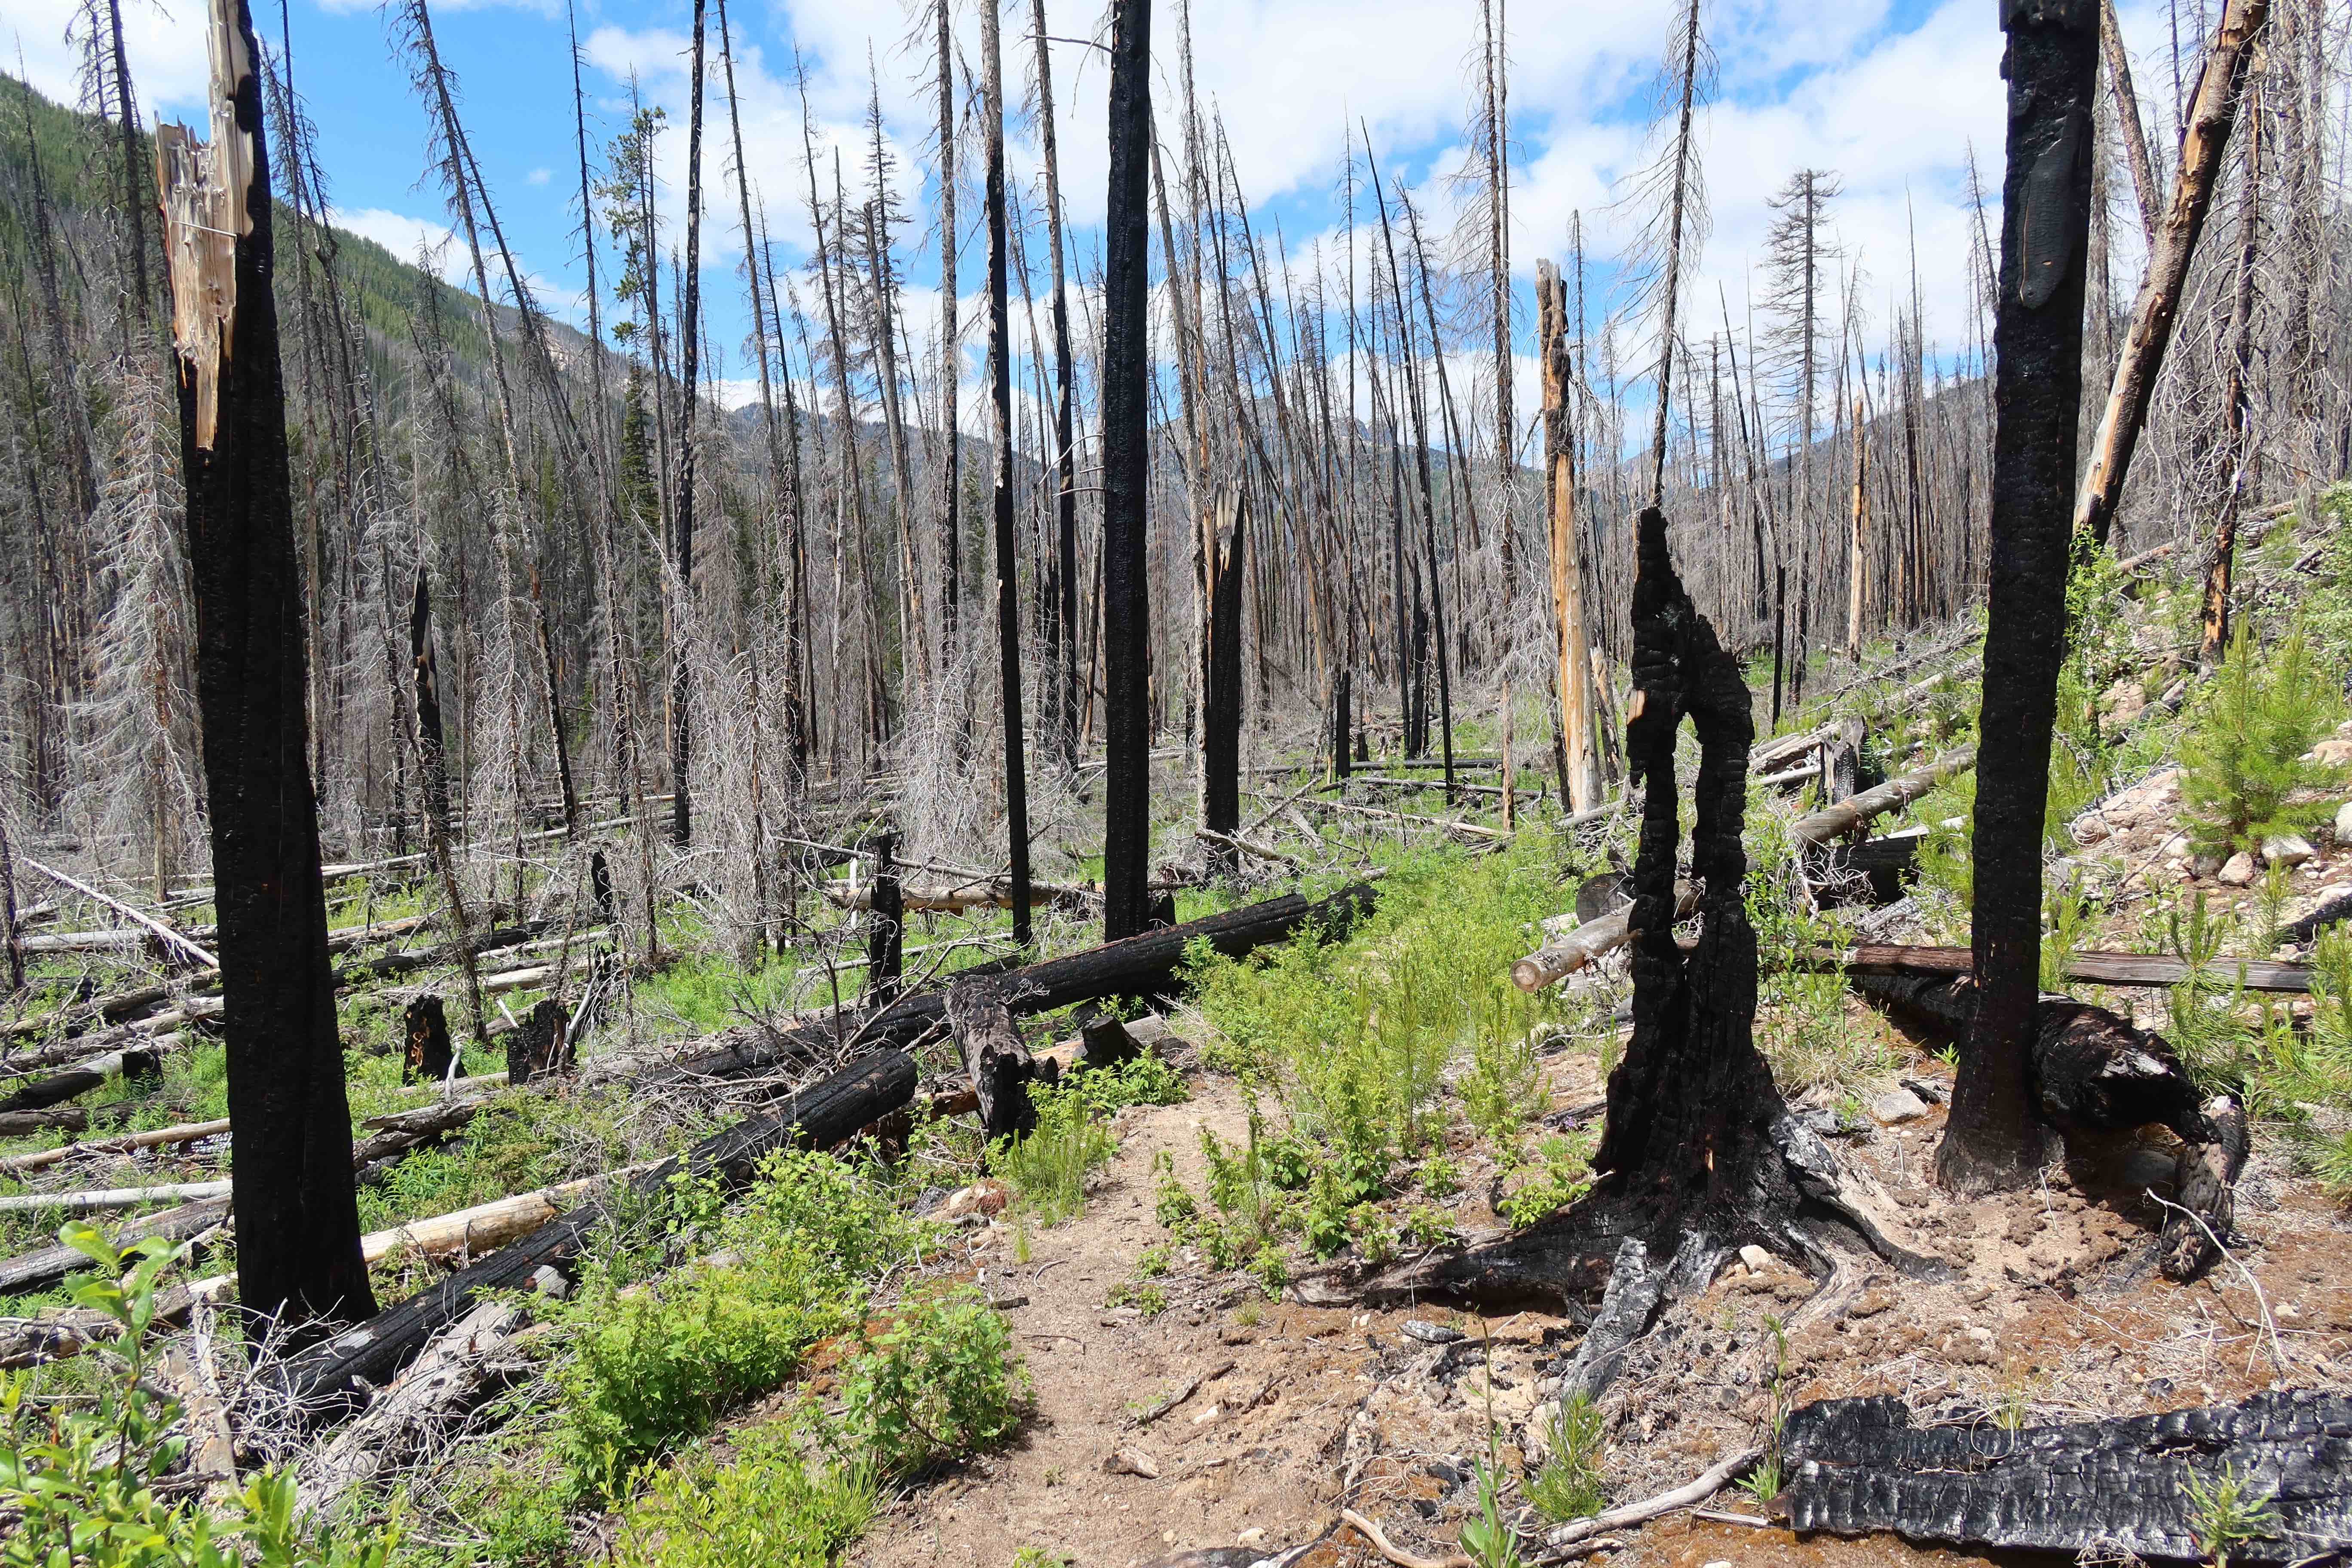
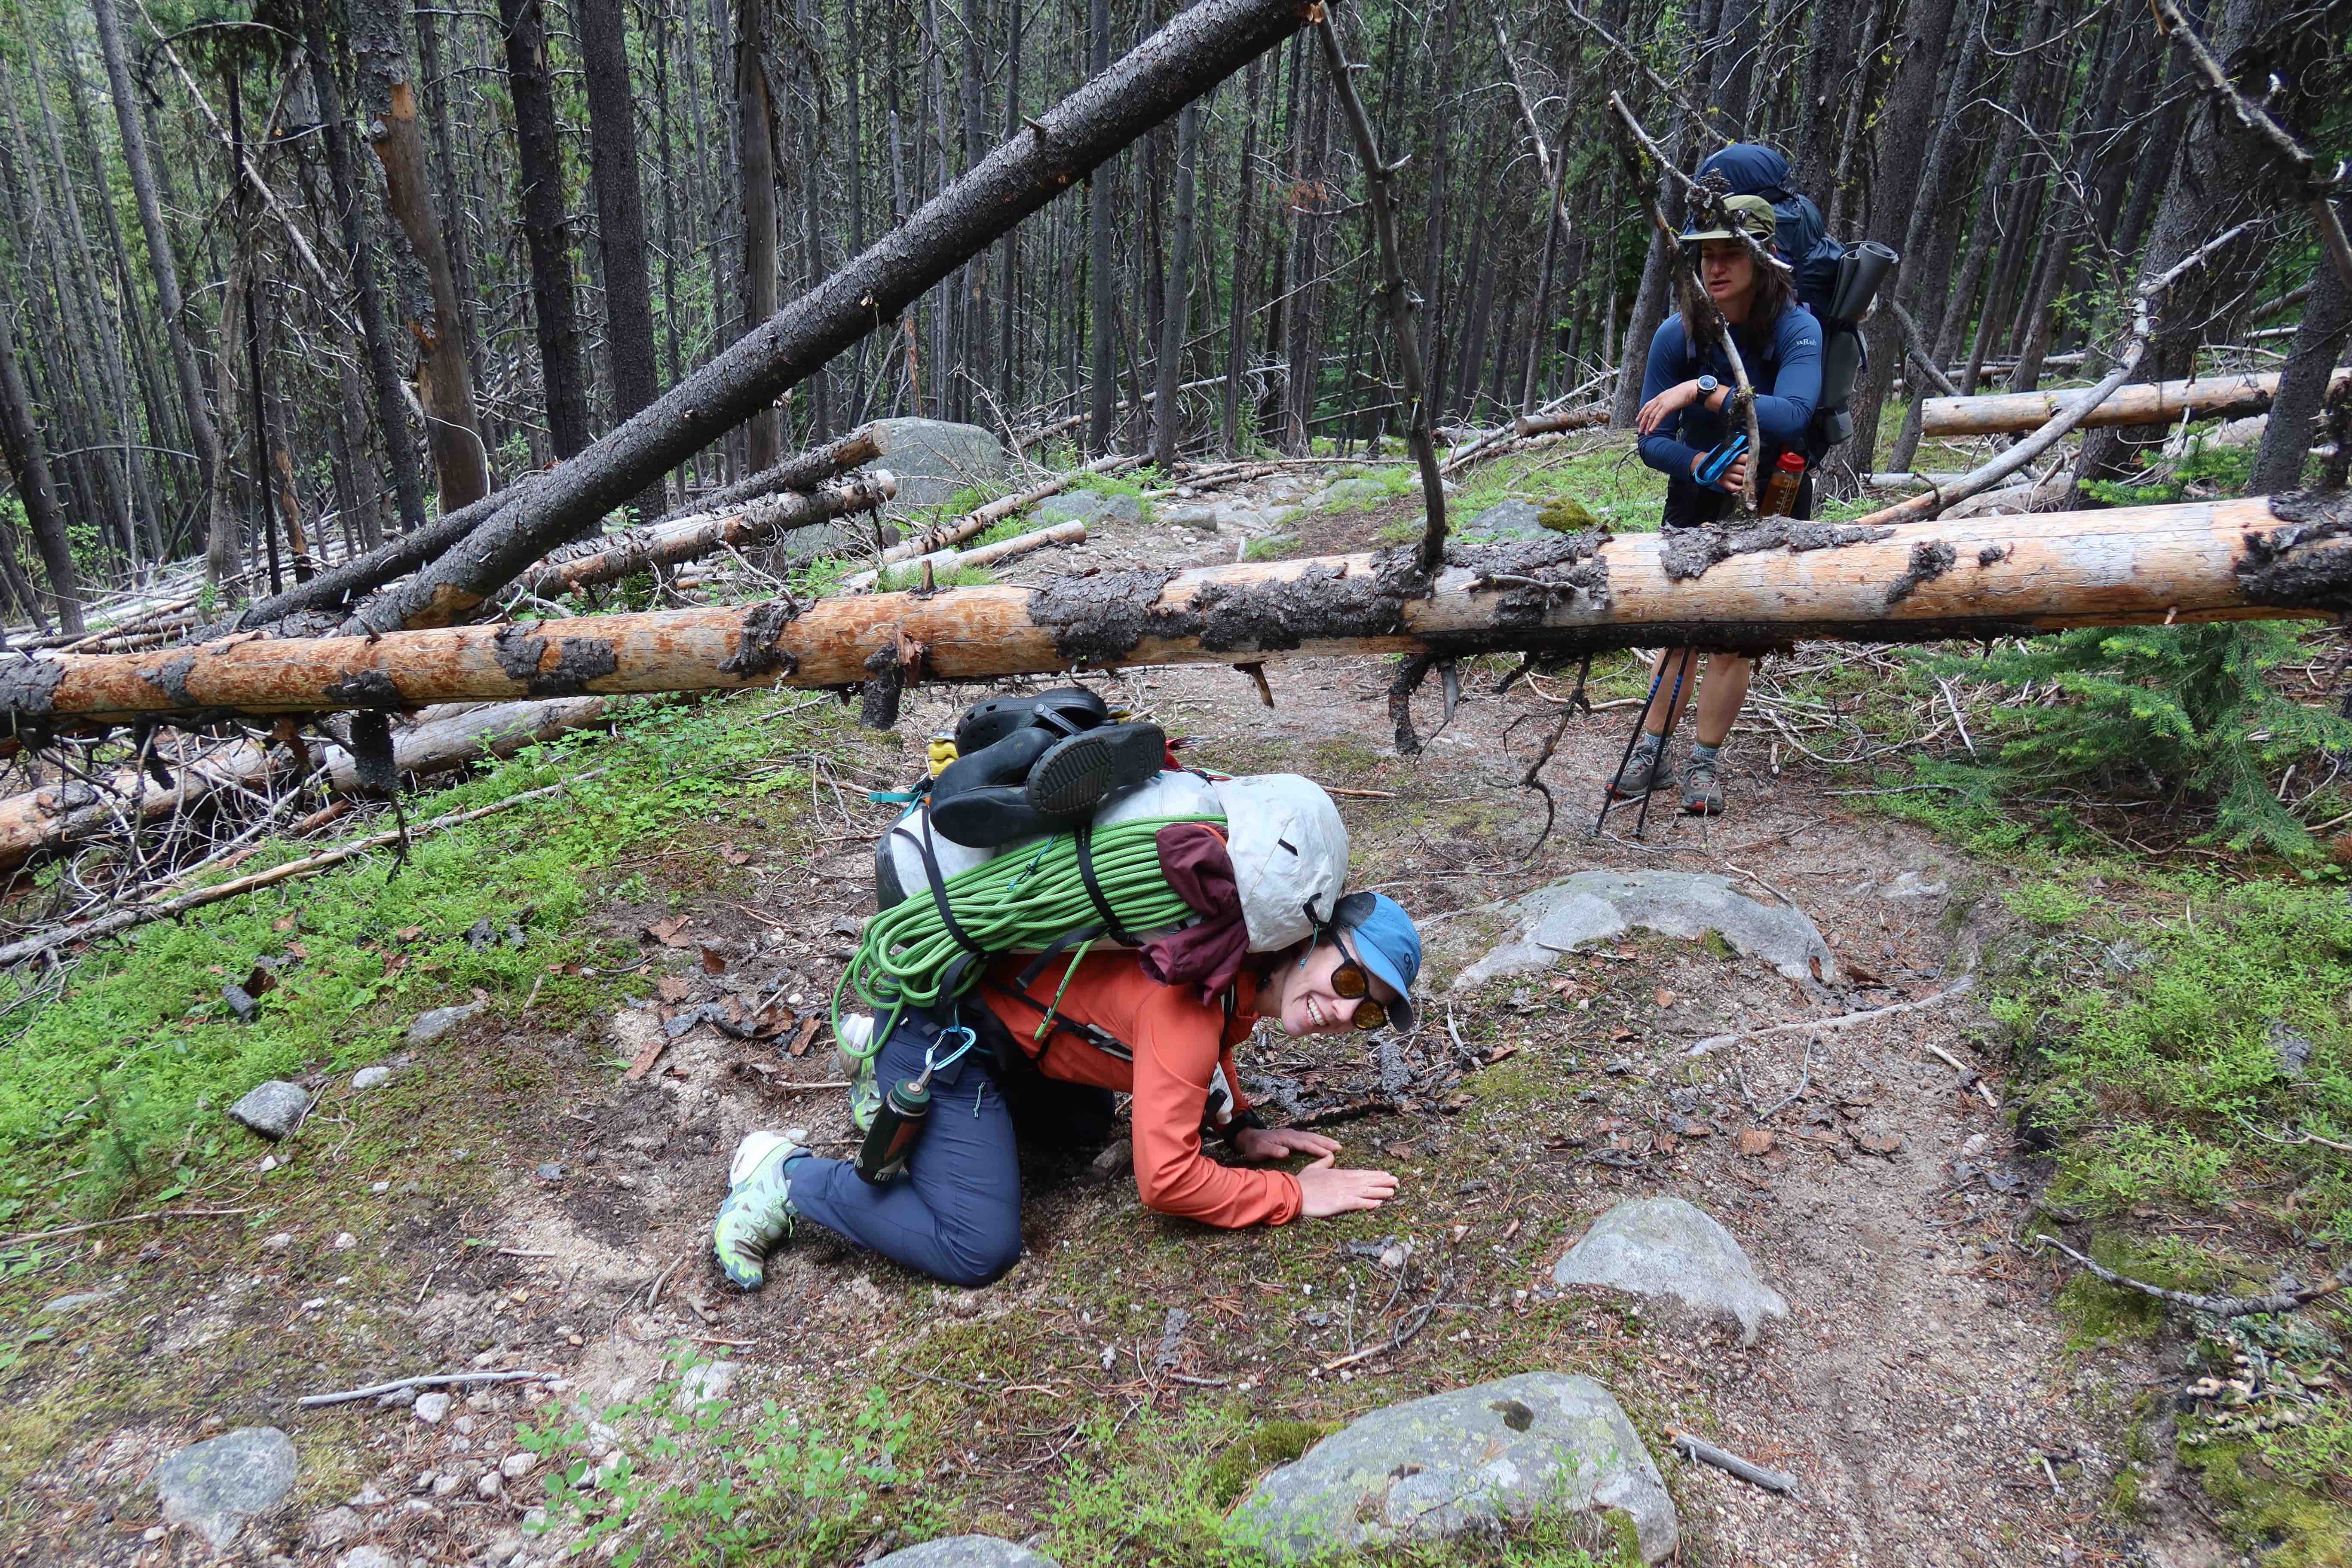
- Reroute to Avoid the Chewuch Burn – The least pleasant part of the hike for us was a section still recovering from the far-reaching Diamond Creek Fire of 2017, the section of the Chewuch Trail north of the Four Point Creek intersection, but south of the Lesamiz Trail. A forest of scorched trunks of burned trees remains standing but canopyless through there, making the fire feel more recent than then 7 years it’s actually been. Though the biggest impact to us was that there were many downed trees across the trail, maybe ballpark fifty blowdowns to duck or climb over through there, some of them sooty, blackening your hands or gear when you touched them. Later, we experienced the Tungsten Trail to be much more pleasant: no visual evidence of a burn, and very few blowdowns. It also offers the more-impressive-version of the first views of Cathedral Peak. It’s tempting to recommend using the Tungsten Trail both to go all the way in to Cathedral Lake, and all the way out, skipping the Chewuch side of the loop entirely. (Or perhaps explore Andrews Creek Trail?) However, the biggest downside of any such reroute is that it makes it harder to include a summit of Remmel in your itinerary, so I suppose it depends on how much you care about Remmel. I hate to say “skip it” though, we quite enjoyed the summit of Remmel, the trail up is mostly easy & pleasant, the views from the top of fantastic, and perhaps most importantly of all: Remmel looked really impressive once we got further north of it and were looking back at it’s north side, and it was fun to know we had stood on top of that.
- Alternative camp location for Remmel – We camped by Four Point Lake, and ran up to the summit of Remmel from there with light packs, which was an easy <4 hour morning activity. However, also moving camp later that day, starting at noon and taking almost 7 hours on top of what we had already done, made for a bit of a grumpy afternoon. (Probably contributing to our feeling of annoyance with the Chewuch burn-area blowdowns.) Plus, getting our full overnight packs up the 2.1 miles and 1650′ gain that is the Four Point Lake side trail on the first day felt a little silly knowing we’d immediately carry them back down that on the next day. I might encourage someone repeating our plan to instead add one day, choose to camp lower, and give the Remmel summit side-trip its own entire day. For example, if instead you camped along the Chewuch Trail near the Four Point Creek intersection, you could make a side-trip to Remmel from there that would be 8.2 miles round trip and 3450′ of gain, all with a light day pack, and let that be the only activity of the day, move camp the next day. You give up camping at Four Point Lake, but that’s not a great loss. Four Point Lake is nice, it is a lovely average alpine lake, but if you’ve been to many other alpine lakes, there’s nothing that is must-see different about this one.
- Consider adding a Rest Day – Our six-day itinerary certainly worked, and we got a lot done in that time, but it also felt like we were always busy. It’s beautiful out there, and a part of me wishes I could have spent one more day at Upper Cathedral Lake, perhaps without a scheduled activity. It would be a delightful place to have a slow day, and just soak in the scenery. Plus, we got lucky that we never got a drop of precip in our six days, we could have entirely missed out on one of the climbing routes if the weather and everything else hadn’t gone so right for us. Having a spare day available in the schedule would add some padding & insurance, just in case weather or something causes you to lose a day otherwise. You’re putting so much work into getting out here at all, might as well get the most out of it you can.
Season
A trip like ours is likely in good shape starting the 1st of July, and in-season until the first snow of October shuts things down. Our own trip was June 30th to July 6th (2024.) I had worried about the potential presence of snow out there that early in the summer season, and convinced the group to carry light ice axes and microspikes, neither of which we ever ended up needing at all, they proved to be entirely unnecessary weight. Despite the high elevations back there, it seems the snow melts away a bit earlier than the rest of the Cascades, almost entirely disappearing as June ends. Sure, in early-July there may still be patches of snow in some places, but most of those snow patches won’t matter: if it’s on-trail, then it’s flat enough that you can just walk over the snow with whatever footwear you’re wearing, and by July 1st any snow across the trail will be very brief. The scramble routes on most peaks are on south-aspects, so they melt out relatively early too. The only place I could see actually requiring ice axe and/or microspikes in July is Amphitheater’s northern scramble gully, but that can easily be avoided by choosing the southern easy-walking route instead, which dips south and circles around Amphitheater’s West Peak, it’s only slightly longer and it’s a lovely meadow walk; it’s not worth carrying an ice axe for your entire trip just for that one gully.
Trailhead Options
With the goal of getting to Upper Cathedral Lake, three different trailheads in Washington offer relatively similar stats for getting there. We opted to both begin & end from the Thirtymile Trailhead. You should consider what your drive-time is to each, whether you want to do a loop (Andrews Creek & Thirtymile are only 5.5 miles apart on the same road, so a car-shuttle would be very easy to set up,) and what the last reported condition of each trail is. (The state of blowdowns, etc.) (There is also the additional possibility of driving into Canada, and walking across the border to approach Cathedral Lake from the north, but that didn’t seem worth it.)
- Andrews Creek Trailhead (Google Maps) (WTA) – 19mi and 5550′ gain to get to Cathedral Lake
- driving time & distance are the same as for Thirtymile Trailhead, just 5.5 miles / 10 minutes shorter
- Thirtymile Trailhead (Google Maps)
- Cathedral Driveway Trailhead (Google Maps)
- compared to Thirtymile, skips the first 4.8mi and 1200′ of gain, but adds it’s own 2.3mi (so net you’re still shorter by 2.5mi,) and adds 1300′ of gain at the very end as you exit. So the stats into Cathedral Lake are:
- Chewuch River Trail – 17.4mi and 3700′ gain to get to Upper Cathedral Lake
- Tungsten Trail – 17.2mi and 4030′ gain to get to Upper Cathedral Lake
- if driving from Seattle via I-5 and Hwy 20, 310 miles, ~7 hour drive
- if driving from Seattle via I-90 and Hwy 97, 307 miles, ~6 hour drive
Elevations quick-reference
- Trailheads
- 3080′ – Andrews Creek Trailhead
- 3430′ – Thirtymile / Chewuch / Tungsten Trailhead
- 5570′ – Cathedral Driveway Trailhead
- Camps & Trail Milestones
- 4300′ – Cathedral Driveway / Chewuch trail intersection
- 4340′ – Fire Creek intersection meadow camp
- 4670′ – Horseshoe Creek / Chewuch River Junction camp
- 5260′ – where Four Point Creek splits off of Chewuch Trail
- 6850′ – Four Point Lake
- 5800′ – Cinch Creek forest camp
- 6800′ – Tungsten Mine Camp
- 7300′ – Apex Pass
- 7570′ – Cathedral Pass
- 7380′ – Upper Cathedral Lake
- Summits
- 8685′ – Remmel Mountain
- 8601′ – Cathedral Peak
- 8269′ – Amphitheater Peak (south peak is true summit)
- 8302′ – Apex Mountain
Trail Milestones
If you start from the Thirtymile Trailhead, and go to Upper Cathedral Lake, here’s a breakdown of some notable distances & gain along that route of travel. (If you start from the “Cathedral Driveway” trailhead instead, you can translate the numbers by subtracting 2.5 miles and 1200′ of gain from each.) Also note, the milage numbers I list here are “map miles”, they represent distances on-paper from an ideally-smooth trail line. If you track distance with a GPS or smartwatch, I wouldn’t be surprised if you see mileage numbers recorded that are 10% to 20% larger than these, given all the little extra movements inherent in that real-time tracking.
- at 3430′, mile 0, 0′ gained – Thirtymile / Chewuch / Tungsten Trailhead
- at 3825′, mile 1.3, 425′ gained – Pasayten Wilderness Boundry
- at 4300′, mile 4.8, 1200′ gained – Cathedral Driveway trail meets up with Chewuch Trail
- at 4330′, mile 5.5, 1330′ gained – Fire Creek intersection & meadow camp
- at 4370′, mile 6.0, 1420′ gained – Basin Creek crossing
- at 4660′, mile 8.2, 1750′ gained – Horseshoe Creek / Chewuch River Junction camp
- at 4660′, mile 8.3, 1760′ gained – major Y, Chewuch & Tungsten trails split
If continuing up the Chewuch trail:
- at 5260′, mile 12.1, 2500′ gained – Four Point Creek trail splits off Chewuch (there’s a medium-sized campsite beside the Chewuch trail 0.2 miles before this)
- if you make a side-trip up to Four Point Lake or Remmel’s summit:
- from trail intersection to Four Point Lake adds 2.1 miles, 1600′ gain (4.2 miles round trip)
- from Four Point Lake to Remmel’s summit adds 2.2 miles, 1800′ gain (4.4 miles round trip)
- from trail intersection to Remmel’s summit adds 4.3 miles, 3400′ gain (8.6 miles round trip)
- a bushwhack “shortcut” is sometimes done from Four Point Lake due north to intersect the Chewuch Trail again at 6040′. In theory, the shortcut is 1.8 miles, gains 550′, then drops 1350′, and replaces a section of trail that would have been 5 miles, drops 1650′, re-gains 830′. However, from what we could see, the number of blowdowns through the forest there looked very dense, and it seemed doubtful that the “shortcut” would be faster time-wise, so we did not attempt it.
- at 5690′, mile 14.2, 2950′ gained – trail crosses Cathedral Creek (a Trail Cat Jim trip report mentions camping here, but I didn’t see the campsite myself)
- at 6040′, mile 15.0, 3300′ gained – where the bushwhack “shortcut” would have rejoined (no visible evidence)
- at 7000′, mile 17.4, 4280′ gained – turn onto Lesamiz Trail (never got all that close to Remmel Lake. Lovely meadow-walking ahead.)
- at 7290′, mile 18.6, 4630′ gained – Lesamiz Trail meets the Boundary Trail
- at 7380′, mile 19.9, 4900′ gained – arrive at Upper Cathedral Lake
If continuing up the Tungsten trail:
- at 4660′, mile 8.3, 1760′ gained – major Y, Chewuch & Tungsten trails spit
- at 5800′, mile 10.5, 2950′ gained – Cinch Creek camp
- at 5820′, mile 11.8, 3100′ gained – a small poor campsite trailside, near a swampy area
- at 6800′, mile 14.3, 4080′ gained – old Tungsten Mine ruins, cabins, campsites next to cabins
- at 6850′, mile 14.7, 4140′ gained – campsites in forest
- at 7300′, mile 16.0, 4600′ gained – Apex Pass
- if you make a side-trip to Apex’s summit, that adds 1 mile, 1000′ gain (2 miles round trip)
- at 7570′, mile 19.1, 5230′ gained – Cathedral Pass
- at 7380′, mile 19.7, 5230′ gained – arrive at Upper Cathedral Lake
Gear
- A 50L – 65L pack for packing everything into
- Climbing Gear
- Rope – 60-meter skinny single rope was ideal. I had a 60-meter 8.7mm Mammut Serenity, which was perfect.
- Helmet
- Rock shoes
- Harness – I carried my cragging harness out here rather than my most minimal alpine one, and I was glad for it, mainly for the gear-loops. The ease of getting gear on and off proper stiffened gear-loops was worth it to me, versus the tiny floppy string loops of my minimal alpine harness.
- The usual bits on the harness for multipitch climbing: belay device, a few lockers, a cordelette for anchors (I brought 20′ of Bluewater Titan cord, which makes an excellent lightweight cordelette,) and the pair of small prusik loops I always have on my harness in case of emergency
- nut tool
- crack gloves – I was very glad to have crack gloves
- chalk – I almost never bring chalk on alpine climbs. That included this one, I did not bring chalk for this. However, I did find myself with sweaty hands on a few hard moves kinda wishing for it. I got through okay, but if I did it again, I would bring chalk. I may imitate Kelsey’s brilliant home-made-ultralight-chalk-bag: she took a zip-loc baggy, put a piece of tape on one side to create a reinforcement, poked holes through the tape and threaded a shoe-lace through, and threw a chalk-ball in it. Presto, the lightest & cheapest chalk-bag you could imagine. Impressively, it held up for the entire trip!
- We didn’t do any rappelling. Things like a PA (Personal Anchor) and rappel-gloves could be left out. Obviously, any mid-route bailing would require rappelling, but if the need arose, you could turn a double-runner into a PA / rappel-extension as needed.
- We did not bring radios, and we felt fine without them.
- a small summit-pack to climb with (e.g. REI Flash 18 pack or similar)
- Rack
- somewhat recommended rack:
- cams: single BD #4 & #3, doubles of BD #2 – #0.3, single #0.2
- set of nuts
- slings: perhaps 12 to 14 slings total, like 10 single-length and 4 double-length
- notes on the rack:
- If doing Pilgrimage to Mecca, you definitely need the #4. For Cathedral’s SE Buttress, I don’t recall the #4 being crucial gear at any point, but since we had it with us, we placed it plenty.
- Optionally, a second #3 would be handy too. You can make do with a single #3, but having a second would be more comfortable at times. Many people will be fine with a single #3, but if I do this again myself, I’ll bring a second #3 for myself.
- I had also included a BD #0.1. I don’t recall it ever being critical, but it was nice-to-have. I think I’d leave it out if I did it again though.
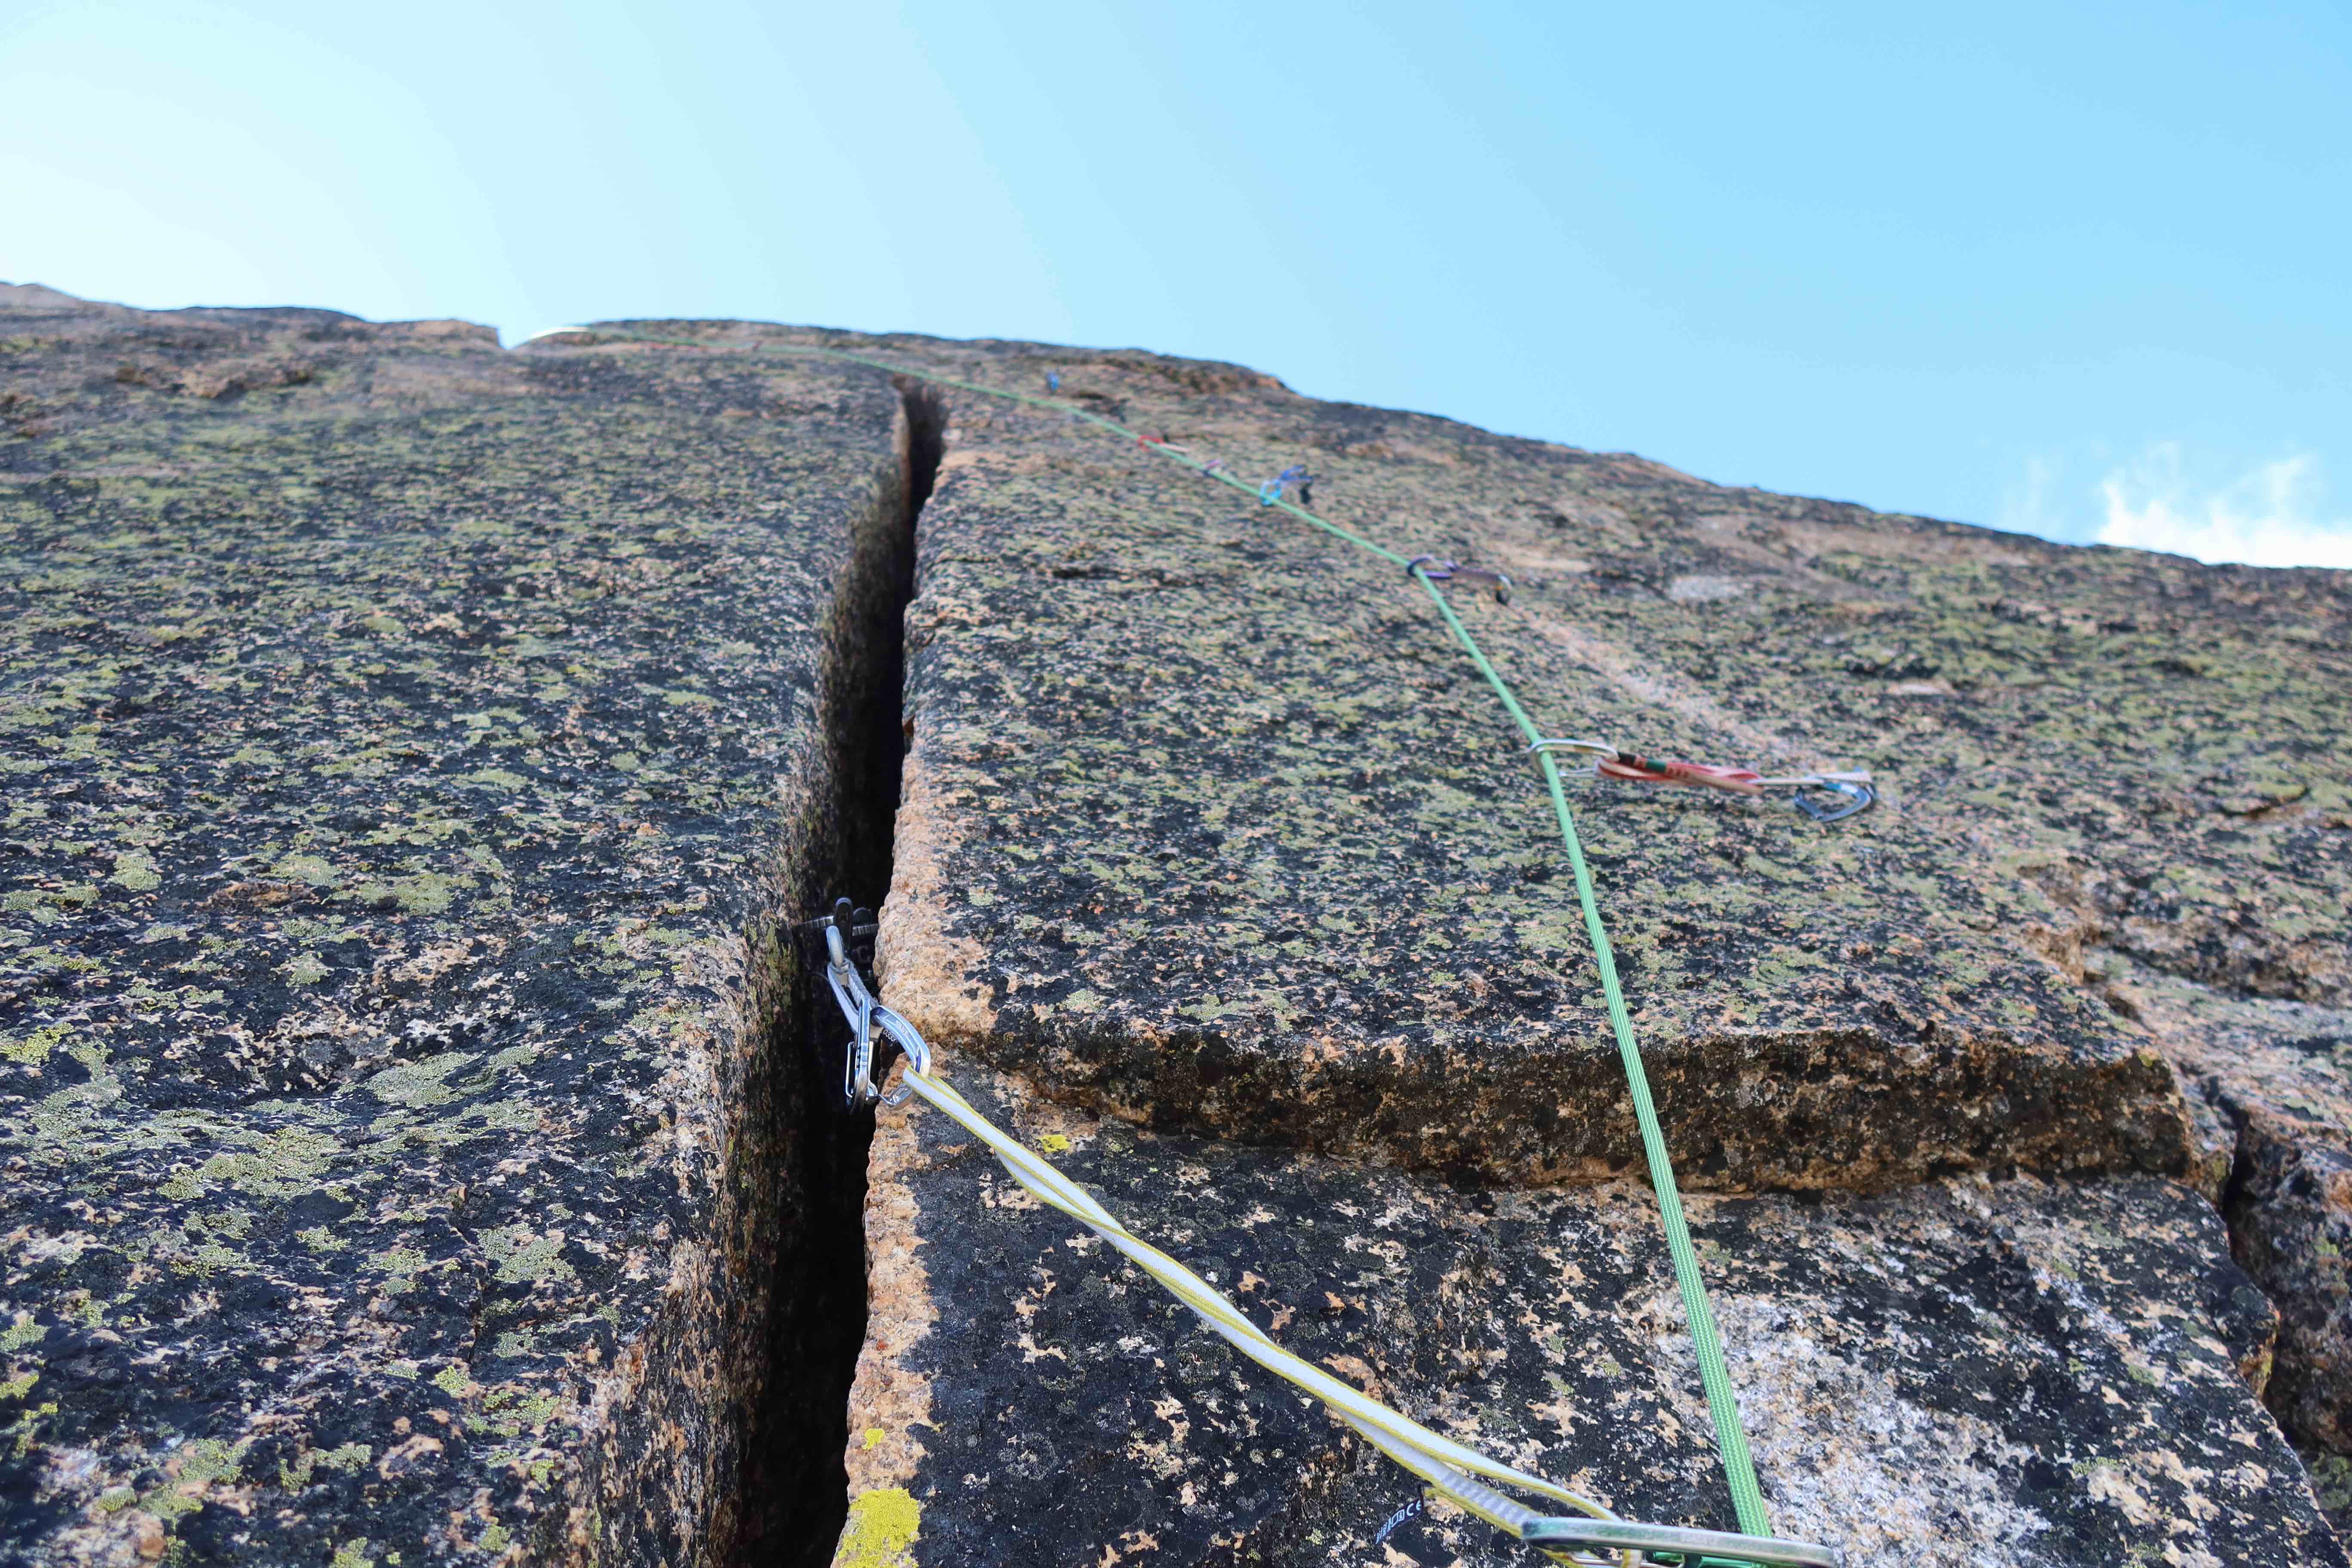
- Both routes had pitches that were long, hard, and sustained 5.9. If it weren’t for the twenty-mile approach, I would have very much preferred triples of certain core cam sizes (e.g. triples of BD #1 – #0.4) and more slings, similar to how I’d have a preference for triples in some sizes if I was leading a 100′ sustained 5.9 pitch at a crag, since that’s fairly close to my limit right now. Bringing only doubles is a weight-saving trade-off, and works out fine as long as you do some degree of back-cleaning gear at times, moving already-placed cams to a higher placement during a moment in a stable climbing stance, not necessarily using a sling on every cam placement by clipping the cams directly when you can get away with it, etc.
- somewhat recommended rack:
- If you are not going for the multipitch climbing routes but do plan on scrambling summits: Remmel, Amphiteather, and Apex are all simple walk-ups, no special gear needed, you don’t even need a helmet for those. Cathedral’s scramble route is worth bringing some gear for, the “leap of faith” chasm will prevent most scramblers from summitting without a rope for reassurance. (In other words, personally I wouldn’t do it without a rope.) For Cathedral, do bring a helmet, and a short scramble-rope (guessing: even a 50-foot rope would be enough,) very light alpine harnesses, and perhaps a little bit of pro (e.g. a couple long slings, small set of nuts, perhaps a few cams, like BD #0.5 #0.75 & #1.)
- Footwear
- For the trail miles, either light hiking boots, or trail-runners, or approach shoes. Trail-runners were a pretty ideal choice, as long as you’re sure you are okay without the ankle-support of boots, considering the heavy packs. There were some wet & muddy sections of trail, so trail-runners probably mean you’ll end up with wet toes at times, but if it’s warm enough out that doesn’t really matter. Keep in mind that you’ll need walk-off footwear that you carry with you up both of the multipitches, so if you hike the long approach in boots, you should probably also carry in a pair of trail-runners or approach shoes for use on the climbing days. While most other times I prefer approach shoes over trail runners for scrambling, the scrambling on the walk-offs is reasonably minimal, I found that trail-runners were definitely fine for all of Amphitheater. On Cathedral, I think it makes sense to keep your rock shoes on a little past the summit, changing into trail runners when you arrive at the leap-of-faith chasm.
- Creek-wading shoes are probably a good idea. While not absolutely mandatory, I’d definitely recommend them. Crocs were ideal. Especially since they did double-duty as comfy camp shoes.
- Optional: Camp-shoes. I brought a pair of crocs, and definitely appreciated wearing those around camp, as a change from what I had spent the day hiking in.
- Already mentioned above in the climbing gear category, but I suppose rock shoes go in the footwear category as well, so here’s a reminder to not forget them. I brought Scarpa Generators (my favorite trad hightop these days) in a half-size larger than my typical cragging rock-shoes, and they were perfect for wearing all day.
- No need for ice axe or traction devices – See my comment in the “Season” section earlier. I think it’s better to just go after July 1st, when it’s unlikely that an ice axe will be needed anywhere.
- The usual camping gear
- tent
- sleeping bag / sleeping pad / pillow / sleep-aids (optional eye mask, ear plugs, melatonin. Most campsites are pleasant and quiet, so sleep-aids are not as important. All campsites were on dry ground, and although we had one night in the mid-30°’s, temps were never down to the freezing point overnight.)
- stove & fuel. Any style of stove would be fine. Jetboil-style canister stoves are especially convenient. Then, always the difficult question: how much fuel?? We went through roughly two medium (220 gram) butane canisters for our group of 5 people spending 5 nights. I expect you’ll go through one medium canister (the 220 gram net-weight size) for every two people in your group for a roughly weeklong trip. Perhaps bring slightly extra fuel, in case that estimate is off.
- water filter. Each of us had our own personal Katadyn BeFree, plus we had one hanging gravity filter which we shared at camp, which worked really well. In terms of water-capacity, for a lot of the trail miles it was fine generally carrying just 1 liter of water at a time, creek-access was regular enough that we could refill every hour or two during the long hike in & hike out. At camps, I appreciated having capacity to store 4 liters at a time. On Cathedral’s SE Buttress, I carried 3 liters in my summit-pack when starting the day from camp, and proved to be an ideal amount for that day.
- for food storage, hang bear bags from trees. A stuff-sack or two, and 50′ of 3mm cord worked perfectly. Since we had a lot of food initially, each person needed their own individual 50′ of cord and had to hang independently. There were decently tall trees everywhere we camped.
- For bathroom needs, a small light trowel is useful, plus toilet paper, and at least one blue-bag for packing out used TP. It seems fine to bury human-waste at all camps, though I would advocate for packing out the used toilet-paper, since that takes so much longer to break down. In the Upper Cathedral Lake area, make sure you travel quite far from camp before burying, so that we don’t start developing mine-fields near campsites. If the popularity of Upper Cathedral Lake as a destination rises in the future, it may eventually become necessary for that zone to become bluebag-only, where all human waste needs to be packed out, but I don’t think we’ve quite crossed the threshold there yet.
- For bugs: in July & August, bringing a bug head-net is recommended. Pre-treating clothing at home with permethrin can really help too. The bugs weren’t that bad, they were far less than the worst I’ve seen elsewhere, but they certainly were present and just regular-levels of annoying.
- Optional: A battery-bank & charging cables for your phone, your smart-watch, etc. My phone is my main way of carrying and checking maps & beta these days, and it would be hard-pressed to last for a six day trip without at least some recharging while out there.
My pack weighed in at an even 50lbs at the trailhead, which included 8lbs for the trad-rack of cams/nuts/slings, a few more pounds of my individual climbing gear like harness/shoes/helmet, about 10lbs of food, and initially just 1 liter of water. Others in the group managed to start with packweights more in the mid-40’s. Jessica carried our rope, which weighed 7.1lbs. We had also brought light ice axes & microspikes, which proved to be completely unnecessary weight.

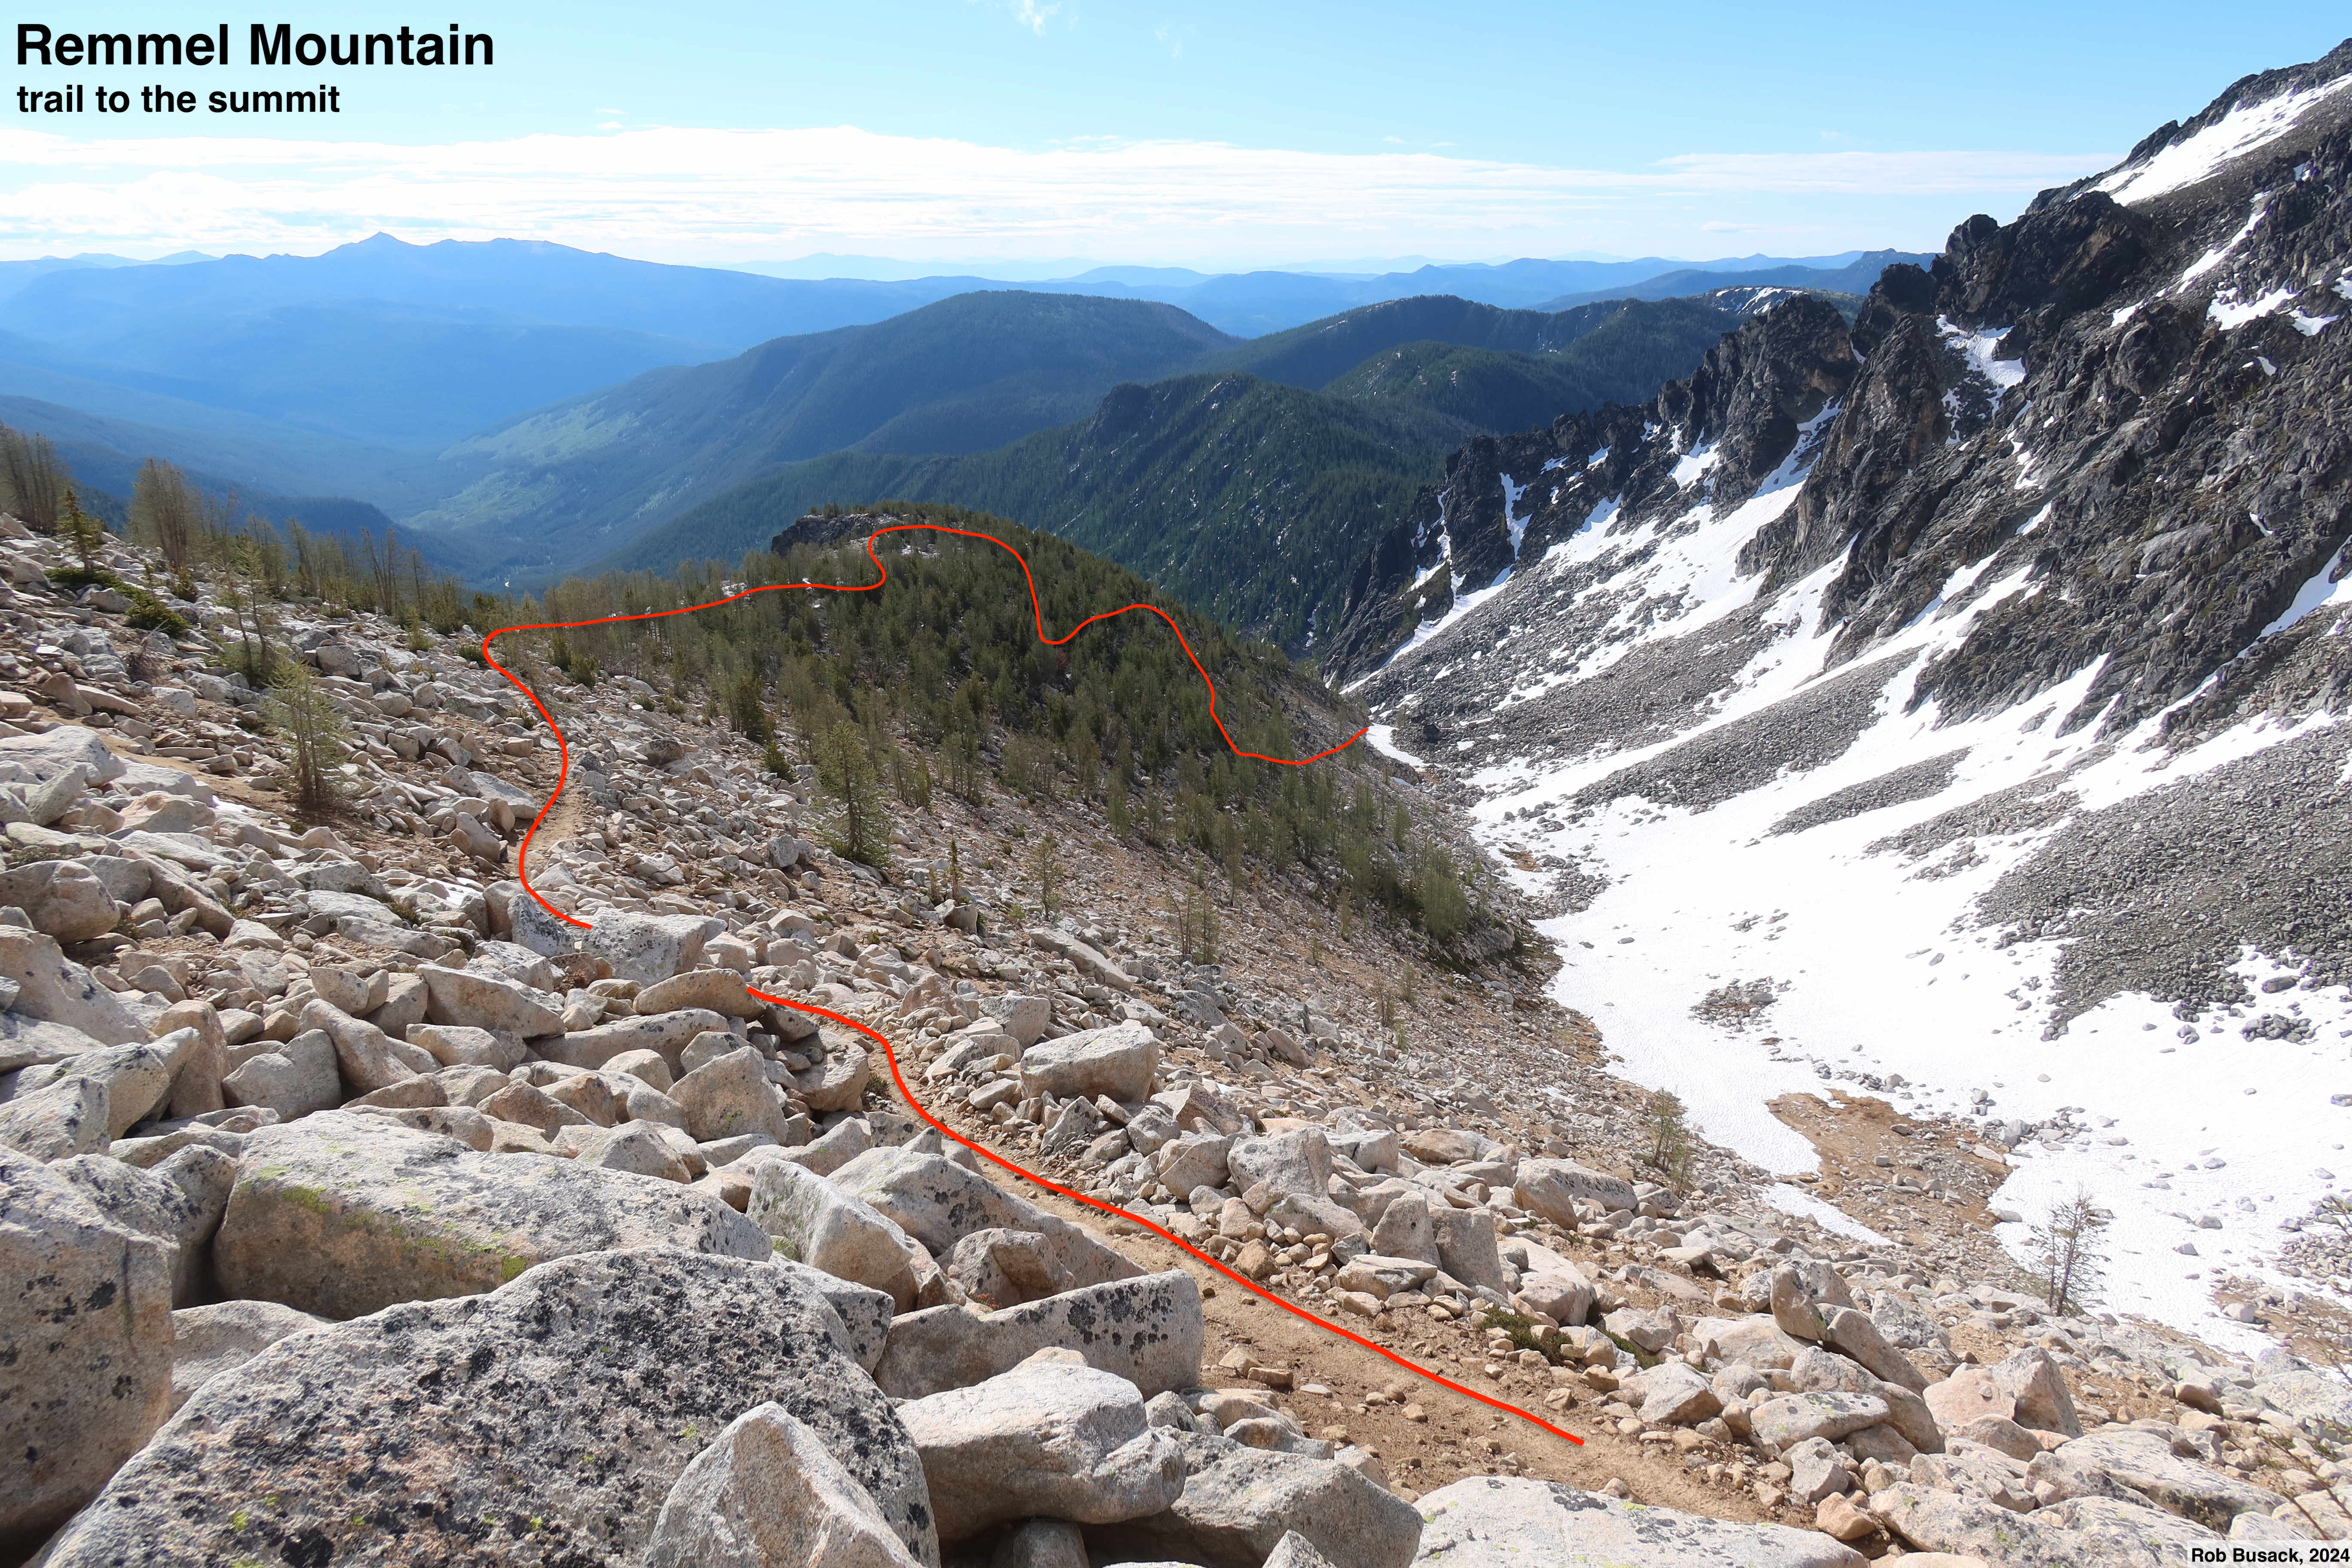
Remmel
Getting to the summit of Remmel is an easy walk-up. A surprisingly good trail exists all the way to the summit.


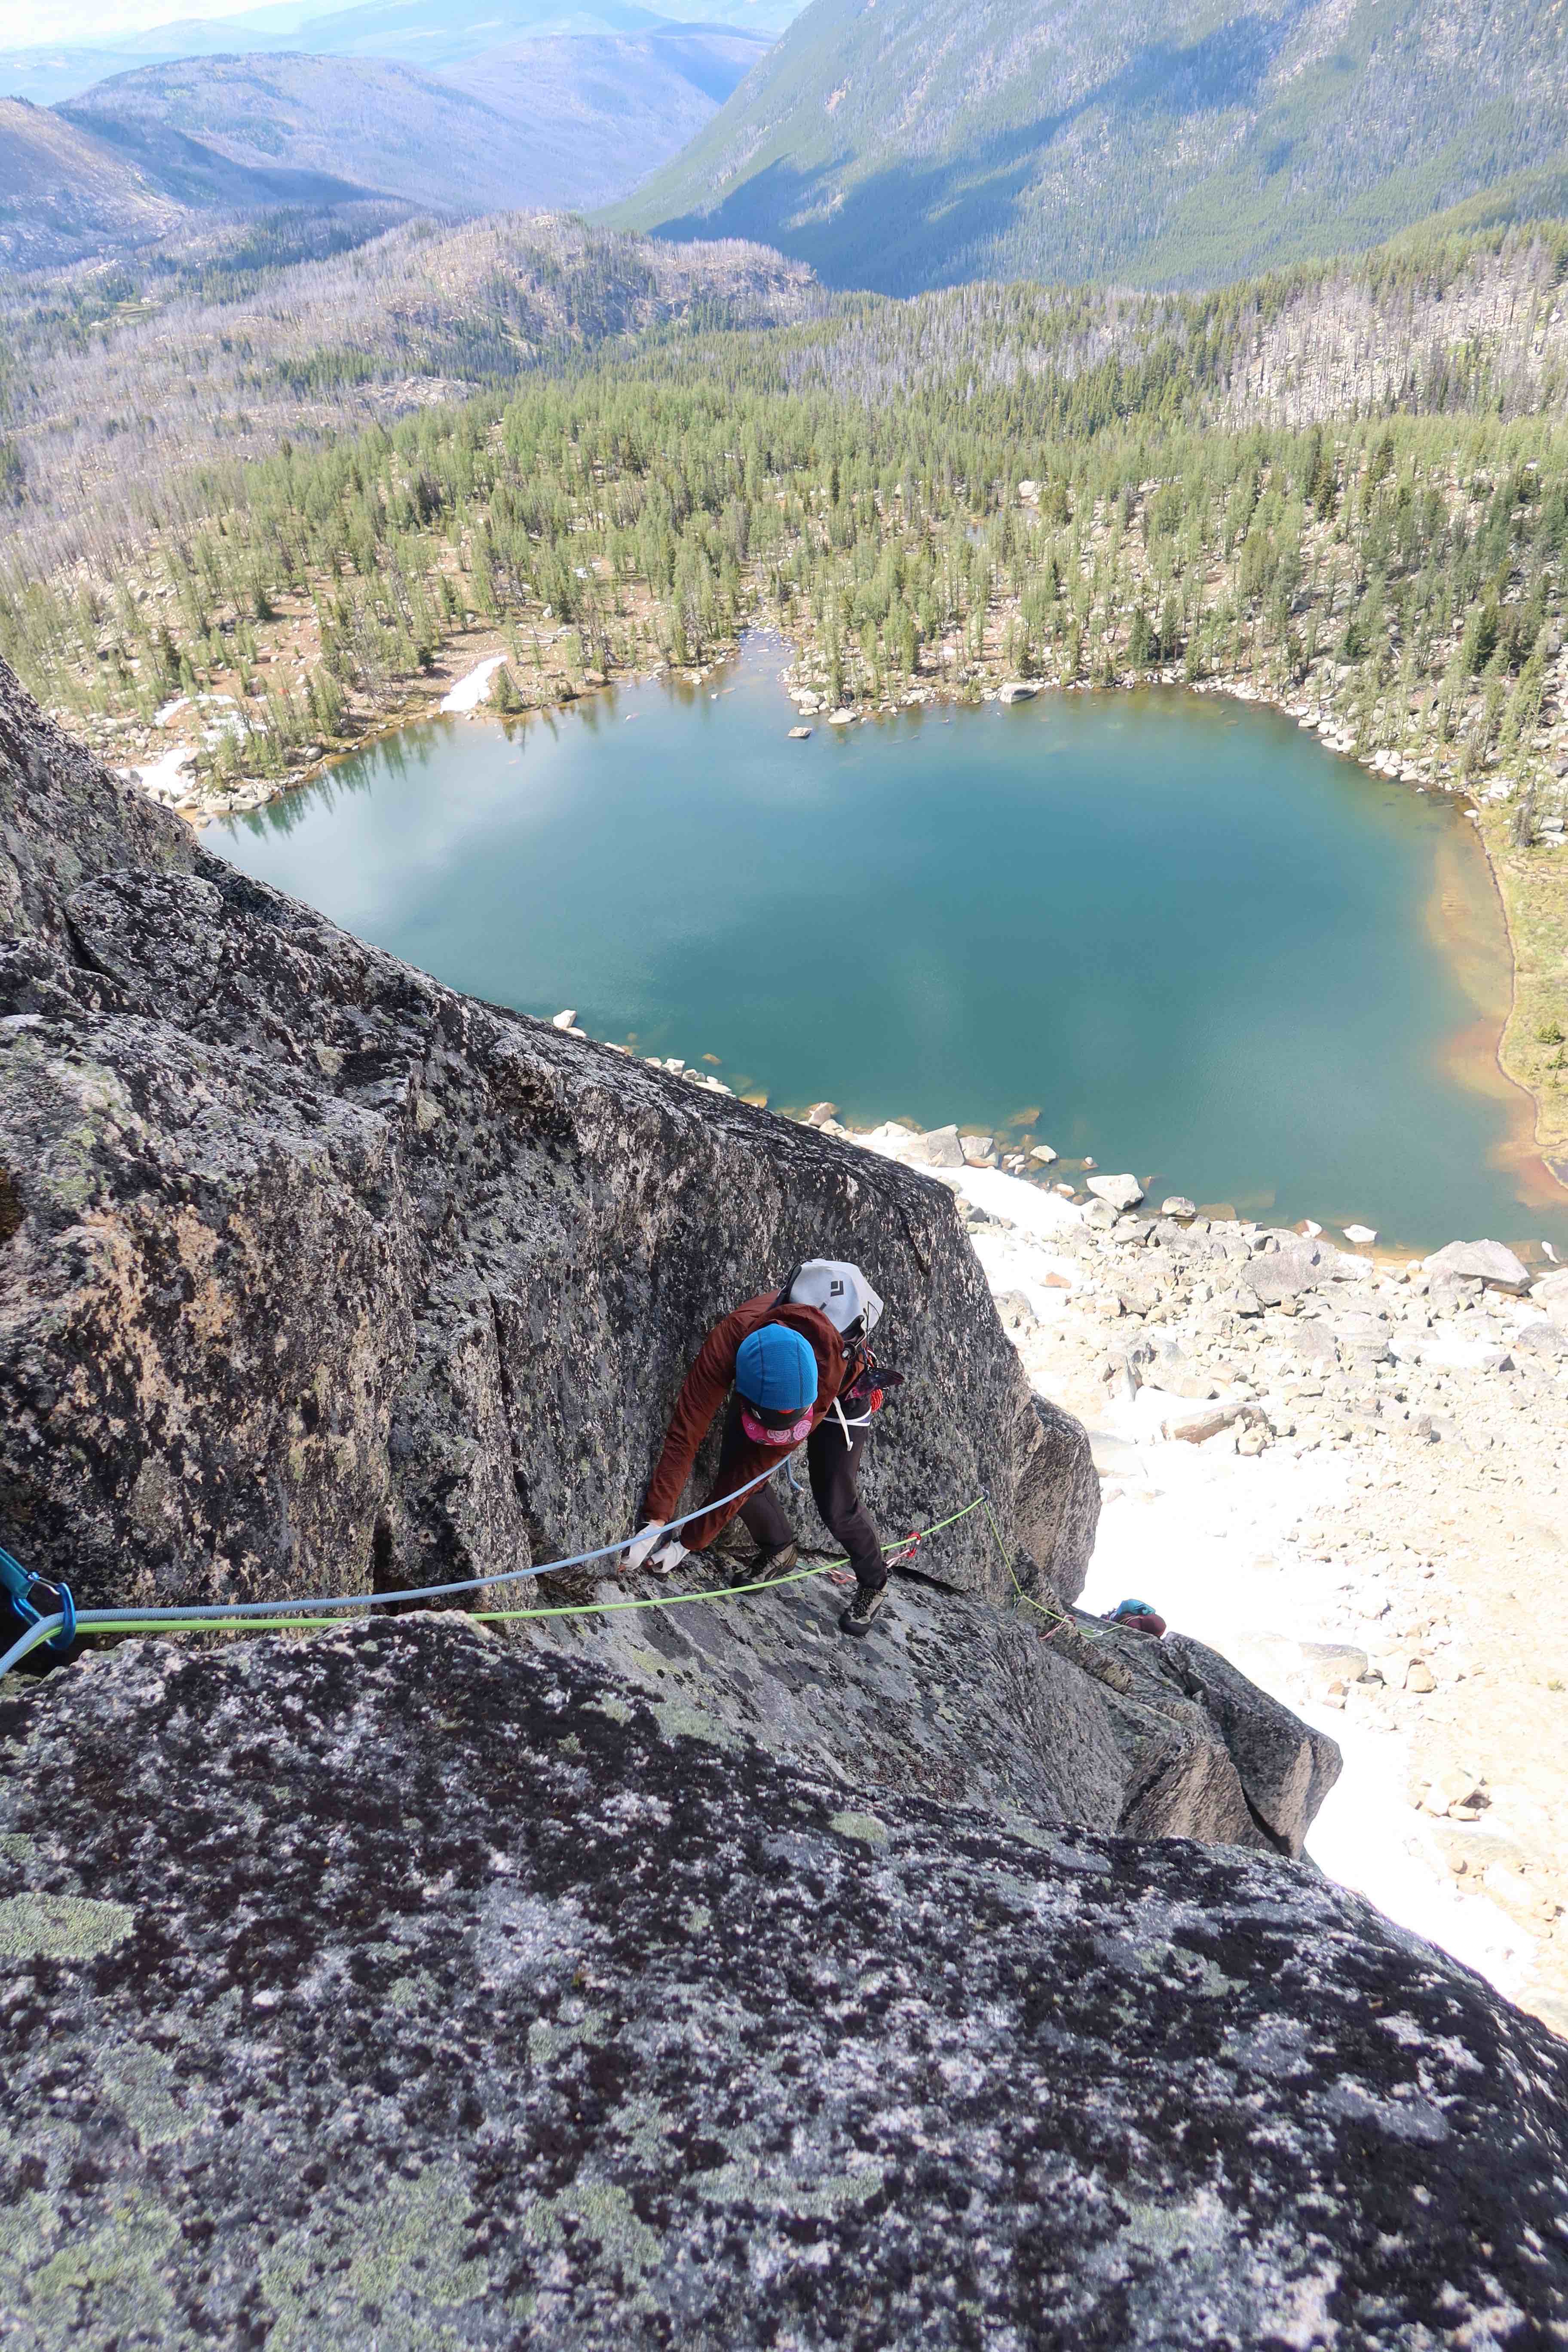
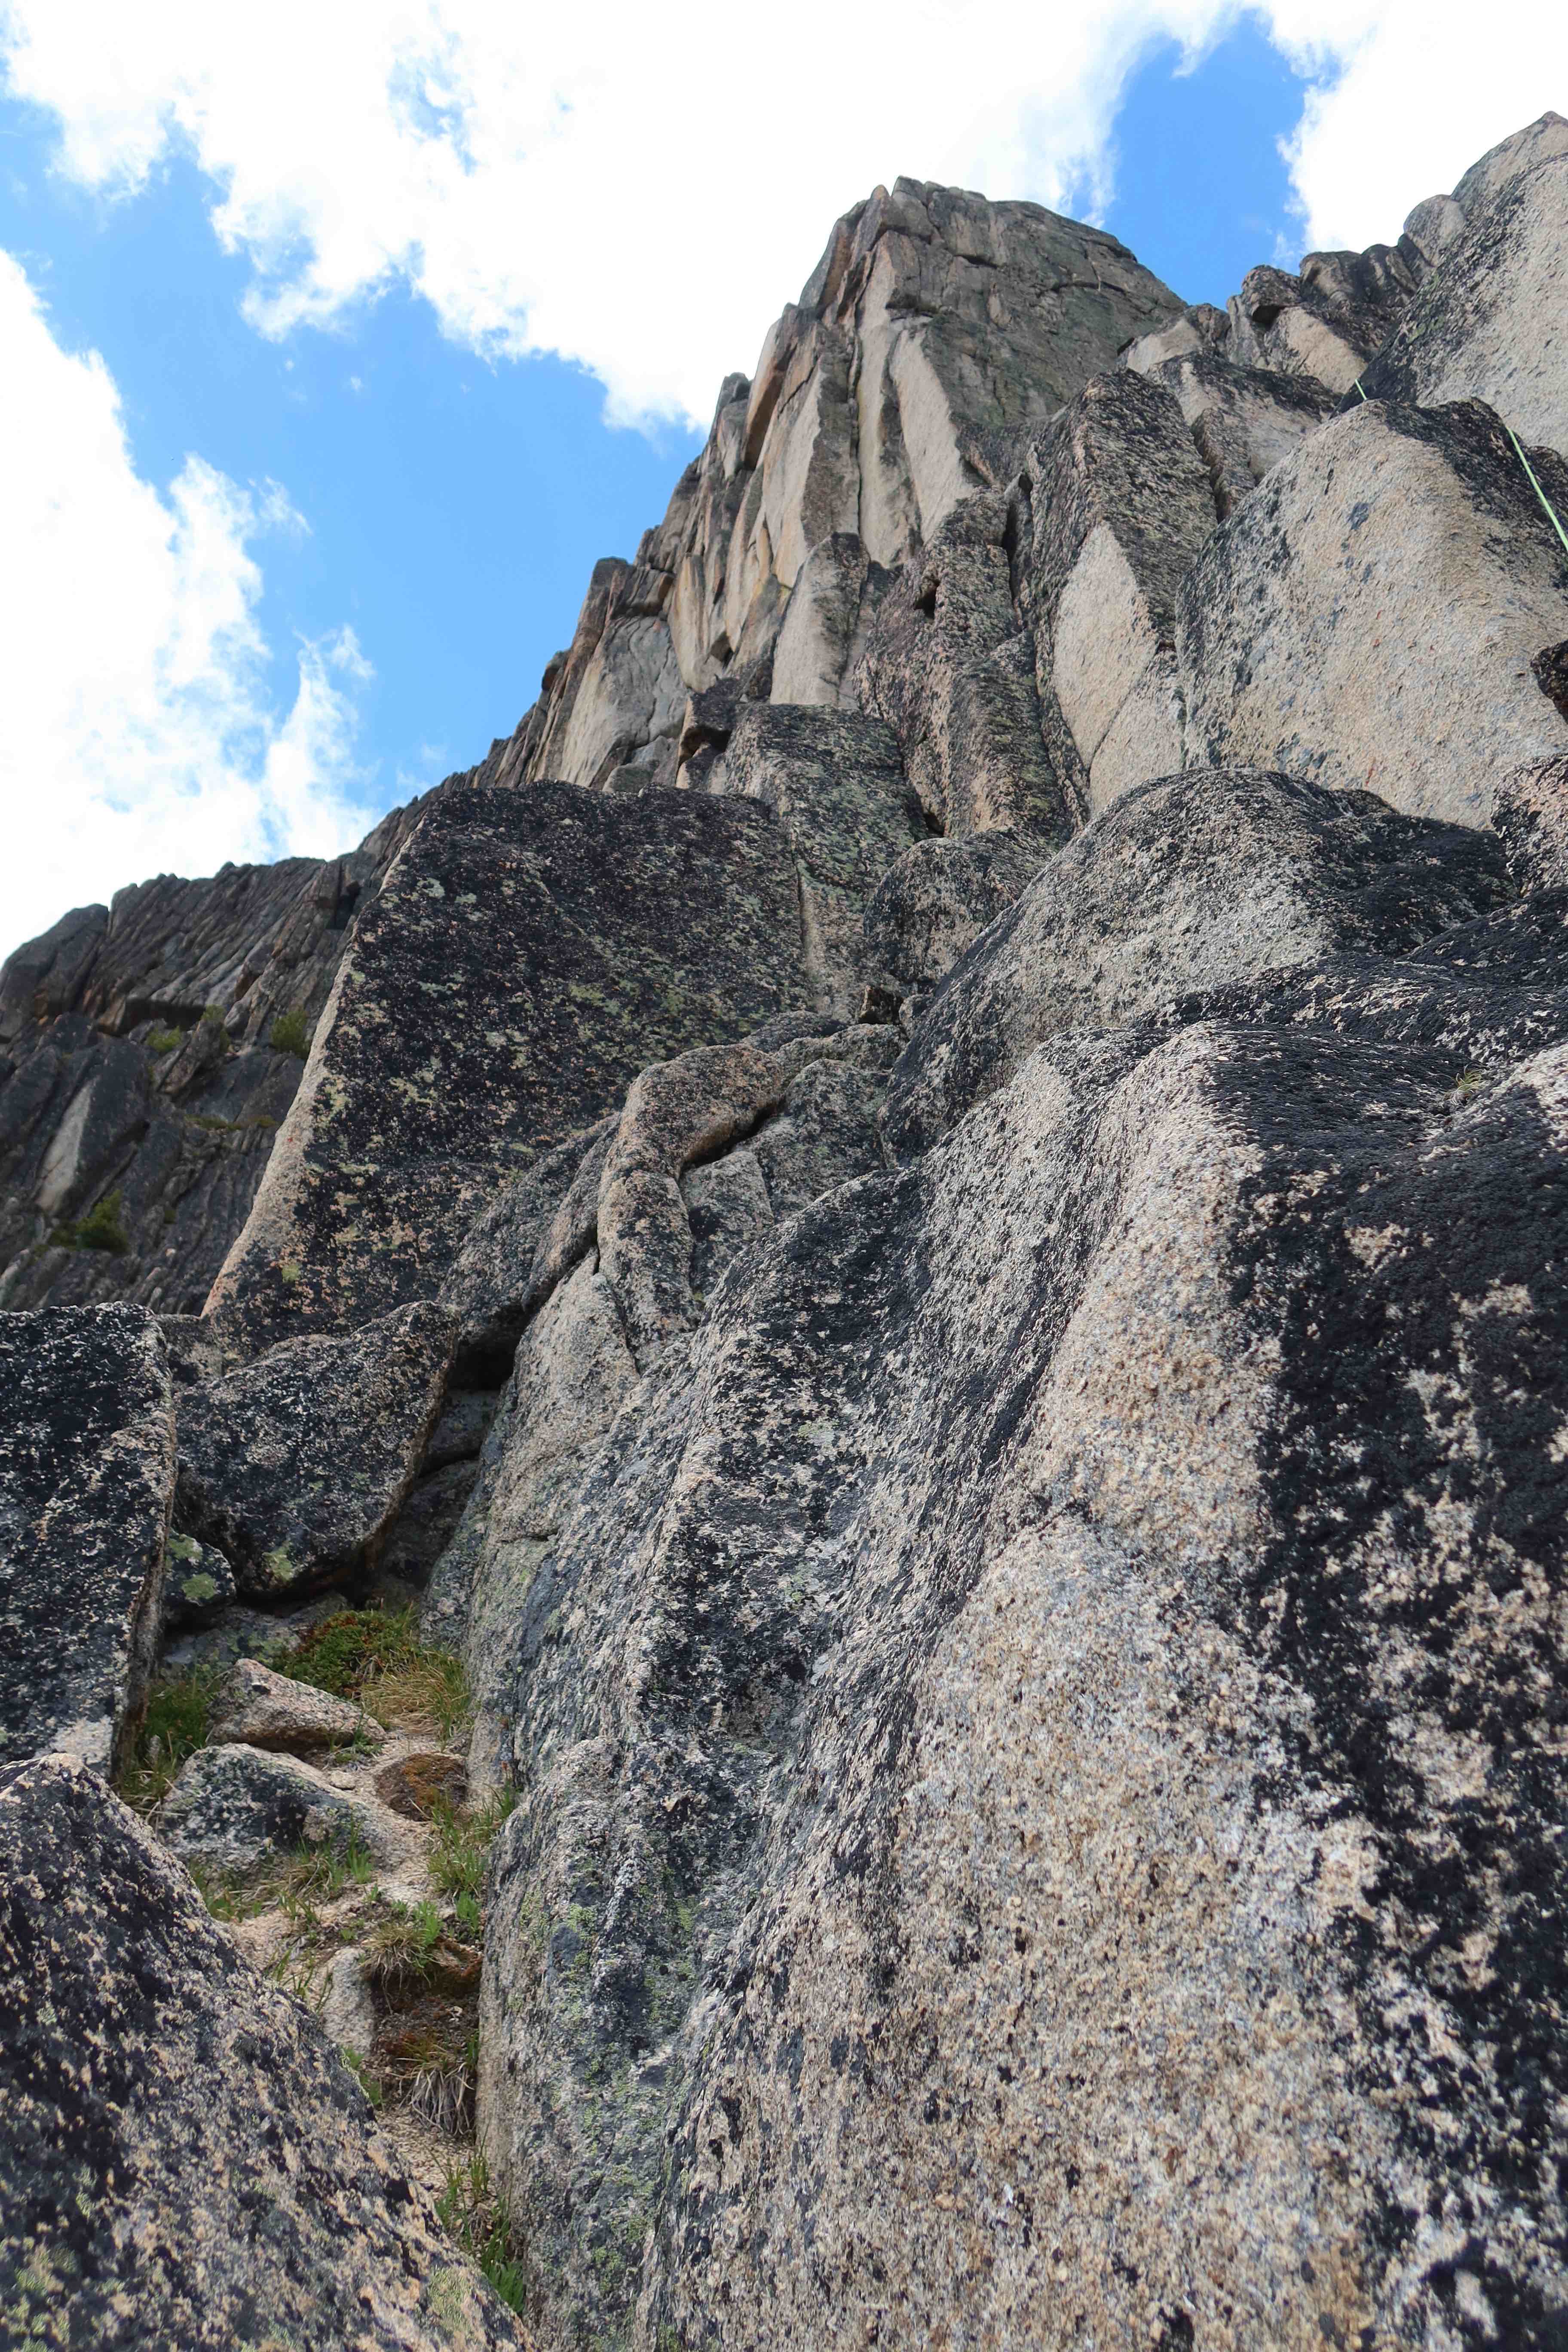
Amphitheater – Pilgrimage to Mecca
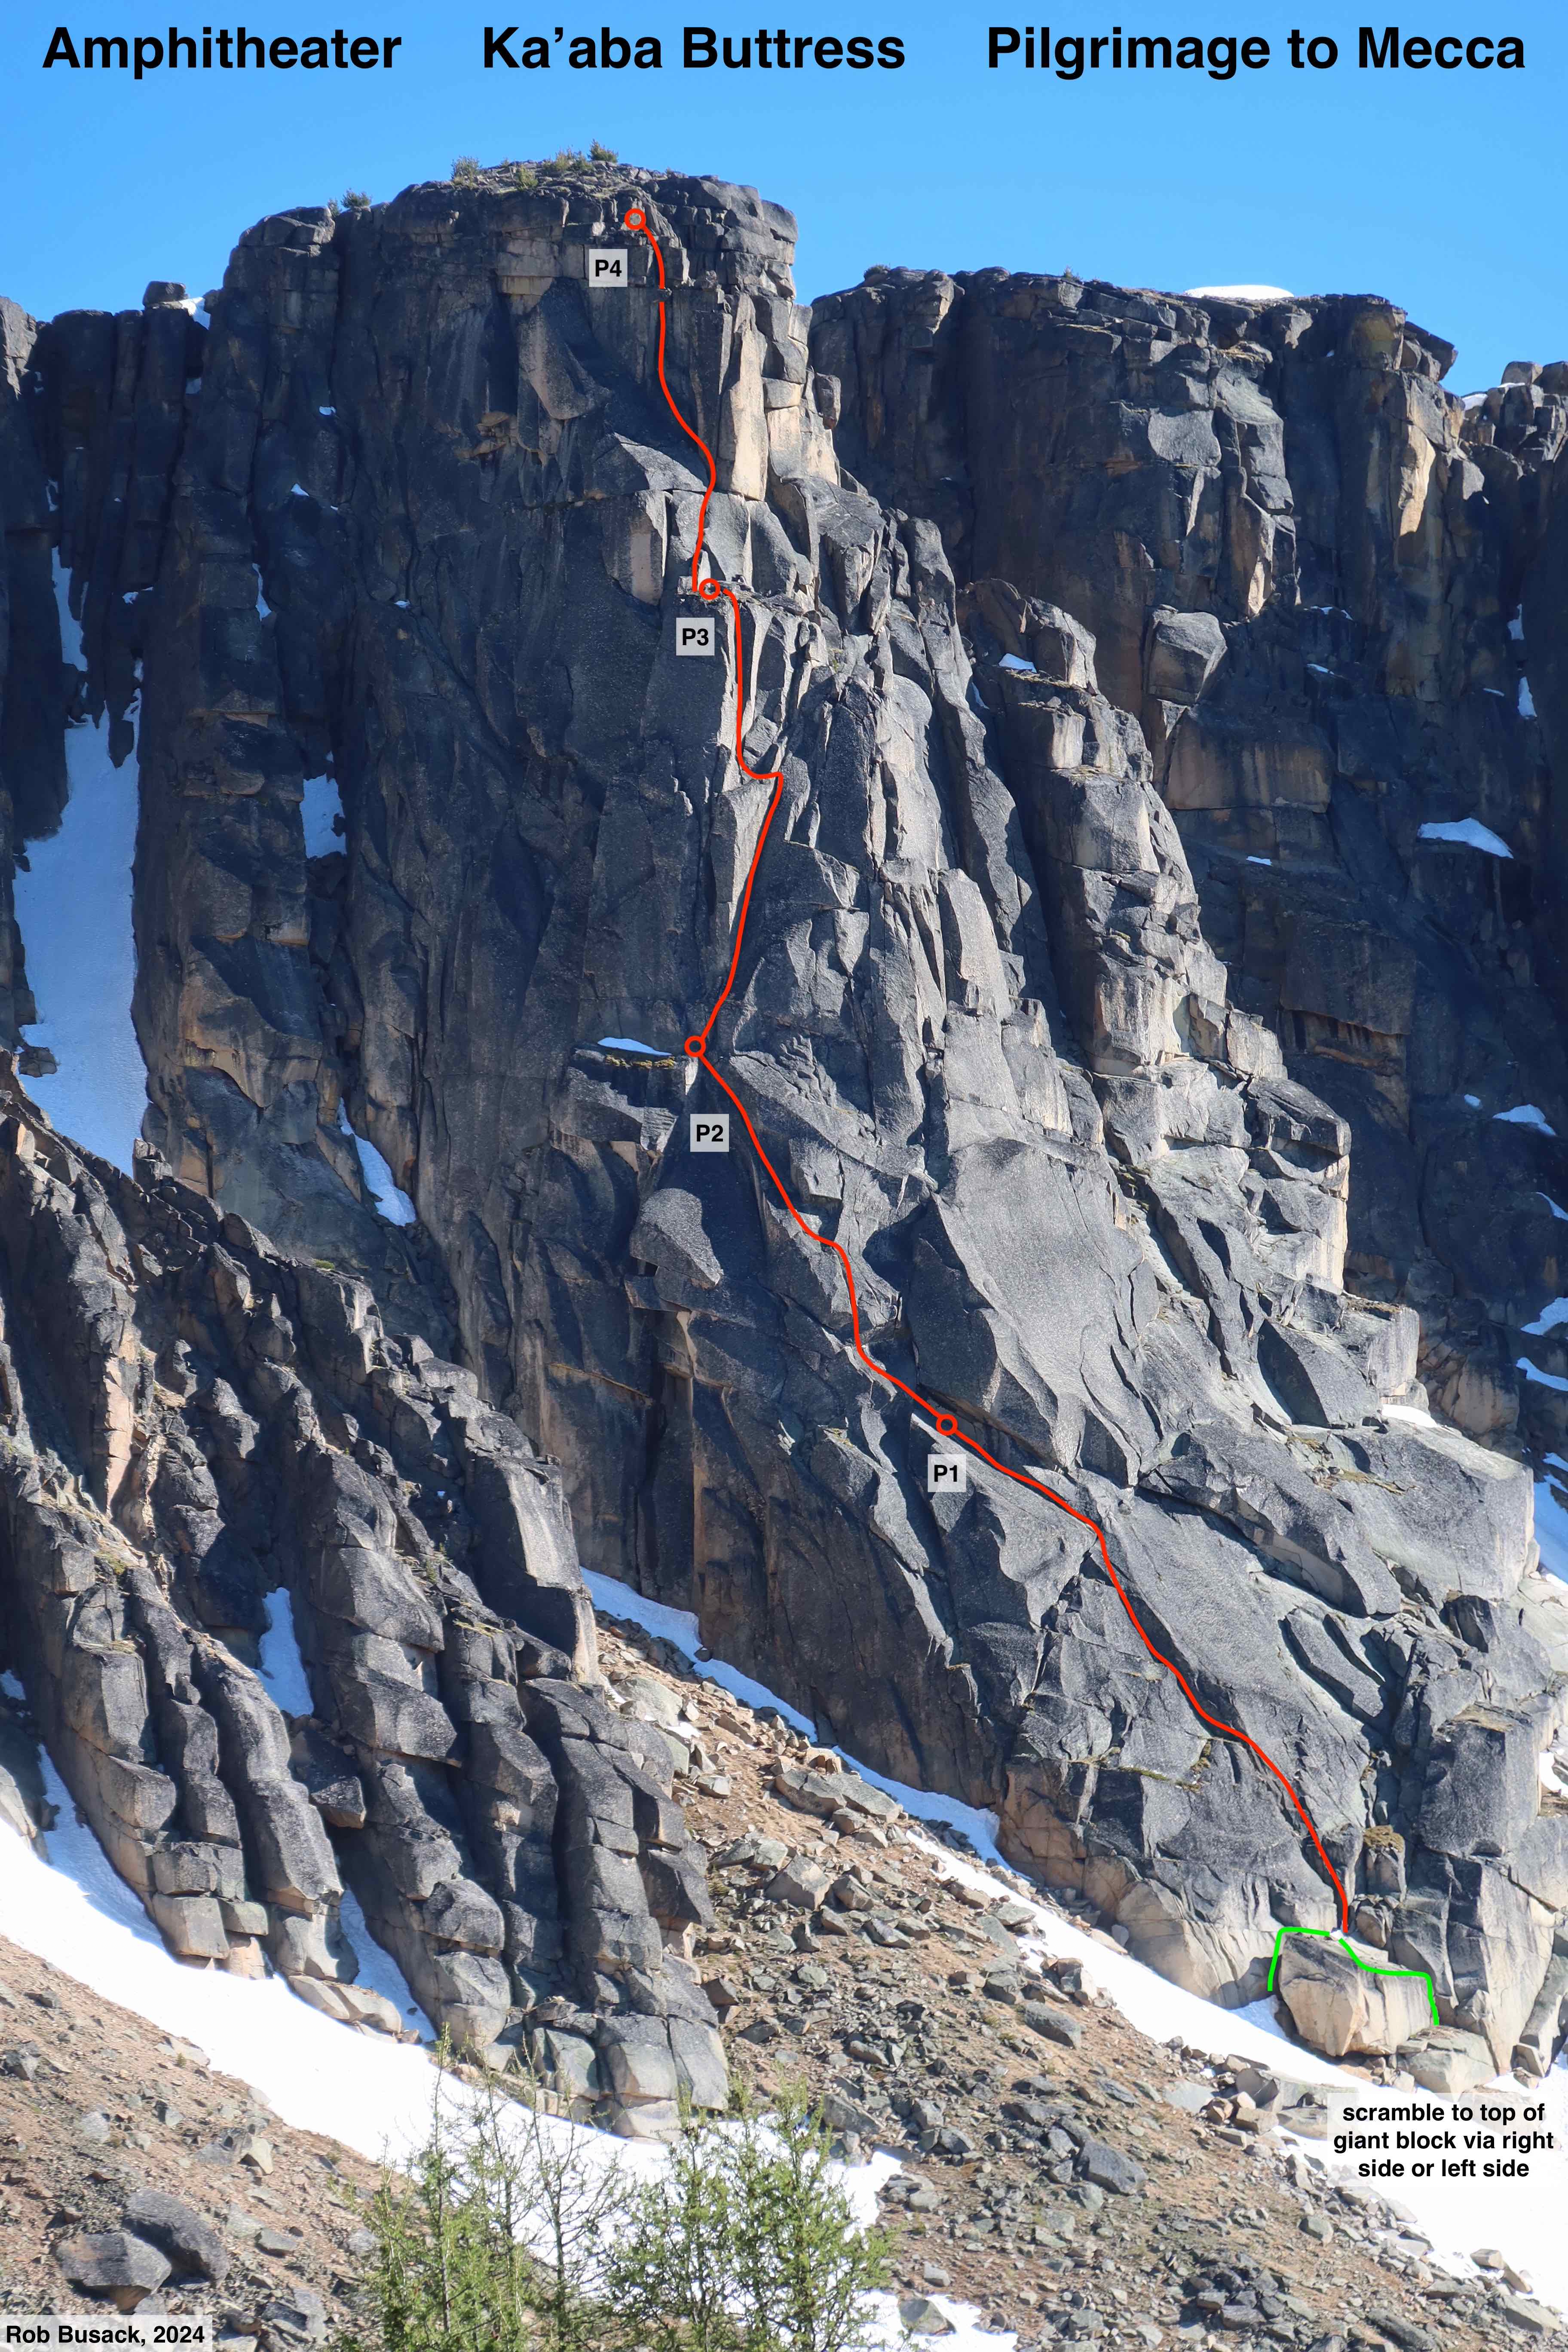
4 pitches, solidly 5.9. 30 minute approach from camp in the area of Upper Cathedral Lake. Two options for walk-off routes: (1) a north-side gully, just 1000 feet east of Ka’aba Buttress, and appears to be around a 35°-40° slope angle, provides a short half-mile walk-off back to the lake, but may hold firm snow throughout the month of July. (2) Slightly longer but incredibly scenic and easy-walking, circle south around the western arm of Amphitheater down sand, then meadows with a nice trail, rejoining the Boundary Trail, returning to Upper Cathedral Lake in a total of 2 miles, a 50 minute walk. The northwestern aspect of Ka’aba Buttress means the route is in shade most of the day, until around 3pm, and we found it to be quite chilly.
I felt the pitch breakdown was:
Pitch 1: 5.7
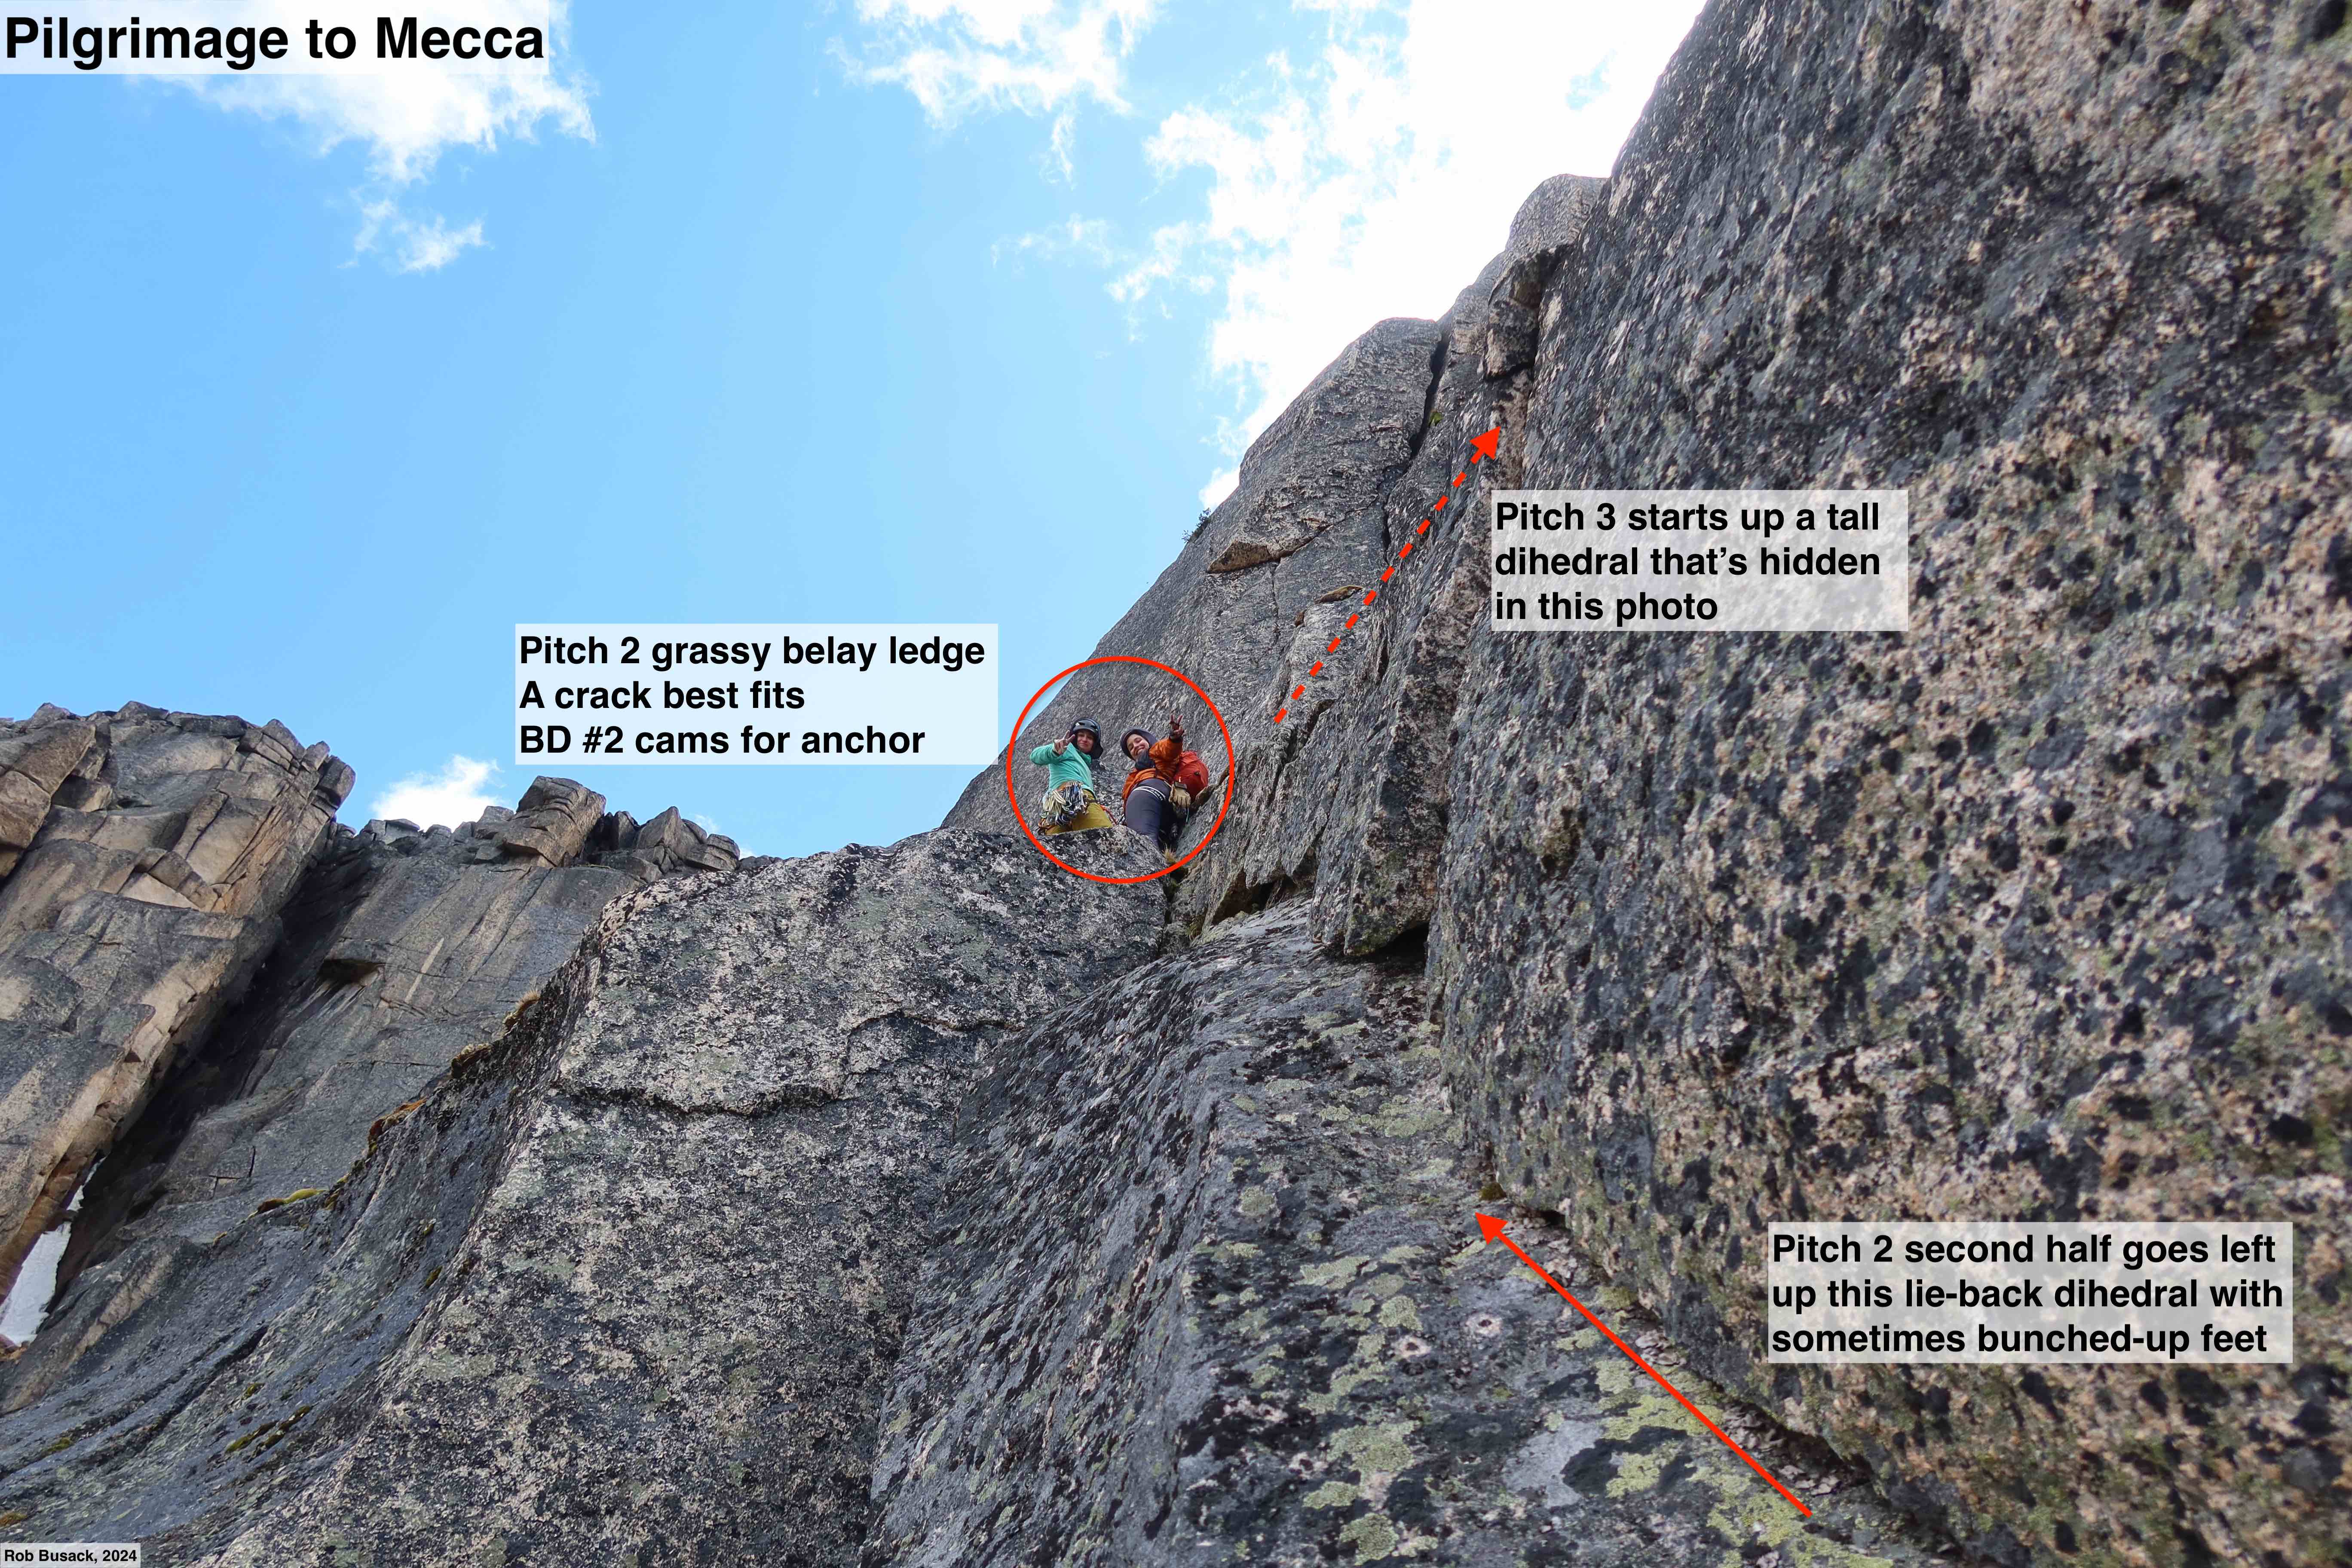
Pitch 2: 5.9 sustained
Pitch 3: 5.9 sustained
Pitch 4: Supposedly 5.8, but the original corner was soaking wet, so we were forced to climb cracks just right of it, which I’d estimate at 5.10b. Above my onsight limit, but it was quality climbing on top-rope!
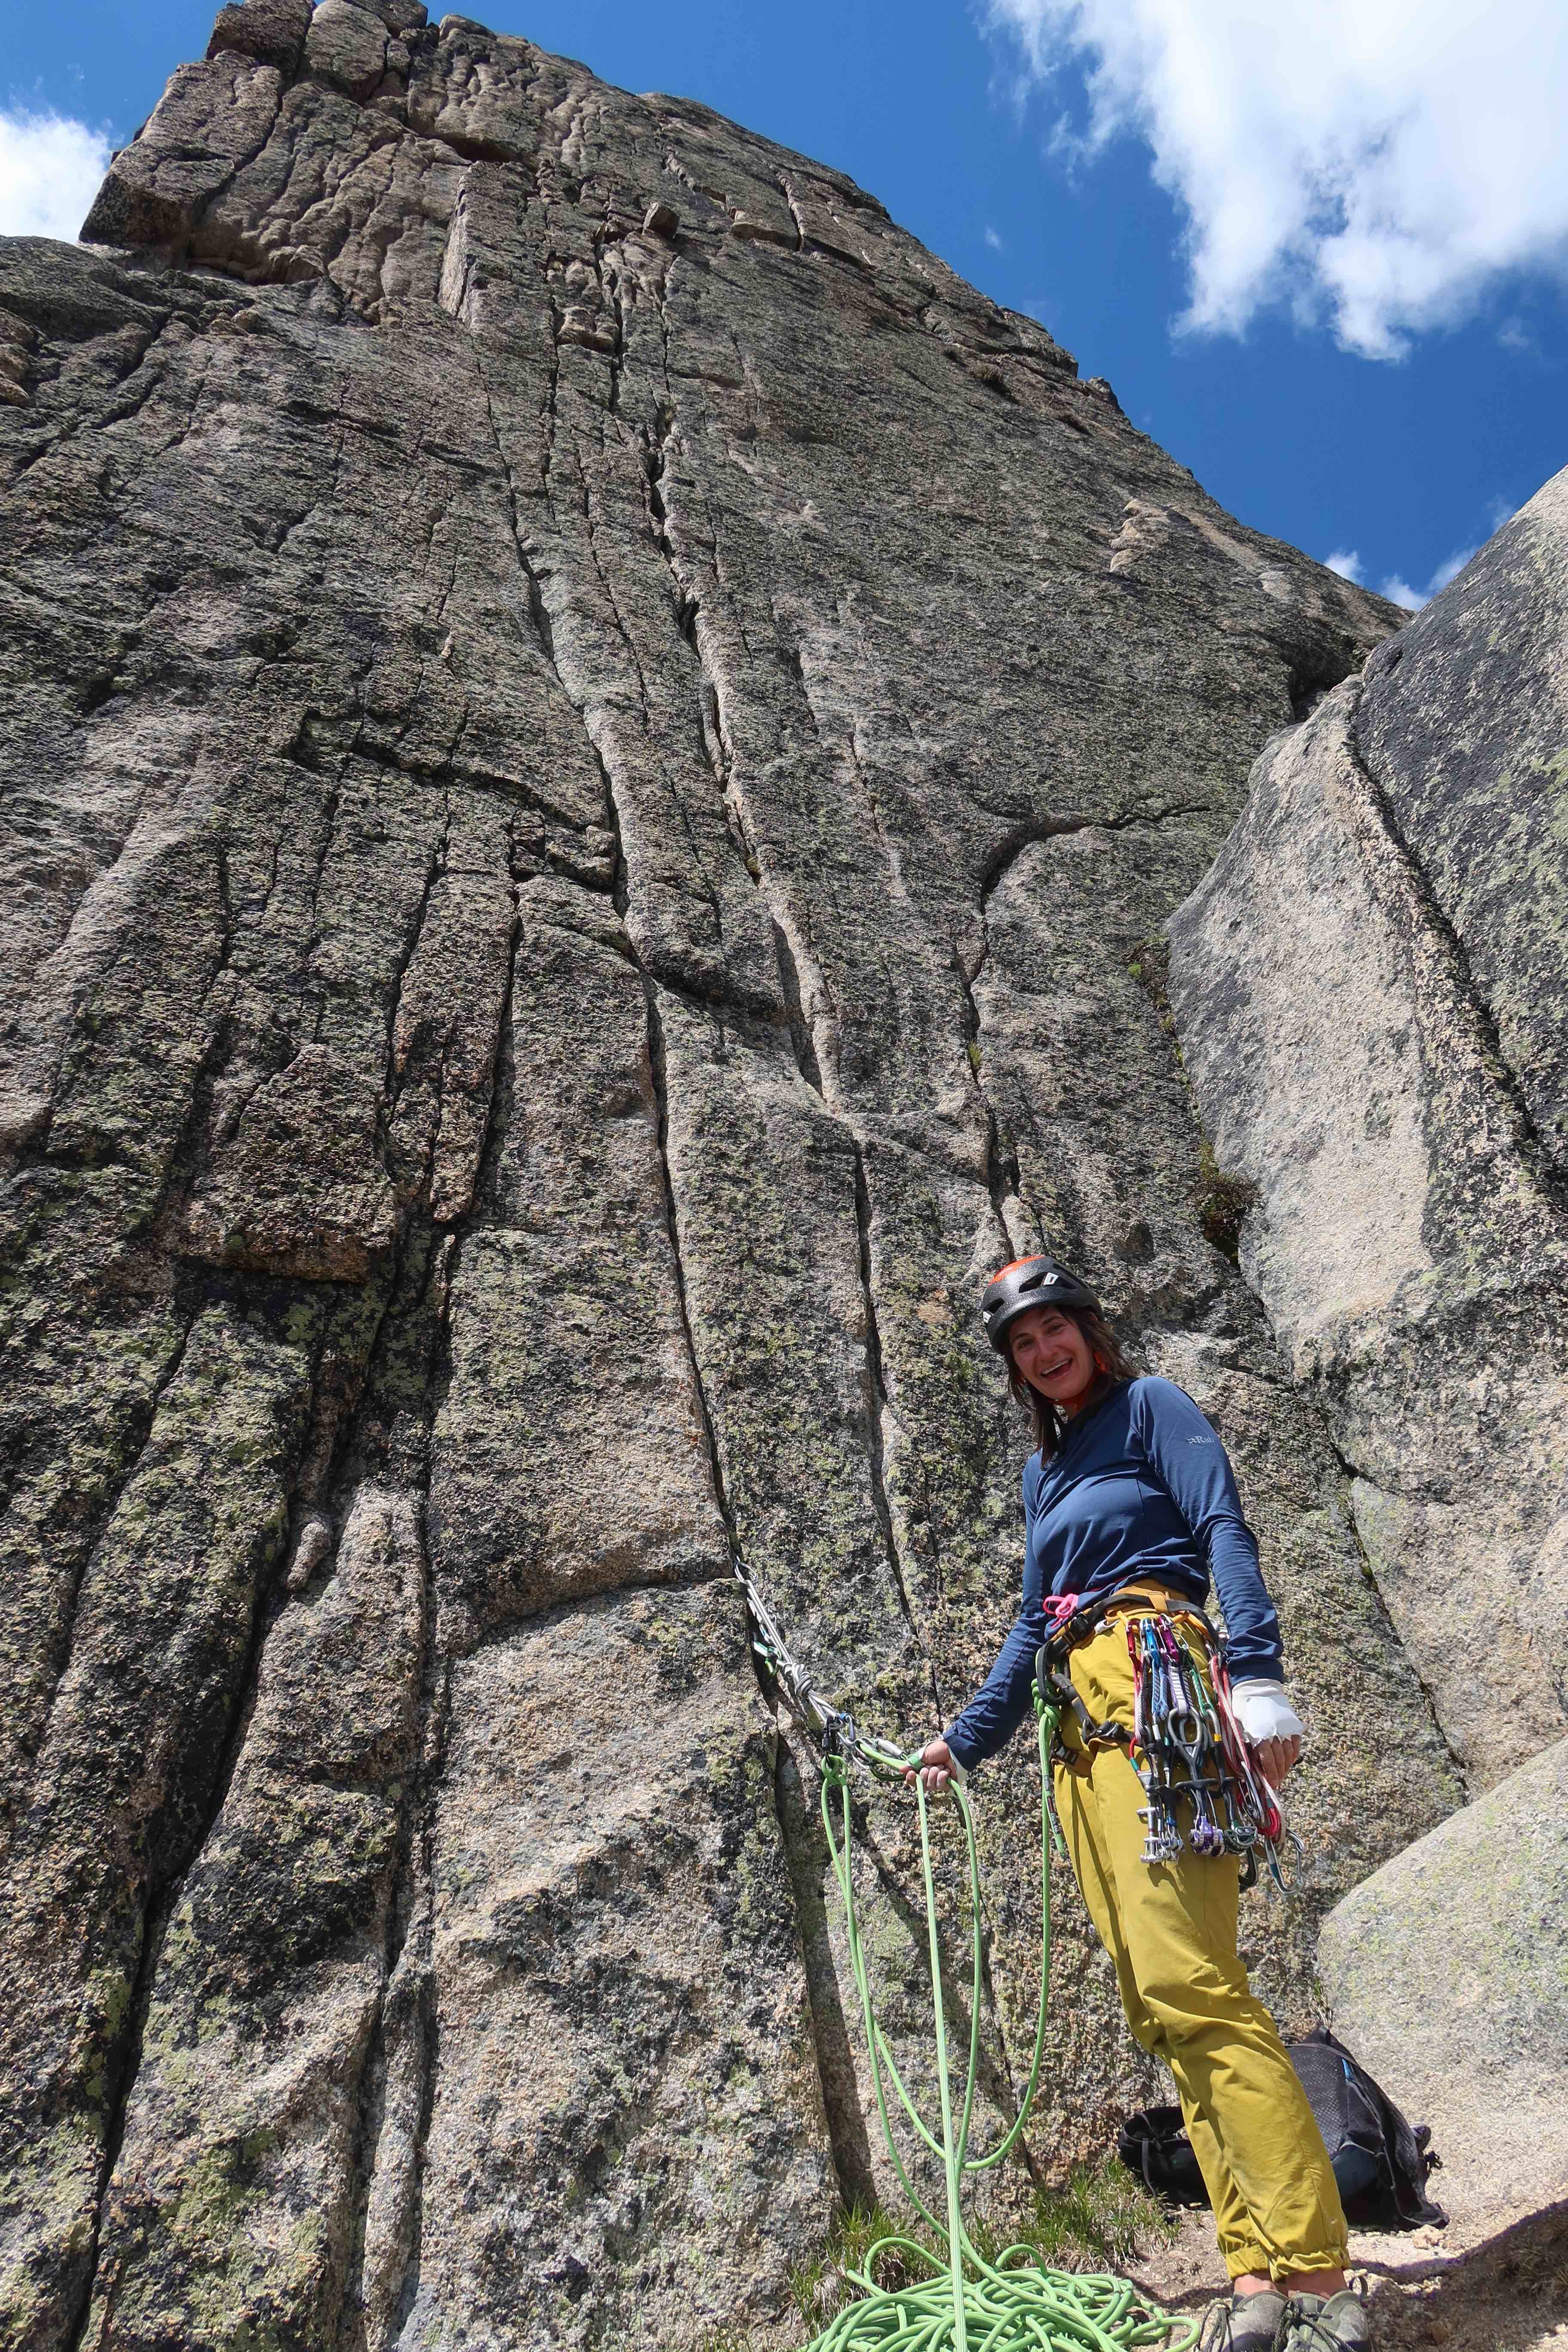
Our group overall was five people. We brought two racks and three ropes, and our plan for today was that Kelsey & Denise would go first as one rope-team. Then myself, Claire, & Jessica would climb together behind them as a party of three, with the lead climber bringing up both ropes, then belaying the two followers simultaneously. We were a bit slow, but with no one else on the route that day, it didn’t matter. I led slowly on this, which I think was the bigger impact to our times than the added rope-management was. I would say my current climbing ability is onsighting 5.9 trad (e.g. I had recently breezed up Inca Roads at Tieton, one I’ve led a number of times before, but I was proud that my most recent lead was so smooth and clean,) and projecting 5.10a/b trad (e.g. I’ve led Orange Sunshine at Tieton, and can get up it with multiple takes, but it’s certainly not smooth.) On Pilgrimage to Mecca, Jessica led pitch 1 very smoothly. I managed to lead pitches 2 and 3 as clean onsights with no takes, but I felt on edge throughout both, I felt right at my limit, and did verbalize my stress during both of them quite a bit, lol. I attempted to lead the 4th pitch, made use of a gear-assist at the early off-width crux, then once I was higher up and into the 5.10b crack variation, I struggled immensely. Kelsey ahead of us had led that stiff crack beautifully! I eventually ended up asking her to throw down a rope-end, and I completed my “lead” on top-rope. I belayed up Claire & Jessica, we coiled the ropes and changed shoes, walked up to the true summit of Amphitheater across the way (30 minutes away), then took the gentle southern walk-off around back to camp (1 hour summit to lake.)
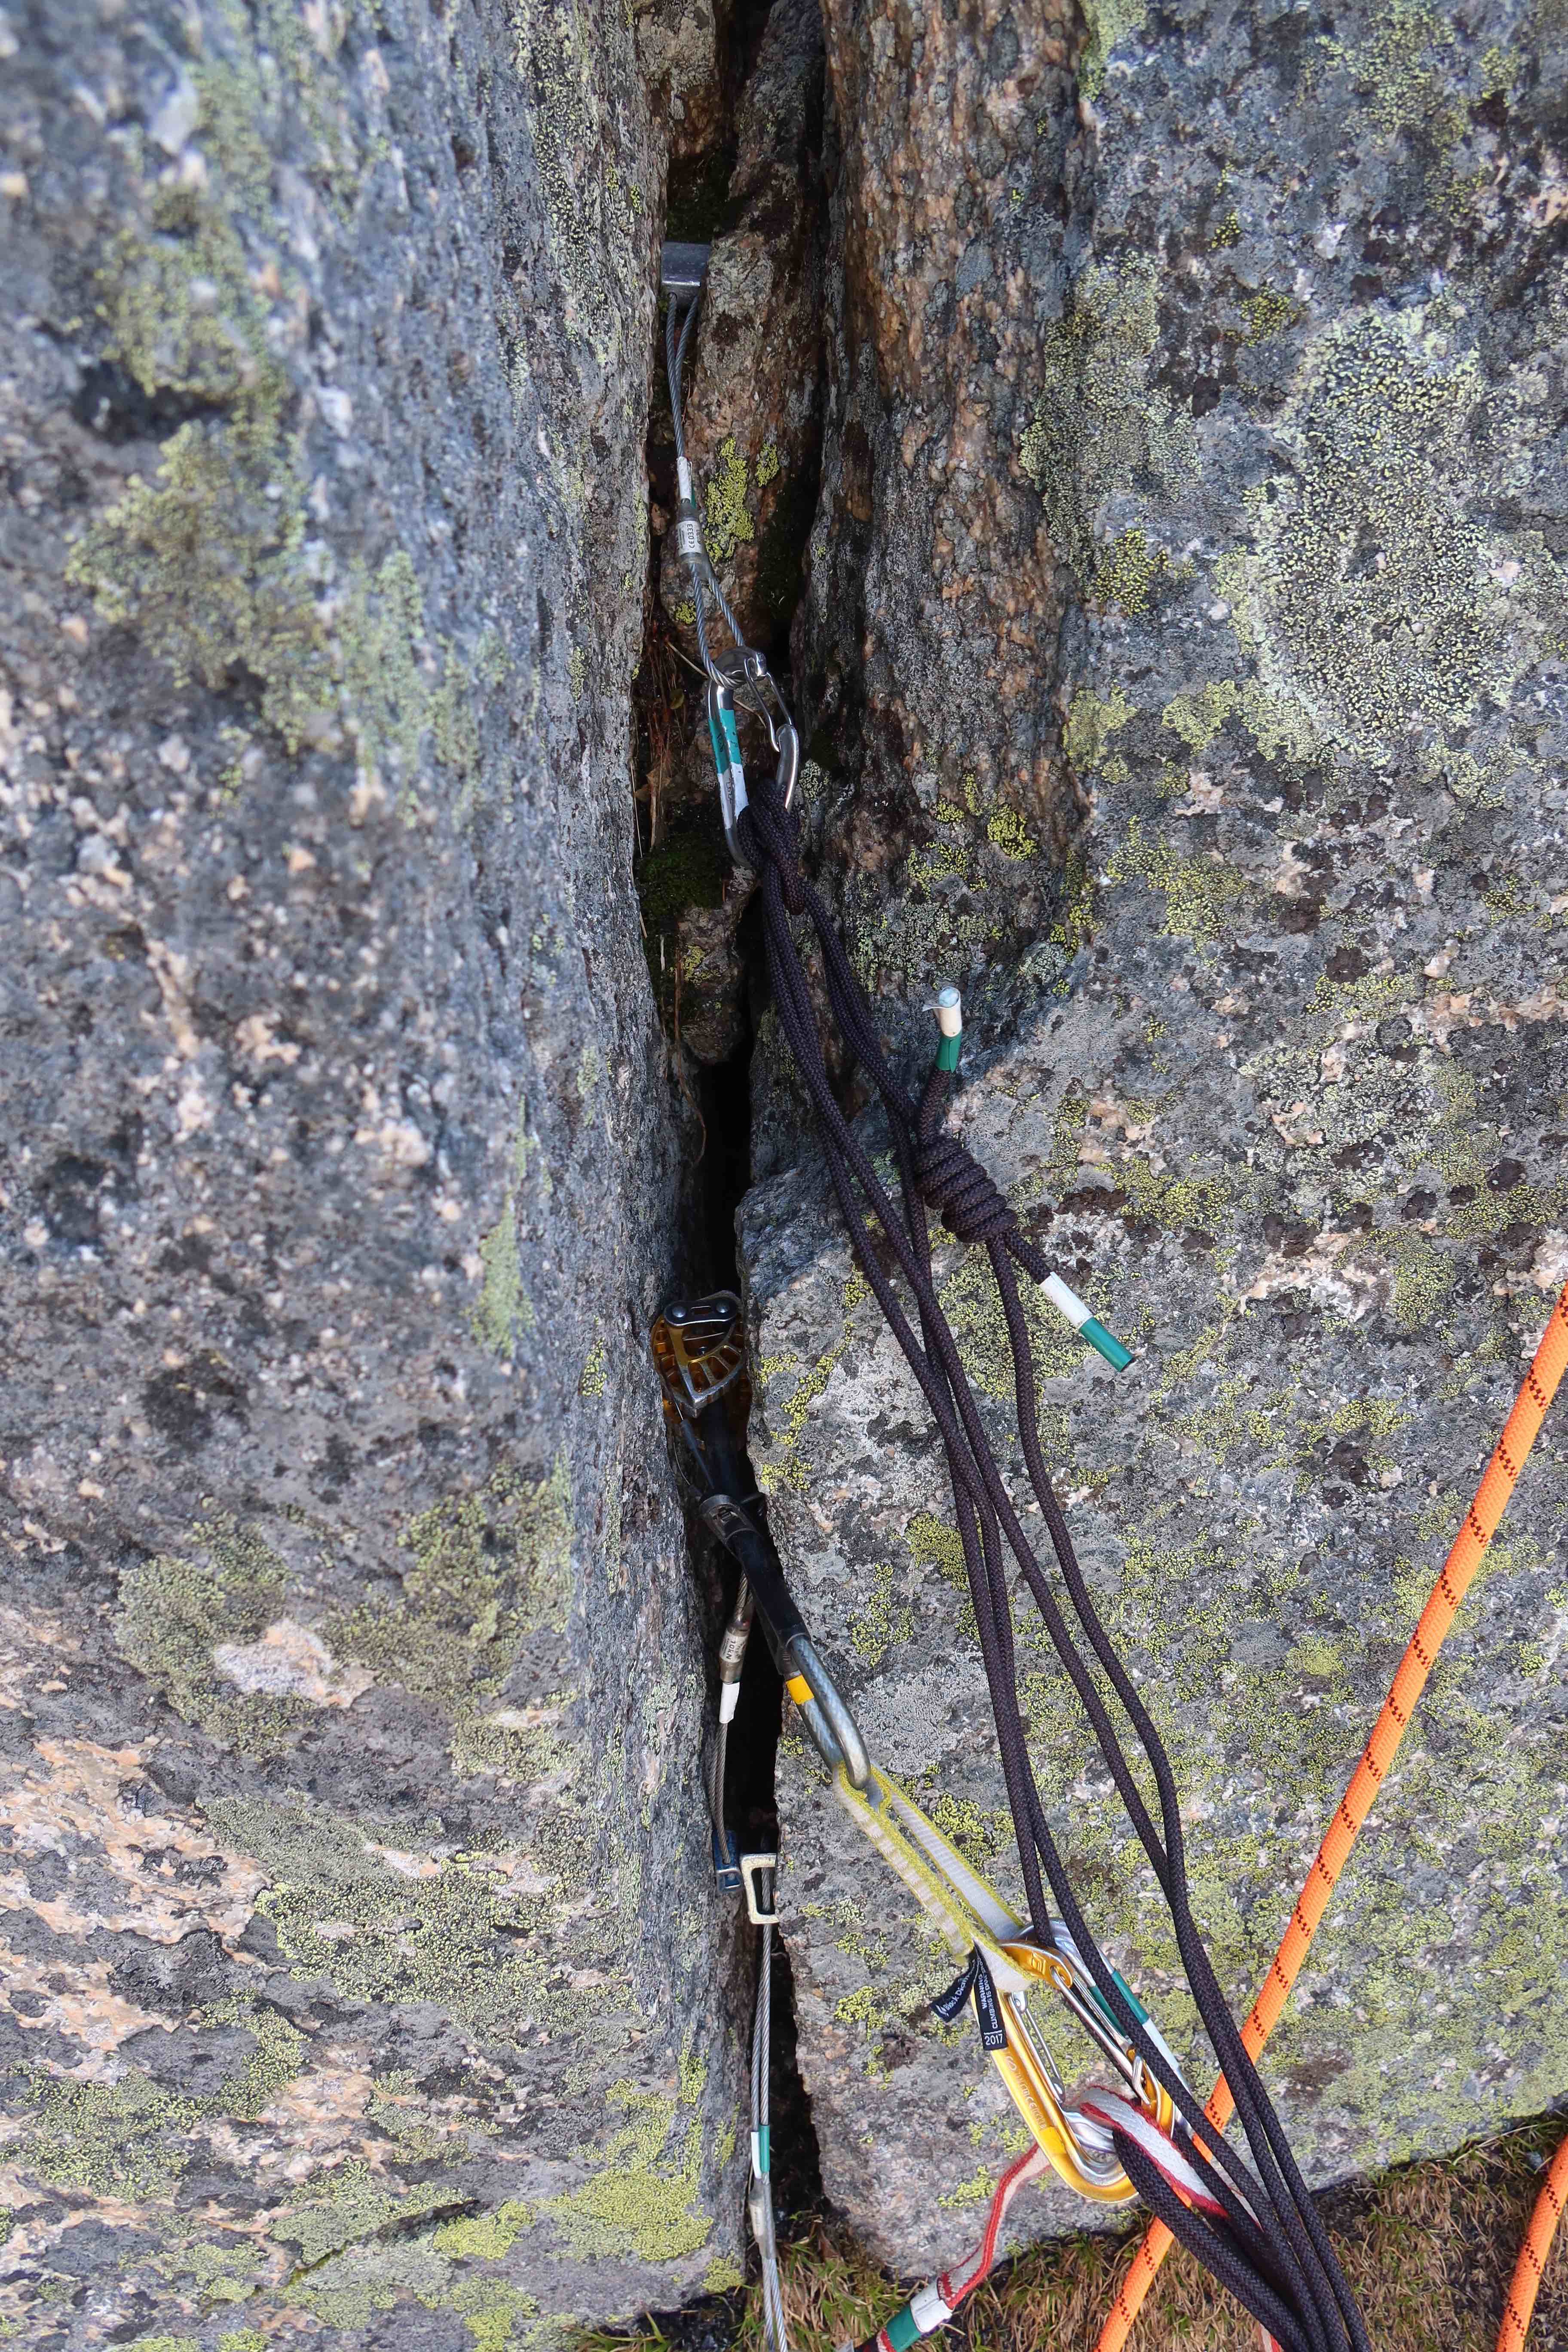
When getting to the start of the route, we initially had tried scrambling up the left-side of the large block at the base, but a large snow-moat there gave us trouble. We tried the right-side of the large block instead, and that went just fine, though it required some care during friction moves crossing the top of the block to get to the wall.


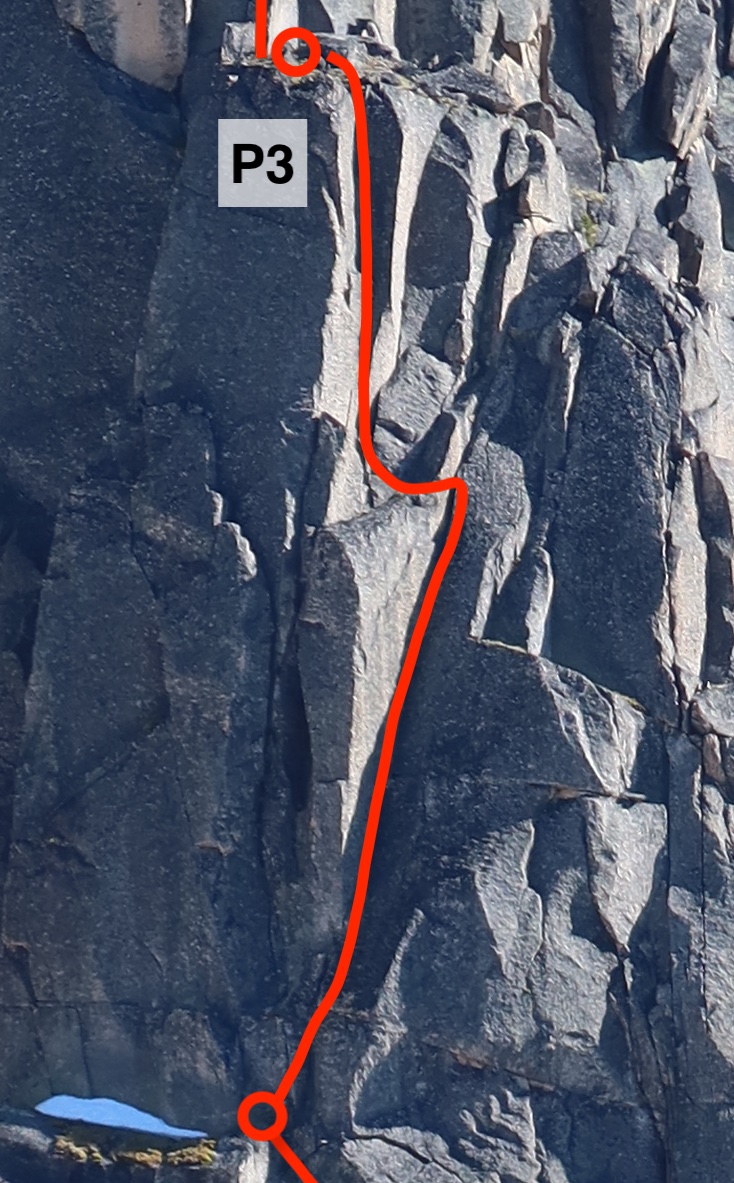


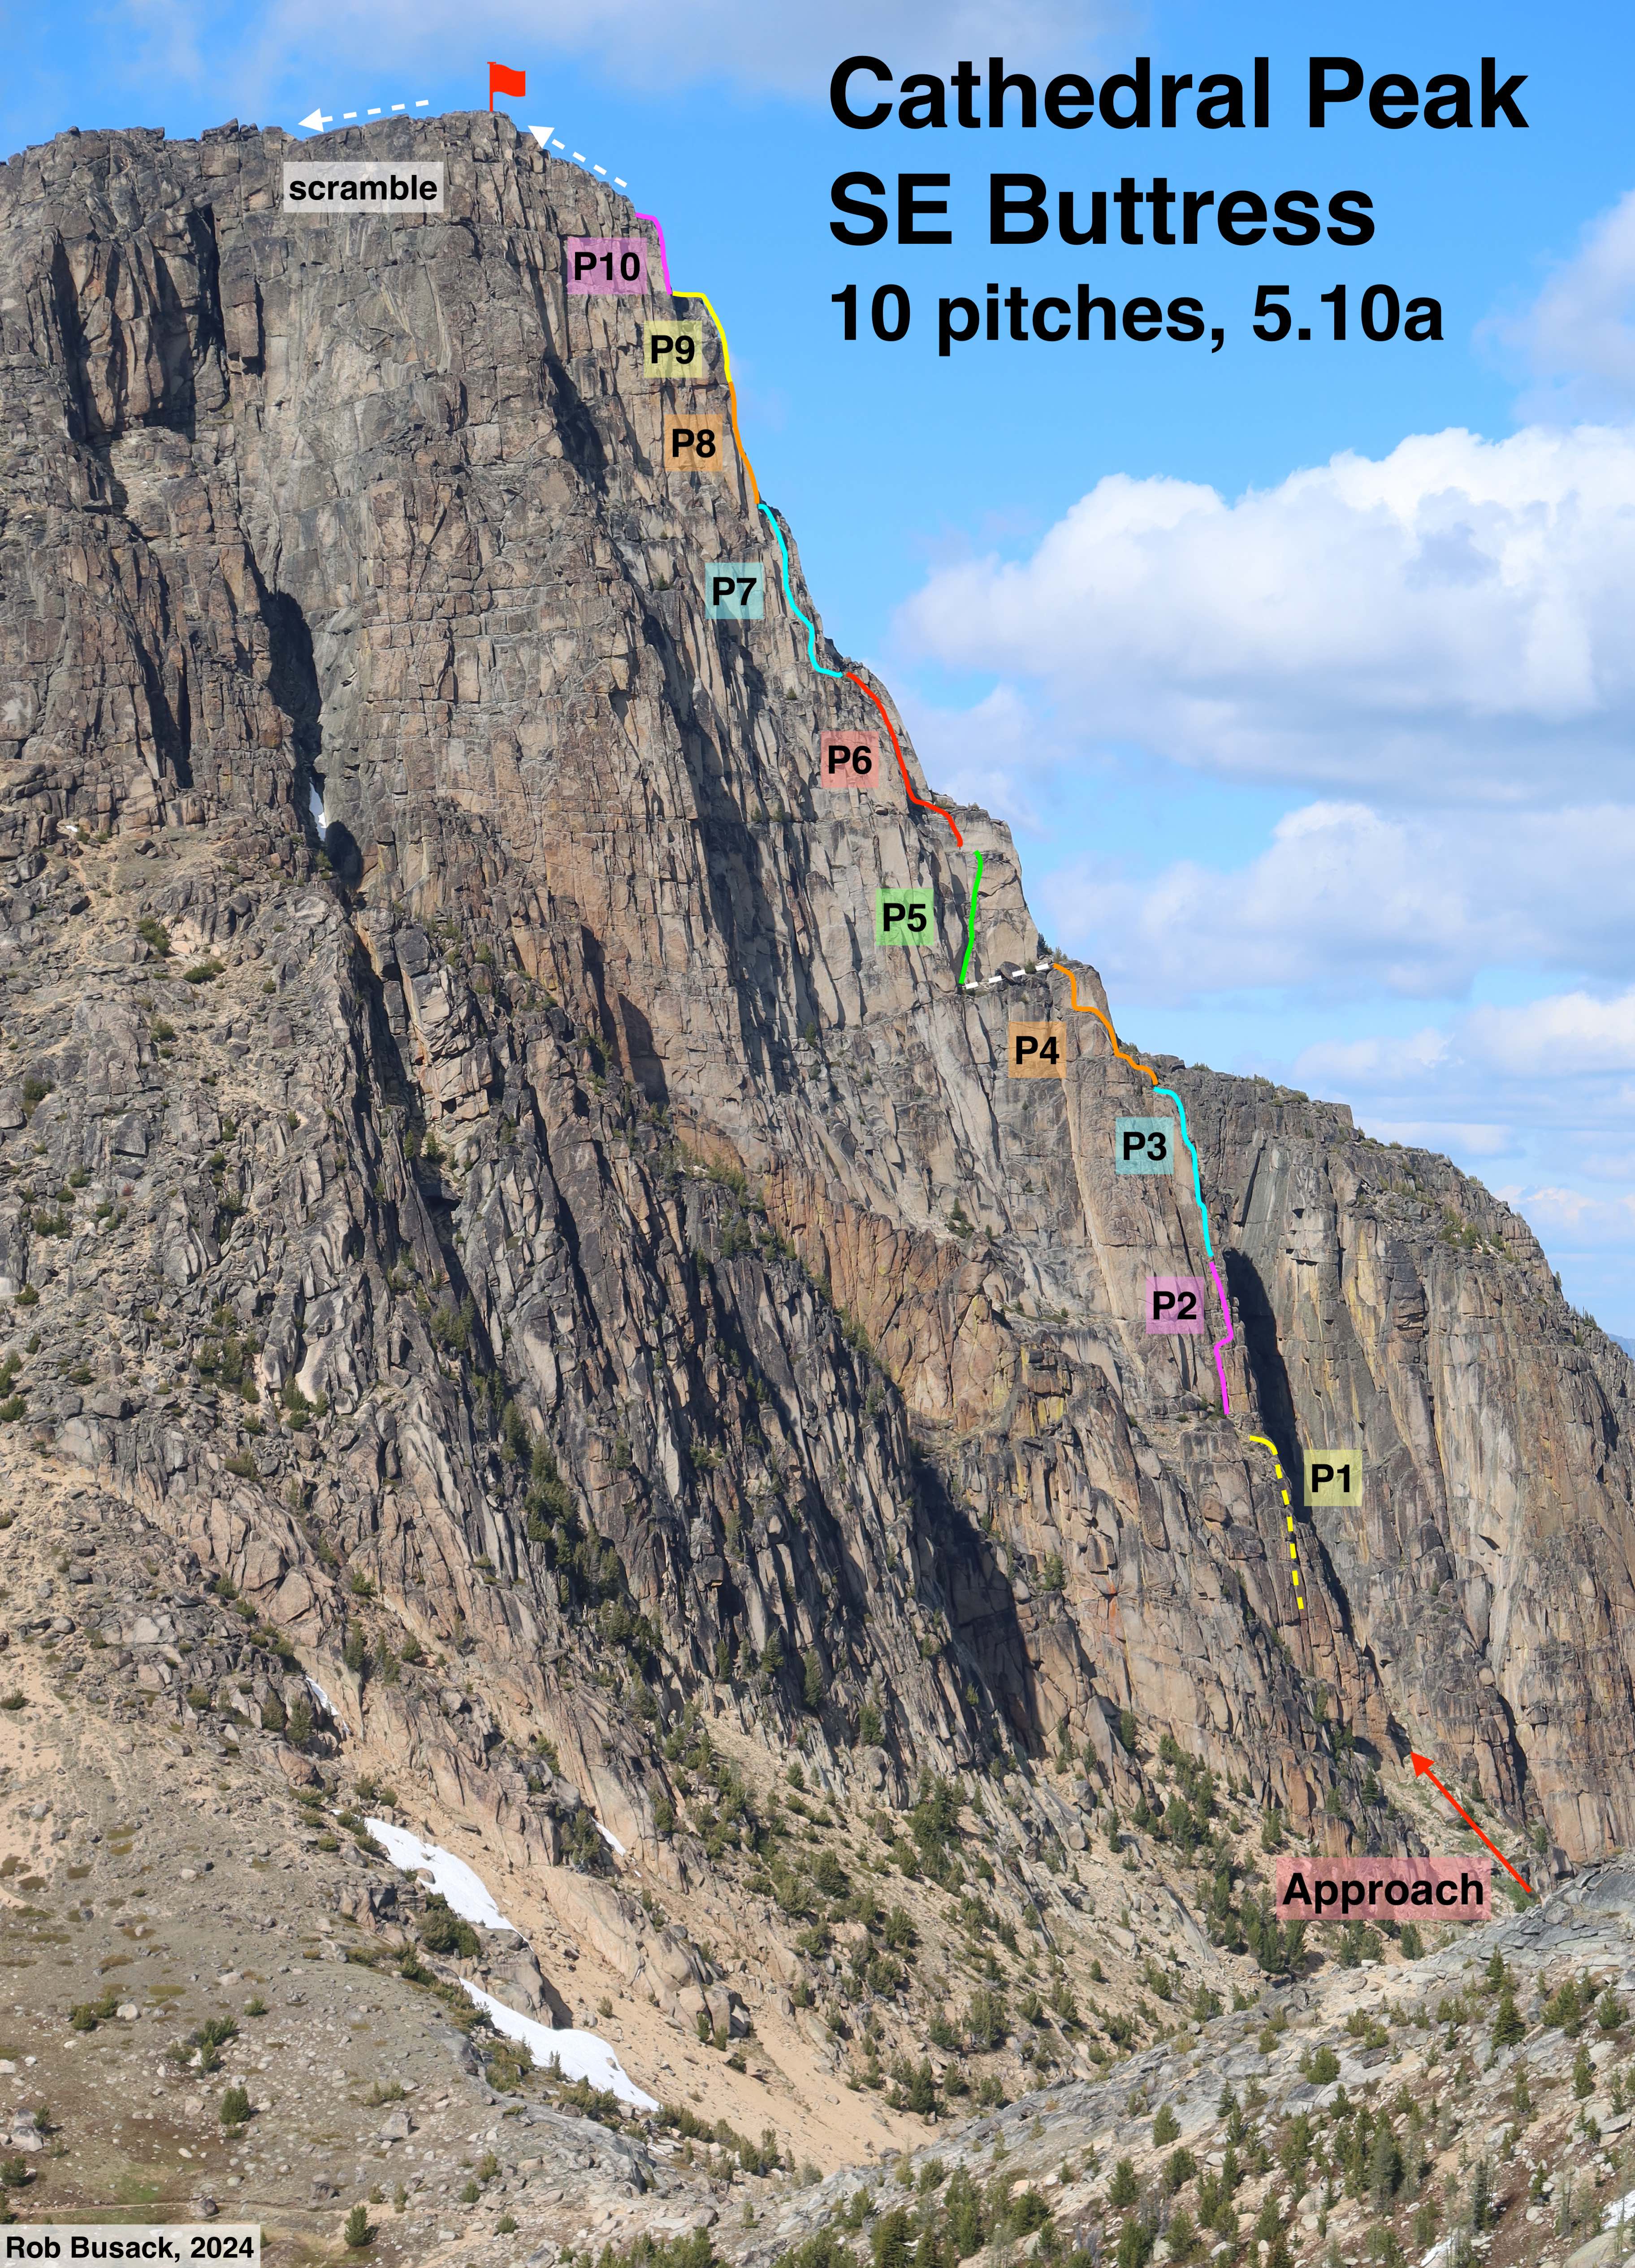
Cathedral – Southeast Buttress
10 pitches, originally rated 5.9, but everyone does the 5.10a version of pitch 9, so in my book that makes this a 5.10a route. I felt that the pitch difficulties were:
Pitch 1: 5.9
Pitch 2: 5.8
Pitch 3: 5.9
Pitch 4: 5.8
Pitch 5: 5.9
Pitch 6: 5.7
Pitch 7: 5.6
Pitch 8: 5.9+
Pitch 9: 5.10a
Pitch 10: 5.8
The best ledges for taking breaks were at the top of pitch 4, and at the top of pitch 7. Okay, there were actually pretty good ledges at the top of almost every pitch, with the notable exception being the hanging belay-belay between pitches 8 & 9. But in terms of our bodies craving snacks during our climbing day, the ledge at the top of pitch 4 was great to break at since it was one of the largest ledges overall, and it was really good to snack again at the top of pitch 7 to get that blood sugar up before diving into the business of headwall pitches.
Time
This route is long. There are quite a few pitches with a lot of sustained climbing on them, they took longer to climb than I thought. We weren’t rushing, but we weren’t dilly-dallying anywhere other than the summit either, so I think these are representatively “average” times:
Our time was 11h30m camp-to-camp:
1 hour – camp to 1st pitch
8h40m – base of 1st pitch to summit
40 minutes – summit lounging
1h10m minutes – scrambling off, and the walk back to camp
Our Group
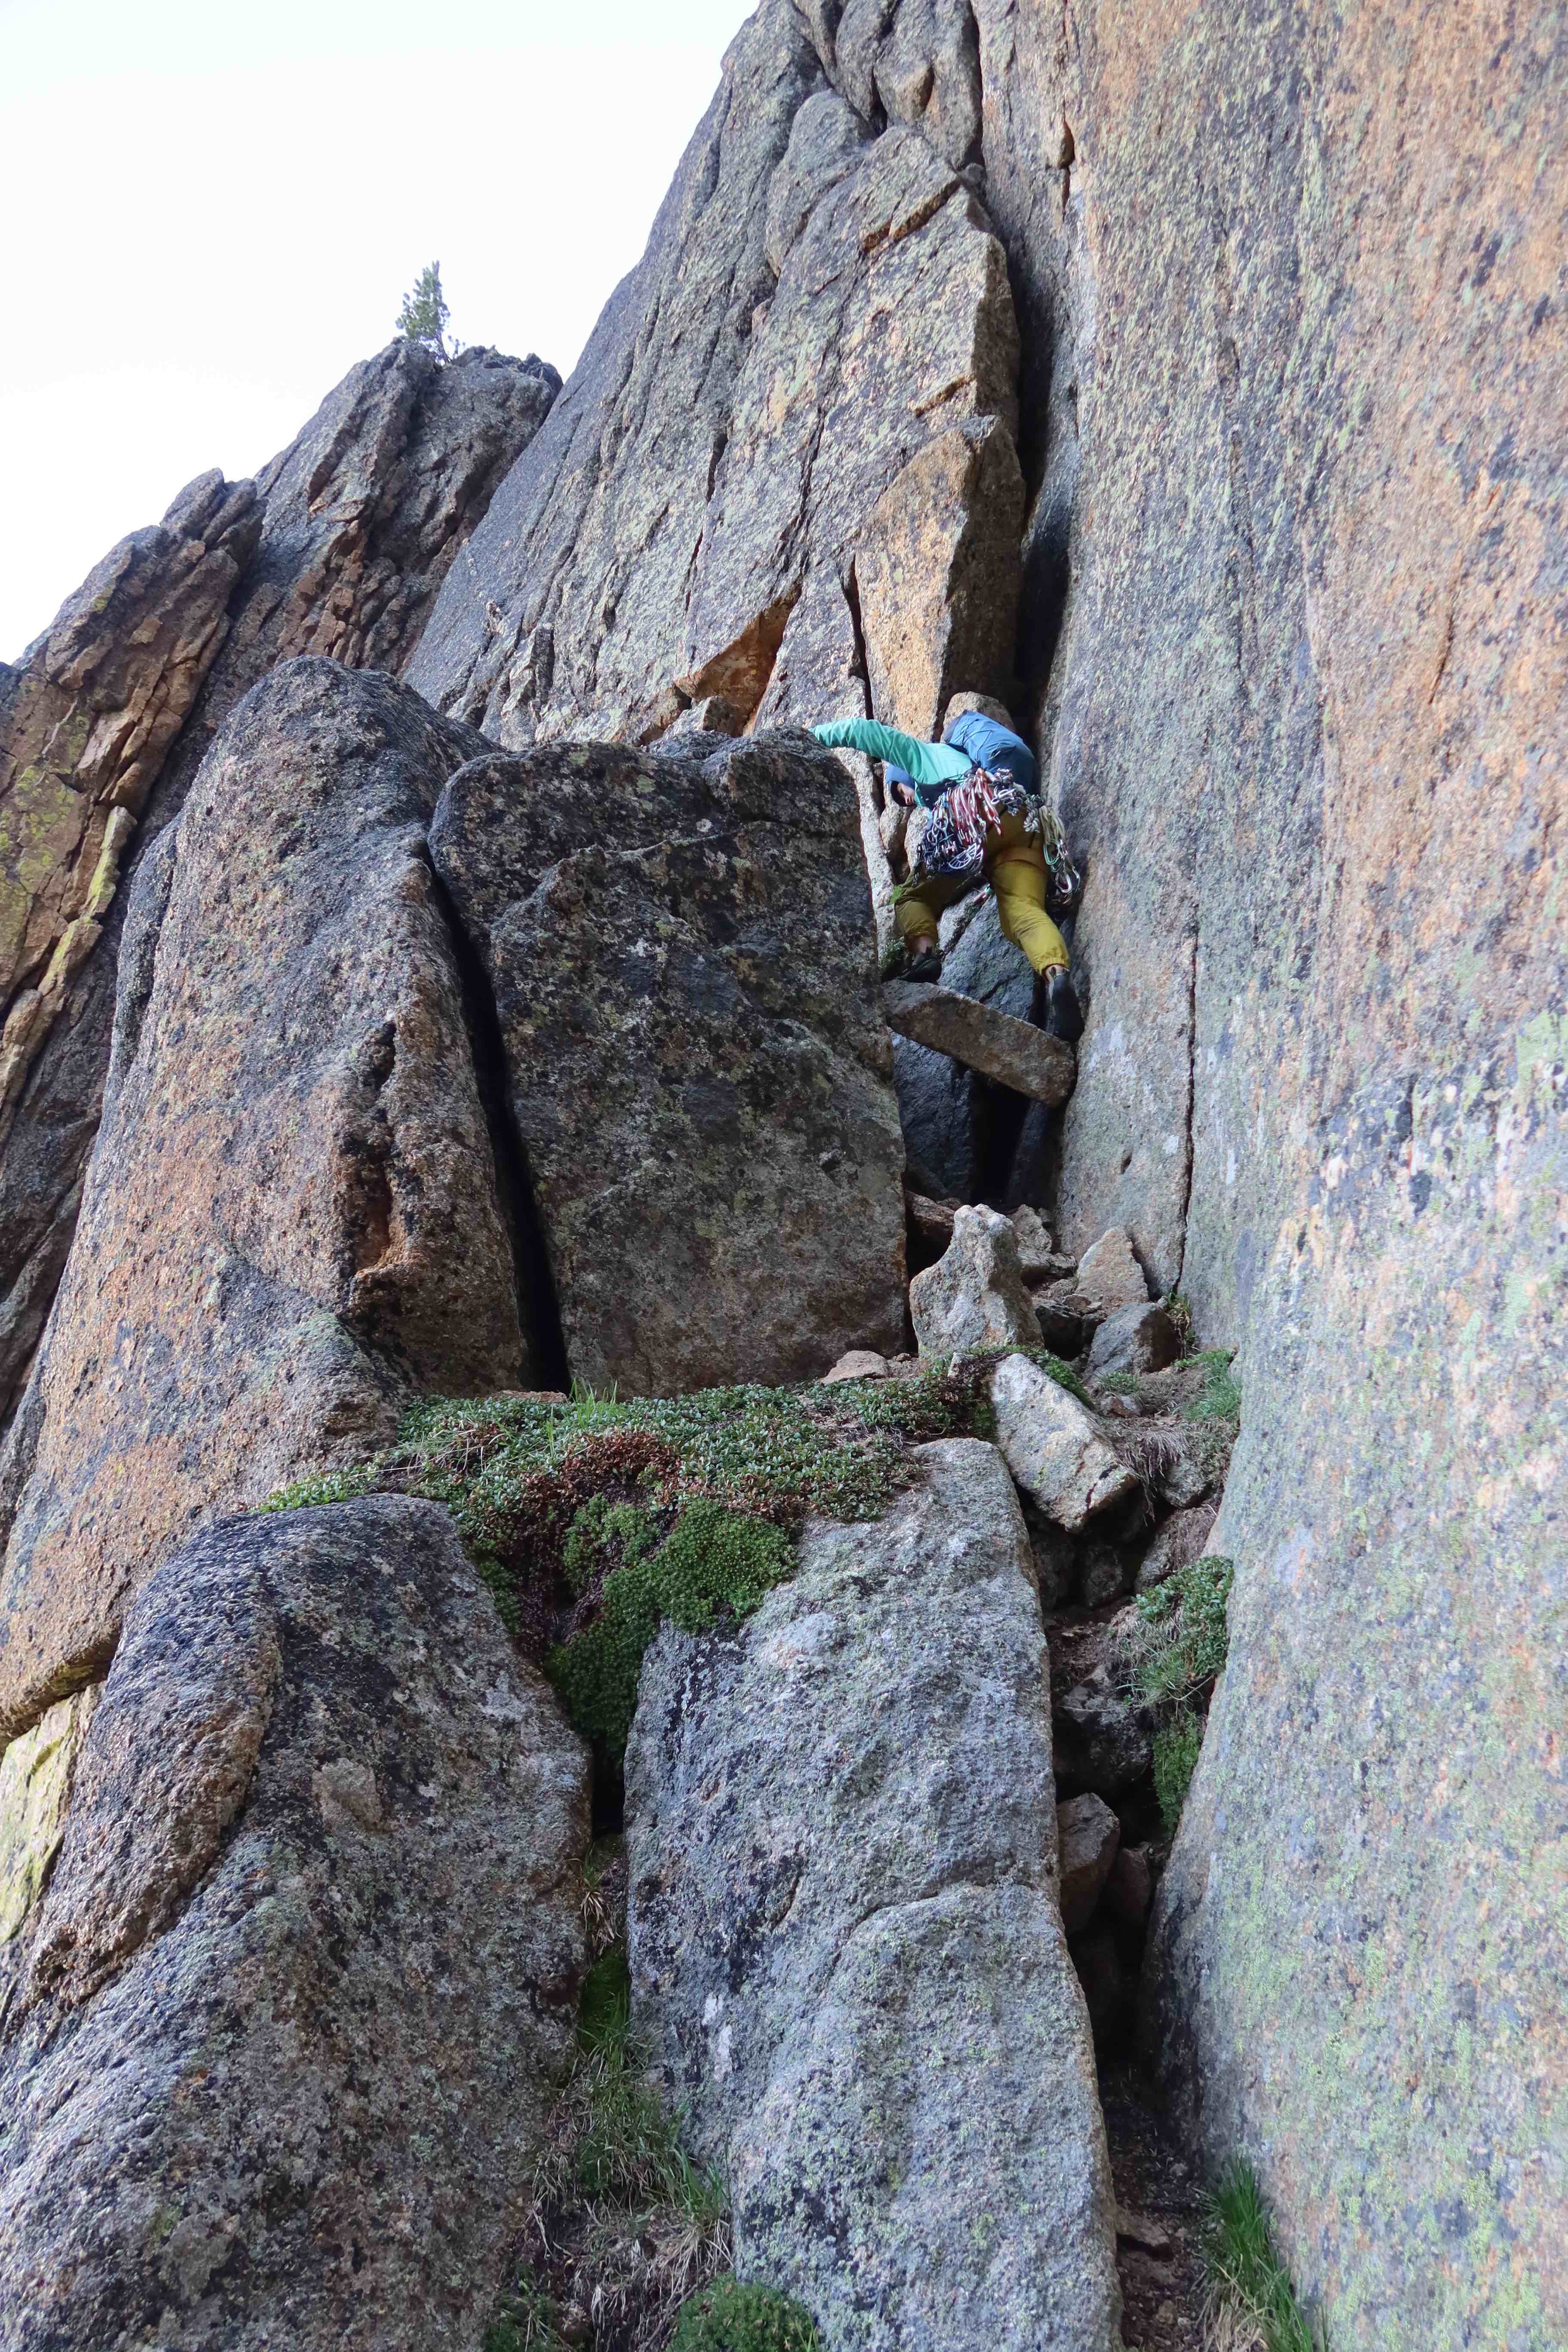
With our previous day’s experience on Pilgrimage to Mecca, where we found the climbing to be more sustained at the rated difficulty than we had expected, it became clear that getting our entire group of 5 all the way up the SE Buttress would require more sharing of hard-leads than everyone was up for. Jessica, Claire, & Denise very graciously encouraged Kelsey & I to go for it just the two of us, while the other three of them got the summit via the scramble route. I’m very grateful for this, I don’t think I could have gotten up this route without a strong partner like Kelsey taking no less than half the leads. And extra-fortunate for me that Kelsey was leading harder than me. I suggested that we swing-leads throughout our day, with her taking the odd-pitches, and me taking the even-pitches, which I definitely think gave me the easier end of the bargin. This worked out well, we each led all the pitches we planned on, and felt glad for it. It also helped that we now had the benefit of a larger rack: by borrowing some cams from the others, we had one #4, two #3’s & two #2’s, triples of #1 to #0.4, two #0.3’s, and a single black totem. Set of nuts, 10 single-slings, 3 double-slings. I don’t know that I’d bring quite all that if I had to carry it all in the 20 mile approach by myself, but it was certainly nice to have. I suppose if I did just this specific route again, I think I would pack doubles of #3 #2 and #1, perhaps triples of #0.75 #0.5 and #0.4, two #0.3’s, and one #0.2. Kelsey & I both carried our own small summit-packs throughout the day with the typical layers, snacks, just-in-case headlamp, etc. We each carried 3 liters of water starting from camp, which proved to be the perfect amount to get us camp-to-camp. There are water-sources close to the trail that you could refill from, but you’re only getting those sources while you’re still within 1 hour from camp at the beginning or end, so in my opinion it’s more efficient to start fully-loaded on water than it would be to stop & filter somewhere.


TODO: Add photos of scramble off
Apex
Apex is an easy cross-country walk from Apex Pass to the summit. However the first few hundred feet of meadow above Apex Pass was surprisingly soggy, impossible to keep footwear dry.
TODO: add a picture
Tungsten Mine
Very cool artifacts to check out!! TODO: Add some pictures
